Gumball Quilt Pattern & Making a Freezer Paper Template

gumball quilt

This is our Gumball Quilt, and while one of the most simple quilts I have made in both technique and fabrics, it is one of my all time favorites. To me it screams happy, joyful and warm summer days! It is just wonderful for a baby quilt, for a little one to use outside on the lawn or as a stunning wall decor. The finished size is 38″ X 45″. This quilt was very popular in kits for our shop, but as it is now retired I thought we would share it as a FREE pattern with you.

gumball close 2

It is great for beginners and experts alike, quick to make and you can easily machine quilt it on your regular sewing machine with ease (which is what I did on this one). You can make this with prints, but I just LOVE the solids and most of us have a ton of those on hand right now. Plus lookie how cute with this polka dot backing and of course stripe binding! I am not sure I can think of a quilt that I have EVER made that does not have striped bias binding. It is always my fave!

gumball back

Our kits came with a acrylic template, so if you already own one of those you can go ahead and use it. You will want a template that measures 4 1/4″ from the middle top to bottom & 9 1/4″ from side to side and the widest point. But if you do not have one, you can easily make your own template with Freezer paper! We will show you how in the tutorial linked below,  it takes minutes. If you are making your own template, make sure to print out the Hexie template & Freezer Paper Template Tutorial in addition to the Gumball Quilt pattern.

We hope you make one or even a few of these, enjoy!

Gumball Quilt Pattern

Gumball Hexie Template

Making a Freezer Paper Template

Bunny Bow Headband

bunnybow1small

We made these sweet fabric headbands for Easter for the little members of our family and I totally want to steal them for myself. They are absolutely adorable and will look perfect with the fancy Easter attire in your photographs. I posted a pic the other day and many of you wanted a pattern, so here is a free tutorial. I know the holiday is just around the corner, but they will only take you about an hour so there is plenty of time to get some finished for your little’s. Grab some fabric from your stash, purchase some simple headbands to cover, print our patterns below and your set.

Bunny Bow Headband Pattern

Ear Bow Pattern Pieces

Row Along 2018: Birds

11277 Hamilton White F'17

Can you believe we are on Row 5!? Okay, so I know the birds strike fear in many of you, but we are going to conquer that fear and become experts in paper piecing by the time we are finished. If you follow the directions exactly, watch our videos and adhere to these tips in our post, I promise you will get great results. You may make a few mistakes and use the seam ripper a few times but that’s part of learning any new quilting technique, honestly I knew what I was doing and still did this a few times.

So here we go!

Templates:

Before you even cut your templates, go through and mark on each piece that is the White background fabric a big “W”.

bird1

Each bird has the white background plus 4 different fabrics, and a couple pieces share the same fabric. To ensure I remembered this as I was cutting, I marked the templates that were fabric prints, each with 4 different color markers. So in other words, the 2 leg pieces that are the same fabric will be marked with the same color (mine are both yellow) and  A2-2, A2-3 & A2-4 will all be the same color (purple) to help you remember as your cutting.  I just did a little dash, but make it bigger if you need.

bird3.jpg

Small Birds Legs:

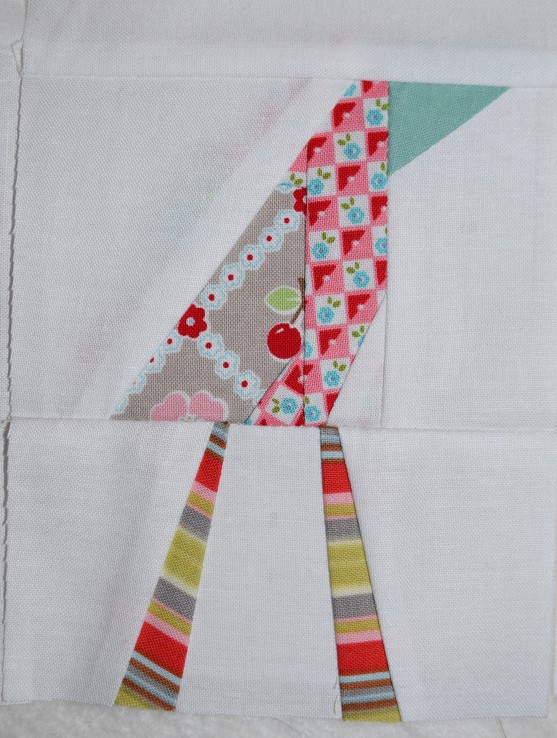
For some reason the small birds legs ended up slightly off alignment once translated to the book pattern from our original. Most of you will not notice or care. If you are a person who this bothers, there is a very easy quick fix. I tried to upload one I fixed for you all to download, but for computer reasons that I do not understand , when I upload it to a PDF, the size of the block changes slightly, which will cause you major problems. There is already a post in our Facebook Group, added by a lovely lady (Georgette) who is quilting along with us, showing a quick How to Fix for your pattern.  I promise its fast and easy and I am truly sorry you have to do it. But if you don’t care, than carry on. I am keeping my birds with the little mistake, because it does not bother me, but I also appreciate those of you who want it perfect. See my imperfect small bird below to help you decide.

bird4


Cutting:

There are several tips when cutting that will help you immensely.

Cut all the pieces for all Large Birds first, than do the same for the small birds.

Cut all of your fabric pieces with a really HEFTY 1/4″ seam allowance (bigger is better here, even if your closer to 3/8″ or more, its fine, you will trim later). Also make sure you are always cutting with the template facing up, wrong side of the template touching the wrong side of the fabric as it says in the directions.

Cut all your white pieces together first, than move on to the colored fabrics. It is really key to STAY ORGANIZED. Here is what we did and it works GREAT.

Cut all pieces for each template piece for all 5 large birds and than later for all 7 small birds at the same time ( count the template pieces that are the same fabric as 1 piece, and do them together for each bird). Stack all of the fabric pieces for a a template on top of each other and than pin the template on top. See my pic below if your confused at all and it should make more sense.

bird2

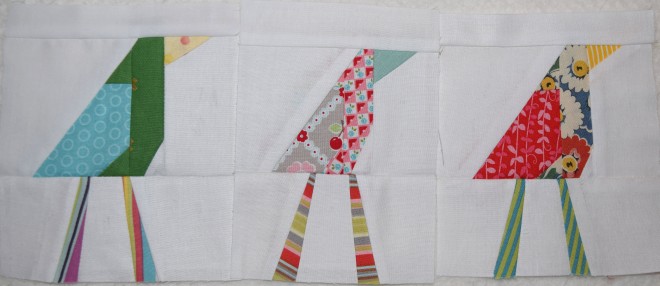
These are all of my pieces for the Large Bird. Now I can easily work on them in an assembly line style.

Paper Piecing:

We highly recommend using velum for your paper piecing. It is easier to see through, you can unpick stitching from it without it breaking apart and it is easier to rip out at the end. We sell it in kits, but you can also get it online and at most paper stores, you will want a medium weight.

Start Piecing:

Follow the directions in the book and watch our videos in the Facebook Group , all of them before you start stitching and than again as you go if you need more help. We made several videos on the stitching process, that I promise will make all of the difference in the world!

Make sure to work in assembly line fashion! If you make 1 bird at a time from start to finish the row will take you FOREVER! But if you do each step, to all large birds at the same time, than the next step to all and so on (this is assembly line) it will be so much faster. Also if you work this way, you will make less mistakes, because of the repetition. Some people like to make a test bird, to make sure they know what they are doing and it works. If you want to do this, just make this 1 from start to finish and than move to assembly line sewing.

bird5

Also don’t worry if your bird looks a little crazy while you are in the middle of a section. At some points they look really weird, but it is probably correct.

bird6

Looks weird, right? But after I trim and add more sections, this is going to be perfect.

Trimming:

When trimming seams inside the section, you can trim to a scant 1/4″, with a ruler or scissors (see videos). But you MUST have a FULL 1/4″ seam on the outside edge of all sections and the finished block.

When trimming around each section that you MUST leave a 1/4″ OUTSIDE of the paper. This is your seam allowance, DO NOT TRIM UP TO THE EDGE OF THE PAPER. I did this on all of my blocks on my very first paper piecing attempt many years ago and to say I was bummed is a major understatement. But, on the bright side, it was a great way to ensure it has never happened again.

Ok, so watch the videos and get stitching. I promise you can do this! And post your pics in the usual places with the tag #row5giveaway to be entered in this month’s drawings.

bird7


Bea’s Blooms Quilt

meadow2

This is my Bea’s Blooms quilt, just finished for my daughter Beatrix. I kinda love it! I was asked to be a part of Shari Butler’s Blog Tour for her new collection “In The Meadow” for Sweet Bee Designs. I received the fabrics and really fell in love!

meadow5

I loved the happy colors and especially appreciated how many different really fun white background prints there were. I decided I wanted to make a quilt that really featured the backgrounds. Bea’s Blooms is made completely with Half Hexie’s , using the layout to create simple flowers. I made this quilt pretty small in size, because in my experience those are the quilts that will become “woobies” for little ones, as they can easily carry them around themselves.

meadow4

See, she loves it already!

Click the links below to download our PDF pattern to make one of your own. You can make your own template with our pattern, or use the Riley Blake 5″ Half Hexie Ruler to make life really easy. Sewing these Half Hexie’s is really simple and quick, the only thing you need to pay attention to is the layout in order to create the flowers with fabric placement.

Bea’s Blooms

Bea’s Blooms Half Hexie Pattern

139

Make sure to check  out all of the other stops on the “In the Meadow” Blog tour! There are some fantastic designers and projects!

Tuesday April 17: Jedi Craft Girl | www.jedicraftgirl.com
Thursday April 19: Jina Barney Designs | http://jinabarneydesignz.blogspot.com
Tuesday April 24: Gigi’s Thimble | www.gigisthimble.com
Thursday April 26: Debby Brown Quilts | higheredhands.blogspot.com
Tuesday May 1: Piper’s Girls | www.pipersgirls.com
Thursday May 3: Go Go Kim | http://www.gogokim.com
Tuesday May 8: Kea Bee | http://keabee.com
Thursday May 10: Doohikey Designs | www.doohikeydesigns.com/blog/


P.S.

I even used some of my In The Meadow Fabrics for my Row #7 in my Row Along Quilt. It’s the row on the bottom, doesn’t it look great!?

162

Row Along 2018: Row 4 Pinwheels

11277 Hamilton White F'17

Row 4 is here and its a quickie! So that means it is a great time to get caught up if you need to and would like to. These simple pinwheels are extra fun because they are 3D! You will add these pinwheels to many quilts in the future. They are only a little more work than the classic, but add fun dimension to your project and are very unique.  Little one’s absolutely love them so they are especially fantastic in baby quilts.

Fabric:

For this row you will use your background fabric plus 8 fabrics of your choosing from your fats (or fat 1/8th’s).

Cutting:

Everything is cut the same size for this row,so its easy peasy.  But you are cutting a 5/8″ measurement which can be a little harder to see on your ruler, so just double check yourself that you are lined up correctly every time you cut.

Row #4

Preparing the Pinwheel Units: 

Pressing:

The first video in the Facebook Group shows how to press your pinwheel fabrics.  Your folds will put you on the bias edge of the fabric, which is super stretchy, so make sure to press ( up and down motion) not iron (back and forth motion).  Ironing, rather than pressing will cause quilting fabrics (especially ones on bias) to stretch and distort out of shape, sometimes when pieces don’t line up and are not fitting together,this is the cause.

Another tip is to use a little glue stick in addition to pressing to hold your triangles in place , this is not necessary but helpful.

A glue stick and an awl are the most helpful tools for this row.

Stitching:

We have you stitch the pinwheel triangles closed, before they are stitched to the background, so that they do not open and give you any trouble in the next step. You can stitch them with your regular stitch length or even move to a larger basting size stitch. When stitching the triangles closed and a couple more times in this row you will use an 1/8″ seam. TIP: The inside edge of your 1/4″ presser foot is an 1/8″ and you can easily line fabrics up with it, as shown in the pic below.

row4-1

You will again use a 1/8″ seam allowance to stitch the triangles to your backgrounds (with a regular or a basting stitch). Follow steps 3 &4 in the book exactly. Also it is very helpful to attach them into place with glue stick rather than pins. You will also find your awl very helpful when stitching from now on, you can use it to easily guide the triangle points under your presser foot. The #2 & #3 videos helps with these steps.

Stitching the Pinwheels:

When making your pinwheel block, there are 2 different configurations you can make, they each result in the pinwheel spinning at a different point or in a different direction. This was a small mistake we noticed in the book, our quilt shows the pinwheels in a different configuration than our how-to step shows. So here are both and you can choose which one you like best, the left or the right. Either works perfectly, they are just different, just make sure whichever configuration you choose, that all of your blocks are consistent. Our book quilt is made with the left picture configuration, and I decided to use the right for my quilt. Videos #4 – #7 offer additional help, pinning and stitching your pinwheel segments into blocks.

This pinwheel block will feel much more bulky than we are used to because of all of the extra layers so pay careful attention when pressing, press some seams open if you like and give each block a little extra press when you are finished. Video #8 helps with pressing the block.

Putting the row together: 

Layout all of your blocks in the order that you like the best, than take a photo or mark each ones place. Stitch them in pairs and so on until all 8 are together for your row.

This row was a breeze, don’t you think? Make sure to post your pics and use the hashtag #row4giveaway for a chance to win a Row Along prize!

Now everyone eat your Wheaties, next month are those darn birds! You’ll either love making them ,or be really excited to be finished, but I know you’ll adore them in the end.

rows

I LOVE my quilt so far! I still need to add my red embroidery stitches to my Row #3, and stitch them together, but its a rainy day today so maybe I’ll get it done finally. We hope your loving your quilt too!!

Fabric Easter Basket

basket0

My daughter Bea needed an Easter Basket and I really wanted to make her one of these fabric versions. Years ago we taught these as a class, it was always popular as they are quick to make and adorable. Plus they are no-sew,  only hot glue gun skills are required. Than I thought if we were making some, we might as well make a tutorial to share with all of you. These baskets really are very simple to make, and you can finish one in a matter of hours. These are a great T.V. project, as you are just repeating the same simple steps again and again. You should already have most of what you need other than the Upholstery Piping Cord that makes up the base of the project, but it is widely available and pretty inexpensive. The fabric strips are cut on bias, you will cut them the same way as you cut bias for binding. If you need a little help on that, we have a very old video that shows you how , just click here to access it: Cutting Bias Binding.  It is the same technique as in our video, you will just cut a smaller width of strip for this basket.

Don’t worry there is still time to make one for this year, or don’t rush and you will be ready for next years decor. Happy Easter!

Click the link below for the PDF pattern:

Fabric Easter Basket