I am a firm believer in the Halloween season—which is to say, that the entire month of October is ideal for celebrating bad horror flicks, for rotting your teeth on free candy, for colors like orange and purple and green.

Halloween is also an especially great time to express your creativity, and as a blogger that has previously only provided free knitting patterns, I am now expanding to share collections of the tips and tricks and interesting projects that deserve everyone’s love! Don’t worry… There’ll still be some yarny things in there. 😉
- Ghost Meringues – These 4 ingredient meringues look as delicious as they are cute, with a short instructional video included.
- Devilish Devil’s Food Cupcakes – From scratch is the best way to go if you have the time, and these awesome horned cupcakes would be an excellent use of that time.
- Candy Corn Cupcakes – Another brightly colored, from scratch cupcake recipe, inspired by the oddly tasty, waxy delight that is candy corn.
- Little Pixie Witch Sleeves and Spats – Halloween colors, black stripes, and flared ruffles make for a fantastic accessory. At 4 sts/1″, this pattern is sure to knit up quickly.
- Skeleton Black Cat – If you’re comfortable working in the round or would like to be, consider this recently published, excellently photographed cat plushie.
- Halloween Cupcakes – If you don’t have time to make cupcakes from scratch, use a boxed mix as shown in this recipe and decorate marshmallows to create a variety of designs, including pumpkins, ghosts, and Frankenstein monsters.
- Tsantsa – This free pattern for a shrunken head pouch would be excellent for hanging from the trees if you’re looking to opt out of the typical garbage bag ghosts.
- Enchanting & Magical Witch Hat – Those flimsy, ill-fitting witches’ hats from chain department stores won’t stand up to this versatile pattern.
- Coffin-Shaped Halloween Pop Tarts – Three ingredients, a cookie butter, and a piping bag make it easy to swap out ingredients for a tastier version… I’d use fudge instead of jam. It’s not as healthy, but it is twice as good.
- Stranded Pumpkin Mitts – Using muted tones of orange, red, green, and grey makes for a gorgeous mitt that you could arguably get away with wearing all season. Plus the pattern is free!
- MUMMY – DIY Halloween Costume & Makeup Tutorial – Pretty much all of the Glam&Gore tutorials are fantastic, but this one seemed easy while still maintaining a movie effects level quality!
- Halloween Spooky Burlap Table Runner – I love the bats and graveyard on either end of this free table runner.
- A Very “Batty” Halloween Apron Tutorial – If you want an adorable apron to wear while you’re baking all of your Hallow’s Eve goods, this is the one to sew up.
- Spider Web Doily – If you can’t find any doilies to sew this with, find a crochet pattern. This will give it an extra handmade touch anyway.
- Basic Halloween Mitts – As stated in the description, the forgiving nature of ribbing makes this free, colorful pattern fit most adults.
- Voodoo Doll Cookies – You had to break out your gingerbread men cookie cutters in a couple months anyway. Get it over with now, and be rewarded with these creative treats.
- Spooky Pumpkin Face/Trick or Treat Dishcloths – A set of three available on PayPal for only $2.00 each. My personal favorite? The seed stitch pumpkin, of course.
- Precious Pumpkin Beret – Another great knit to last you the duration of the Halloween season.
- Wicked Witch Bottle Cozy – Few other wine cozies will ever beat this one. Hat and cape, check… Broom not included.
- Pumpkin Tea Cosy – You can’t include a wine cozy without also including a costume for the designated driver’s drink of choice.
- Marshmallow Spiderweb Cake – If you don’t have time to decorate 50+ cookies or cupcakes, use a boxed cake recipe and follow this easy tutorial for a super cute, spooky treat
- Frozen Banana Ghosts – Not everyone is into the super sweet scene, but you’ll find a slightly healthier alternative in these chocolate coated banana pops.
- Ultimate Caramel Apples – The original Halloweeny fruit-covered-in-something snack.
- Cauldron Halloween Crochet Pattern – The sturdiness of crochet in comparison to knits makes this a go-to cauldron pattern. Using thicker yarn and a bigger hook will also result in a bigger cauldron, meaning it’ll hold more candy!
- Tiny Fall Patterns – Mochimochiland never disappoints with their impossibly adorable patterns, and this collection of tiny pumpkins, bats, squirrels, and footballs is no exception.
- Witch on a Broom – The thin line of garter stitch bumps and the hooked nose really sell this witch’s silhouette. Knit in a variety of Halloweeny colors to keep your kitchen or bathroom sink as festive as the rest of your home.
- Cable Knit Pumpkin – What beautiful flecked pumpkins these are! If you don’t like to waste food just in the name of the Halloween season, this should be your go to.
- Roasted Pumpkin and Squash Seeds – If you’re still partial to the traditional jack o’lantern, you can use the seeds up by cooking them. Roasted seeds always were and still are my favorite seasonal snack, despite my prevailing sweet tooth during the rest of the year.
- Crochet Ghost Coasters – A set of these for all of your guests to use would make for a pretty lively party!
- Trick-or-Treat Bag – No lists for a handmade Halloween would be complete without the time honored trick-or-treat bag. If you don’t have kids, you can still use it to carry your pumpkins and candies back from the grocery store!
- Shattered Cinderella – This is the entertaining promotional video for Glam&Gore’s macabre Disney princess makeup tutorial series. Be sure to check them out using the YouTube sidebars.
Even if you don’t have time to do a full project every day, you still have a myriad of options to choose from. Happy October 1st, everybody! See you next week!
Have I ever mentioned that I’ve gone Cold Sheep for my New Year’s resolution? I designed this as a bit of a scrapbuster for my cotton yarns, to get rid of my leftovers quickly so I could make progress. I also wanted to use my new stitch dictionary—400 Knitting Stitches by Potter Craft—and this was one of the perfect ones to use.
It’s simply a large dishcloth, with a loop to hang it and a single crochet panel for extra scrubbing power! I made mine with two colors for a bright appearance. Since I used lime green and bright blue, so my dishcloth is very Mystery Machine-esque. It can also be made with one, if you want a more modern look.
-Gauge should be about 22 sts per 4″, and rows are relatively unimportant. I used US size 7 (4.5mm) straights and a 3.0mm crochet hook with some regular cotton yarn.
-I ended up with a 8″-9″ by 8″ square dishcloth by the time that I was done and had used it a couple times.
Knitted Panel
Cast on 50 sts in MC (if working with 2 colors). Knit as follows.
Rows 1 and 3: (k1, p1) to end
Rows 2 and 4: (p1, k1) to end
Rows 5 and 7: k1, p1, k1, knit to last 3 sts, k1, p1, k1
Row 6: p1, k1, p1. (p4, k2) to last 5 sts, p2, k1, p1, k1
Row 8: p1, k1, p3, (k2, p4) to last 3 sts, k1, p1, k1
Repeat rows 5 to 8 till piece measures 5.5″ long. Do not repeat rows 1 to 4, your seed stitch border. Bind off.
Crocheted Panel
Using a crochet hook to match your gauge, (sc) across in CC (if working with 2 colors). Chain 1 before turning your work each row, and repeat. When the crocheted piece measures 2.5″ long, make a chain of sts any length you like that comes from the corner. Slipstitch into the same corner you chained from to make a sizable loop to hang your cloth. Cut yarn. Weave in all loose ends.


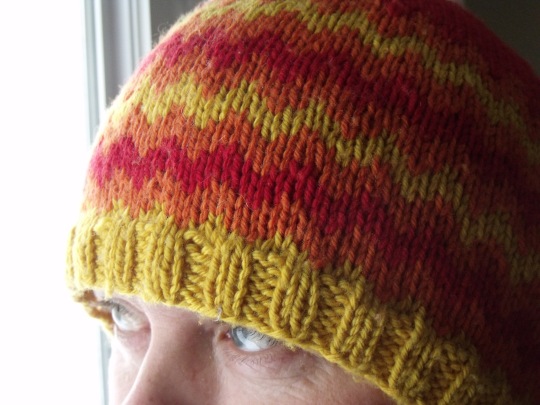
I needed something to use up my remaining KnitPicks Swish Worsted, a very soft yarn that I only really had warm colors left of. This is what I came up with—a simple, chevron hat.
The fair isle helped give it extra bulk for warmth, but the plain rows aid it in staying stretchy. I tried to whip this up before I went visiting family, so it had to remain a fairly basic pattern in case I needed to finish it on the bus (which I did). It was a quick knit overall, would make a good gift, and would make an excellent scrapbuster if you were willing to do it in many different colors!
Modeled by my mom’s boyfriend. 🙂
-Gauge should be 20 sts per 4″ and 28 rows per 4″ using worsted weight yarn on circular needles. I had to use US size 10 needles, but I am an exceptionally tight knitter. You will need 2-3+ colors. Instructions provided for my color palette.
-It fits a 22.4″ head circumference, and up.
Brim
Cast on 112 sts to circulars in yellow. Join in the round. Place st marker to mark beginning of the round. Knit 2 by 2 ribbing for 6 rounds, then…
Body
…begin knitting as indicated by chart.![]() Measure the length of the hat thus far. If it does not measure 5″ long yet, knit a couple of plain red rounds.
Measure the length of the hat thus far. If it does not measure 5″ long yet, knit a couple of plain red rounds.
Crown Shaping
Place st markers every 14 sts. Decrease as follows.
Round 1: (k to 2 sts before marker, k2tog) to end
Round 2: knit to end
When 8 sts remain, skip round 2. Cut yarn, weave twice through live sts, pulling tightly. Weave in all loose ends.
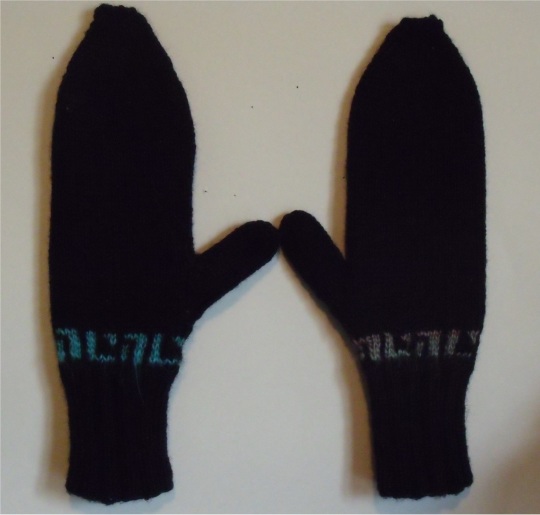
These were originally designed as a gift for my brother’s sweetheart of a roommate! She loves a comic called “Bitch Planet,” a very feminist, very sci-fi exploration of women in prison as a genre.
-Gauge needs to be 24 sts per 4″ and 32 rows per 4″ in stockinette stitch with (light) worsted weight yarn . Use needles to get gauge! Any color choice works.
-There is one M size only, measured by knuckle circumference. M=7.33″
Cuff
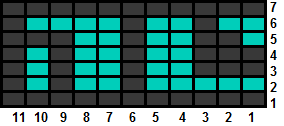
Cast on 44 sts to DPNs. Join in the round. Knit 2 by 2 ribbing for 26 rounds, then knit fair isle, as indicated below by the chart. I used a variegated yarn as the contrast color. You will follow the same chart for your left and right mittens.
Cut the yarn of the secondary color, leaving a tail.
Thumb Gusset & Body
A thumb gusset is a set of increases that create a triangular shape in the knitted fabric, which will allow for the thumb to fit comfortably in a mitten without an excessively loose/tight-fitting wrist. To do this, you will need to place stitch marker before the last stitch of the round.
http://www.knittinghelp.com/video/play/backward-loop-cast-on
Round 1: k to marker, CO1, k to end, CO1
Round 2: knit to end
Repeat these rounds, until thumb gusset has a total of 15 sts. Knit up to the gusset sts, then place them on scrap yarn. CO1 to make up for the one lost.
Continue working on the body of the mitten. Knit plain stockinette till close to the fingertips, about 3″ from the gusset for me.
Fingertip Shaping
Place markers every 11 sts, then decrease as follows.
Round 1: (k to 2 sts before marker, k2tog) to end
Round 2: knit to end
When 12 sts remain, distribute your sts amongst two DPNs, 6 sts each. Do a three needle bind off to square the fingertips.
Thumb
Slip thumb sts onto DPNs. Join in the round as you knit to reattach yarn.
For your first stitch, kfb, then knit plain stockinette for 14 rounds.
To shape, (k2tog) to end. Cut yarn, weave twice tightly through live sts. Turn mitten inside out, weave in all loose ends.
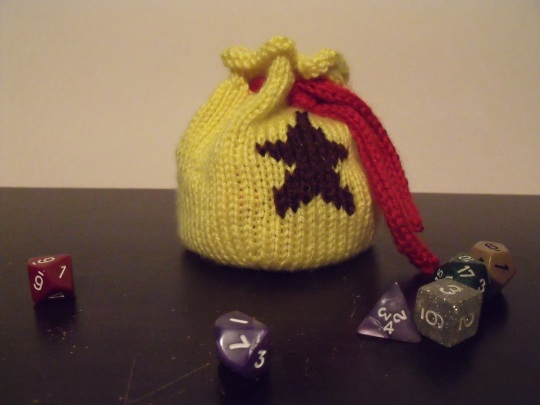
I couldn’t find a pattern for a knitted bellbag (though there were a few really good crochet ones!), so I made my own. The bag is knit from the bottom-out and up in one in-the-round piece, then the icord is made and the star is duplicate stitched on.
I knit tightly so my bag was kinda small, but it fits a couple sets of my D&D dice without looking too bulky. If you knit loosely, knit more than 3.5” of stockinette where the pattern suggests it in order to keep proportions.
The colors that are supposed to be used are yellow (bag), bright red (drawstring), and dark brown (star). If you want a more neutral palette, use tan (bag), dark red (drawstring), and dark brown (star).
-Gauge is relatively unimportant. Mine was 24 sts per 4″ and 32 rows per 4″ in stockinette. I used US size 7 (4.5mm) DPNs and worsted weight yarn in various colors.
-Size is 10″ circumference. You can make it bigger or smaller by going up or down a needle size.
Bag Bottom
Using yellow yarn, cast on 4 sts over four DPNs. Using a fifth needle, begin knitting in the round. Carefully keep track of rounds, or at least till you can spot the spiral pattern. Knit as follows.
Round 1: (kfb) to end (8 sts)
Round 2: (k1, kfb) to end (12 sts)
Round 3: (k2, kfb) to end (16 sts)
Round 4: (k3, kfb) to end (20 sts)
Round 5: (k4, kfb) to end (24 sts)
Round 6: (k5, kfb) to end (28 sts)
Round 7: (k6, kfb) to end (32 sts)
Round 8: (k7, kfb) to end (36 sts)
Round 9: (k8, kfb) to end (40 sts)
Round 10: (k9, kfb) to end (44 sts)
Round 11: (k10, kfb) to end (48 sts)
Round 12: (k11, kfb) to end (52 sts)
Round 13: (k12, kfb) to end (56 sts)
Round 14: (k13, kfb) to end (60 sts)
Bag Body/Drawstring Holes
Knit plain stockinette for 3.5″, or if you knit loosely, till it looks good. I am a tight knitter, so you’ll need to knit extra length to keep proportions right. The last few rounds, including the drawstring holes, are as below.
Round 1: (k3, yo, k2tog) to end
Rounds 2 to 7: knit to end
Cast off with a crochet hook that matches the size of your needles. With a long piece of brown yarn, begin duplicate stitch. Weave in loose ends.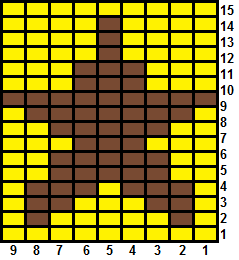
Drawstring
Cast on 4 sts in red to DPNs. Knit i-cord for a length of 10″, then cut yarn and weave through live sts. Weave cord through drawstring holes. Fill bag with all of your sweet, sweet dice.
I designed this to work with some attractive, sparkly yarn that I found in the craft aisle of my local Walmart. (Bernat Satin Sparkle, if anyone is wondering! Caron Simply Soft Party also works well.) It’s a long beanie, with about 2″ of ribbing and a series of garter ridge rows to give the hat it texture.
-Gauge of 24 sts per 4″ and 32 rows per 4″ using US size 7 (4.5mm) circulars. The yarn is worsted weight, but not a heavy worsted.
-Beanie should fit most adults/late teens, as it is very stretchy.
Brim
Cast on 120 sts to US size 7 (4.5mm) circulars. Join in the round. Place st marker to mark the beginning of the round. Knit two by two ribbing for 12 rounds.
Body
Knit as follows till piece measures 9″ from cast on edge.
Rows 1 to 7: knit to end
Row 8: purl to end
Crown Shaping
Place st markers after every 15th st. Begin decreasing as follows.
Rows 1, 3, 5, and 7: (k to 2 before marker, k2tog) to end
Rows 2, 4, and 6: knit to end
Row 8: purl to end
Cut yarn, weave twice through live sts. Weave in all loose ends.


This lovely beginner’s pattern was featured during a WEBS in-store “Stitch for the Cure” event!
It is an easily customizable gift thanks to duplicate stitch, but remember that the thumbs should face different directions before you start embroidering! Otherwise, you’ll wind up with two lefties or two righties.
-Gauge needs to be 24 sts per 4″ and 32 rows per 4″ in stockinette stitch with (light) worsted weight yarn . Use needles to get gauge! Any color choice works.
-There is one M size only, measured by knuckle circumference. M=7.33″
-The sizes are listed in the order of S (M, L). Small = 6.66″; Medium=7.33″; and Large = 8″
Cuff
Cast on 40 (44, 48) sts to DPNs. Join in the round. Knit 2 by 2 ribbing for 1.25″ or so, then knit plain stockinette for 1″ (8 rows).
Thumb Gusset & Body
A thumb gusset is a set of increases that create a triangular shape in the knitted fabric, which will allow for the thumb to fit comfortably in a mitten without an excessively loose/tight-fitting wrist. To do this, you will need to place stitch marker before the last stitch of the round.
http://www.knittinghelp.com/video/play/backward-loop-cast-on
Round 1: k to marker, CO1, k to end, CO1
Round 2: knit to end
Repeat these rounds, until thumb gusset has a total of 13 (15, 17) sts. Knit up to the gusset sts, then place them on scrap yarn. CO1 to make up for the one lost. Knit plain stockinette for 10 (12, 14) rounds. Knit 2 by 2 ribbing for 1.25″ (8 rows), then bind off in pattern.
Thumb
Slip thumb sts onto DPNs. Join in the round as you knit.
For S/L mitts, k2tog once, then knit plain stockinette for 5 rounds.
For M mitts, kfb once, then knit plain stockinette for 5 rounds.
For all mitts, knit 2 by 2 ribbing for 3 rounds. Bind off loosely in pattern. Weave in all ends. Repeat once more, and then you have a set!

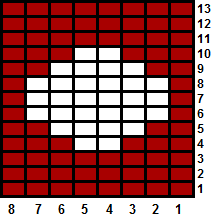
Though not made with a beefalo wool/silk blend, this charming recreation of the Winter Hat from Klei’s Don’t Starve will still keep one warm through that dreary time of year!
You will need white, pale blue, deep red, and black yarn. I used scraps for all but the blue.
You may also choose to support the developers! This hat was not available in store when I designed this.
-Gauge of 24 sts per 4″ and 32 rows per 4″ using US size 7 (4.5mm) circulars and a nonheavy worsted weight yarn. You can use needles to get gauge, or remove/add 8 sts
-US size 7 (4.5mm) 16″ circulars
-Thin worsted weight yarn in white, pale blue, deep red, and black
Brim
Cast on 120 sts to US size 7 (4.5mm) circulars in white. Join in the round. Place st marker to mark beginning of the round. Knit 2 by 2 ribbing for 1.25″ (8 rows), then switch to pale blue.
Body
Knit six rounds of plain stockinette. Switch to deep red, and knit fair isle motif as indicated by the chart.
Measure the length of the hat thus far. Keep knitting stockinette in pale blue till the entire piece measures 5.5″ (more if you have a larger-than-average head).
Crown Shaping
Place st markers every 15 sts and decrease as follows.
Round 1: (k to 2 sts before marker, k2tog) to end
Round 2: knit to end
When 8 sts remain, cut yarn and weave through live sts. Make a white pompom, secure to top of hat. In black, embroider “eighth size slices” onto the white circles. Weave in all loose ends.


