
If you are a blanket person, then I have something exciting for you. A new crochet-a-long is here!
Introduction
Kamala Blanket was inspired by a single square designed several years ago. I have made a few pillowcases using this pattern, but the textured flower design was too beautiful not to turn it into a blanket. The flower with fragile petals reminded me of a Kamala flower, and this is where the blanket’s name comes from.
Being a simple construction of squares and border, the Kamala Blanket offers lots of interest regarding stitching and texture. And no doubt you will not be bored making it.
The blanket is big! It measures approx. 130 cm x 160 cm/ 51¼ in x 63 in, after blocking.
Where to get the pattern
Kamala Blanket consists of two patterns: A Different Granny Square and Kamala Border. You can grab a complete e-book with everything you need to make a blanket via our website HERE.
However, you can also purchase both patterns separately on Ravelry and Etsy (discover the links below).
Of course, as a stand-alone pattern, Kamala Border can be used for any other project of your choice. You will just need to adjust the stitch counts to start the border (everything explained in instructions).
A Different Granny Square: Ravelry, Etsy
If you previously purchased A Different Granny Square, you should have received an updated version which was added to your library. And if you have the pattern from Etsy, please check an introduction file for how to put a blanket together, as there you will see yarn amounts and placement of the colors for every round of the square.
Materials and yarn amounts
The Kamala Blanket comes in three colorways: Stained Glass, Sand and Blossom.
All three use Softfun yarn by Scheepjes which has been one of our absolute favourite. It is a cotton and acrylic blend, very soft. It also has just the right thickness for a medium size hook, which makes the crochet relatively fast and enjoyable.

Not to mention, the Softfun yarn does not split at all and is easy to care for. I have made several cushions with this yarn, and after years of hard-wear and washing they still are the perfect shape and look.
As for the previous CAL’s, this time we have also collaborated with Laura Jackson (aka @taemombo), who created her own colorway for the blanket and made one of the samples.

And Esther Schippers, who helped with testing, thought of a Blossom colorway for her blanket.
You can either choose one of our ready colorways, or you can pick your own colors to match your taste the best. Luckily, Softfun yarn comes in 90+ gorgeous colors, and you can also combine regular solid shades with Denim and Aquarel lines.
If you are in the USA or Canada, you can purchase a ready yarn kit from Laura’s shop HERE. You can also have a look at other colors and get yarn in your nearest Scheepjes shop or via online retailers: Wool Warehouse (UK, international shipping), Caro’s Atelier* (NL and Europe).
What is CAL (crochet-a-long) and how to join
As with the previous large projects, we have decided to host a Kamala Blanket as a CAL.
Crochet-a-long means that crafters from different parts of the world are making the same project at the same time. Usually, the CALs are hosted on a weekly basis, with new portions of instructions released every week.
However, with the Kamala Blanket we have decided to host a relaxed CAL allowing everyone to work at their own path. After purchasing the patterns, you will right away have all the instructions you need. You can begin at any time, and you can make as much progress every week as you wish.
The CAL means that we will have a space in our Facebook group, where you can share your pictures, give advice, and ask for help.
If you are not in a group yet, please join it, and do not forget to answer the simple question upon signing up. The approving process is automated, and without answering the question you will not be let in.
***
We officially begin on May 24th, 2024 to allow enough time for getting all materials. But you can start right away, of course!
Hope you will join us on this journey.

Spring is finally getting here, and in quite an unusual way. It’s been cold and windy for weeks, and then suddenly the sun came out with almost summer temperatures. Guess we will not have a chance to wear mid-season clothes and will need to jump into the summer dresses and shirts right away. And then, I thought, maybe it is time to create some new accessories. So, this is how the Seeds Clutch came to life.

The crochet pattern is available on
Ravelry HERE
and
Etsy HERE
and you can enjoy a 20% introductory discount through Monday, April 8th, 2024.
You do not have to enter any codes, as the pattern is discounted
already.
Or you can get an e-Book with two Seeds patterns with even a bigger saving on
Ravelry HERE.
After walking in circles and making blankets, and pillows, and shawls, and sweaters, and blankets again, I suddenly felt an urge for a change.

Being a crochet designer for almost 10 years now, I have probably tried everything (except of interlocking and Tunisian crochet, making lace doilies, and probably lots of other techniques and projects). But anyway, after 10 years of designing and almost 40 years of crocheting, it still does feel like I tried everything. And something new was needed to keep my creative spirit alive.
So, I thought about making a clutch. With metal closure and fabric lining. This idea sounded like a challenge, as I am not experienced with bag making and especially with lining sewing. But well, I just love to challenge myself!

In my early designing days, I created a couple of crochet handbags with round shapes. I still think they are cute, and I am proud of these designs, but this time I was looking for a different shape.
It all started with finding the right frame. There are lots of different types of bag frames on the market, but the metal tube one appealed the most to me. It does not require sewing skills, it is easy to install, and it looks effective and modern, too.

I found my frames on Amazon, but you can also find them in your local craft shop, maybe. This type of the frame is sometimes called “a doctor bag frame”.

It has a clean design without additional closure, and stays closed well. The curved aluminium parts have a silver color, but the bending mechanism on both sides can differ in color and be silver, golden, or even copper. So please have it in mind while searching for the right frame for yourself.
But on the other hand, it is almost entirely hidden under fabric, so you can hardly see it.

Next step was to find the right yarn, and I have chosen Scheepjes Mighty which is a natural jute blend yarn, a little stiff and I thought it would help the clutch keep its shape well.
You can find Mighty yarn in your local Scheepjes store, and if you are in the US or Canada, you can order a complete kit for the Seeds Clutch in two sizes from Taemombo yarn shop. The kit includes yarn, bag frame and chain strap.

The designing itself and creating the seeds stitch pattern was fun, and I knew from the very beginning how I wanted the clutch to look. I used the same ribbed technique, which you have probably seen (or tried) with Astrid Shawl. It is very simple and uses only single crochet stitches in back loops.
Because creating Seeds Clutch was a designing challenge for me, I have recorded many short videos to guide you through every step. This pattern is the most supported with videos and I am safe to say that crochet beginners will handle it. For sure!

More than that, I have also recorded a detailed video tutorial about how to sew the lining for a Seeds Clutch. All by hand. Without using a sewing machine. I am amazed myself how the lining looks (you will never guess it was sewn by hand), and I am very proud of myself.

And you know what? If I could do it, then anyone else can do it as well.

Because I liked the Seeds stitch pattern so much, I have decided to use it for another project, too. I have designed a pillow, but the same stitch pattern can be easily adjusted for a blanket, or a scarf, or any other project with a rectangular shape. And it is reversible too!

The Seeds Pillow is available as a stand-alone pattern on Etsy HERE and Ravelry HERE. And if you would like to get both patterns from a Seeds collection, you can purchase an e-Book on Ravelry HERE with even bigger saving.

Hope you enjoy!
Subscribe to a newsletter not to miss a single post. You can also follow me on Facebook, Pinterest and Instagram.
I continue to explore brioche crochet technique, and today I am happy to share a new design with you. Good news for those who enjoyed the Archway Square, as the new pattern is also a large brioche square which can be turned into an infinity stitch pattern. I named it Blomma, as it reminds me of the flower.

Blomma Square brioche crochet pattern is available on Ravelry HERE and Etsy HERE with an introductory discount of 20% which will expire on Tuesday, March 5th, 2024. The price you see now is a discounted one, and no codes are needed.

Lately, every time I start working on a new project, I say to myself it should be a beginner-friendly one. Not in the way it looks or how it is constructed, but in a way how the stitch pattern flows, and how this is reflected in the written instructions.
It means that the crochet design which looks intricate would necessarily be difficult to make. I sometimes get messages from the beginning designers asking about my own designing process. Of course, everything (and always) starts with inspiration. In a burnt-out mode, it is not easy to design something unique and appealing.
Basically, the easier the design process goes, the more chances are that the result will be great. And if you are stuck from the beginning, it often means something is wrong and creative spirit is blocked at some point. And then it is better to leave the idea aside and create something else.

I never draw sketches beforehand. Usually there is a rough idea inside my head, but I prefer to draw with yarn right away. So, the beginning of every design of mine always starts with a ball of yarn and a hook, late in the evening, in front of the TV.
Somehow the first rows or rounds with simple stitches bring in a certain mood, and slowly after each new round the idea becomes clearer. The designing process does involve lots of frogging and remaking. It would be ambitious to think that genius stitch patterns come to the world on the first try.

And when I say genius, I mean the stitch patterns which are perfect regarding maths, with perfect stitch counts and repeats, which are easy to write down. And the last is probably the most important in the crochet design, for me at least. Which makes the pattern doable for crocheters with different skill levels.

Of course, not all my crochet designs are “genius” in that way, but with every new project I am trying to get closer to this ideal and make written instructions as easy to follow as possible. Brioche crochet is one of those techniques which look extremely intricate, and not even doable.
But Archway Square proved that crafters with advanced beginner skills can handle the pattern. Basically, the required minimum level is to know how to do basic crochet stitches. And the rest is only about their placement, which is explained in the pattern.

If you did Archway Square, then no doubts that Blomma Square is right for you. And if this is your first time with brioche crochet, an introductory video is waiting for you in the pattern explaining basics of technique and showing first rounds of the pattern to bring you into the right flow. And then the pattern also contains progress pictures for all the rounds.

The Blomma Square consists of 49 rounds, and with Scheepjes Softfun yarn (DK weight) it will make a perfectly sized front decoration for a ready-made fabric pillowcase. And if you want to experiment with the infinity looks, stop the pattern after any even round, and join small squares with an invisible technique (explained in the pattern).

For my pillow, I made four squares with 30 rounds, and the final joined large square is about 60cm.

Esther Schippers, who helped me with testing, decided to make a smaller one and stopped after 24 rounds on her squares. And ta-da! Here is a totally different look.

And Laura Jackson turned her Blomma Squares into a cute and stylish handbag. Check her Ravelry project page to learn more about the colors she used and how she assembled everything.

Get your own copy of the Blomma Square pattern on Ravelry HERE and Etsy HERE and unlock your creativity.
Hope you enjoy!
Year 2023 is right behind the door. I hope you had a relaxing holiday and time to meditate and reflex on the passing year. I do not make resolutions for a new year, as I think life does not finish on December 31st and does not start again on January 1st. And I do not really believe that it is possible to become a different person overnight. Though of course the last days of the year kind of force to think of what you’d like to bring to a new year. And what new achievements you’d like to make.
I’d like to become a better person. I’d like to find peace for my soul. I’d like to better balance my work and personal life. I’d like to finish my second book. I’d like to design more. And I’d like to design more simple patterns, stylish and wearable.
There is one pattern that I finished in December and planned to release before New Year's Eve. But in the holiday rush with a One Evening Mystery make-a-long (which was a huge success – thank you for all the love you gave my tiny patterns) I felt like that new pattern can wait for a while. And be released in January.
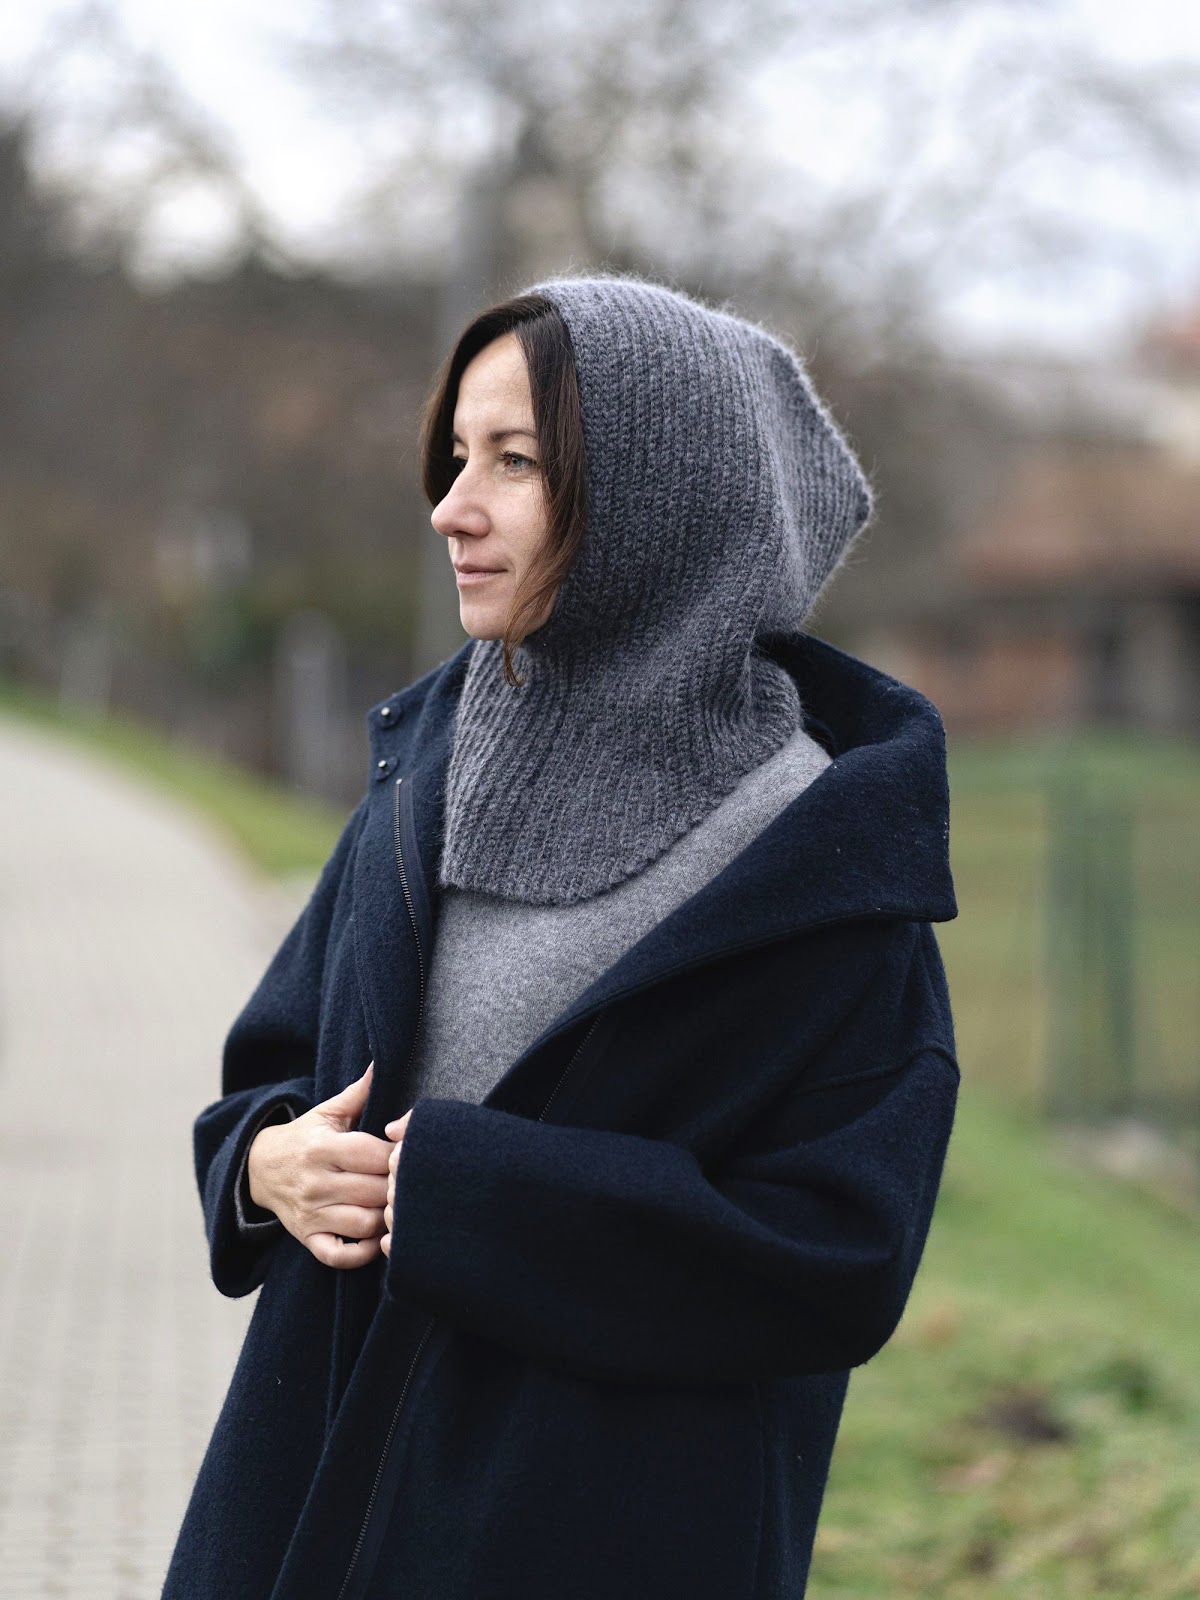
So… Here it is. A Friday Balaclava!
Find the pattern on Ravelry HERE and Etsy HERE.

Balaclavas and all kinds of hoods have been popular for quite a long time now. And it feels like this trend will stay with us for a while. And yes, I know there are plenty of balaclava patterns out there. Mostly knitted, but also crochet. But I could not help myself and try my own hand in something simple and wearable like this. And I should admit, I am very happy with how it turned out.

I’ve made four Friday Balaclavas, and they have already been claimed by my friends. Which makes me even happier and proves that I’ve designed something nice. I managed to save one balaclava for myself. Just in time for frosty weather.


Friday Balaclava pattern is written for one size, and keeping consistent and correct gauge is critical for accurate sizing. Though, some gauge variations are not too important. Just to assure you, all my four balaclavas turned in slightly different sizes. But they all fit just fine.

As for the yarn, I figured that merino yarn works the best for this pattern. I made two balaclavas with Scheepjes Merino Soft yarn (fantastic feel) and one balaclava for myself with Scheepjes Metropolis and Scheepjes Rhythm Mohair held together.
The gauge for the latest was a little bigger, but I love the roomy shape, as slim fitted hats and hoods do not suit my face. And if you cannot wear wool, then Scheepjes Stonewashed is also an option. The stitch definition with this yarn looks great and the fabric is warm enough to protect from cold and wind.

Check all colors of Scheepjes yarns in your local Scheepjes store, or via online retailers: Wool Warehouse* (UK & international shipping), Caro’s Atelier* (NL & Europe), Taemombo* (US & Canada).
Find the pattern for Friday Balaclava on Ravelry HERE and Etsy HERE.
Coming back to New Year's resolutions, it feels satisfying to enter the new year with a new design. And hopefully, more designs to come.
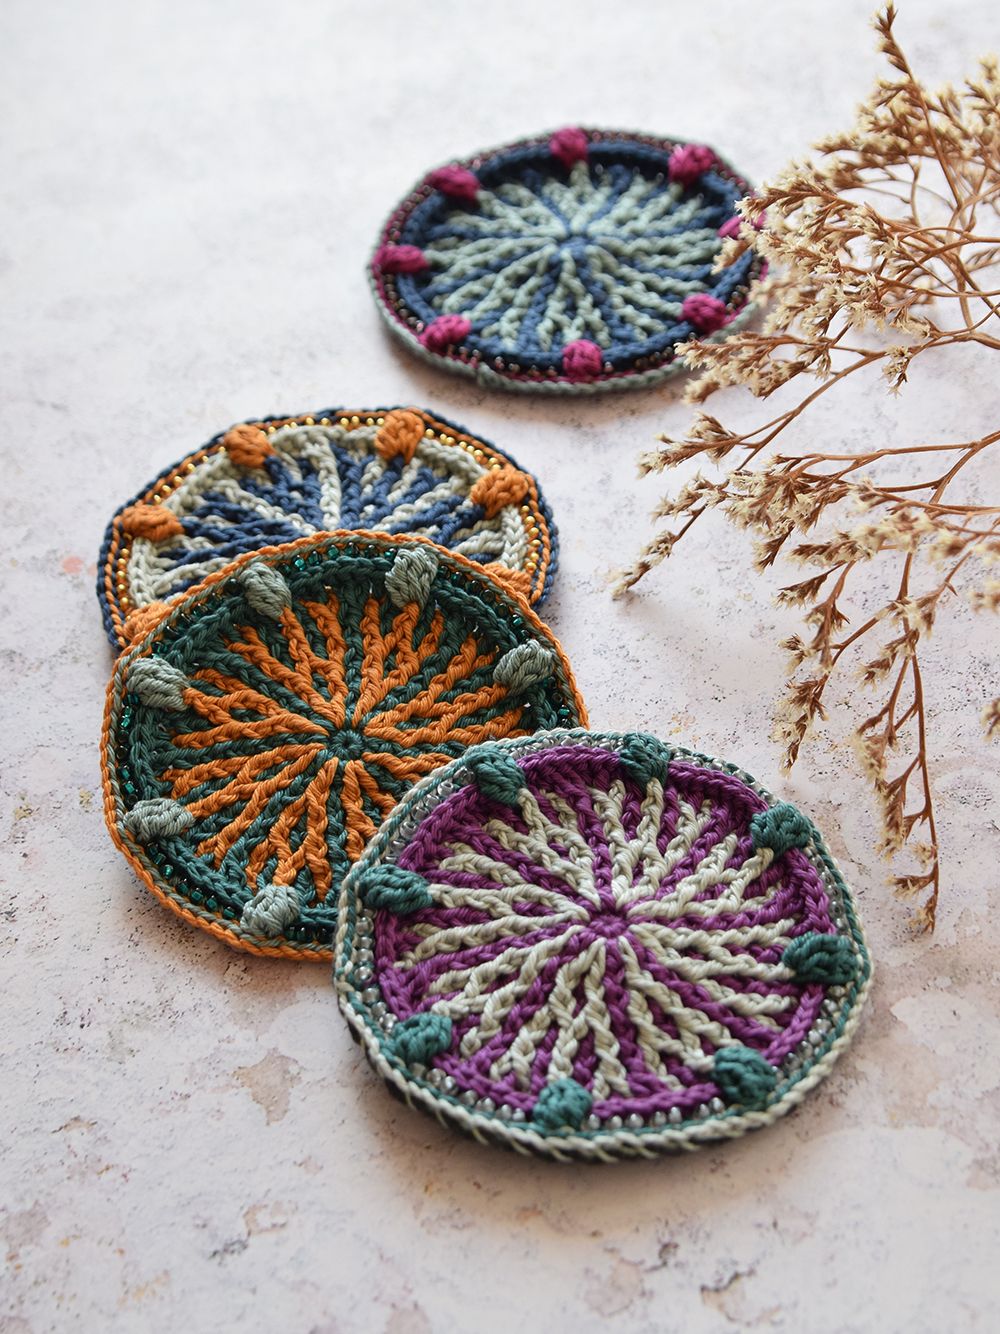
Welcome to Week 4 of the One Evening Mystery make-a-long. Time flies fast, and we are on the last part of the MAL already. In the previous three weeks we made a mug wrap, a colorful bauble, a fragile snowflake. And this week we will be making a coaster in a beloved brioche crochet technique.

If you purchased the MAL listing on Ravlery, the last pattern has already landed to your library, and you can download the instructions (again, there will be 2 files available for download, with one of them containing detailed progress pictures).
And if you do not own the patterns yet, but would like to join, you can grab your copy on Ravelry HERE and newly on Etsy HERE.
And if you would like to make even more small and cute hanging ornaments, check out an e-book with 7 patterns HERE on our website.
One Evening Coaster is a compact design with a practical ridge preventing glasses and cups from sliding off the coaster. It is small, but also big enough to get a nice introduction into the brioche crochet technique, with a helpful video tutorial accompanying the pattern.
And except of learning the technique, you will also get a chance to practice making modified crochet clusters. For a better result, choose a light and dark color for the center of the coaster, with a bright accent color for the last rounds.

And make a set of several coasters by switching placement of the colors for each new motif.
Brioche has been one of my most favourite crochet techniques over the last couple of years. If you want to check more patterns in this wonderful technique, have a look at my Brioche Masterclass HERE.

To hide the back side of the coasters, you can optionally sew a piece of felt to the bottom of them. Or you can turn them into hanging double-sided ornaments by making two circles in joining them together with some stuffing inside.

And of course, the beads will add a final festive touch. I sew the beads only along the last rounds of the coaster to keep the centre flat, as I am going to use those as coasters.
Hope you enjoyed the One Evening Mystery make-a-long.
See you next year with the new adventures.


