

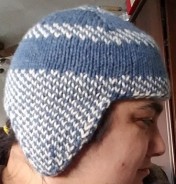
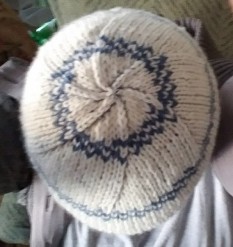
I have not been keeping up well with this blog although honestly, I’m doing better than I thought I would, by which I mean I haven’t totally forgotten about it. I am calling this a pattern but even as I type this, I am not sure I can actually come up with coherent instructions. I did not keep good notes while making this hat. I do think that my original plan worked out pretty well although I probably should have knitted a few more rounds before decreasing. It fits me but I won’t know for sure if it is actually too short until I give it to its intended recipient.
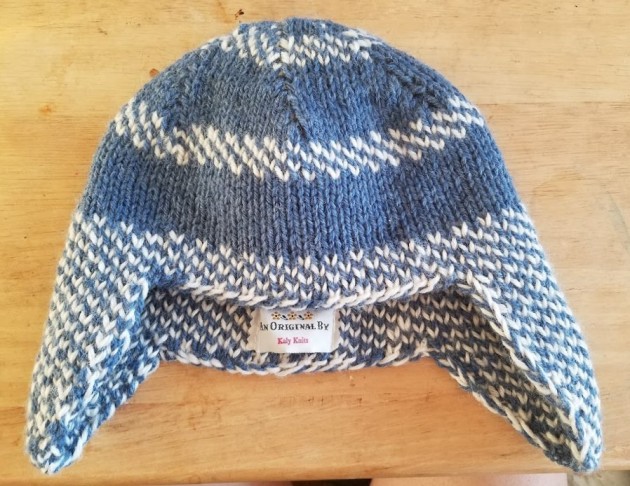
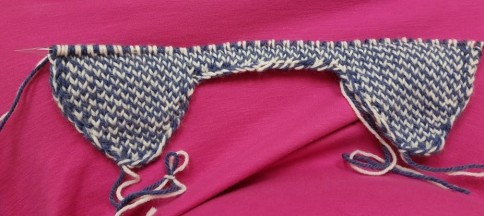
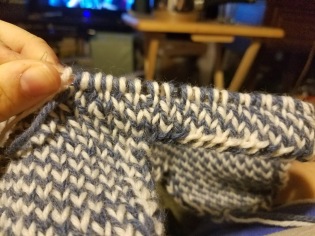
 I don’t actually like hats. Despite knitting them fairly regularly, I almost never wear them. They tend to look weird on me, although I do have a hat with a hole for my ponytail that I wore occasionally until I lost it. What I liked about that hat is that my ponytail going through the back held it in place so that it didn’t come down in the front and cover my eyes. I decided to try a different route to the same end and add some earflaps for good measure. I spent kind of a while pondering the whole idea before I decided to just grab some yarn and have at it! I did have a couple of false starts but eventually I decided on double knitting because I figured that earflaps should be extra warm. When I got to the hat itself, I kept on with the double knitting because I decided it would look weird otherwise – and if you’re double knitting, you might as well make it reversible and different on each side. Of course, double knitting provides the additional challenge of finding subtle ways to weave in yarn ends since there is no wrong side, but I like to let issues like that be problems for “future me”.

What I did not count on was the difference between my tension when knitting and purling. Like many people, I purl more loosely than I knit. At the beginning, I did not realize this was a problem because I worked the earflaps and the start of the back of the hat in rows, back and forth. When I added the front, however, I joined it in a round, although it still took a few inches for me to catch on to the problem and even when I did, I persevered. In the end, I decided that the white was definitely the inside and I put a label on it although that could easily be removed if a mostly white hat was desired. Anyway, let’s see if I can remember how I made it. By the way, a “Yooper” is someone from the U.P., or upper peninsula of Michigan. It is notoriously cold there, so it seemed like a good name for a doubly thick wool hat with earflaps.
Yooper Hat Pattern by Kalyani
Materials: Patons Classic Wool (worsted, 220 yd/100g) 1 ball each, Color A & Color B.
Needles: Size 8 circular and / or DPNs
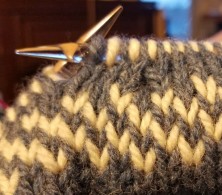
Gauge: 4 sts/inch (double knit)
NOTE: When working the first and last stitch of a row, hold both strands together and treat as one stitch. For all other pairs, treat each strand as its own stitch.
Earflap (make 2)
Holding a strand of A & a strand of B together, cast on 5 stitches
Row 1: s1 (A & B), wyb k1 A, wyf p1A, wyb k1 B, wyf p1B, wyb k1 A, wyf p1A, k1 (A & B)
Row 2: s1 (A & B), wyb pick up & k1 A, wyf pick up & p1 A, wyb k1 B, wyf p1B, wyb k1 A, wyf p1A, wyb k1 B, wyf p1B, wyb pick up & k1 A, wyf pick up & p1 A, k1 (A & B)
Row 3: s1 (A & B), wyb k1 A, wyf p1A, *wyb k1 B, wyf p1B, wyb k1 A, wyf p1A, repeat from * to last st, k1 (A & B)
Row 4: s1 (A & B), wyb pick up & k1 A, wyf pick up & p1 A, wyb k1 B, wyf p1B, *wyb k1 A, wyf p1A, wyb k1 B, wyf p1B, repeat from * to last st, k1 (A & B)
Repeat last 2 rows 5 x more until there are 17 pairs of stitches between the edge stitches
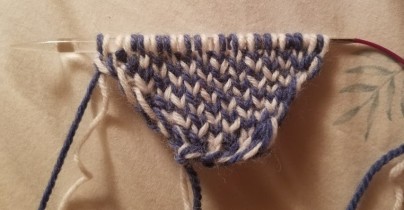
Row 15: as row 3
Row 16: s1 (A & B), wyb k1 B, wyf p1B, *wyb k1 A, wyf p1A, wyb k1 B, wyf p1B, repeat from * to last st, k1 (A & B)
Repeat last 2 rows 1 x more
Cut yarn (leaving enough to weave in) on 1st earflap only. Do NOT cut yarn on 2nd earflap.
Back
Setup:
With 2nd earflap still on needle, s1 (A & B), wyb k1 A, wyf p1A, *wyb k1 B, wyf p1B, wyb k1 A, wyf p1A, repeat from * to last st, k1 (A & B)
Use attached yarn to cast on 19 stitches (holding a strand of A & a strand of B together)
Join second earflap, s1 (A & B), wyb k1 A, wyf p1A, *wyb k1 B, wyf p1B, wyb k1 A, wyf p1A, repeat from * to last st, k1 (A & B)
NOTE: From this point forward, the former edge stitches of each earflap which abut the cast on stitches will be treated as two stitches and only the first and last stitch of the whole row will be treated as a single stitch.
Row 1: s1 (A & B), wyb k1 B, wyf p1B, *wyb k1 A, wyf p1A, wyb k1 B, wyf p1B, repeat from * to last st, k1 (A & B)
Row 2: s1 (A & B), wyb k1 A, wyf p1A, *wyb k1 B, wyf p1B, wyb k1 A, wyf p1A, repeat from * to last st, k1 (A & B)
Repeat last 2 rows 2x more, after row 6, DO NOT TURN!
Main Hat Portion (or whatever you want to call it)
NOTE: From this point forward, the hat will be worked in the round. You can use double pointed needles or a circular needle to do this. (All of my circular needles are too long for hats so I work with an extra loop sticking out between stitches, whatever works for you!) Also, with the exception of the first stitch of round 1 which helps to close a gap, no more pairs of stitches will be treated as a single stitch.
Setup:
Cast on 21 stitches (holding a strand of A & a strand of B together)
Place marker for beg / end of round
Join the work by positioning the beginning of the last row on the left needle, being careful not to twist stitches
Round 1: s1 (A & B), wyb k1 B, wyf p1B, *wyb k1 A, wyf p1A, wyb k1 B, wyf p1B, repeat from * to end marker, sm
Round 2: *wyb k1 B, wyf p1B, wyb k1 A, wyf p1A, repeat from * to end marker, sm
Round 3: *wyb k1 A, wyf p1A, wyb k1 B, wyf p1B, repeat from * to end marker, sm
Repeat last 2 rounds 1 x more
Round 6: *wyb k1A, wyf p1B, repeat from * to end marker, sm
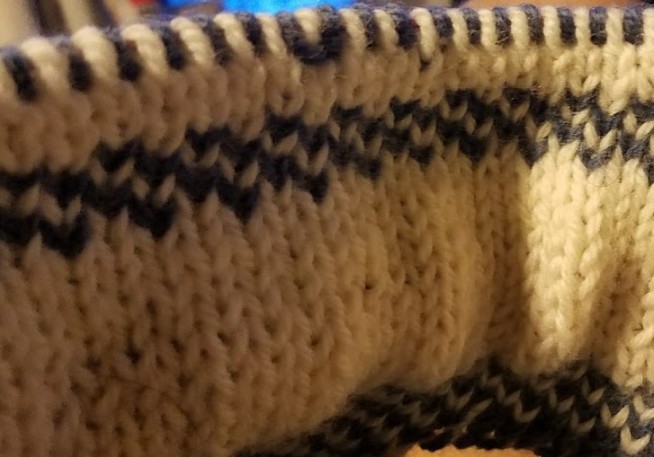
Repeat last round 11 x more (in the photo, I only did it 9 x more but the hat is a little short)
Round 19: as round 2
Round 20: as round 3
Repeat last 2 rounds 1 x more
Round 23: *[wyb k1A, wyf p1B] 13 x, pm, repeat from * to end marker
Crown
Round 1: *wyb k1A, wyf p2togB, wyb k2togA, wyf p1B, [wyb k1A, wyf p1B] to marker, repeat from * to end marker (6 x total)
Round 2: *wyb k1A, wyf p1B, repeat from * to end marker (slipping all other markers), sm
Repeat last 2 rounds 5 x more
Round 13: as round 1 (36 sts remain)
Round 14: *wyb k1 A, wyf p1A, wyb k1 B, wyf p1B, repeat from * to end marker (slipping all other markers), sm

Round 15: *wyb k1B, wyf p2togB, wyb k2togA, wyf p1A, wyb k1B, wyf p1B, wyb k1A, wyf p1A, wyb k1B, wyf p1B, sm, wyb k1A, wyf p2togA, wyb k2togB, wyf p1B, wyb k1A, wyf p1A, wyb k1B, wyf p1B, wyb k1A, wyf p1B, repeat from & to end marker (30 sts remain)
Round 16: as round 14
Round 17: *wyb k1B, wyf p2togB, wyb k2togA, wyf p1A, wyb k1B, wyf p1B, wyb k1A, wyf p1A, sm, repeat from * to end marker (24 sts remain)
Round 18: as round 2
Round 19: as round 1 (18 sts remain)
Repeat last round 2 x more (6 sts remain)
Cut both strands of yarn. Thread each strand through all 6 sts of the same color and pull tight (keeping color B inside the hat).
Weave in ends, which I find to be a particular challenge on a reversible object.
Abbreviations
- beg – beginning
- k1 – knit 1
- p1 – purl 1
- pm – place marker
- s1 – slip 1 stitch
- st – stitch
- sm – slip marker
- wyb – with yarn in back
- wyf – with yarn in front

When it is cold my ear lobes hurt so this is perfect for keeping them warm when those chilly winds reach South Texas. Your design is great for anyone who needs a great hat for those non warmer days coming ahead. thanks
LikeLike
If you are wearing pierced earrings, it is quite possible the metal is causing your ear lobes to be more sensitive to the cold. Try leaving this out when in the colder temperatures. Suggested by a Yooper!
LikeLiked by 1 person
Thanks! Earflaps can be super useful and while I think they can look dorky, I also think they can look cool in a hipster sort of way if you lean into it 🙂 I have my own style which includes wearing whatever is best for the weather although I did not actually make this hat for myself!
I have to say that I am surprised to hear that anybody in South Texas has need of a wool hat at all, let alone one with earflaps. As a lifelong Michigander, I guess I just figure it is always hot down there but I am glad that you have found something that works 🙂
LikeLiked by 1 person
I read through in one of your previous blog comments that somebody has worked with the Website Scraper by Creative Bear Tech (https://creativebeartech.com). I’m contemplating of purchasing this Website Scraper but can not seem to be able to locate a user guide for it. Can somebody please point me in the correct path? Many thanks
LikeLike
Hi everybody! I was speculating if anyone wants to register with me as a hemp and CBD product reviewer? I have actually received a ton of cbd product lines from well known manufacturers just like Julian Marley Juju Royal I also have a lot of CBD and hemp items to send out to CBD and hemp reviewers, featuring CBD Vaping, CBD Topicals and CBD Topicals I likewise do vape reviews and am looking for a vape reviewer also to review the following eliquid labels (will be transported to you): Candy POP! E-Juice, Goddess Vapor E-Juice and Not Fair E-Juice Many thanks guys and have a fabulous day! You can contact me at https://allvapestores.com
LikeLike