

Okay, two months later, I guess it is time for another blog post that nobody will read . . .
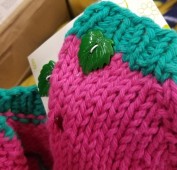
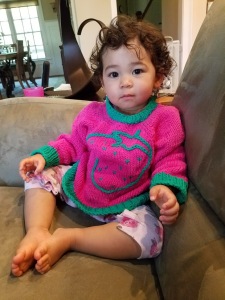
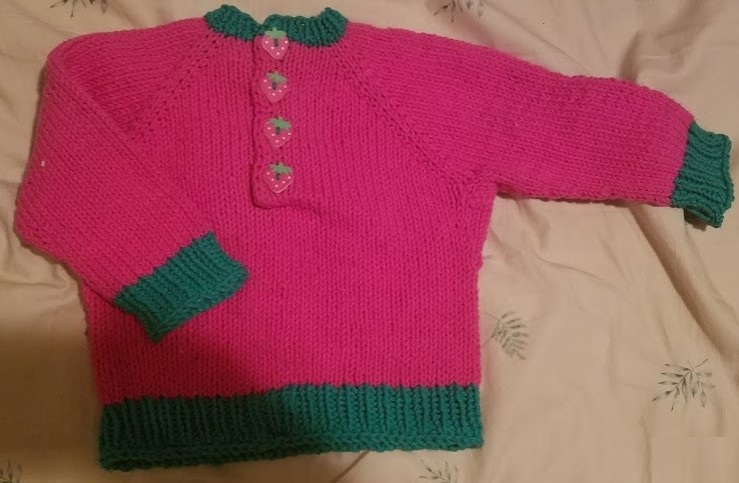
Earlier this year, I found myself between knitting projects and decided to use some of my stash to knit a sweater for my baby niece. She looks super-cute in pink so I started with that and picked out a turquoise-y green for contrast. Like I usually do, I made up a pattern based on theoretical sweater construction and math then made notes about what I actually did. Initially, this sweater had no theme, it was just a tiny sweater with a placket in the back to make it easier to put on a squirming toddler.
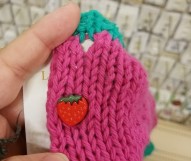
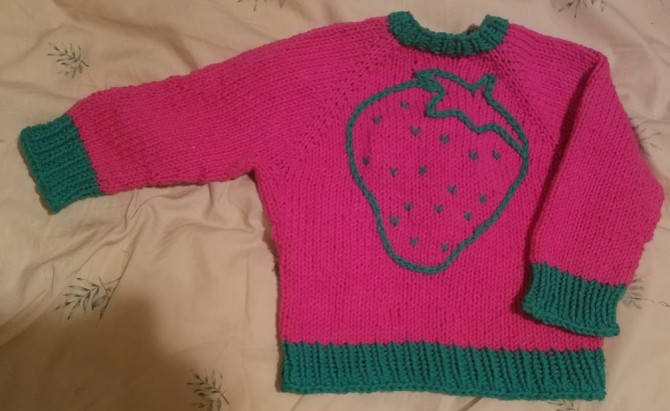
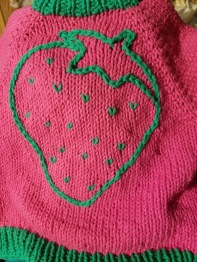
About halfway through the sweater, I thought about how plain it would look, even in the awesome hot pink color, so I decided to do something with the contrasting green on the front. It occurred to me that the colors were reminiscent of a strawberry, so I decided to go with that. Also, that made me think of how my nephew used to say the word when he was a toddler, “straw-BABY” and it seemed especially appropriate as a motif!
I experimented a bit with embroidery and duplicate stitching but in the end, I decided the best way was to use a crochet hook and chain stitch the outline of a strawberry then duplicate stitch in some seeds. This turned out to be harder than I initially expected and after trying and failing more than once, I decided to use waste yarn to make a rough strawberry using a running stitch then follow that shape with my chain stitching. In my (totally not biased) opinion, it turned out pretty well.
The real challenge was finding buttons that worked with the theme. I started out by going to JoAnn where I looked at pretty much every pink, green, strawberry, and leaf button I could find but nothing worked.
The pink buttons were too boring and none of the greens were the right color. The closest I came to matching my self-inflicted theme were still totally wrong. I went to every store in town that I thought might carry buttons but had no luck at all.
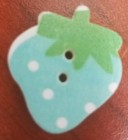
Eventually, I decided to try the internet. I generally don’t like shopping online for supplies that need to match but by this point, I had become desperate for strawberry-shaped buttons that would do the job. I found a promising set on Amazon that was inexpensive although would take a long time to arrive since they were shipping from China. They did not arrive when expected so I went to visit my niece without the buttons and made her try the sweater on before taking it away for future finishing. Eventually, my buttons came and while they were mostly as advertised, I have to wonder who the hell wants turquoise or blue strawberries? Of course, I got more of the silly colors than anything else. Also, some of the buttons were mis-printed but fortunately, mostly the aforementioned useless colors.
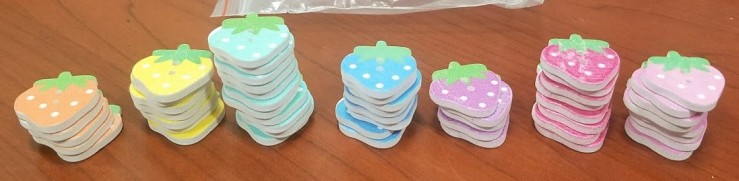
At least I got enough red ones to finish my project. Well, they are supposed to be red and appear as such in the listing but they turned out to be dark pink instead, which is actually better because they ended up matching my pink yarn almost perfectly! The green was totally off but you can’t have everything. I think that these wooden buttons are a great match for the sweater, assuming they hold up over time.
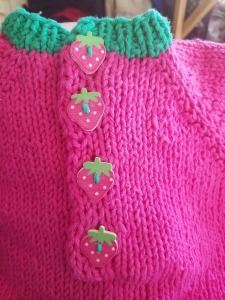
I used the long green yarn end that I had left hanging to sew on the buttons and I think that the end result was worth the wait. I’m pretty sure my niece would think so too if she wasn’t too little to comprehend my weird strawberry-button obsession. I am going to see her again in about a month and even though it will be the height of summer, I am totally going to give her this sweater and make her model it for me again. That’s what she gets for being so darn cute and lovable!
Straw-baby sweater pattern by Kalyani
Size: 18 months – 2 years
Materials: Lily Sugar’n Cream (worsted, 120 yd/71g) 2 balls MC, 1 ball CC
Needles: Size 7 & Size 8 circular
Notions: Size G crochet hook; 4 1″ buttons; stitch markers; cable needle and/or stitch holders / waste yarn.
Gauge: 4 sts/inch on larger needles
NOTE(*): I like to cast on and off with larger needles even when using smaller ones to work the ribbing, this is mostly because I tend to cast on tightly and this keeps me from doing so. Cast on and off with the smaller needles if this is not a problem for you.
Neck Ribbing:
With CC, cast on 45 stitches using long-tail method on larger* needles
Switch to smaller needles
Row 1 (ws): k4, *k1, p1, repeat from * to last st, k1
Row 2 (rs): s1, *k1, p1, repeat from * to last 4 sts, k4
Repeat rows 1 & 2 1x more
Row 5 (ws): k4, switch to MC, p4, pm, p8, pm, p12, pm, p8, pm, p8, k1 [45 sts]
Switch to larger needles
Short Rows:
Row 1 (rs): s1, k2, yo, k2tog, *k to 2 sts bef m, kfb, k1, sm, kfb, rep from * 1x, k2, w&t [bh made]
Row 2 (ws): p to last st, k1, turn
Row 3 (rs): s1,*k to 2 sts bef m, kfb, k1, sm, kfb, rep from * 1x, k5, w&t
Row 4 (ws): p to last st, k1, turn
Row 5 / 1 (rs) : s1, *k to 2 sts bef m, kfb, k1, sm, kfb, rep from * 3x, k to end
Row 2 (ws): k4, p19, w&t
Row 3 (rs): *k to 2 sts bef m, kfb, k1, sm, kfb, rep from * 1x, k to end
Row 4 (ws): k4, p26, w&t
Row 5 (rs): as row 3
Row 6 (ws): k4, p to last st, k1
Yoke:
Row 1 (rs): s1, *k to 2 st bef m, kfb, k1, sm, kfb, repeat from * 3x, k to end [8 sts inc]
Row 2 & all ws rows through 24: k4, p to last st, k1
Row 3 (rs): s1, k2, yo, k2tog, *k to 2 st bef m, kfb, k1, sm, kfb, repeat from * 3x, k to end [8 sts inc & bh made]
Row 4 (ws): as row 2
Repeat rows 1 & 2 3x
Row 11 (rs): as row 3
Repeat rows 4 – 11 [bh made on row 19]
Row 20 (ws): as row 2
Repeat rows 1 & 2 1x
Row 23 (rs): s1, *k to 2 bef m, kfb, k1, sm, k to m, sm, kfb, repeat from *, k to end [161 sts]
Row 24 (ws): as row 2
Row 25 (rs): s1, k to last 5 sts, slip 5 sts to cable needle, do NOT turn
Join in round (rs): hold cn behind work, *k 1 st from cn tog with st from beg of last round, repeat from * 4x more, k to end of round, pm
Divide for Sleeves & Body:
Round 1 (rs): s1, *k to m, sm, place 36 sts on holder, co 8 sts, sm, repeat from * 1x, k to beg of round [100 sts]
Round 2: k around
Round 3: *k to m, ssk, k to 2 bef m, k2tog, repeat from * 1x, k to end
Repeat round 2 3 x
Repeat rounds 3 – 6 3x
Round 19: k around [84 sts]
Repeat round 19 until body measures 6” from co sts at armpit
Switch to CC & smaller needles
Bottom Ribbing:
Round 1: k around, sm
Round 2: *k1, p1, repeat from * to end, sm
Repeat round 2 7x more
Bind off with larger* needle
Arms (with MC & larger needles):
From the armpit sts on the body, pu & k 4 sts, k 32 sts from holder, pu & k 4 sts, pm
Round 1: k around, sm [40 sts]
Round 2: k3, k2tog, k to 5 sts bef m, ssk, k3, sm [38 sts]
Repeat round 1 2x
Round 5: k2, k2tog, k to 4 sts bef m, ssk, k2, sm [36 sts]
Repeat round 1 2x
Round 8: k1, k2tog, k to 3 sts bef m, ssk, k1, sm [34 sts]
Repeat round 1 2x
Round 11: k2tog, k to 2 sts bef m, ssk, sm [32 sts]
Repeat round 1 4x
Round 16: ssk, k to 2 sts bef m, k2tog, sm
Repeat rounds 12- 16 until sleeve measures 6” from armpit [sts mayvary]
Switch to CC & smaller needles
Cuff Ribbing:
Round 1: k around, sm
Round 2: *k1, p1, repeat from * to end, sm
Repeat round 2 7x more
Bind off with larger* needle
Repeat for 2nd arm
Strawberry Motif & Finishing:
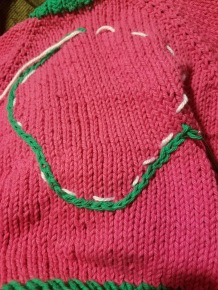
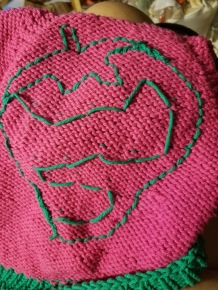
Holding yarn inside sweater use crochet hook to chain stitch the outline of a strawberry on the front. Cut a long tail and duplicate stitch “seeds” inside the outline. (It may help to use a long running stitch made of waste yarn to vaguely outline the shape before you begin chain stitching. Each chain should be no more than 1 ½ stitches long.)
Sew 4 buttons to garter stitch band opposite buttonholes
Weave in ends
Abbreviations
- bef – before
- bh – buttonhole
- CC – contrasting color
- cn – cable needle
- co – cast on
- inc – increase(d)
- k# – knit # sts
- k2tog – knit 2 together
- kfb – knit into the front & back of the stitch
- m – marker
- MC – main color
- p# – purl # sts
- pm – place marker
- pu – pick up
- rm – remove marker
- rs – right side
- s1 – slip 1 stitch
- ssk – s1, s1, k 2 slipped sts together
- st(s) – stitch(es)
- sm – slip marker
- w&t – wrap yarn around the next stitch and turn the work (note, on row after w&t, work wrap together with stitch)
- ws – wrong side
- yo – yarn over

One year later! I th ink you did a great job; it’s a lovely jumper & looks gorgeous on the little girl. I will have to try this out myself. Very clever & sensible to use a running stitch to get the basic outline of the strawberry.
LikeLiked by 1 person
Thanks! Her parents like to put it on her backwards but there isn’t really a reason that the buttons can’t go in the front 🙂
LikeLike