Free Patterns, knitting, Uncategorized

Turkish Short Row Booties

One of the knitting Facebook groups I’m in had a post searching for an English version of these booties – and I was enthralled. Short rows? Garter? I’m sold!

IMG_20190831_141326.png


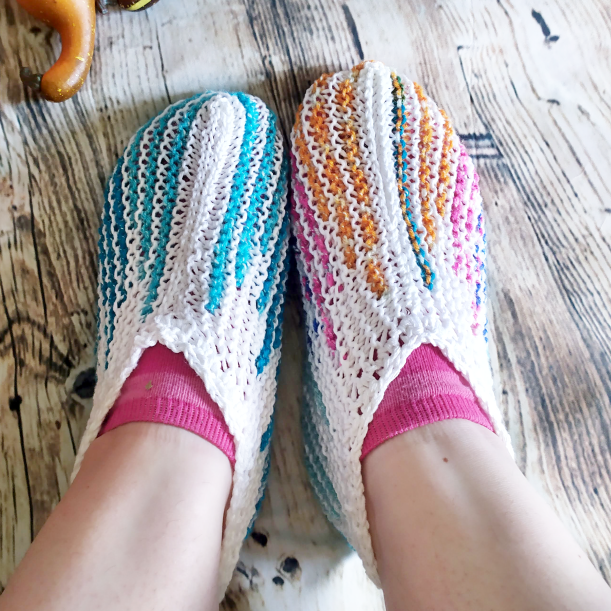
After studying the video, I’ve written down my version of it as best I can. There’s a lot of flexibility here, and I’ve included a few ways to easily customize it if you’re willing to do some trial and error. As written, these will fit a US 9.5 women’s foot (about 9″ / 23 cm length foot). They have some wiggle room though, and would likely be able to size up or down easily.

These are a little on the loose side, I’d suggest going down a needle size or two if you want a denser fabric.

Carry CC up the wrong side of the fabric.

To incorporate German Short Rows (my preferred short rows), work 1 more stitch than directed in pattern, and work the turn as usual. Directions are written for an easy turn without wraps, but it does leave a small hole.

Note: This is just my version of the pattern & may have errors – if you have any suggestions or changes, please let me know! If you’d like to support me, you can buy me a coffee here: ko-fi.com/cbibler.

Details on the sample can be found on my Ravelry project page here: https://www.ravelry.com/projects/sketchymurr/turkish-booties

~~~


Needles: US 6 (4 mm) – straights or circular

Gauge: 18 st x 36 rows per 4″ (10 cm) (about 18 garter row ridges per 4″)

IMG_20190831_141245

Yarn: DK yarn (Sample used Coboo & James C. Brett Harmony DK.)

Cast on 50 using a long tail cast on.

Sizing Note: If making a smaller sized bootie, subtract even numbers to get the correct width – the cast on length is what will sit up against the heel, so adjust for the correct height. Cast on length divided by 2 = heel height.

Row 1: (RS) Slip first st, purl to end, turn

Row 2: (WS) Slip first st, purl to end, turn

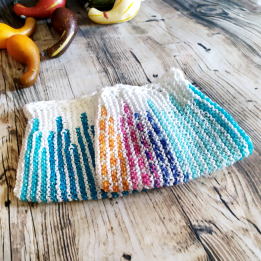
Row 3 – A Stripe: Slip first stitch, purl 3, attach CC. Purl to last four, turn. Slip first stitch, purl to last 4 st, turn

Row 4: Purl to end of row using MC, turn.

Row 5: Slip first st, purl to end of row, turn

Row 6 – B Stripe: Slip first stitch, purl 7, switch to CC. Purl to last 8 st, turn. Slip first stitch, purl to last 8 st, turn.

Row 7: Purl to end of row using MC, turn.

Row 8: Slip first st, purl to end of row, turn.

Row 9 – C Stripe: Slip first stitch, purl 11, switch to CC. Purl to last 8 st, turn. Slip first stitch, purl to last 12 st, turn.

Row 10: Purl to end of row using MC, turn.

Row 11: Slip first st, purl to end of row, turn.

Row 12: Repeat B stripe.

Repeat A – B – C – B stripes (each stripe is 3 rows) until there are 5 A stripes total, making the last row the 5th A stripe repeat.

Piece is about 7.5” wide before binding off. To make your bootie for a smaller size, omit A stripe repeats. To make for a longer foot size, add A stripe repeats. Garter is stretchy, so assume some forgiveness in fit.

Bind off. (Alternatively, fold live stitches in half and kitchener them together.) 

Fold in half (with the cast on and cast off edges as the “halved” sides). Seam up along the cast on and cast off edge on each side.

Crochet a picot edging around the top if desired. I suggest using a smaller hook to tighten it up a little.

Happy knitting!


IMG_20190831_141341

crochet, Patterns, Promotions

Doughnut Blanket

The doughnut blanket has launched! I’m so in love with this pattern. The little cupcake border makes me so happy, too. It’s great for scrap eating and using up fun little bits of variegated yarn that’s hard to use in larger projects, and is super easy to customize for baby shower themes, too.

Also, it looks delicious. Yum!

20180724_122716.png

The pattern is up in my Ravelry shop for $1 off for the launch weekend (until 8/12/18), or in Etsy if you’d prefer that.

20180724_122526

Ahhh, just look at those little cupcakes!

If you make your own version of the blanket, please tag me on IG (#tigardneedlework & #cassandrasdesigns) or make a project page on Rav! I love seeing what everyone comes up with.

Happy crafting!

Patterns

Mosaic Dishcloths Everywhere

It’s been a while since I’ve written up a blog post, but suffice to say: my life is dishcloths.

I love that they’re easy to make, quick, satisfying, and useful. They make great gifts and there’s something lovely about having a nice stack of finished dishcloths sitting on my table at the end of the day.

Mosaic ones have particularly been my jam, but I’m trying to branch out into some crochet options, as well.

Here’s a small sample of some dishcloths you can find up in my Rav store.

20180417_120921
Hogwash: a mosaic dishcloth pattern

Find Hogwash on Ravelry, here: https://www.ravelry.com/patterns/library/hogwash


20180401_161951.png
Purr: a mosaic dishcloth pattern

Find Purr on Ravelry, here: https://www.ravelry.com/patterns/library/purry-baby

Charts / Graphs, Free Patterns, Patterns

Cupcake Chart

The corner to corner (C2C) craze has finally caught hold of me. I love these silly charts and have been making them far faster than I can crochet them – but that doesn’t mean I can’t share them with others!

First up, is a cute cupcake. It’s a pretty simple chart with only a few colours used. It’s also easily customized to just about however you want it to work up. I want to make one and stitch on some sprinkles in a varigated yarn, maybe..? Mmm. All the deliciousness, none of the calories!

I’ve included the chart if you’d like to save it and zoom in (the rows are numbered for C2C), and also uploaded a PDF that can be downloaded and printed off. The PDF has the chart split onto four pages so you can cut and tape them together for a big picture. This chart is 80 pixels wide by 100 pixels tall, and will make a decent sized blanket with a standard worsted weight yarn & hook size. (This will vary with gauge, but expect a blanket about 80″ wide by about 100″ tall or so, not counting a border.) Speaking of a border, maybe a cute cupcake border will be in order?!

Cupcake - chart

Download the printable PDF for free here from Google Drive: click me!

If you prefer written directions for C2C, or would rather work this in a single crochet chart format, you can find those PDFs in my Ravelry store, here: click me! (or if you’d rather, in my Etsy shop: click me!)

I hope you enjoy the pattern & share your creations for everyone to see!

Finished Project, Patterns

GAL Projects

Between my furious crafting fest for the bazaar next Tuesday (ahhh, it’s coming up so fast!), I’ve been sneaking time to work on an Indie Design now & then. The prizes are pretty awesome & it’s been a lot of fun scouring the patterns and picking out gifts. It’s also nice working from stash.

This particular hat pattern is a fave of mine. I’m going to make another up soon, even!

20171129_110926

The pattern is called Feathery Owl Hat, and it’s up for sale on Rav, which you can find by clicking here.

Want to learn more about the Indie Design GAL & maybe enter for a chance at some prizes? You can read all about it in the Rav group located here: https://www.ravelry.com/groups/indie-design-gift-a-long

Finished Project

2017 Indie Design Giftalong

Sometimes, I’m surprised to find there are things I don’t actually know about happening in the fiber community. One of those things that took me by surprise recently is the Indie Designer Gift-along.

Instagram_Challenge

I managed to catch this early enough to quite possibly impulse purchased more patterns than I should have – but now the crafting portion is in full swing! I haven’t been keeping up on IG much, I admit, but I have managed to finish 2 GAL projects while also gearing up for my craft fair next Tuesday!

For now, I’ll leave you with a link to the Rav group where you can learn more about it – come work up a project or two and enter for some fab prize opportunities!

Click here to go to the Ravelry group!

Patterns, Promotions

Black Friday / Small Business / Cyber Monday

How many sales can we hit at once? Three, apparently! Right now, until 11/27 @ 11:59PM (PST), all of my patterns on Ravelry are 30% off – no coupon code needed! If you’ve had your eye on any, now is the time to catch ’em!

Click here to check out my Ravelry patterns!

IMG_0809
Get this pattern & others in my shop!
Free Patterns

Outlander Cowl

20171005_123116

The infamous Outlander Cowl! I decided I wanted something simple, beginner friendly, and fast. Fast was really something I was after. This pattern fits the bill – it is very simple, works up fast – and best of all, it’s gorgeous. Squishy and drapey, the bulky yarn really shines.

Great for beginners or experienced knitters, this project is a hit for holiday gifts, too.

For a classic Claire style, pick a heathered grey yarn.

This pattern is free, but if you’d like to support my designing habit, buy me a cup of coffee!

Materials

Yarn: 200 yards of bulky weight yarn. Sample used Loops & Threads Charisma in “Forest”, 2 skeins.

Needle(s): US 35 (19 mm)

Notions: Optional buttons (sample used 2 but 3 would work better), sized 1 1/8” (28 mm) or larger as needed.

Note: This cowl is worked flat with two strands held together to create a super soft, squishy end project.

Pattern

Using 2 strands at once, CO 10 stitches. If making a solid loop, use a provisional cast on for a seamless finish. Otherwise, cast on as usual.

Row 1: k all stitches

Repeat row 1 until cowl is desired length, leaving enough yarn to BO (measure 4 x the width of your piece and leave at least that much yarn – a bit extra doesn’t hurt though!).

For a seamless finish with a provisional cast on, sew pieces together using Kitchener stitch.

If no provisional cast on was used, seam ends together.

Optionally, twist piece as it’s being sewn to make the cowl lay flat when worn longer as a scarf.

To add buttons, sew along one end. No button holes are needed since the piece is gappy enough to let them slip through.

Don’t knit? I make these to order in my Etsy shop in colours of your choice. Check out the listing here!

20171008_160613

Free Patterns

Pumpkin Chart

20170919_155835

Autumn! My favorite time of year. Between the cooler weather rolling in, the grey rainy days, and shrugging into my favorite sweaters yet again, I’ve noticed once again, the theme is back:

PUMPKINS.

People love ’em. So do I. So I designed up this cute little pumpkin chart that can be used for various crafting purposes – tapestry crochet, double knitting, stranding, etc. Do whatever you’d like with it!

I’ve made a printable PDF version available on Etsy & Ravelry, as usual – there’s 3 charts in the paid version (plain pumpkin, pumpkin face, checkered divider), as well as some direction on what sort of crafts could be used with the chart – summaries, really – nothing in depth. If you’d like to check those out though, here’s the links.

Etsy — & — Ravelry

For those of you who would like to jump right in, here’s a free chart to get you started! I can’t wait to see what everyone uses it for. I think it’d be adorable on a sweater pocket, perhaps…

Copy of Pumpkin

Enjoy!

Free Patterns

Lucky Horseshoe Mason Jar Cover

I set out to design this mason jar cozy after finding an interesting stitch pattern that reminded me of horseshoes. I thought the arches and gaps in the pattern would make for very interesting light patterns on the wall – and it turned out great!

If you’d like an easy to print PDF with notes on how to adjust your pattern, you can purchase it on Ravelry, Etsy, or Craftsy! Thank you for your support & I hope you enjoy the pattern!

20170808_125021

Materials

Yarn: 50 yards (~25 grams) of worsted weight yarn. A lighter worsted weight yarn will give a more delicate effect.

Hook(s):

J (6 mm) hook

Notions:

Yarn needle for weaving in ends, Mason jar (32 oz  / 1 quart).

Pattern

Note: Ch 3 do not count as a st.

Ch 26, join in the round being careful not to twist. (Or, fdc 26 and join to work in the round with a slip stitch to first fdc. Begin pattern on round 2.)

Round 1: Ch 3, dc in each st to end. Join with a slip stitch to first dc. (26 dc)

Round 2: Ch 3, *fpdc, hdc. Repeat from * to end. Join with a slip stitch to first fpdc.

Round 3: Ch 3, *fpdc, hdc. Repeat from * to last two stitches. Fpdc, 2 hdc in last st. (27 st)

Round 4: Ch 3, *dc in next 3 st, ch 2, skip 2 st, dc in next 3 st, ch 1, skip 1 st. Repeat from * twice more. Join with a slip stitch to first dc.

Round 5: Ch 3, *dc in next 3 st, ch 5, dc in next 3 dc, ch 1. Repeat from * twice more. Join with a slip stitch to first dc.

Round 6: Ch 1, *skip next sts and 12 dc in ch 5 space from previous round, sc in ch 1 space. Repeat from * to end. Do not join at the end of this round. We’re moving the beginning of this round a little, but it’s okay, I promise!

Round 7: Ch 7 (counts as tr and 3 ch). *Skip 4 dc, sc in next 4 dc, skip 4 dc, ch 3**, tr in next sc, ch 3. Repeat from * twice more, finishing the last repeat at **. Join with a slip stitch to the top of the beginning tr (4th ch of the ch 7).

Round 8: Slip st into ch 3 space. Ch 3, *3 dc in ch 3 space, ch 2, 3 dc in next ch 3 space, ch 1. Repeat from * to end, join with a slip stitch to first dc.


Repeat rounds 5-8 once more. Your cover should be about 8” (20 cm) long. If you want a longer cover, repeat rounds 5-8 as desired. (If your cover is about 7” (18 cm) long, you should still be fine to start decreases, it will just stretch a bit more.)

If you want your cozy to have a bottom, work the decreases. Otherwise, work round 1 of the decreases and finish off, weaving in your ends. This will leave the bottom uncovered and make a sleeve instead of a cozy.

Begin decreases below.

Decreases

Round 1: Ch 1, sc in each dc and ch around. Join with a slip stitch to first sc. (27 sc)

Round 2: Ch 1, *sc in next 7 st, sc2tog. Repeat from * to end. Join with a slip stitch to first sc. (24 sc)

Round 3: Ch 1, *sc in next 4 st, sctog. Repeat from * to end. Join with a slip stitch to first sc. (20 sc)

Round 4: Ch 1, *sc in next 3 st, sctog. Repeat from * to end. Join with a slip stitch to first sc. (16 sc)

The bottom should be flat – if it’s not quite working out, decrease another round more or less to get a flat bottom so the jar sits level.

Cut yarn leaving a long tail. Using a yarn needle, weave through the stitches of round 4 and pull tightly. Weave in ends.