Today’s free knitting pattern is a really easy to knit pair of fingerless mittens.
The mittens are knit with chunky yarn on straight needles.
Once knit, they are simply sewn up at the side and a hole is left for the thumb holes.
These little mitts are a super fast knitting project and look so sweet.
They are also very practical for when its a bit nippy and you need your fingers free to type, text, take photos, pay bus fare etc.
This project is also a super stash buster, as you don’t need a full ball of one colour to complete it.
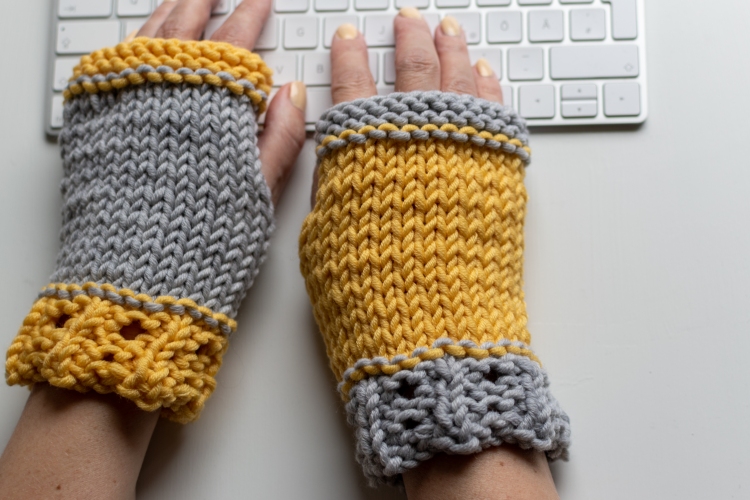
The rib on the mittens is a worked using the lovely eyelet lace rib stitch, which is much prettier than regular rib stitch. The photo below gives a better view of the eyelet lace rib stitch.

Knitting Pattern for Easy Chunky Fingerless Mittens
Materials and yarn used
Needles – 6 and 7mm straight needles.
Yarn:
Approx 50g each of two colours of chunky yarn. The yarn used to make the mittens in the photos is Lana Grossa Superbingo. This is a pure merino which I would describe as ‘extra chunky’. The mittens came out quite generously sized and they would be more snug with a thinner type of chunky yarn.
The pattern
With 6mm needles and first colour, cast on 25 stitches. Work the following 8 rows to form the lace rib border. Note that row 1 is the right side.
- *p1,k3* to last stitch, p1
- K1, *p1, yo, p2tog, k1* rep to end
- *p1, k3* to last stitch, p1
- K
- *p1,k3* to last stitch, p1
- K1, *p1, yo, p2tog, k1* rep to end
- *p1, k3* to last stitch, p1
- K
Now change to the second colour, cutting the first colour yarn but leaving a long tail, and k one row.
The right side is now showing. Change to 7mm needles.
Starting with a knit row, work stocking stitch until piece measures 15cm from the cast on edge, ending on a right side row.
Change to first colour.
K 1 row.
Change to 6mm needles and work 4 rows of garter stitch. Cast off. Cut yarn, leaving a long tail, pull this yarn through the stitch that remains on the needle and pull to secure. Sew up the side seam, leaving a hole for your thumb. A good way to do this is to sew up the very bottom rib part and then sew up the rest of the mitten whilst on your hand. Then you see exactly where you want your thumb to be.
Weave in all the loose ends and make a second mitten. The colours on the second mitten are reversed, knitting the second colour first. The photo below shows how the colours are worked differently for the second mitten.
When sewing up, remember to place thumb hole on opposite side.

Thanks very much for visiting The Knitting’s Times today.


One thought on “Easy Chunky Fingerless Mittens Free Knitting Pattern”