


Angle and Inclination, a free knitting pattern from Knitty.com.
INTRODUCTION
Angle and Inclination
 by Anne Blayney

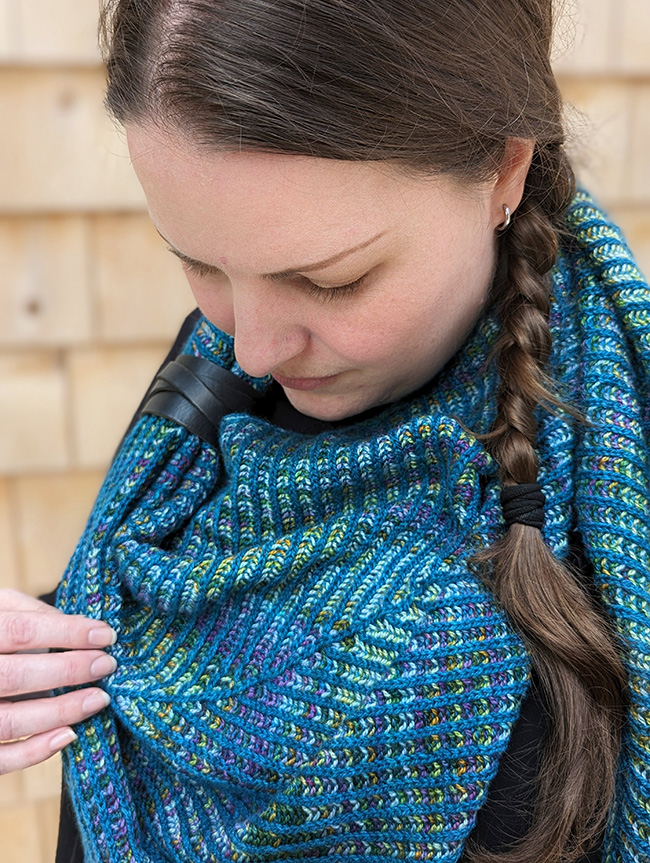
The brioche stitch is plush, squishy, bouncy, and a highly enjoyable way to play with pairs of contrasting yarns. It's also possibly the only type of knitting where the two-color version is actually easier than the one-color version!
With its bold, graphic vertical stripes, brioche automatically lends itself to symmetry and balance... But what if we send it veering off at dynamic angles?
The result is this asymmetrical shawl, which draws heavily on the kite shape pioneered by Martina Behm/Strickmich and beloved of knitters everywhere. The standard kite shape plays with the stitch:height ratio of garter stitch, but brioche has a ratio all its own, and its vertical stripes make the shape look very different compared to the horizontal emphasis in garter stitch. A 3-stitch border around the whole shawl also adds a graphic touch and a tidy, finished look.
The shawl size is adjustable, with a guide to using a scale to make sure that you get the most shawl possible out of the yarn you have. It can be worked in any weight of yarn, with appropriate needles.
The shawl is shown here in three versions: one in laceweight, one in fingering-weight, and one in DK-weight yarn. All three follow the same instructions, with only the needle size and the number of pattern repeats changing along with the yarn weight.
As a bonus, there is only one stitch to cast on, and one stitch to bind off, and there are only 4 yarn ends to weave in!
 model: Anne Blayney, Gillian Whitcombe
photos: Dan Blayney, Anne Blayney


SIZE
One size, adjustable to accommodate your yardages.
FINISHED MEASUREMENTS
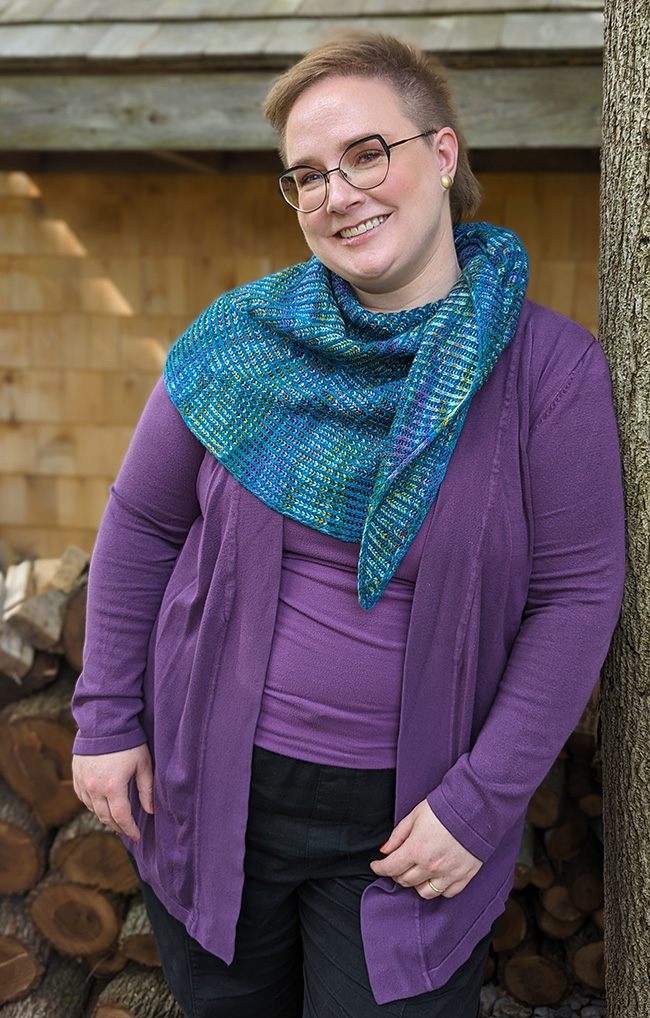
Laceweight version (tonal teal and multicolored – shown at beginning of DIRECTIONS):
Wingspan: 62 inches/157 cm
Depth: 20 inches/51 cm
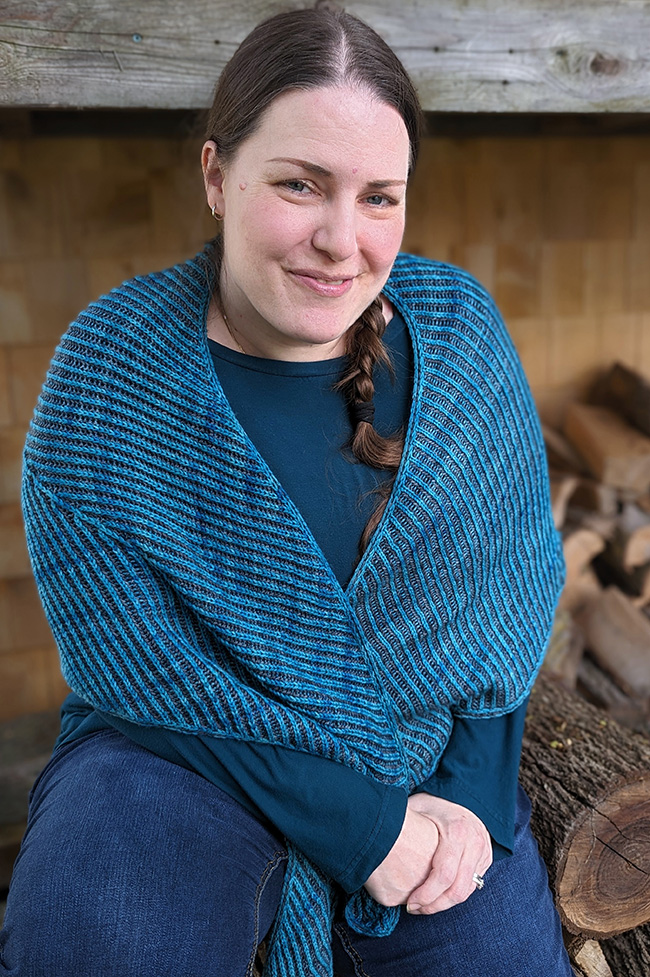
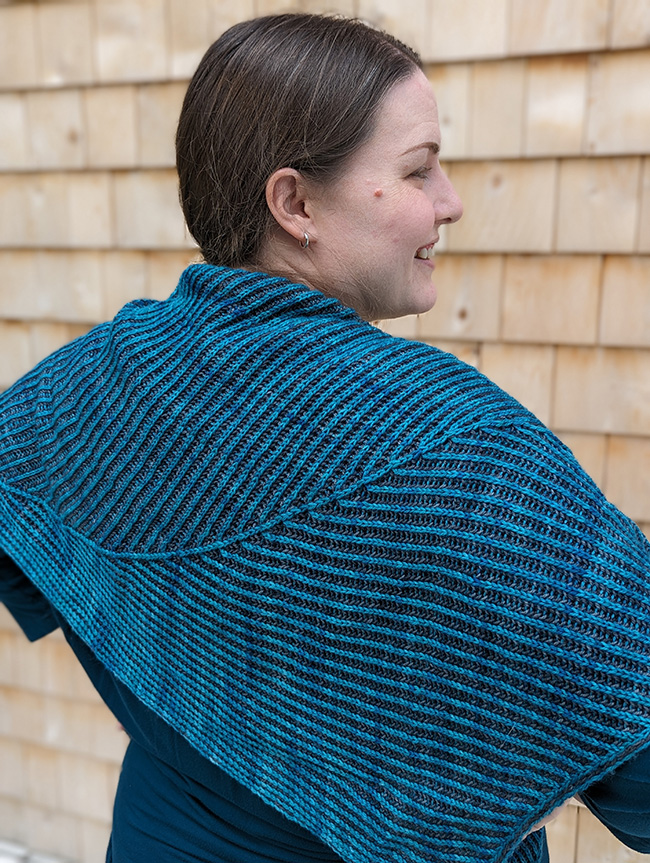
Fingering-weight version (tonal teal and charcoal – shown above):
Wingspan: 66 inches/168 cm
Depth: 24 inches/61 cm
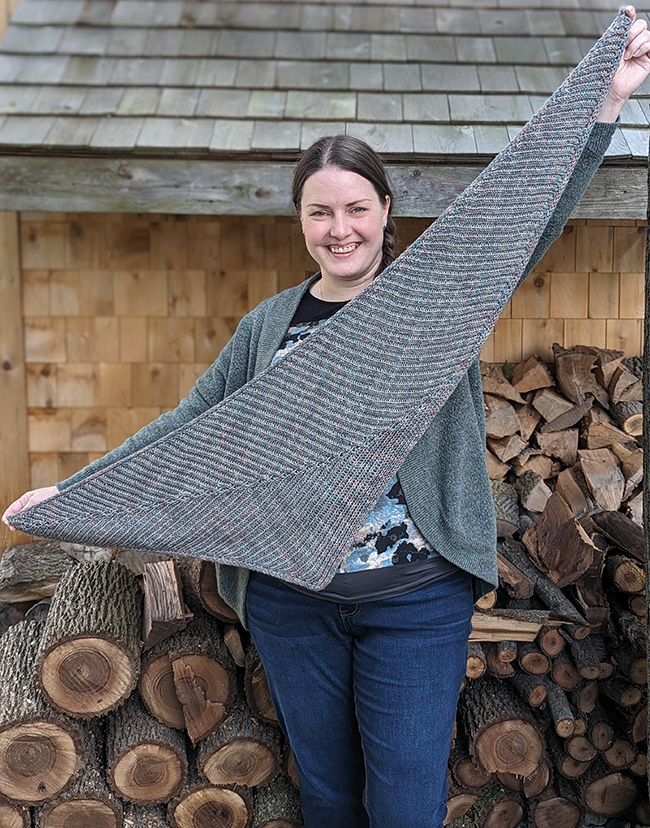
DK-weight version (peach and grey-green – shown in MATERIALS):
Wingspan: 50 inches/127 cm
Depth: 16 inches/40 cm
MATERIALS
Laceweight version (tonal teal and multicolored):
Miss Babs Yeti [65% merino wool, 35% silk; 400 yd/366 m per 65g skein];
![]() [MC] Sea Teal; 1 skein
[MC] Sea Teal; 1 skein
![]() [CC] Ziggy Stardust; 1 skein
[CC] Ziggy Stardust; 1 skein
Fingering-weight version (tonal teal and charcoal):
Sweet Paprika Messa di Voce [100% superwash merino wool; 460 yd/420 m per 100g skein];
![]() [MC] Georgian Bay; 1 skein
[MC] Georgian Bay; 1 skein
![]() [CC] Graphite; 1 skein
[CC] Graphite; 1 skein
DK-weight version (peach and grey-green):
Julie Asselin Leizu DK [90% merino wool, 10% silk; 260 yd/238 m per 115g skein];
![]() [MC] Voyager; 1 skein
[MC] Voyager; 1 skein
![]() [CC] Kerava; 1 skein
[CC] Kerava; 1 skein
Yarn Characteristics
Generally, brioche works bettter with a smoother yarn – and something that drapes well, for example a wool, superwash wool, or wool and silk blend. Choose two yarns with pleasing contrast in color and value. You can work this shawl in any weight of yarn, though it will work best if the two yarns you choose are similar in weight. Use a scale and follow the tips in the pattern to adjust the size accordingly.
Brioche looks great with any of the following combinations:
- One variegated/handpainted/speckled yarn and one solid or semi-solid yarn
- A gradient yarn and a contrasting solid or semi-solid yarn (or a second, contrasting gradient)
- Two solid or semi-solid yarns
- One smooth yarn and one fuzzy mohair yarn
The pattern is written to work with any yardage, but we recommend using the yardages above as a guideline for minimum quantities.
Recommended needle size
[always use a needle size that gives you the gauge listed below - every knitter's gauge is unique]
Use a needle that gives you a fabric that you enjoy. Here are the needle sizes used for the three sample shawls, as a starting point:
![]() Laceweight version: US 2/2.75mm circular needle, 20 inches/50cm or longer
Laceweight version: US 2/2.75mm circular needle, 20 inches/50cm or longer
![]() Fingering-weight version: US 3/3.25mm circular needle, 20 inches/50cm or longer
Fingering-weight version: US 3/3.25mm circular needle, 20 inches/50cm or longer
![]() DK-weight version: US 6/4mm circular needle, 20 inches/50cm or longer
DK-weight version: US 6/4mm circular needle, 20 inches/50cm or longer
Notions
![]() cable needle (or DPN or spare circular needle in size similar to working needles)
cable needle (or DPN or spare circular needle in size similar to working needles)
![]() locking stitch marker
locking stitch marker
![]() scale for weighing yarn
scale for weighing yarn
![]() yarn needle for weaving in ends
yarn needle for weaving in ends
![]() cable needle (or DPN or spare circular needle in size similar to working needles)
cable needle (or DPN or spare circular needle in size similar to working needles)
GAUGE
Important: When you finish knitting the shawl, it will not be a perfect triangle. There will be a slight angle at the end of the central spine. The shawl can easily be pinned out to hold a triangle shape – but note that in doing so, different sections of the shawl will be stretched more vertically or more horizontally, so it is impossible to give a single standard gauge measurement for the blocked fabric. (This is similar to how gauge varies over a pi shawl when it’s blocked. You knit it with the same tension throughout, but different parts of the shawl are stretched differently when finished.)
The important thing is to create a fabric that you like, that drapes nicely but isn’t so open that it doesn’t hold together. Assess your gauge and fabric after washing/drying.
NOTE: Gauge was measured on the samples at various places, and this information is provided for your reference. Matching these measurements is not required.
Laceweight version:
Gauge 1 (near start): 18 sts/30 rows = 4 inches/10 cm in stockinette stitch
Gauge 2 (near long edge in straight section): 23 sts/21 rows = 4 inches/10 cm in stockinette stitch
Gauge 3 (near final border): 16 sts/32 rows = 4 inches/10 cm in stockinette stitch
Fingering weight version:
Gauge 1 (near start): 17 sts/29 rows = 4 inches/10 cm in stockinette stitch
Gauge 2 (near long edge in straight section): 20 sts/22 rows = 4 inches/10 cm in stockinette stitch
Gauge 3 (near final border): 17 sts/27 rows = 4 inches/10 cm in stockinette stitch
DK weight version:
Gauge 1 (near start): 13 sts/25 rows = 4 inches/10 cm in stockinette stitch
Gauge 2 (near long edge in straight section): 17 sts/23 rows = 4 inches/10 cm in stockinette stitch
Gauge 3 (near final border): 15 sts/26 rows= 4 inches/10 cm in stockinette stitch
Note: gauge is always taken after blocking.
PATTERN NOTES
[Knitty's list of standard abbreviations and techniques can be found here.]
Construction method:
Two-colour brioche, when worked flat, comes in pairs of rows: two right-side rows, then two wrong-side rows, etc. To achieve this, you will work 1 row with the MC, then without turning the work, slide the stitches back to the other end of the circular needle, and work the next row with the CC. Then you will turn the work and repeat this process.
For the first stitch of every other row of this brioche pattern, you are working into a stitch that just has the YO loosely draped over it — the YO is not caught in a further stitch. For this reason, I find it helps to hold the CC strand firmly while working the initial brk with the MC strand. Your preferred method may vary, but rest assured that the draped YO doesn't mean you've done anything wrong!
The pattern is broken into sections. You may find it helpful to place a lifeline when moving from one section to the next, and potentially at other intervals in the shawl; brioche is fiddly to ladder down and fix if you make an error, and lifelines make it easy to rip back and rework any challenging sections.
I also recommend placing a locking stitch marker on the spine stitch column (the central column of the miter) to make it easy to identify. By the time you have worked a few repeats of the increase section, it will be easier to spot the spine, but especially at first, it helps to mark that column. Don't place the stitch marker directly into the stitch on the needle, as it gets manipulated extensively during the decrease process; rather, place the marker a row or two below that stitch. You may want to shift the marker up the column as you progress through the shawl, or place an additional marker after each repeat to keep track of how many repeats you've worked.
I have calculated the proportion of stitches in the increase section (which determines the size of the shawl) relative to the rest of the shawl. Using an accurate scale, weigh your yarn before you start, and then weigh your yarn as you work through the increase section. You can work more or fewer repeats to make sure that you can optimize your yarn use, using all of what you have without running out.
List of Abbreviations and Stitch Instructions:
Kfbf: Knit into the front, back, and front of a stitch. 2 sts increased.
Sl1yo: slip next stitch and make a yarnover, at the same time.
On knit rows – working with MC on RS and CC on WS: Bring the yarn to the front, slip the next st purlwise; and then drape the yarn over the right-hand needle as you knit the following stitch.
On purl rows – working with MC on WS and CC on RS: With the yarn in the front, slip the next st purlwise, take the yarn over the right-hand needle and all the way to the front again, ready to work the following (purl) stitch.
When working a sl1yo at the start of the row, bring the yarn to the front and slip the first st purlwise; when working a sl1yo at the end of the row, the movement is the same, but the yarn will not be anchored. When you turn, ensure that the CC yarn remains draped over the needle.
Brk: brioche knit. Knit the next stitch and its yarnover together.
Brp: brioche purl. Purl the next stitch and its yarnover together.
Inc2: 2-st brioche increase. Work (brk1, yo, and brk1) into the next stitch and its yarnover. 2 sts increased.
Inc4: 4-st brioche increase. Work (brk1, yo, brk1, yo, and brk1) into the next stitch and its yarnover. 4 sts increased.
4st br dec: 5-into-1 centered decrease. Slip the next stitch and its yarnover together, knitwise, then slip the next (single) stitch knitwise. Place the next stitch and its yarnover together onto your cable needle, and hold it to the front of your work. Knit the next (single) stitch. Pass the single stitch you had previously slipped over the stitch you just knit, as if binding off. Slide the worked stitch back to the left needle, purlwise, then pass the next double stitch over the worked stitch, from left to right. Return the worked stitch back to the right needle, purlwise, and pass the stitch and yarnover that you had previously slipped over the worked stitch, as if binding off. Transfer the remaining stitch and yarnover from the cable needle back to the left needle, then slide the worked stitch back to the left needle again, and pass the stitch and yarnover over the worked stitch, left to right. Finally, slide the finished, worked stitch back to the right needle. 4 sts decreased.
BrRsldec: Right-leaning 3-into-1 decrease. Work an SSK decrease on the next 2 sts, by slipping the next stitch and its yarnover together, knitwise, then slipping the next (single) stitch knitwise; return them to the left needle without twisting, and knit these together through the back loop. Slip the resulting stitch back to the left needle, purlwise, and pass the next stitch and its yarnover together over the worked stitch, from left to right. Finally, return the finished, worked stitch back to the right needle.
Br4stRdec: Right-leaning version of 4st br dec. Work as for BrRsldec, but then pass stitch back to left needle, and pass the next 2 sts over it in turn, before returning it to the right needle. 4 sts decreased.
W&T: Wrap and turn. Slip the next stitch purlwise; move the working yarn from its current position, between the needle tips to the other side, and then return the slipped stitch to the left needle. Turn work. Note: There is no need to worry about picking up/working the wrap on a subsequent pass, because of the nature of brioche.
Techniques:
For tutorials on the basic brioche stitches, and working two-colour brioche flat, I recommend the following resources:
DIRECTIONS
Set-up section:
Weigh your yarn and make note of the weight of your MC and your CC, separately.
Cast on 1 st with a slip knot, using MC.
Set-up row 1 [RS]: Kfbf into stitch. 3 sts.
Set-up row 2 [WS]: P1, k1, p1.
Set-up row 3A [RS]: K1, kfbf, k1. 5 sts. Do not turn work. Slide work back across needles.
Set-up row 3B [RS]: With CC, (sl1yo, p1) twice, sl1yo. Turn work.
Set-up row 4A [WS]: With MC, (brp1, sl1yo) twice, brp1. Do not turn work. Slide work back across needles.
Set-up row 4B [WS]: With CC, sl1yo, (brk1, sl1yo) twice. Turn work.
Set-up row 5A [RS]: With MC, brk1, sl1yo, Inc4, sl1yo, brk1. 9 sts. Do not turn work. Slide stitches back across needle.
Set-up row 5B [RS]: With CC, sl1yo, brp1, (sl1yo, p1) twice, sl1yo, brp1, sl1yo. Turn work.
Set-up row 6A [WS]: With MC, (brp1, sl1yo) 4 times, brp1. Do not turn work. Slide stitches back across needle.
Set-up row 6B [WS]: With CC, (sl1yo, brk1) 4 times, sl1yo. Turn work.
Set-up row 7A [RS]: With MC, brk1, sl1yo, Inc2, (sl1yo, brk1) to last 4 sts, sl1yo, Inc2, sl1yo, brk1. Do not turn work. Slide stitches back across needle. 4 sts increased.
Set-up row 7B [RS]: With CC, sl1yo, brp1, sl1yo, p1, (sl1yo, brp1) to last 5 sts, sl1yo, p1, sl1yo, brp1, sl1yo.
Set-up row 8A [WS]: With MC, (brp1, sl1yo) to last st, brp1. Do not turn work. Slide stitches back across needle.
Set-up row 8B [WS]: With CC, (sl1yo, brk1) to last st, sl1yo. Turn work.
Repeat Set-up rows 7A-8B 3 times more. 21 sts.
Looking at the RS, identify the centre column of stitches, and place a locking stitch marker in that column. Move this marker up as needed as you work the increase section, to make identifying that spine column easy.
Increase section:
In this section, you will build increases at the outer edges of the work, and decreases in the centre of the work, gradually creating a miter effect.
Increase row 1A [RS]: Using MC, brk1, sl1yo, Inc2; (sl1yo, brk1) until 3 sts before spine stitch; sl1yo, 4st br dec; (sl1yo, brk1) to last 4 sts; sl1yo, Inc2, sl1yo, brk1. Do not turn work. Slide stitches back across needle.
Increase row 1B [RS]: With CC, sl1yo, brp1, sl1yo, p1; (sl1yo, brp1) to last 5 sts; sl1yo, p1, sl1yo, brp1, sl1yo. Turn work.
Increase row 2A [WS]: With MC, (brp1, sl1yo) to last st; brp1. Do not turn work. Slide stitches back across needle.
Increase row 2B [WS]: With CC, (sl1yo, brk1) to last st; sl1yo.
Increase row 3A [RS]: With MC, brk1, sl1yo, Inc2; (sl1yo, brk) to last 4 sts; sl1yo, Inc2, sl1yo, brk. 4 sts increased. Do not turn work. Slide stitches back across needle.
Increase row 3B [RS]: Work as Increase row 1B. Turn work.
Increase row 4A [WS]: Work as Increase row 2A. Do not turn work. Slide stitches back across needle.
Increase row 4B [WS]: Work as Increase row 2B. Turn work.
Repeat Increase rows 1A-4B until you have used approximately 30% of your yarn by weight. (For reference, the fingering weight version includes 29 total repeats of the increase section.)
Adjusting shawl size
Weigh your yarn after each 8-row repeat of the increase section. The set-up and increase sections together make up just under 34% of the total number of stitches in the shawl, depending on the dimensions. To be safe and ensure you don't run out of yarn, stop working the repeat section when you've completed a full 8-row repeat and have used close to 30% of your yarn.
For instance: if you started with two perfect 100-gram skeins of the same base yarn (one MC, one CC), you would have a total of 200 grams of yarn. 30% of that is 60 grams (but weighing your work in progress would entail weighing your needles, too). 200 minus 60 is 140 grams. So, when you have 140 grams of yarn left to knit, you will have used 60 grams, and it will be time to switch to the next section of the shawl pattern.
If your yarns aren't the same base, weigh them separately. Focus on the weight of whichever yarn is being used up most quickly, and make the switch to the next section when that yarn gets close to 30% used up. The pattern should use equal lengths of both yarns, but if one yarn base is denser, it will have fewer metres per gram than the other yarn.
Straight section:
In this section, you will continue increasing along the right edge of the shawl, and decreasing at the centre of the shawl, but you will stop increasing at the left edge of the shawl. Each pair of increases and decreases will shift the central spine of the shawl towards the left edge. The number of stitches worked per row varies slightly row by row in this section, but always returns to the same number of stitches by the end of the 8-row repeat.
Straight row 1A [RS]: With MC, brk1, sl1yo, Inc2; (sl1yo, brk1) to 3 sts before spine st; sl1yo, 4st br dec; (sl1yo, brk1) to end. 2 sts decreased. Do not turn work. Slide stitches back across needle.
Straight row 1B [RS]: With CC, sl1yo, brp1, sl1yo, p1; (sl1yo, brp1) to last st, sl1yo. Turn work.
Straight row 2A [WS]: With MC, (brp1, sl1yo) to last st, brp1. Do not turn work. Slide stitches back across needle.
Straight row 2B [WS]: With CC, (sl1yo, brk1) to last st, sl1yo.
Straight row 3A [RS]: With MC, brk1, sl1yo, Inc2; (sl1yo, brk1) to end. 2 sts increased. Do not turn work. Slide stitches back across needle.
Straight row 3B [RS]: Work as Straight row 1B. Turn work.
Straight row 4A [WS]: Work as Straight row 2A. Do not turn work. Slide stitches back across needle.
Straight row 4B [WS]: Work as Straight row 2B. Turn work.
Repeat Straight rows 1A-4B until spine is the 5th st away from left edge of shawl, ending with Straight Row 4B. If you are keeping track of the number of repeats you've worked, this will be three repeats more than you worked in the increase section.
Transition section:
In this section, you will set yourself up for the final edging, ending with both working yarns on the left side of the shawl.
Transition row 1A [RS]: With MC, brk1, sl1yo, Inc2; (sl1yo, brk1) to 8 sts before end; sl1yo, br4stRdec, sl1yo, brk1. 2 sts decreased. Do not turn work. Slide stitches back across needle.
Transition row 1B [RS]: Work as Straight row 1B. Turn work.
Work Straight rows 2A-3B. You will end with WS facing.
Edging section:
In this section, you will use short rows to work a 3-column brioche edging across the remaining stitches. By the end, you will be left with only 1 stitch — no binding off!
Edging row 1A [WS]: With MC, (brp1, sl1yo) twice, brp1. Let yarn drop (no need to wrap a stitch). Do not turn work. Slide these 5 stitches back across needle.
Edging row 1B [WS]: With CC, (sl1yo, brk1) twice, sl1yo, W&T.
Edging row 2A [RS]: With MC, brRsldec, sl1yo, brk1. 2 sts decreased. Do not turn work. Slide stitches back across needle.
Edging row 2B [RS]: With CC, sl1yo, brp1, sl1yo. Turn work.
Repeat Edging rows 1A-2B until 5 sts remain.
Ending section:
Ending row 1A [WS]: With MC, (brp1, sl1yo) twice, brp1. Do not turn work. Slide stitches back across needle.
Ending row 1B [WS]: With CC, (sl1yo, brk1) twice, sl1yo. Break CC, leaving a 6 inch/15 cm tail for weaving in. Turn work.
Ending row 2 [RS]: With MC, 4st br dec. 1 st rems. Break MC yarn, leaving a 6 inch/15 cm tail for weaving in, and draw tail through the remaining st.
FINISHING
Weave in ends. Wash shawl gently and lay flat to dry; you can choose to stretch the shawl and pin out the points firmly, or just pat it lightly into shape.

ABOUT THE DESIGNER
 Anne Blayney is a conference planner in Kitchener, Canada, where she lives with her husband and posts far too many Instagram pictures of her dog. She learned to knit from Knitty Editor Amy's book Knit Wit back in the early days of Knitty, so being published here feels like her knitting has come full circle.
See more of her work on Ravelry.
Pattern & images © 2023 Anne Blayney