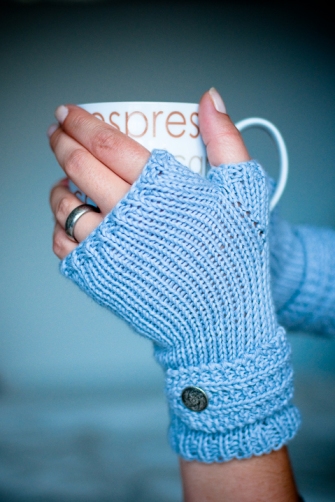
You will need:
50 grams d.k yarn
4 mm straight needles
2 small stitch holders
darning needle
2 decorative buttons
stitch markers
Size – small (medium)
Tension/Gauge – 4” x 4” 24 sts & 28 rows in stocking stitch
Abbreviations
k – knit p – purl st – stitches rs – right side of work ws – wrong side of work sl1, k1, psso – slip the next stitch knitwise to right needle, knit following stitch, pass slipped stitch over the previously knitted stitch k2tog – knit the next two stitches together st st – stocking stitch, knit on right side, purl on wrong side m1 inc – make 1 increase, with right needle pick up thread between stitches & place on left needle then knit into back loop pm – place marker
Directions
Mittens (make 2)
cast on 35 (39) stitches using the long tail cast on method.
row 1 – k1, p1 repeat til end of row.
row 2 – p1, k1 repeat til end of row.
these two rows form 1 x 1 ribbing, continue in 1 x1 rib until piece measures 2 cm ending with a ws row.
next row – k1, sl1, k1, psso, k10 (12), sl1, k1, psso, k5, k2tog, k10 (12), k2tog, k1.
next row – purl.
next row – knit.
these two rows form stocking stitch (st st). continue in st st until piece measures 5.5 (6) cm ending with a ws row.
Shaping:
next row – m1 inc at each end of this & following alternate row [35 (39) st]
continue in st st until piece measures 10 (10.5) cm ending with a ws row.
Start thumb shaping:
next row – k17 (19) st , pm, m1 inc, k1, m1 inc, pm, k to end. continue in pattern increasing one st after fisrt marker & a second st
before last marker on every knit row until 13 (15) st between markers.
next row – p to marker, place 13 (15) st on st holder, purl to end.
work st st for another 4 cm ending in a ws row.
work 3 rows in 1 x 1 rib.
bind off in pattern.
place st from holder on needle & work 2 rows in 1 x 1 rib.
bind off in pattern.
Wrist bands (make 2)
cast on 10 st.
knit 1 row.
next row – sl1, k2, p1, k2, p1, k3.
*next row – sl1, k to end.
next row – sl1, k2, p1, k2, p1, k3**
Start buttonhole:
next row – sl1, k3, bind off 2 st, k3.
next row – sl1, k2, p1, cast on 2 st, k the 2 cast on sts , p1, k3.
repeat from * to ** until piece measures 14 (14.5) cm.
bind off.
Finishing up:
sew up thumb seams. pin wrist bands into place & sew up side seams at the same time sewing wrist bands into seam as well. attatch buttons. block as ball band dictates.
enjoy your new mitts!
Copyright to craftylittlesewnsew 2010. Please feel free to use this pattern for personal or charity use. Please do not use for making profit or selling/publishing as your own. Please link back if you would like to share this pattern.
If you notice any mistakes or have any questions please let me know by leaving a comment – thanks x

Ooh they’re really pretty. I particularly like the ‘button band’ 😀 Definitely the next project on my list after this seemingly never-ending cardie!
These are absolutely gorgeous. Have you considered selling them in your etsy shop? I’d love to make them myself, but haven’t developed the skill to do so!
Thanks for your lovely comments! 🙂 & yes the plan is to make some up to sell in my etsy shop hopefully in time for autumn/winter – its on the big list!!! if only there were more hours in the day…& more coffee 😛
So I love these and got as far as the button band. I feel like there is a problem here. I did not in the order that it says. Should the star repeats be before the start button hole? If you do it after the pattern is off. There are more stitches in the pattern than on the needle? Please clarify.
Thanks.
Athena
Hi Im glad you like them & sorry you are having trouble with the band. The band starts from the button hole end & yes the repeats are for after the button hole. I am not sure why your stitch count is off but I did notice when I just knit one myself that you have to remember to put the yarn to the back after the P1 but before the knitwise cast on that may be where the extra stitch is coming from?
I hope this helps:) thanks, Sian
[…] source […]
one of my favourite knitting patterns ever