Knitting & Crochet Project Organization

There are so many ways to organize knitting and crochet projects. I have set up so many different ‘systems’ that I have most likely lost track of the amount of times that I have reorganized my yarny projects.

Thankfully, there are a few sites that offer advice for organizing knotty projects, supplies, and give advice for how to make the most of our crafting time.

A few sites I have found with helpful information include:

With all of that helpful information, I was not able to find exactly what I was looking for the help me organize my projects. I wanted a printable list to help me organize the patterns I wanted to knit, and to write down yardage needs and if I did have the yarn for the project.

Below I have shared exactly that. So, feel free to print and share this PDF to help you in your project organization. Just click on the link below to download.

Folded Potholders Using Bits

What is this? Two new posts. Who is behind this?

Turns out it’s me, needing an outlet.

I’ve been doing lots of sorting and organizing this year, and trying to keep myself occupied/distracted. 2020 has been a beast of a year between COVID-19, social injustice finally being addressed/hopefully being fixed, politics are a nightmare, the list goes on and on and on and on. Every morning I just tell myself ‘be kind’. If all I can do in my days is be kind right now, I feel like I’m doing something.

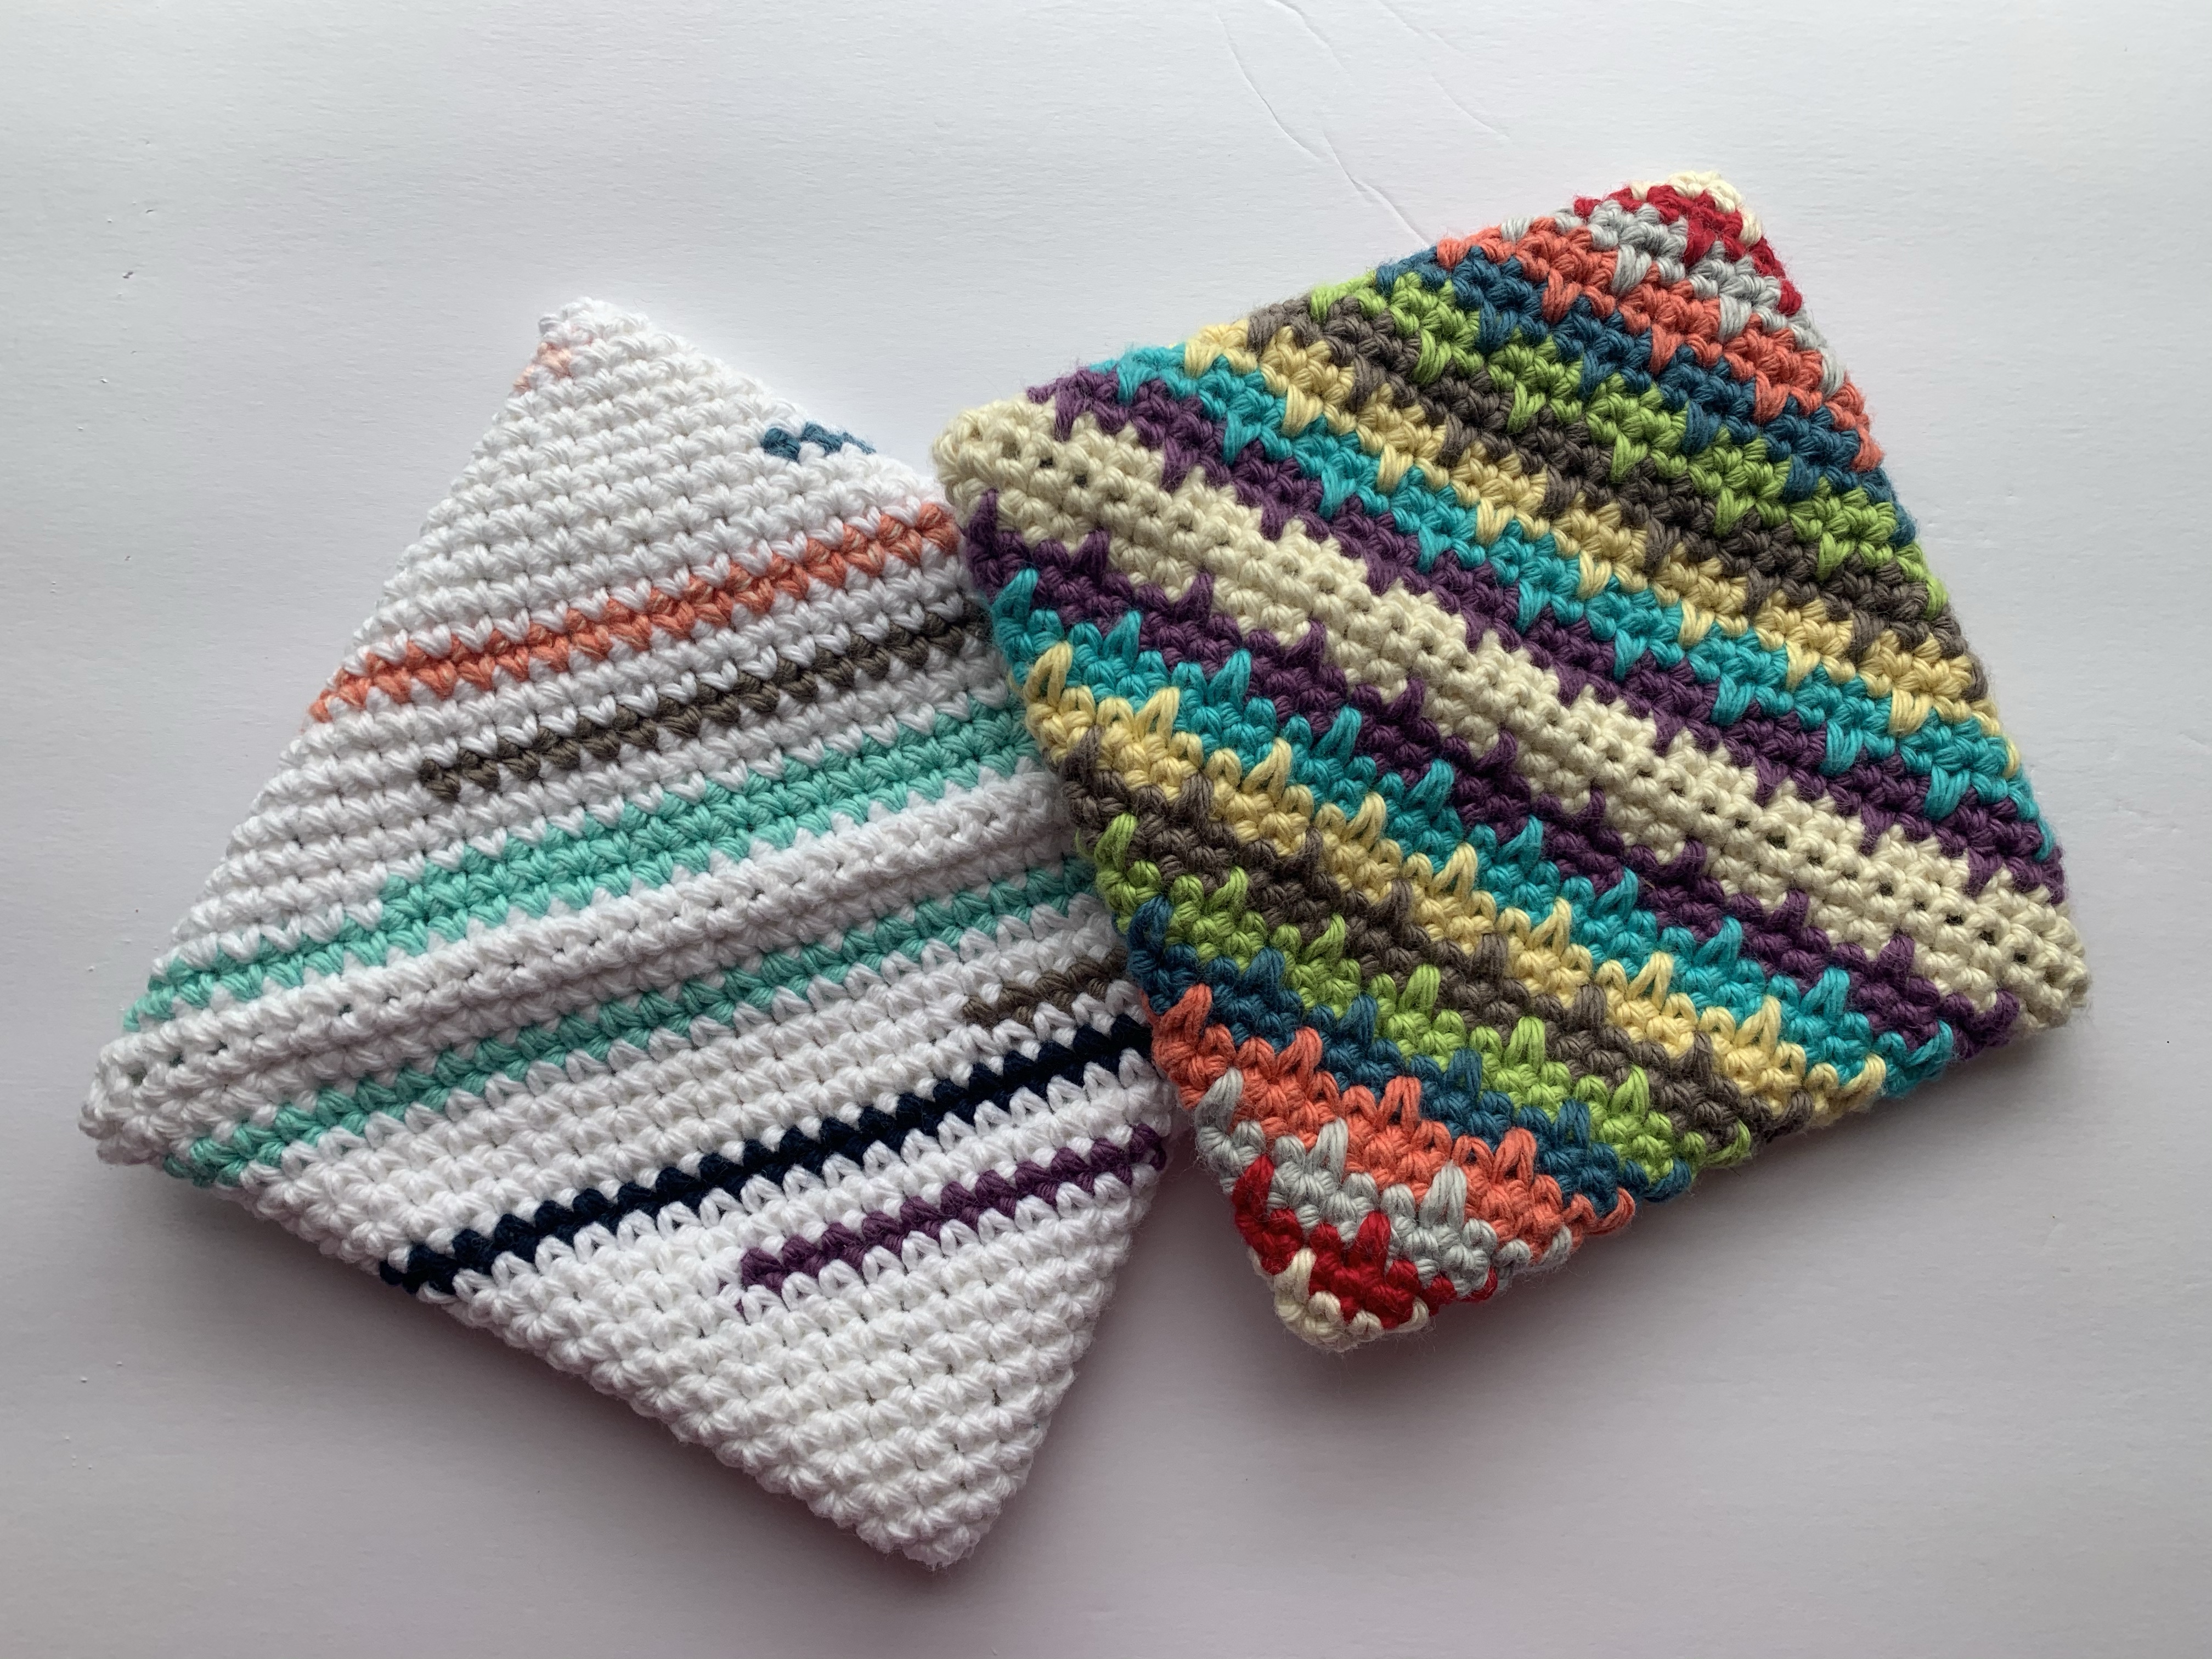
So, if you were thinking ‘I want to make so-and-so something to brighten their day’ one of or a pair of these potholders are super quick and easy.

This pattern is seriously nothing new, I’m not taking credit for the pattern, just sharing with you my numbers and a little twist.

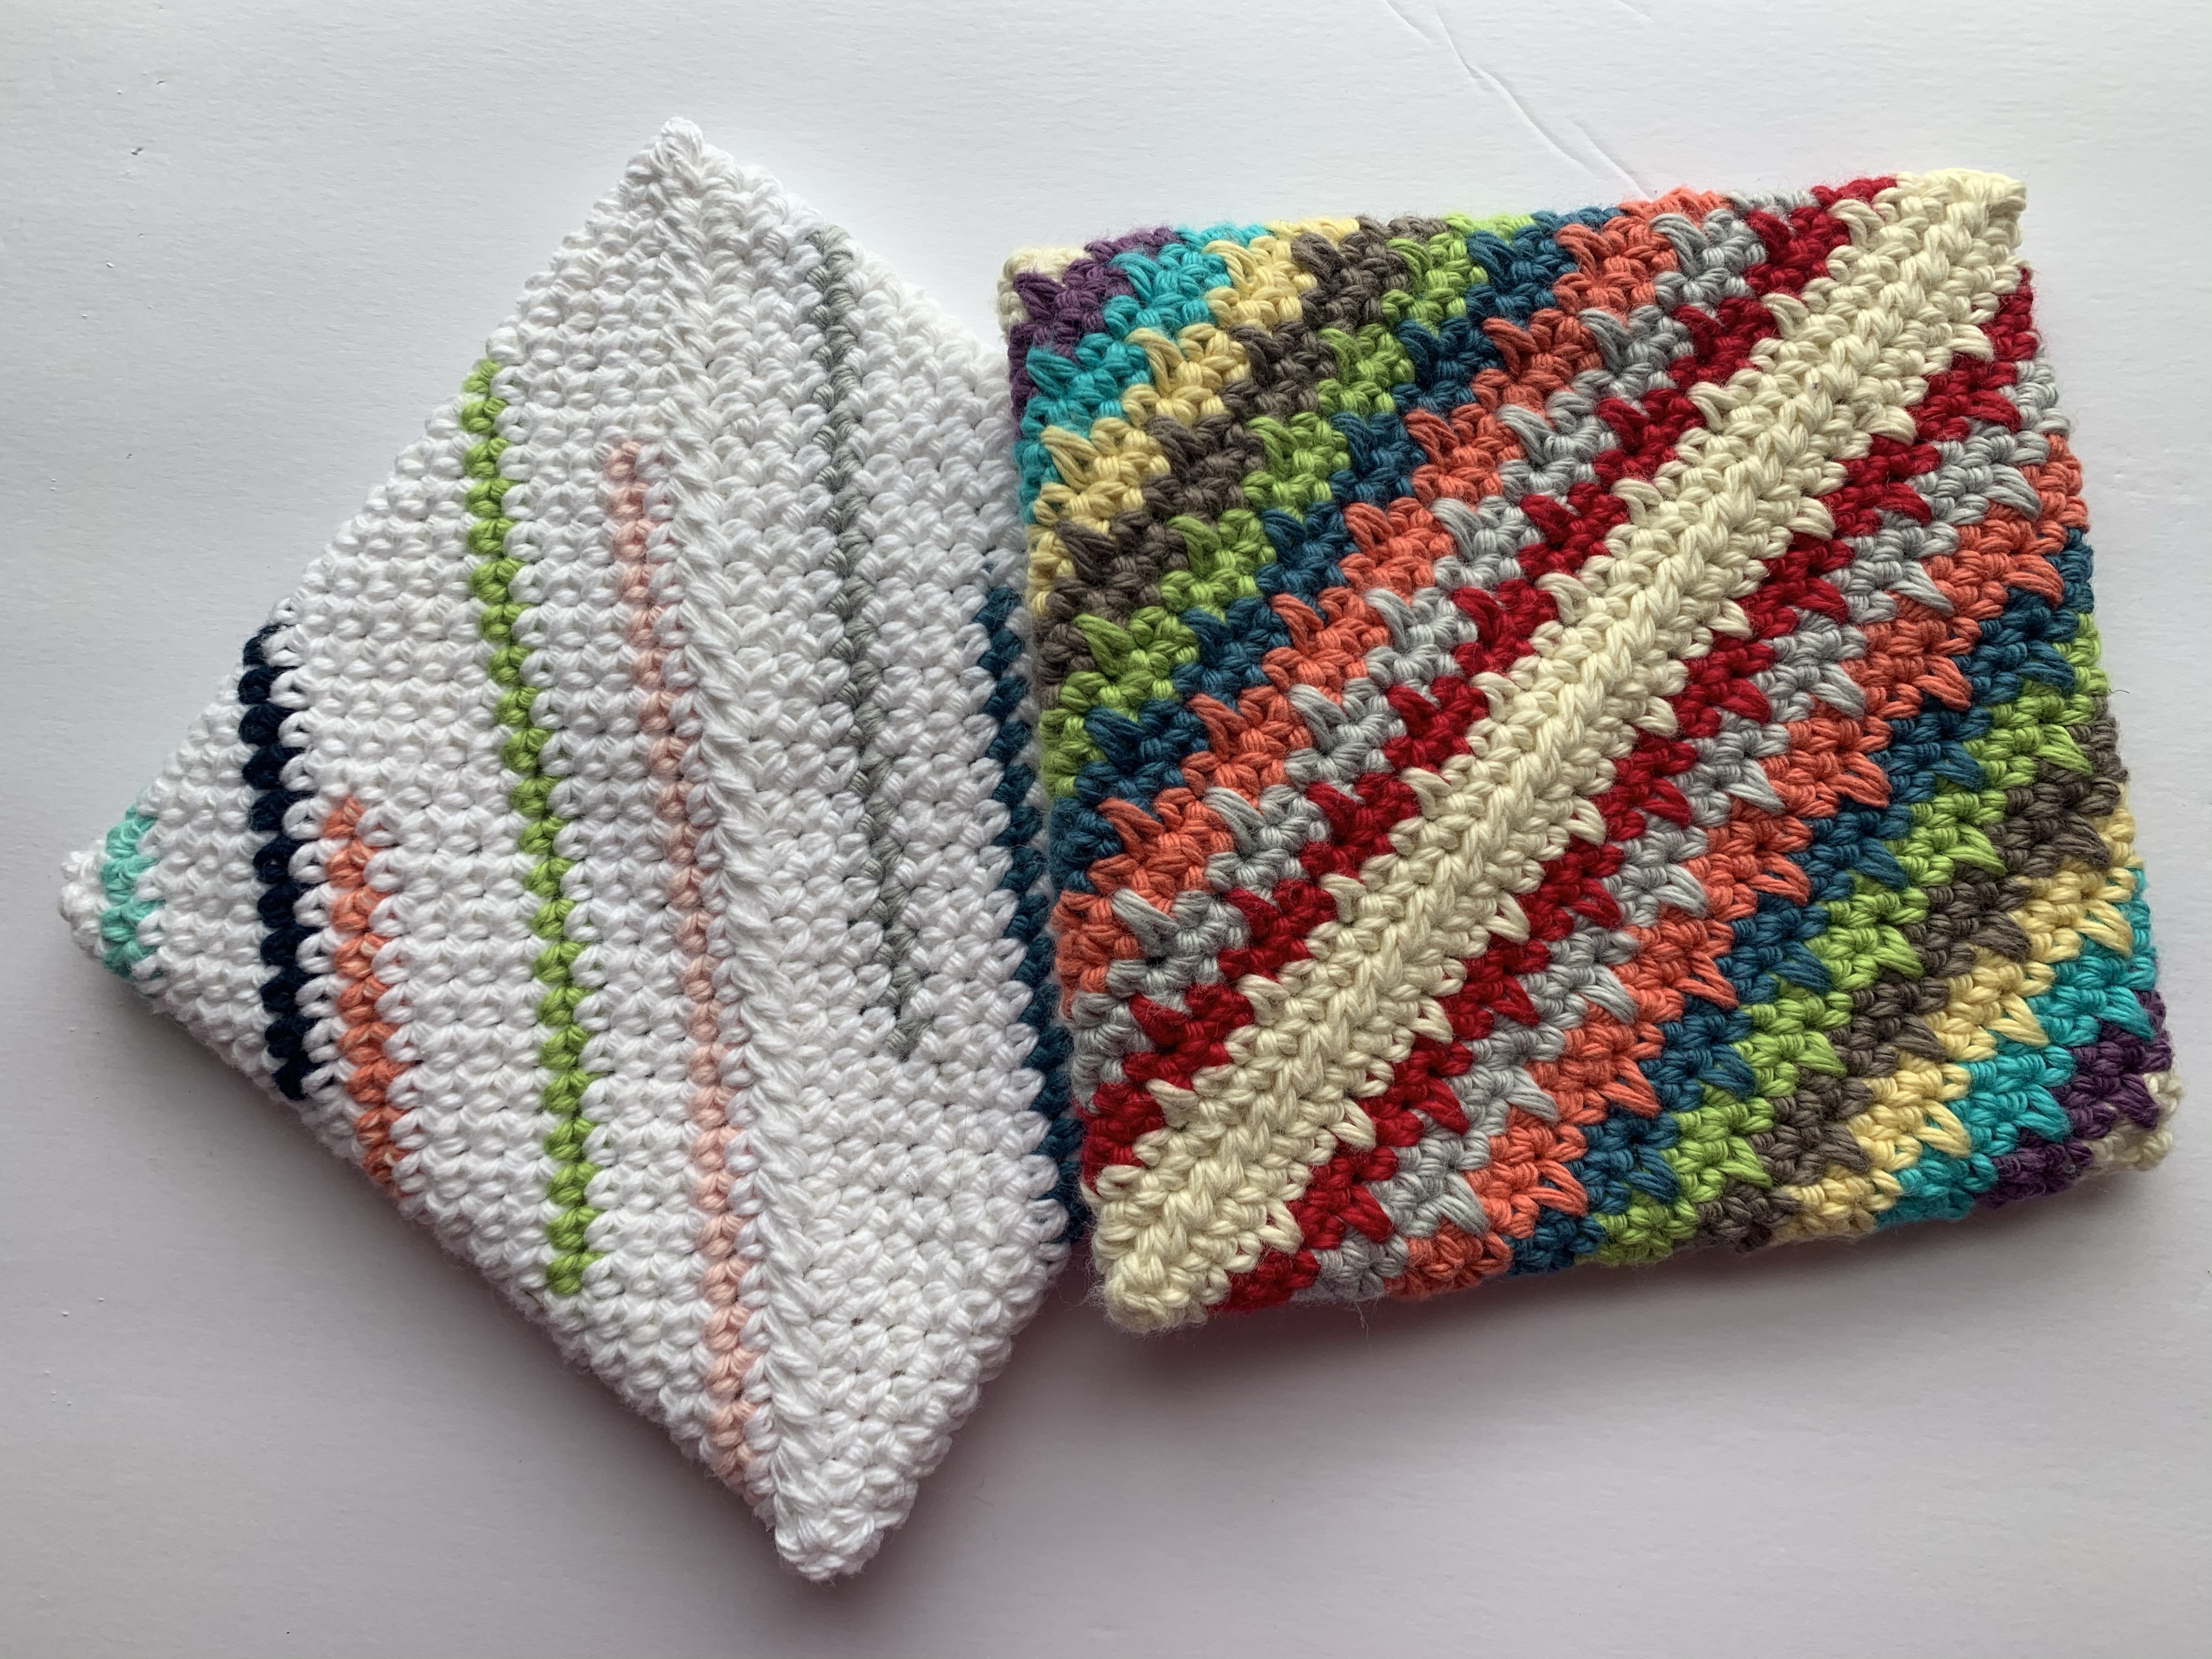
Using 100% cotton worsted weight yarn and a size US G hook, I chain 36 as the start. Then you simply do 1 single crochet in each stitch down your chain, and 1 single crochet in each chain stitch back. You want to make sure you have 72 stitches in your first round. Continue doing single crochet around and around, do not chain or turn your work between rows.

For the mostly cream potholder, I used those super tiny scraps that you feel like you might not have any use for, all the way down to only 20 inches of yarn or so, and I did 20 rounds. Here’s my best tip to change color without any jog or funky line in crochet: do all the steps in your stitch (whatever stitch it is) until the very last yarn over and pull loop through, then you pick up the new color and use that to do the final yarn over and pull through. So, in this case, since you’re doing single crochet, you insert hook and pull through current color, then yarn over the new color and pull that through both loops. Please do NOT worry about weaving in or crocheting over the tails, just do a good square knot and trim ends to no shorter that an inch and a half. These ends will be inside the middle of the potholder, and no one will see them.

For the stipey potholder, I incorporated a basic extended single crochet (esc) stitch in the first round of each color followed by two rounds of plain single crochet, and I did 22 rounds. The extended stitch does make your rows a tiny bit shorter over the whole pattern. To do the extended single crochet you simply drop down one row to insert the hook and pull through the first loop, then continue on with the remainder of the stitch. When switching colors in this potholder, I wanted to somewhat hide the color change along the folded edge. To do that, I changed colors the stitch before the extended single single crochet stitch, so the color changes a few stitches past what would be the end of row. For my extended crochet rows, the repeat is: 1 esc, 2 sc. To make things feel symmetrical I placed the extended single crochet stitch of the next section in the middle of the two extended stitches from the previous section. You could easily move it to the either stack them or have it appear to cascade by putting them closer to right by one stitch.

Finishing these off is super easy. On your final round, you will end your crochet in the middle of the first side when you lay it down flat. That will become the corner of the ‘top’ of the potholder, these really don’t have a true top or bottom. Then you ladder stitch both sides to the last together all the way to the other corner, weave in, and your done.

I would like to add a note about yarn. The Lily Sugar N Cream yarn works great for these, so does Crafter’s Secret, I Love This Cotton, and even Cotton Supreme. The first two I listed are a bit more firm and can be tougher to work with for those with arthritis or sensitivity to having to push through yarn. The key is to choose 100% cotton yarn or it will melt from the heat of the pans, yes melt (super sad).

There are lots of videos/patterns out there for this style of potholder, just google or search on YouTube ‘folded potholder’ if you need a good visual.

Stay safe and please be kind.

Scrappy Rectangles Quilt

Yes, it’s been quite a while since I’ve utilized this space. Life happened, and it keeps happening. Children are born, pandemics happen, you know, all the exciting stuff.

During this hiatus, I joined again with the Serenity Circle of the Do Good Stitches quilting bee. Thankfully my group only makes a quilt every other month, so the stress is really nonexistent. We get the joy of creating a few blocks every so often, mailing them along, and seeing a beautiful quilt that will be donated to someone who just needs a loving hug.

(Scrappy Rectangle Quilt 2017)

For me, being a part of this group presents a few moments to be creative in a carefree way. Not having the pressure of making the entire quilt is quite wonderful, and knowing I’m not contributing to a few blocks being added to my WIP pile or box of single blocks is also very satisfying. My moments of creativity get to be just that, and it’s perfect.

My months this year were March/April, which essentially means that I chose the block & color palette for that quilt, and I would be responsible for finishing and donating said quilt.

(Color Palette for 2020 Quilt)

Who has jelly roll scraps (or 2 1/2″ wide strips) leftover from cutting remnants or unused from other projects? This block uses exactly that, so feel free to use a fabric line or go as scrappy as your heart desires.

Download the instructions as a one page PDF here:

Please share your creations and tag #scrappyrectanglequilt.

Thirty One Quilts

I started selling Thirty One bags almost 4 years ago now. I love it! Love the company, products, events, I could go on and on.

With each new catalog, we consultants have the opportunity to get fabric swatches of the cute new fabrics. As a quilter/crafter I’ve always thought it would be fun to make a quilt with these swatches as a memento of my time with the company.

Of course, I wasn’t the only one with this idea. A friend of mine who also used to be a Thirty One consultant asked me to make a quilt for her daughter, thus the first quilt came about.

20150603_192523

I recently had the opportunity to make more swatch quilts, and here’s one I finished just a few months ago.

DSC_0760

And now, I on to my third quilt. It’s so fun to see these prints and swatches turn into come cute and useful! (Sorry, awful basement photo)

20160307_095027

Make All the Minis!

Holy summer batman!

Yes, I’m alive. And, I did have a pretty good summer too.

I had some good waves of sewing/crafting amid all the chaos. Err, I mean, amid the trips, camps, pool days, picnic days, etc.

As you all know, I absolutely love making Sew Together Bags. And, in case you didn’t know, there’s a wonderful little spreadsheet put together by Occasional Piece Quilt.com to calculate the Sew Together Bag pattern into a mini!

DSC_0720

SAY WHAT?!?! Yes ma’am!

Now, why did I need to make 8 of them you say??

DSC_0724

Well, why not? right?

Just kidding, I made 8 so I could share in the mini goodness.

DSC_0727

You see, every fall I get the privilege to journey up to Lancaster, PA for a little Mayhem in Paradise with seven other awesome ladies. So, naturally I had to make one for each of them. Can you guess which one is mine?

DSC_0729

I decided to do these production line style, and man it was fun!

Fun, up until the hand stitching of the binding down part. Maybe it’s because that part always takes the longest, that and the cutting part.

DSC_0731

So, now you want to go make some mini Sew Together bags right??

I think I may have a little stack of fabric patiently waiting to be a part of my next production line.

Just maybe. *grin*

Aztec Granny Stripe Blanket

I think I almost forgot that I have a blog… geez.

Between everyone passing around colds in January & February, gearing up for Spring Break, Spring Break itself, and now it seems everyone has a field trip/field day that needs getting ready for. The joys of family life, never a dull moment. And, of course about half of my kids have woken up with feet two sizes bigger, or a few inches taller so lots of sorting clothes and shopping for shoes has been going down lately too.

Luckily I have some time to crochet while waiting at school pick ups and activities, down time yes!

DSC_0666_1__medium2

I just finished this granny stripe blanket, oh I love it! Granny crochet in any form is probably my favorite crochet goodness EVER.

The stripes are all random and crazy like, because I can only make so many blankets with a ‘must stick to it’ pattern. I guess I need to be a little rebellious sometimes.

I used a total of 6 skeins of yarn (I did buy a skein of Aran, just needed it) and 6 balls of yarn. There were 5 balls left from the skeins, I consider it a ball if it’s smaller than a softball and larger that a golf ball. Anything larger I still consider a skein and anything smaller I consider scrap (not enough to really make anything)

The final measurements are: 40in by 50in

If you’re interested, this blanket is listed in my Etsy shop.

AND, my new stats for #UseAllTheYarn2015 are:

  • 104 Skeins (down 5.4%)
  • 60 balls (down 1.7%)
  • 7 large cones (no change)

Yay for progress using my stash! I have pulled to start my next project already too, an African flower throw it is!

Use All The Yarn 2015

Yes, I know it’s February but I just had to start this even though it’s not the real beginning of the year.

I have a question for all you crocheters/knitters out there. How many skeins of yarn do you have right now?

wpid-20150210_110810.jpg

Don’t lie, be honest. (That basket is full, and it’s three feet wide, two feet high, and two feet deep)

Me? How many do I have??

As of right now I have:

109 skeins, 61 balls, and 7 large cones of yarn. And a few handspuns, but I won’t count those here. They’re from my grandma, little different see:

wpid-20150210_112344.jpg

You read that right.

I had two different ladies give me yarn at about the same time almost two years ago. I put it away and just knew I would be making things with them gradually and the stash would dwindle.

Even though I have made a few things, I still have that much yarn. (Just imagine how much there really was to start….) I would like to add that some of these yarns are not what I would necessarily choose to buy, but I’ll be more than happy to work with what I have!

So, enter #UseAllTheYarn2015!!!

wpid-photogrid_1423584798010.jpg

Use the yarn you’re stashing, share on instagram with the hastag #usealltheyarn2015, and I’m thinking there will be random giveaways throughout the year for those playing along!

I’ll be keeping track of how much I use of my stash throughout the year, and I’d be glad to have you join along!

Right now I’m on my second project in this endeavor.

wpid-20150209_111938.jpg

Since I used 4 skeins (with only one small ball left) on the first one, here’s my current stats:

Used:

4 skeins

Have Remaining:

105 skeins, 62 balls, 7 cones

Here’s to using what we have and making beautiful things!!

Around the World Blog Hop

I was invited by the amazing Julie of Jolie Maxtin. She’s a good friend I met a few years ago at my very first quilt retreat. The woman is a magical quilter and the fastest binder I know!

My apologies for posting this two weeks late, the flu hit two in my household (thankfully I made it through unscathed) so not much room for blogging/crafting.

What am I working on?

I’ll be honest with this one, I have a long list of what I’m working on right now. I think I have crafting ADD….

There are some lofty goals for the beginning of this year for me, and tackling my WIPs is definitely one of them. Other than that, there are quite a few fun things I’m working on.

I’m trying to wrap up a surprise ROY G BIV project:

wpid-20150126_120642.jpg

And, I’ve been turning my postage stamp 9 patches that I was doing for the #scrappypostagestampqal on Instagram into 16 patches. I think joining the larger ones will be easier.

wpid-20150126_120547.jpg

There is a wonderful pile of Churn Dasher blocks, from my first time being the Queen Bee in a quilting bee, that I need to add just a few to that will hopefully make their way to a finished quilt soon.

Also, this month I’m the Quilter for the Promise Circle of do.good.stitches quilting bee on Flickr. Here are the blocks I have received so far:

wpid-20150126_121635.jpg

Why do I create?

The age old question, why? Simply put, I create because I feel I need to. I’ve always been driven to make things, anything really. I learned to crochet at 5, and that was only the beginning. I’ve always been intrigued with the process of making things. All through school, the only part about history class I ever really payed attention to were the parts about how people used to make things, or the ways that people used to garden. One of my favorite school memories was making candles by dipping in I believe 5th grade. I like things simple, and I love the process! That doesn’t mean I don’t like a project that’s a challenge (those are great too).

I enjoy every part of creating something, from selecting materials and patterns to every stitch involved (not so much the stitches that sometimes have to come out though…). Being able to give someone a gift that I have made especially for them is such a blessing to me.

I’m not forwarding to any other bloggers, but would love to leave this blog hop open to anyone who would like to participate!

Jacob’s Ladder Block

This is a quick tutorial for a vintage block with lots of possibilities!

wpid-20150103_083350.jpg

These blocks finish at 8 inches (AKA- jellyroll scrap friendly). Also, I made more than one block at a time so that I could switch around my HSTs (half square tringles) blocks to get a scrappy look.


For each block you will need:

4 – 2 1/2 in squares color A (warm colors in photo)

4 – 2 1/2 in squares background (low volume in photo)

2 – 5 1/2 in squares one color B and one background (color B is cool color)

wpid-20141231_111244.jpg

First, I made the HSTs. To do this, draw a line diagonally across the back of the background (low volume) square that is 5 1/2 in. Then, sew 1/4 in away along both sides of the line you just drew.

wpid-20141231_111540.jpg

Then, cut along the line, and press the HSTs towards the dark fabric. Trim each HST to 4 1/2 in square.

Next, make two 4 square blocks using the 2 1/2 in squares. Press. Here’s what things should look like:

wpid-20141231_120851.jpg

Next, just sew these 4 smaller blocks together to get your finished Jacob’s Ladder block.

wpid-20141231_122328.jpg

This is a great block to burn through different sized scraps, so go ahead and ATTACK your scraps!


To make a larger block, simply cut the pieces larger using:

4 – 3 1/2 in squares color A

4 – 3 1/2 in squares background

2 – 7 1/2 in squares, one color B and one background.

Using the same instructions as above you will have a finished 12 in block.