Pattern: BQ Baby Tee
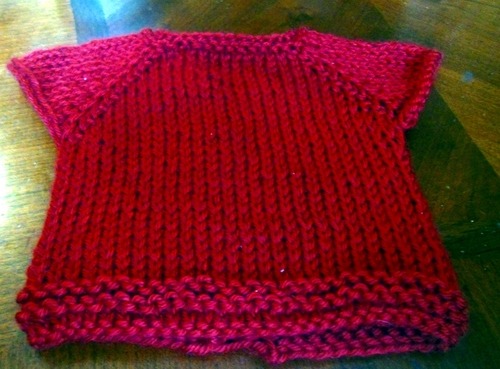
The BQ in this pattern’s name is for Bev Qualheim. I wanted a knitted version of her Diaper Shirt and couldn’t find one that made sense to me and/or wasn’t done in a super-small gauge and/or was for a newborn. I finally found another pattern that, while very far from what I wanted, at least made the sleeve shaping clear. So I was able to come up with this. It is roughly the same size as one of her shirts.
Please bear with me when it comes to this pattern. Crochet patterns I’ve been writing for years; knit ones are still quite new to me. There will be many, many parenthetical statements from me trying to explain this. I’m going to post this to Ravelry, so if you have any questions about the pattern, please send me a message there. It’s absolutely a beginner pattern, though; I have little skill in knitting, so if I can do it you can.
Materials
5 mm needle, 16" circular (12" would work if you had it, but not anything larger)
5 stitch markers, one of which is a different color or style than the others (this isn’t strictly necessary, but will make knitting in the round while doing your increases easier)
2 or 3 oz worsted weight yarn (I’m probably overestimating the amount of yarn needed; I used Caron Simply Soft for the example)
Gauge:4 stitches to the inch (Though, as Elizabeth Zimmerman said, babies come in all sizes.)
Sizing: This shirt will definitely fit a newborn (I’ll show you proof of that come November) and will probably fit up to about three months. Need bigger? Cast on 5 or 10 extra stitches and go up by one stitch in each section but the center, which would increase by 2. Add about a half inch in length for every two sizes (5 sts) you go up.
Instructions
Cast on 40 stitches. (I used long tail cast on. If you know of a stretchier one, use it.)
1)Knit 6 stitches, place marker. Knit 8 stitches, place marker. Knit 12 stitches, place marker. Knit 8 stitches, place marker. Knit final 6 stitches.
2)Knit even, slipping markers.
3)*Knit to within one stitch of marker. Knit into the front & back of this stitch. Slip marker. Knit into the front and back of the next stitch.* Repeat what’s between the stars until you hit the end of the row.
4)Purl even, slipping markers.
You’re going to be increasing 8 stitches every other round, one on each side of your four markers. The first three rows were worked in garter stitch to prevent rolling, but you can certainly purl row 2 as well & go back and add some sort of trim when you’re done.
Repeat rows 3 & 4 until you have just barely enough stitches to go around the needle. (This was after row 9 for me.) Join to work in the round, placing your mismatched marker to mark the beginning/end of the round.
Continue as before, increasing your 8 stitches every other round, until the work measures 3" from the cast-on edge.
This next round forms the sleeves; you’ll be removing the markers as you go:
Knit to first stitch marker. Bind off all stitches between the first and second markers. Knit all stitches between the second and third markers. Bind off all stitches between the third and fourth markers. Knit remaining stitches in the round.
Knit to the last stitch before first section of bound off stitches. (It’ll be obvious.) Knit together this stitch and the next. Knit to the last stitch before the second section of bound off stitches. Knit together this stitch and the next. Knit the remaining stitches in the round.
Continue knitting in stockinette until piece measures 7" from the neck edge. (Obviously, you can make it a little longer if you want.)
Knit ½" more in garter stitch (or some other pattern to prevent rolling. Or not, & just let it roll). Bind off using the loosest bind-off you know.
Now, to address the inch or so you have in the back. Three choices here: 1) Consider it a design feature (I went with this option) that will help you get the shirt over baby’s head with little fuss. 2) Sew up the stockinette part, leaving the garter stitch part open to ensure you can get it over baby’s head. 3) Knit or crochet some sort of button placket to suit you.
Variations:
Obviously, quite a few are possible. You can vary the pattern at the very top and bottom (seed stitch, maybe?). Rather than plain stockinette you can work the bottom part, after you form the sleeves, in some sort of lace pattern. Instead of binding off the sleeves, you can slip their stitches onto waste yarn and go back later and add longer sleeves. You can work the whole thing flat, though for the life of me I don’t know why you would do that. You can add stitches after forming the sleeves and make the bottom part longer for a dress. You can not add stitches (or add only a few), knit it very very long, and make a baby nightgown.
