Sunday, October 12, 2014

Cabled Arm Warmers

All right, here's my pattern for the Claire Mitts! They ended up being more form fitting than the pictures of Claire's but I know they'll also stretch out a little bit with wear. 

If you want to make sure they're looser and slouchier, do the cable piece a bit longer and don't slip the first stitch of each row. This will give you more little holes to pick up more stitches around the edge.

OK, here we go! As always, please let me know if anything needs to be clarified.

Click pictures to embiggen

Size 8 needles
Worsted weight yarn (Mine is Malabrigo Worsted in Marron Oscuro)

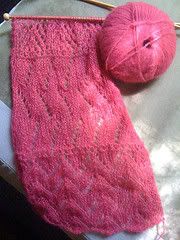
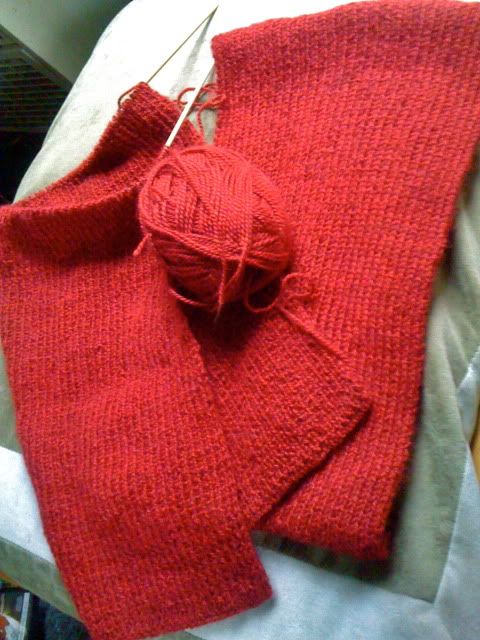
The first step is to create the cabled piece that will wrap around the fingers.

Cast on 19 and set up with the following two rows:

K3, p2, k9, p2, k3
P3, k2, p9, k2, p3

Then begin pattern. I slip the first stitch of every row to smooth out the edge but again, if you want it to be looser and slouchier around the arm, don't slip the fist stitch so you have more little holes to pick up stitches with.

*K3, p2, Sl 3 sts to cn and hold to front, k3, k3 from cn, k3, p2, k3

P3, k2, p9, k2, p3

K3, p2, k9, p2, k3

P3, k2, p9, k2, p3

K3, p2, k3, Sl 3 sts to cn and hold to back, k3, k3 from cn, p2, k3

P3, k2, p9, k2, p3

K3, p2, k9, p2, k3

P3, k2, p9, k2, p3*

Repeat from * to * until you reach your desired length

I stopped at 9 inches so it would wrap loosely around the hand and be able to slip down to the wrist easily.

Join the ends to create a loop. I used Kitchener stitch: http://www.knitty.com/ISSUEsummer04/FEATtheresasum04.html

But you can also just cast off and sew the two ends together.


Then put the loop on your hand with the seam on the underside (palm side) and mark the point where your thumb hits. This is where you'll start picking up stitches and knitting along the edge. (Remember, when doing the second mitt, to mark this spot on your other hand so that you have Left and Right mitts with the seams hidden on the palm sides.)


Because the length of your loop might be different from mine, the number of stitches you'll pick up along the edge might be different as well. I picked up 26.

http://www.knittinghelp.com/video/play/pick-up-and-knit-stitches

http://www.knitty.com/ISSUEwinter04/FEATwin04TT.html


Next, you'll be creating a thumb hole down from the marker. You started picking up stitches at the marker because you won't be knitting in the round right away. For approx 2 inches you'll be knitting and purling back and forth in stockinette stitch, slipping the first stitch on every row.

After those two inches, (mine was 12 rows) rejoin and knit in the round until it's as long as you want it to be. I knit 5 inches after the rejoin.


Once you get to the length you want, do three rounds of purl and then a loose cast off and you're done! Remember, when you do the second glove, be sure to check the placement of the seam under the fingers on your other hand so that you have distinct Left and Right gloves.


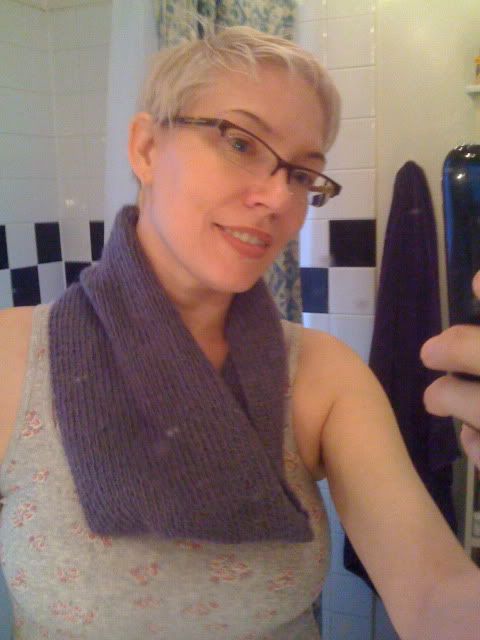
As much as I love the grey ones I did before, I think I'm going to be wearing these every day this winter, they're SO comfortable and warm.

Let me know how these directions are and feel free to ask any questions either in the comments here or on Facebook / Ravelry. Good luck, Stitchenachs! 

Friday, October 10, 2014

Fitted fingerless Gloves Wrapped with a Cable

Fingerless gloves! You can never have too many, and with the season turning right as Outlander was flaunting so much gorgeous knitting at us, I had to make some.

I set out to make a pair of fitted fingerless gloves with a band of cabling going around the fingers. After searching for a good recipe and not finding any, I figured what the hell... I'll figure it out on my own.

Click pictures to embiggen them

I've written out a couple of patterns here and there but I'm not a pro so if anything is confusing, please ask and I'll explain the best I can. Knittinghelp.com and Knitty.com are also fantastic resources if you have questions about how to do something. I also did this to fit my hands, which are long, so take that into account when making yours and tweak as necessary.

I'm using a grey tweed Alpaca fingering weight yarn that I've doubled so if you're using a DK weight, you should get similar numbers to mine. On #4 dpn's, I swatched and got 5 1/2 sts and 7 rows per inch in stockinette.  This pattern will also work just as well in a Sock or Sport weight all the way up to Worsted. In fact, I'll also be making a variation in Worsted that's more of a slouchy sleeve, a la Claire's, and posting soon.

Glossary:

k = knit
p = purl
sl = slip
cn = cable needle
m1 = make 1
st = stitch
ssk = slip, slip, knit (left leaning decrease)
k2t = knit two together (right leaning decrease)
sm = slip marker

The first thing to make is the cable piece that will go around your fingers. I figured a basic 4 Stitch Cable with a couple of stitches along the sides for edging would be good, but there's a pattern in Vogue Knitting's cable collection that has a great little addition I've used in the past and really liked. Instead of just 4 stitches that you cable back and forth, this adds a couple of extra knit stitches on each end to make the cables lay flatter and wider, which is great for around a hand.

So, adapting this pattern (Peek-a-boo, minus the peek-a-boo part) I came up with the following. Those two extra stitches I mentioned are highlighted in red so you can see where they are, and I slipped every first stitch but that's a personal preference and you don't have to.

Cast on 14

Row 1 (RS) K2, p10, k2
Row 2 P2, k10, p2

Then begin pattern:

*K2, p2, Sl 2 sts to cn and hold to front, k2, k2 from cn, k2, p2, k2

P2, k2, p6, k2, p2

K2, p2, k2, Sl 2 sts to cn and hold to back, k2, k2 from cn, p2, k2

P2, k2, p6, k2, p2 *

Repeat from * to * until you reach your desired length


Your length is what will fit comfortably around the base of your fingers. Mine worked well at 7".

Either cast off and sew the ends together or pick up stitches on your cast on edge and graft together.

My favorite guide to grafting and I pull it up EVERY time I do it:

http://www.knitty.com/ISSUEsummer04/FEATtheresasum04.html

I made the second one right away, while I was still in the cabling groove, and blocked them so they'd be flat and I could figure out the rest of the pattern more easily. You don't have to but I highly recommend blocking your cable work so you can see all of your beautiful work better. The rest of these gloves don't necessarily need to be blocked so just blocking that one part worked out really well.

So now you have a little cable circle and the next step is to pick up and knit stitches around one of the edges.

A couple of fantastic stitch picking up guides:

http://www.knitty.com/ISSUEwinter04/FEATwin04TT.html

http://www.knittinghelp.com/video/play/pick-up-and-knit-stitches

Another thing to take into consideration is where the seam is on your little circle. No matter how good you are at grafting, the cable pattern will be a little wonky in that one spot so you want to hide that on the underside of your fingers.


I then put a marker on the spot directly above my thumb and that was the beginning of my round so I started picking up from there. Because I had slipped my first stitches, I was picking up one stitch for every two rows and came out with 28th stitches.


Starting at the marker, you'll be knitting in the round and doing increases at the marker, above the thumb. So that first round should be:

*k1, m1, k around to 1 stitch before marker, m1, k1

next row: k*

Repeat those two rows three times or until it's the correct length to be hitting the base of your thumb.


At this point, you're going to stop knitting in the round and begin knitting back and forth and increasing, to create the thumb hole and the body of the hand. Again, I slip every first stitch to create a nice, clean edge.

Row 1: Sl1, m1, k to the end
Row 2: Sl1, m1, p to the end

Repeat those two rows until it's long enough to meet again at the bottom of your thumb. When I counted the number of stitches I had at that point, I had increased to 46.


Make sure you're ending with a knit row and you're going to rejoin and start knitting in the round again, while doing some decreases to shape the wrist.

The decreases will be done below the thumb and on the opposite outside point so I divided the stitches in half, 23 on two needles, with a stitch marker at the end and 23 on the other two, with a stitch marker at the end. I'll write it out but you might want to think about it this way:

On the first row, you'll be doing one decrease right before the outside halfway point and then another right after it, then you'll do one decrease right before the inside halfway point and then another right after it.

Row 1: K to 3 sts before marker, ssk, k1, sm, k1, k2t, k to 3 sts before second marker, ssk, k1, sm, k1, k2t

Row 2: K

Repeat those two rows two more times for a total of three times.

Now, that may be enough of a decrease for you. Try slipping it on and seeing how it looks. If you want to decrease a bit more, stop doing the decreases at the outside point but continue doing the decreases under the thumb. I did three more of those decreases and it was nice and snug.

I placed a marker at that point and then just knit in the round until I had gone 3 inches from that spot.

To finish at the wrist I wanted to echo the top border but, as they'd almost always be hidden up a coat sleeve, felt they didn't need the full cable.

So, once you get to a length you'd like, purl three rows and then knit one row. Then do six rows of a 2x2 Basket Weave stitch.

Row 1: K2, p2 around
Row 2: K2, p2 around
Row 3: P2, k2 around
Row 4: P2, k2 around
Row 5: K2, p2 around
Row 6: K2, p2 around

Then one knit row, three purl rows and a nice, loose cast off (I used Jeny's Super Stretchy Bind Off). Weave in your ends and you're done!


Again I am NOT a pro at writing these things out so I might be assuming things here and there so please ask me if you're confused! It helps me learn how to explain things more clearly. Good luck and please share your finished pieces here, on the Stitchanachs page or on the Ravelry page!

Monday, September 8, 2014

Outlander Cowl


As you may know, I've not really been knitting much lately, as ceramics take up a lot of time and creative energy but also because it's summer so it's been HOT. Wool and heat do not mix, especially for someone who's been craving cool, wet weather for years. Literally.... years.

So it kind of snuck up on me when I was watching the new series, Outlander, and this gorgeous, super chunky cowl burst onto the screen, practically screaming KNIT ME!!!


And who am I to argue with sneaky, super chunky, screaming cowls?

Add to this the fact that we're starting to get some beautiful, cool mornings here in Portland, which is bringing thoughts of cozy autumn evenings to my head...

And then this happened.


Here I am, walking along, minding my own business when Pearl Fiber Arts LEAPS out at me, (I know... lots of sneaking and screaming and leaping in this one,) and I see this in it's front window. 

Click on the picture to embiggen and you'll see close up the unmitigated disaster this wall of yarn was to my knitting willpower. It's..... it's super chunky yarn the likes of which I don't know if I have ever seen. As they don't really have a whole lot of alpaca farms around Los Angeles, (where I've been living for the past umpteen years if you're new here,) that is unsurprising. But now that I'm in Portland, Oregon, the natural fiber sources abooooound. I'm a goner.

So! I got these:


I've looked up these:

http://outlanderevangelist.wordpress.com/2014/09/01/the-outlander-evangelist-knits-again/

https://www.facebook.com/groups/OutlanderPatterns/846542588689843/

http://www.ravelry.com/patterns/library/the-gathering-2

And tomorrow I'm going to get my gigantic skein of yarn.

It's on.

(except I might have to wait a liiiiiiittle bit to start as it's supposed to be in the freaken 80's this whole week and into the next. We'll see...)

When it's in the 70's at least, IT'S ON!

UPDATE 9/9/14: Achievement unlocked:


Where to find me

Just in case you come to this blog to actually find out what I'm doing, let me direct you to the places I'm most often found these days:


and

xoxo
~E

Thursday, June 5, 2014

My first kiln fire

So, at the studio they do communal firings of the kilns, where you pay by the piece, which is what I've been doing up to this point. You have to have a lot of work ready to fill a kiln by yourself!

Well, you start to get your groove on and you can build up a bunch of work that needs to be fired. That's where I found myself in April but I hadn't loaded and fired a kiln in over 10 years so I was really nervous to do it on my own. Luckily, one of the studio managers, Craig, (most likely in the interest of not wanting to see the studio burned down,) helped me out. My first kiln!


Everything on the shelves and getting loaded in. 


24 hours later!


I tried a lot of glaze experiments in this round and a lot of them didn't work out but there were a few awesome pieces and it definitely got me closer to figuring out what direction I want to go in glaze-wise.


I have another kiln reserved for next weekend! A lot of new glaze experiments and my shapes getting better and better. Might I be opening my etsy store soon? We shall see...

Tuesday, February 4, 2014

Full Time in the Studio

A friend on Facebook posted tonight about whether anyone she knew had a blog, and if they had advice on starting one. It was really fun to answer her and remember how fun blogging can be.

Almost a year ago, I posted about my moving to Portland and possibly updating this little blog of mine again but then.... I didn't. You guys! Moving is HARD!!! I went through a lot of ups and downs in the last 9 months, with some really hard downs, but most definitely now on the upswing and I thought it would be nice to do a quick post.

I got a job, I got a supercute little house, I got a great studio to work in. Here are some pictures:

Supercute new little house


Bowls. :)

I'll try not to wait another 9 months to post again.


Saturday, May 11, 2013

Portland

Helloooooo! I won't promise to be on here a bunch more but, let's just say it's on my radar again so you never know.

If I look back at my last post, there are a few projects I've finished since then but, for the most part, I haven't been doing a lot of knitting. I haven't been doing a lot of creative stuff at all, to tell you the truth. This not only sucked but, after a couple of years of it, caused me to take a serious look at my life and decide to make some big changes.

The biggest being that I just moved from Los Angeles, California to Portland, Oregon.


Eeeeeeeeeeeee!

I can't tell you how excited I am to be here and how I think there just may be a whole lotta creative stuff happening in the future. You never know! Only time will tell! But what I do know, in this moment, is that we just got back from Crafty Wonderland and I'm freaken inspired... :)

Sunday, January 2, 2011

Christmas Knitting

So I can finally talk about all of the Christmas knitting I've been doing! I've practically gotten carpel tunnel from it all so it's nice to be able to show it off a bit.

First were the ones I knew would take the longest.... lace.


Mom wanted a scarf like the one I did for my sister last year but in a pink or coral. My sister wanted another in a blue but I couldn't handle doing that same pattern again (lovely though it is) so I found this pattern in "Knitted Lace of Estonia" by Nancy Bush. God, that's a great book for lace. I started them in October, just to be sure I'd get them done and I was so glad I didn't have to rush this stuff.

Then was a series of cowls: Serenity is a wonderful, and wonderfully simple, recipe from my favorite gals over at Unwind. It's a two piece cowl and shawl set and I decided to do a bunch of the cowl parts in different colors for some of my favorite women, with the thought being that I'd save one for myself and do the shawl in whatever color I decided to keep for me. Of course, I decided to go a nice, dark red. The best part of these is that they're all just k1, p1 ribbing so they're a great palate cleanser when the lace starts to make your eyes cross.


Last, but certainly not least, was a series of one of the cutest hats you'll ever see: Capucine. It started when my sister mentioned how much she loved the hat I made her last year but would love one that covered her ears.


This one definitely covers the ears and is just so freaken cute, I not only made one for my sister but I made one for myself, one for my mom and one for Eva. And on my sister's, I rigged snaps so you can take the tassels off the bottom and attach ties.

And now I'm off to tackle miles and miles of k1, p1 and maybe get a new project started. It's going to either be Daybreak or Encompass but both will be on the needles soon. Happy 2011!