Wednesday, February 1, 2017

Super Chunky Knit Infinity Scarf


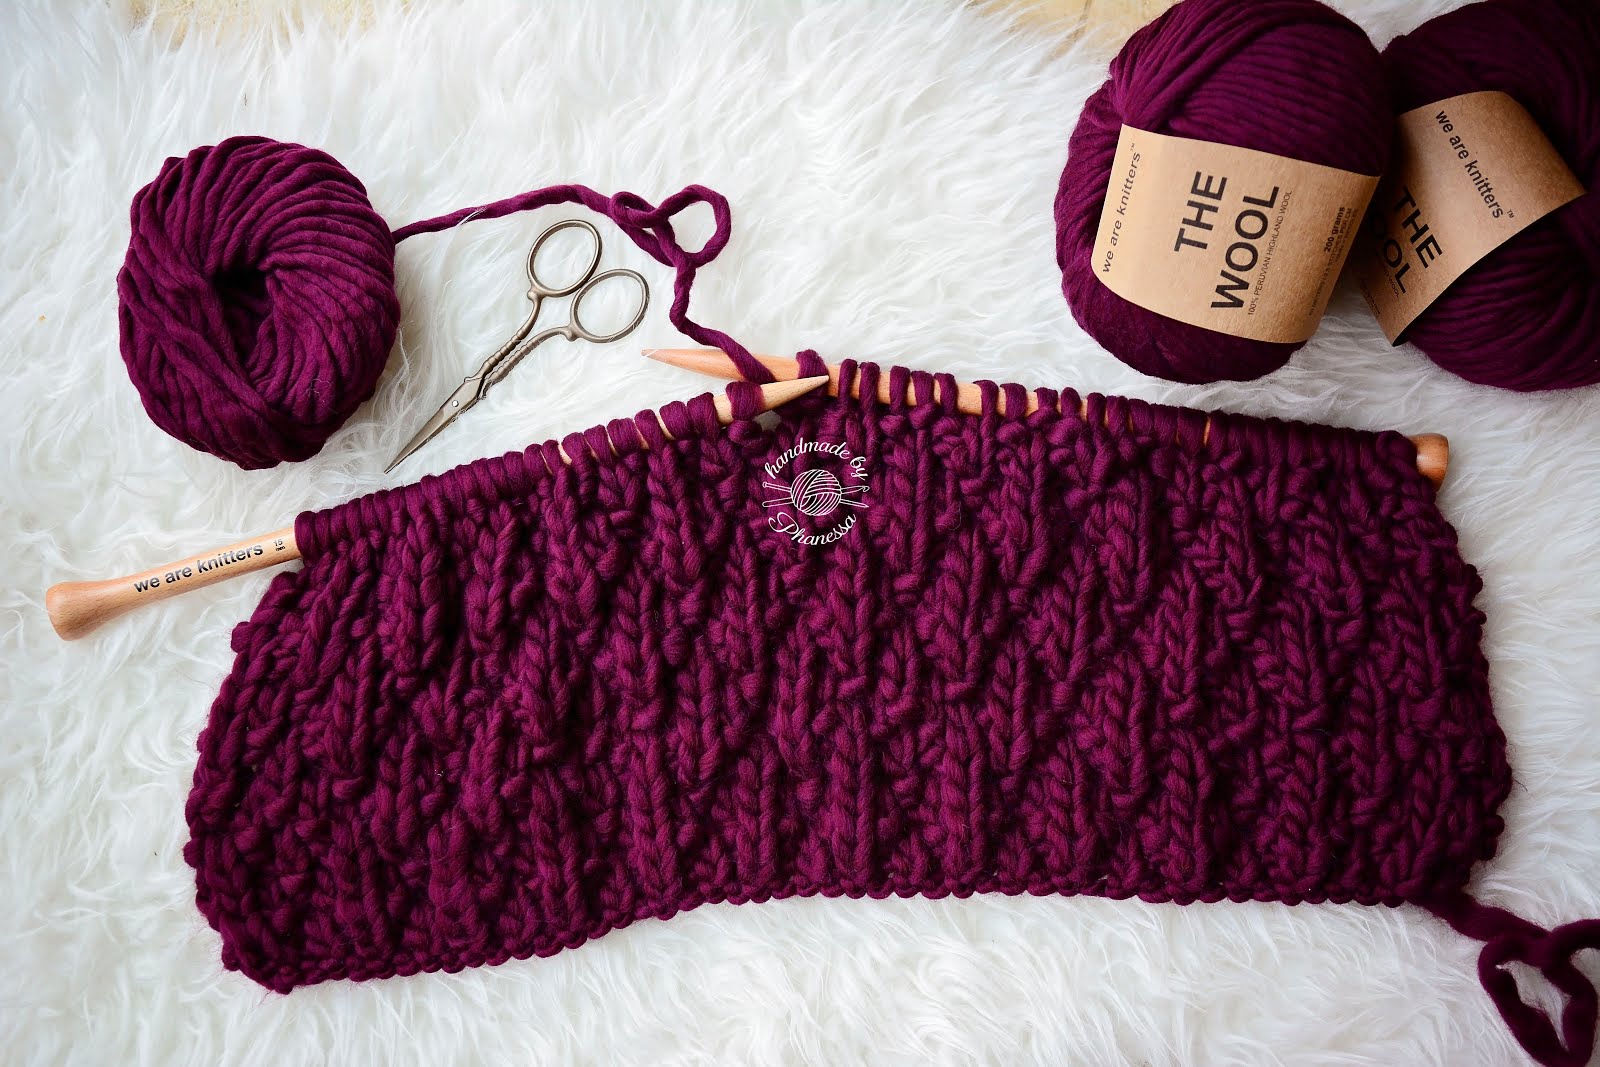
I got these lovely balls of yarn from We are Knitters (WAK) at the end of the year when I first opened my Handmade by Phanessa Etsy shop and I just got so caught up and busy with pattern writing, it got put on the back burner. The color Bordeaux is amazingly rich and the yarn is so soft!


I originally started a blanket and then thought "Who am I kidding?" A scarf or something smaller would be better (for me) and faster. I had the idea of using only half of what I got to make the scarf & the other half will be part of my giveaway on Instagram. 


When I first signed up for Instagram strictly dedicated to my handmade items, I never thought I would get where I am now. 1 year later and 17k followers. I hit 1k in August and then it sort of spiraled out of control (in a good way). It has been amazing and I absolutely love doing these giveaways too. 

I wanted to create something simple and beautiful. Personally I'm a circular needle kind of gal but since WAK uses straight needles, I decided to make a chunky scarf using the moss stitch. In the end, I did switch to circular needles because it was much more easier on my wrist and hands.  


Super Chunky Knit Infinity Scarf | 10.5" Wide | 64" Circumference

Skills Required:

Long tail cast on
Knit
Purl
Casting off
Adding new ball of yarn
Seaming the ends
Weaving in ends

Materials:

The Wool Yarn (2 balls) 400 grams total | 160 Meters
15mm Knitting Needles
Yarn Needle (large eye)
Scissors

Abbreviations:

co - Cast on
k- Knit
p - Purl

Pattern:

Co 18 stitches (if you want your scarf thinner and longer, cast on less stitches)

Rows 1-2: *k1, p1. Repeat from * across
Rows 3-4: *p1, k1. Repeat from * across

Repeat rows 1-4 until you have just enough yarn to cast off. Add new ball of yarn at the beginning of a new row (not in the middle of a row). Then, cast off in pattern. With the 2 short ends together, sew the edges with a yarn needle.

Weave in all ends.


Special thanks to We Are Knitters for sponsoring The Wool Yarn. 

For other patterns, visit my shops:

Etsy         Ravelry          Craftsy        Knit Picks

You may sell products using ©Handmade by Phanessa Patterns, but please give credit and link back to the patterns. Please send me a message if there are errors to the pattern handmadebyphanessa@gmail.com. Thank you!


© 2017 Handmade by Phanessa, All rights reserved. 

Sunday, October 30, 2016

Beginner's Knit Scarf - Leolani Super Scarf


I don't know why I had such a hard time figuring out what to make my bestie for her birthday. There are so many stitches and so many things I could make but then in the end, I decided on a simple knit scarf - The Leolani Super Scarf. She wanted a neutral, long scarf so I headed to Hobby Lobby because their cotton yarn is so soft! Since I used a worsted weight yarn, I doubled up by using 2 strands with the 8mm needles. 

Note: You can easily adjust by using a bulky yarn and the 8mm needles. You can also choose any size yarn and suggested needles however you will need to decide what your cast on number is to achieve desired width.

Example: Worsted - 5-6mm needles | Bulky - 8-9mm needles | Super Bulky - 9-10mm needles

I just love the simplicity of the garter stitch which makes this pattern easy for beginners. All you need to know is how to cast on, knit & cast off. That's it! If you're looking at one side, it's alternating rows of knits and purls. The purl stitches are just the back side of the knit stitches. You will not need to do any purl stitches for this pattern.

I don't have any beginner video tutorials so you will be linked to my favorite tutorials on YouTube.


Materials:

Yarn - Use 2 strands together | 4 Skeins total | I Love this Yarn (Hobby Lobby) | Dove
8mm Straight Needles or Circular Nneedles (worked back and forth)
Scissors
Yarn Needle (with large eye)

Leolani Super Scarf Pattern: Finished scarf is 9" wide and 88" long.

1) Cast on 28 using 2 strands
2) Knit all Stitches back and forth until desired length
3) Bind/Cast off
4) Weave in ends with yarn needle

See below for more details (Remember that 2 of the strands count as ONE stitch)

1) Using 2 strands of yarn together, start by doing a long tail cast on | Video Tutorial from Sheep and Stitch
Cast on 28 stitches - This gave me a width of 9 inches. 
Note: If you want a wider or narrower scarf, cast on less or more stitches

2) Knit all 28 stitches across | Video Tutorial from Howcast 
Turn your work, knit back across all 28 stitches

That's it! You just repeat by knitting all 28 stitches in each row until you reach desired length. I used up 4 skeins of the cotton yarn which measured 88 inches. Remember that a super scarf is just a long scarf. 

3) Bind/Cast off: Now you are ready to complete the scarf. To do that you "Bind off" or "Cast off" | Video Tutorial from VeryPinkKnits

4) Weave in all ends with yarn needle | Video Tutorial from VeryPinkKnits


For other patterns, visit my shops:

Etsy         Ravelry          Craftsy        Knit Picks

You may sell products using ©Handmade by Phanessa Patterns, but please give credit and link back to the patterns. Please send me a message if there are errors to the pattern handmadebyphanessa@gmail.com. Thank you!


© 2016 Handmade by Phanessa, All rights reserved. 

Monday, August 29, 2016

Basic Knit Boot Cuffs


Who is ready for FALL? I have been ready since last Fall!

I'm so excited since learning how to knit, I've enjoyed making so many things and one of them is the boot cuffs! I only crocheted last Fall season so this season, I'm super excited to knit boot cuffs as well!

Please visit my Handmade by Phanessa etsy shop to purchase a pair or you can make your own! The free pattern is available here. If you know how to knit, it's pretty basic and very easy.

Aren't these so cute!?!?


Thursday, July 28, 2016

Chunky Raspberry Beanie with Pom Pom


While searching for patterns and different stitches, this one kept popping up. This is the Raspberry Stitch (also known as Trinity Stitch).


This video shows you how to make it in rows which isn't what I wanted because I wanted to make it in rounds. If you watch the video, the knitting and purling is opposite from the pattern below.

When you work in rounds, it almost seems like you're working it opposite, if that makes sense. This video taught me how to do the stitches so I had to do it opposite (from the video).

Honestly, I do not know how to decrease these stitches. I tried different ways and ended up frogging it. I did a quick search online and wasn't able to find anything and not wanting to spend too much time on it, I just decided to decrease 2 rounds with purls. Not perfect, but you can't tell and I'm happy with it.


Supplies: 

Super Chunky Yarn - Lion Brand Wool Ease Thick and Quick
Mega Bulky Yarn (for Pom Pom is optional. You may used the same yarn instead).
9mm & 10mm 16" Circular Needles
Stitch Marker
Yarn Needle
Scissors
Tape Measure

Abbreviations:

co - Cast on
k - Knit
p - Purl
pfb - Purl front & back (increase)
k2tog - Knit 2 together
k3tog - Knit 3 together

Brim

co 44, place stitch marker and join
k1, p1 for 6 rounds or as thick as you want the brim

Main Hat

The Raspberry Stitch is worked in multiple of 4s and in a 4 rounds repeat:

Round 1 - *p9, pfb. Repeat from * all the way around (4 increases). You may increase more if you like just remember to increase so that you have a multiple of 4 stitches. I'm going to try an additional 4 stitches next time!
Round 2 - *p1/k1/p1 All in the same stitch, k3tog. Repeat from * all the way around.
Round 3 - p1 all the way
Round 4 - *k3tog, p1/k1/p1 All in the same stitch. Repeat from * all the way around. The bumps should appear in-between the bumps below. If this isn't the case, it's wrong.

This is the same repeat except there is no more increase rounds so I thought I'd include a new set of instructions:

Round 1 - p1 all the way around
Round 2 - *p1/k1/p1 All in the same stitch, k3tog. Repeat from * all the way around.
Round 3 - p1 all the way
Round 4 - *k3tog, p1/k1/p1 All in the same stitch. Repeat from * all the way around. The bumps should appear in-between the bumps below. If this isn't the case, it's wrong.

Repeat 2 more times or as high as you want your beanie (especially for slouchy hats). Mine was 7.5 inches before decreases.

After a few attempts, I just decided to do this. If you have a better way, let me know! :)

Decrease rounds:
Round 1 - *p9, p2tog. Repeat from * all the way around.
Round 2 - *p4, p2tog. Repeat from * all the way around.

Cut yarn and weave through stitches as if to knit and fasten off.

Using a extra large pom pom maker, make a pom pom using same yarn or contrasting color yarn. I actually used Barnat's mega bulky yarn. Attach pom pom and weave in all ends.

For other patterns, visit my shops:

Etsy         Ravelry          Craftsy        Knit Picks

You may sell products using ©Handmade by Phanessa Patterns, but please give credit and link back to the patterns. Please send me a message if there are errors to the pattern handmadebyphanessa@gmail.com. Thank you!


© 2016 Handmade by Phanessa, All rights reserved. 

Thursday, July 21, 2016

Knit Slouchy Moss Beanie


I have been getting more comfortable with using smaller knitting needles. I'm trying to get away from making things with bulky or super bulky yarn only. Don't get me wrong, I will never give up my big needles and big yarn. It's my true love :)

After making this hat, I still feel like it took more time than I wanted to work on a hat. Maybe when I can speed through a project at lighting speed, I'll enjoy making things with smaller needles!
I have been making a lot of newborn knit items with smaller needles but I don't mind so much when the items are so itty bitty and adorable!

Knit one front and back is the method of Increase I used

Supplies:
Worsted Weight Yarn 
US 10 - 6mm circular 16" needles
Stitch Marker
Yarn Needle
Scissors

Abbreviations:
co - Cast on
k1 - Knit one
p1 - Purl one
k2tog - Knit 2 together
p2tog - Purl 2 together

Pattern:
BRIM (11 rounds) - The circumference fits 21-24"
co 68 stitches 
Add stitch marker and join round (my favorite way of invisible joining)
k1, p1 all the way around

MAIN Hat:
Round 1 (Increase Round) - k1 all the way around increasing (see video above) every 10th stitch (74 stitches total)

Repeat rounds:
Rounds 2-3: k1, p1 all the way around
Rounds 4-5: p1, k1 all the way around

Repeats rounds 2-5 until desired length is reached. The longer, the slouchier. 

You can cinch the top of the hat together or you can decrease the rounds and round off the top. I actually don't know the proper way to decrease seed/moss stitches so this is what I did:

Decrease Rounds:

Round 1 - *k1, p1* (4 times) for a total of 8 stitches and every 9th and 10th stitch, you decrease by doing *k2tog, p2tog*. Continue around [k1, p1 (4x); k2tog, p2tog]. 
Round 2 - k1, p1 all the way around
Round 3 - p1, k1 (3 times) for a total of 6 stitches and every 7th and 8th stitch, you decrease by doing p2tog, k2tog. Continue around [p1, k1 (3x); p2tog, k2tog]. 
Round 4 - p1, k1 all the way around

You can continue to decrease but this is where I stopped (4 rounds only for me). 
Cut yarn leaving long tail. Weave through the remaining stitches as if to knit and close up. Weave in all ends.

To add or not to add a pom pom? That was the hardest questions of this? ha-ha This beanie was for me so it's large on my model ;)


For Handmade by Phanessa patterns, visit my shops:

Etsy         Ravelry          Craftsy        Knit Picks

You may sell products using ©Handmade by Phanessa Patterns, but please give credit and link back to the patterns. Do NOT use any of my photos or copy/distribute any of my patterns as your own. If you share my free patterns, please link back to original pattern page. Please send me a message if there are errors to any of my patterns to handmadebyphanessa@gmail.com. Thank you!

© 2016 Handmade by Phanessa, All rights reserved. 

Tuesday, July 19, 2016

Newborn Striped Shorts & Beanie Set


This is cuteness overload. I have been out of control making knitted pieces for newborns from Shae Simms. I just can't help it! Most of what I've been making has measured the correct size except this one for some reason. It was slightly larger than what the pattern was supposed to be.

Newborn Striped Set Pattern by Shae Simms

After making the beanie, I decided I wanted a matching Bonnet too! ;)

Sunday, July 17, 2016

Newborn Knit Shorts and Textured Bonnet Set

So... this happened! I made 3 newborn sets this weekend! So freaking cute! 


I have no idea why I was so intimidated! Actually, I do know why. I'be only been knitting for 7 months and mostly hats. I recently learned of the magic loop method and it was like discovering light! haha

The pattern for the shorts can also be made into pants and the bonnet is a moss stitch so the texture is really awesome!