
The Seed Stitch Cable Headband

You can see doggo there. Such a cute doggo!
Is anyone else already thinking about winter?
I am and then I’m not. Mostly because there was a heat wave last week in Montreal, and it’s got me craving that cold cold snow….which in turn I will probably hate when the winter actually gets here. Give me eternal fall and I’d be a happy camper. Seriously.
With the heat wave, though, I’ve gotten to have a change of scenery for a little bit. I’ve migrated operations down to a cute little cafe down the street from my house where there’s an adorable doggo and good coffee… oh, and air conditioning. Can’t forget about that little perk. And, they let me sit there and caffeinate myself to the gills while I mutter to myself about knitting and my balls fall out everywhere. it all works out quite well.
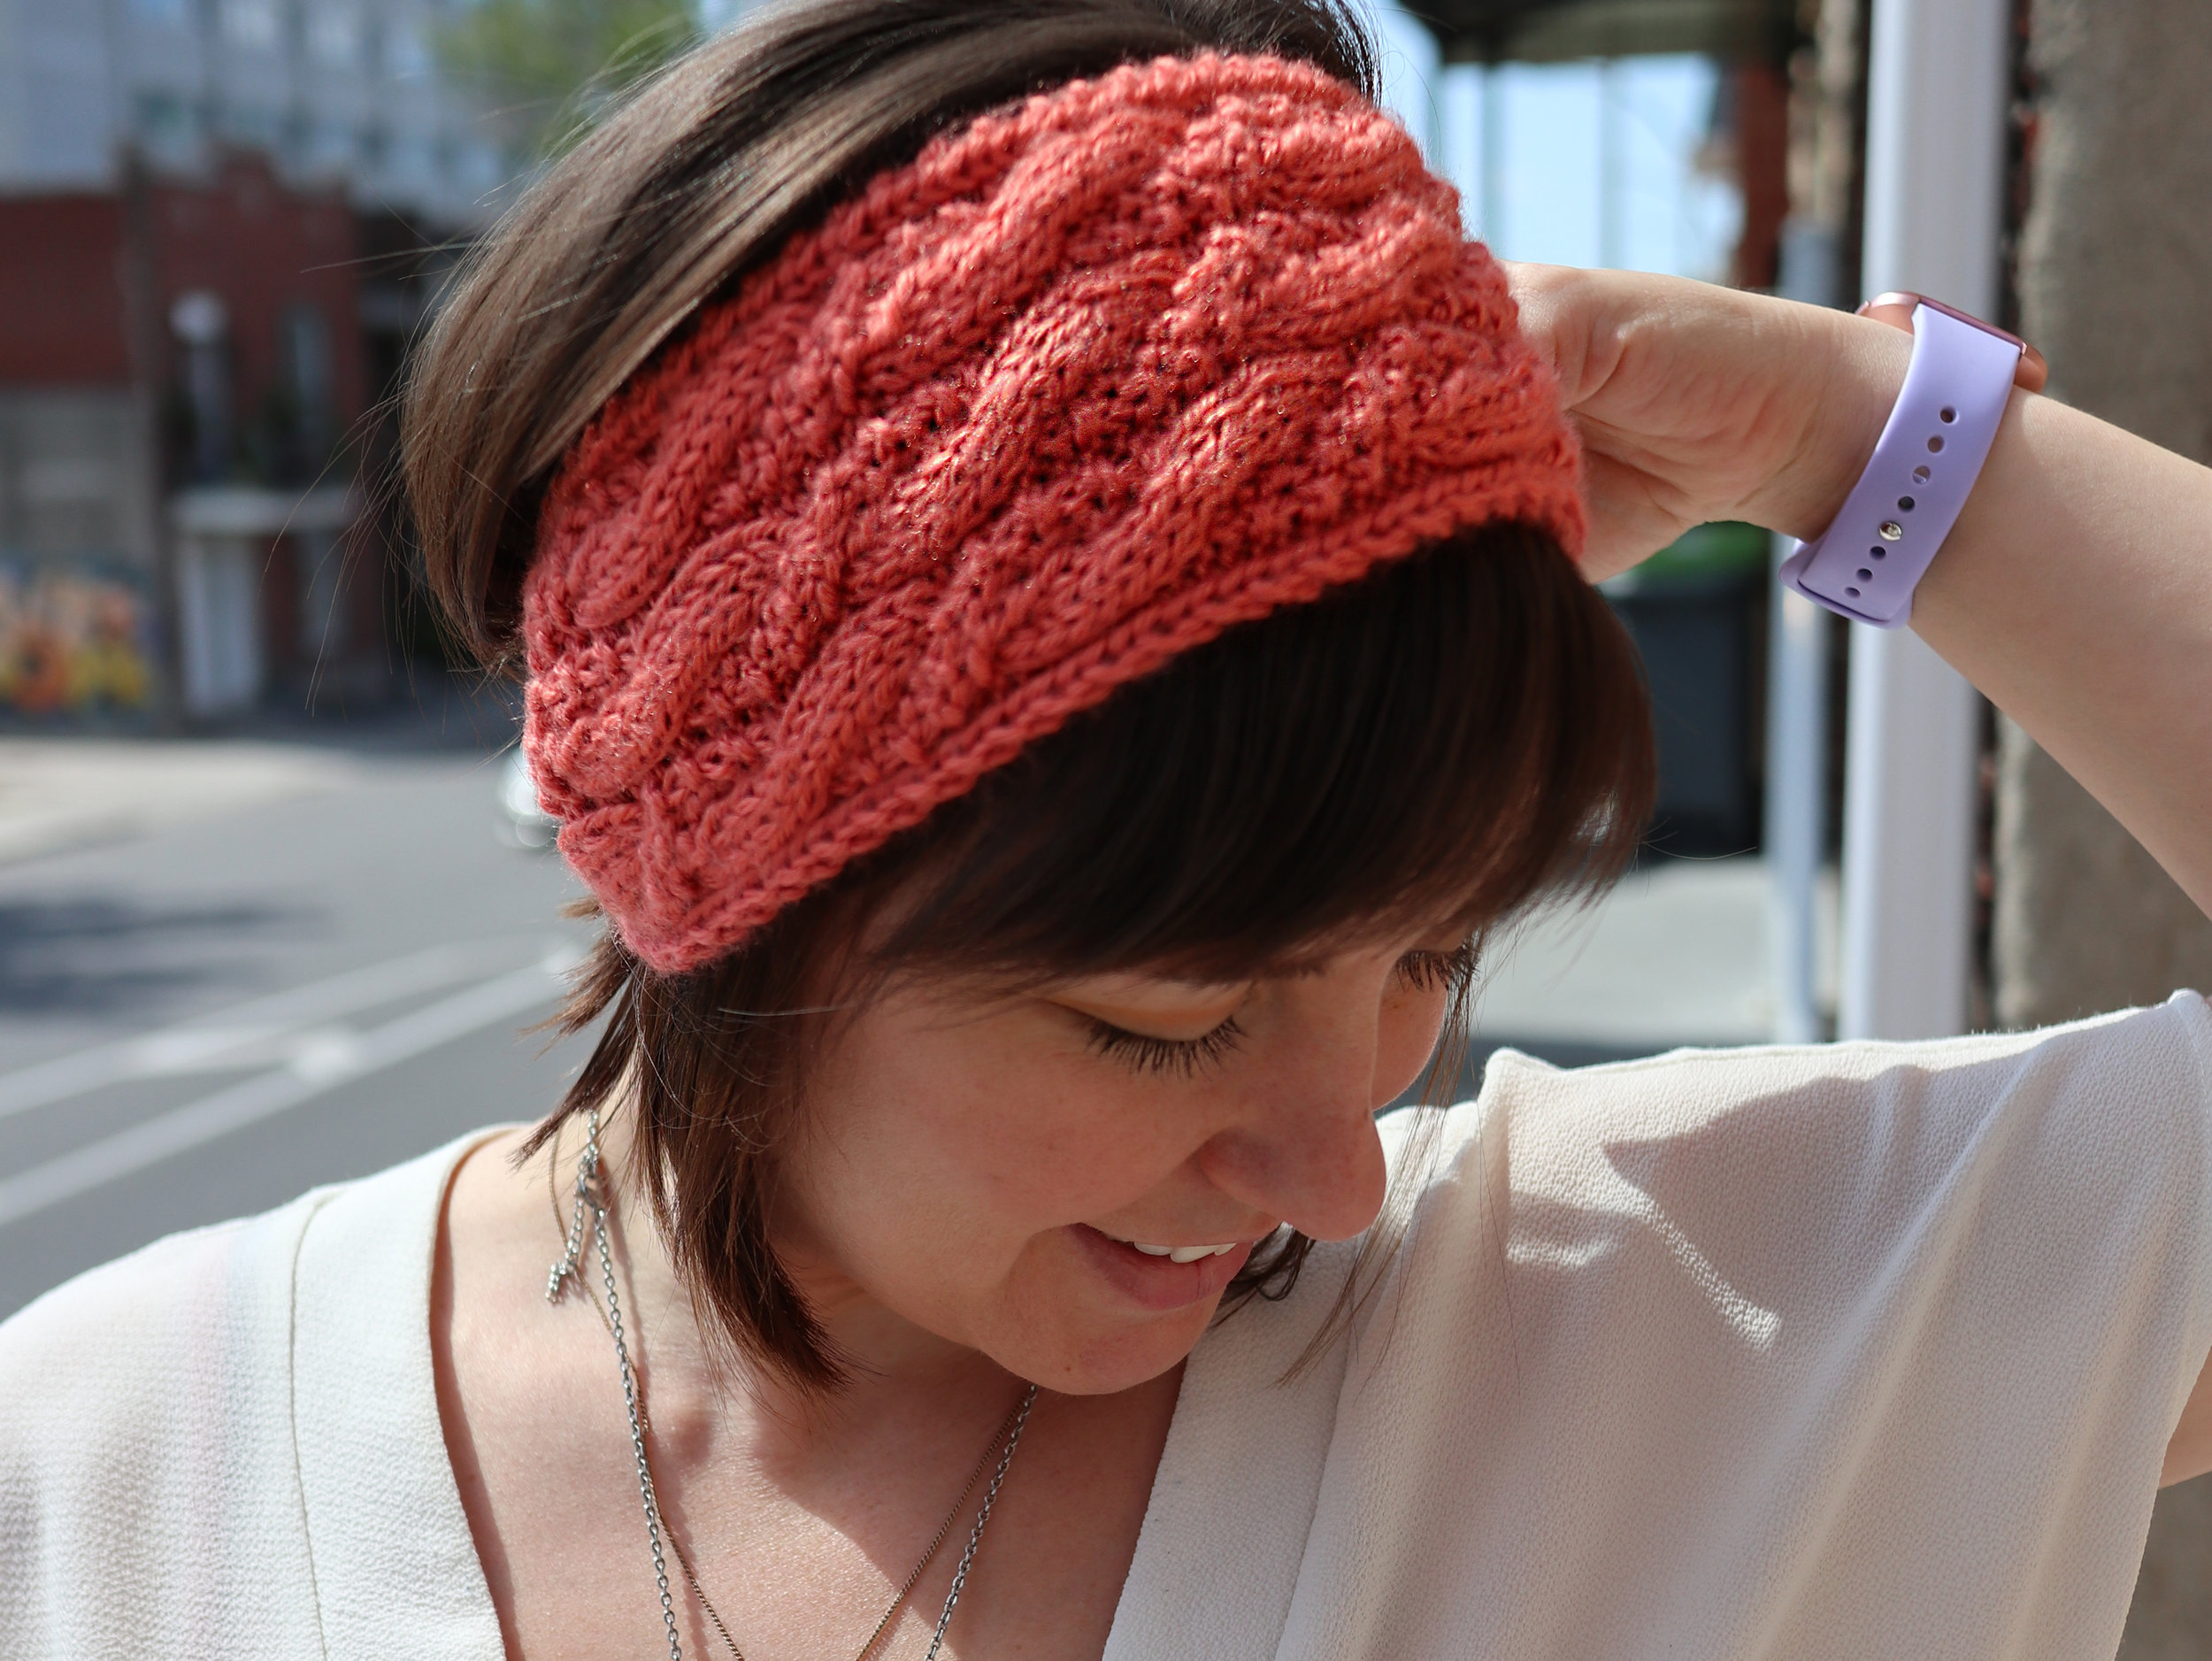
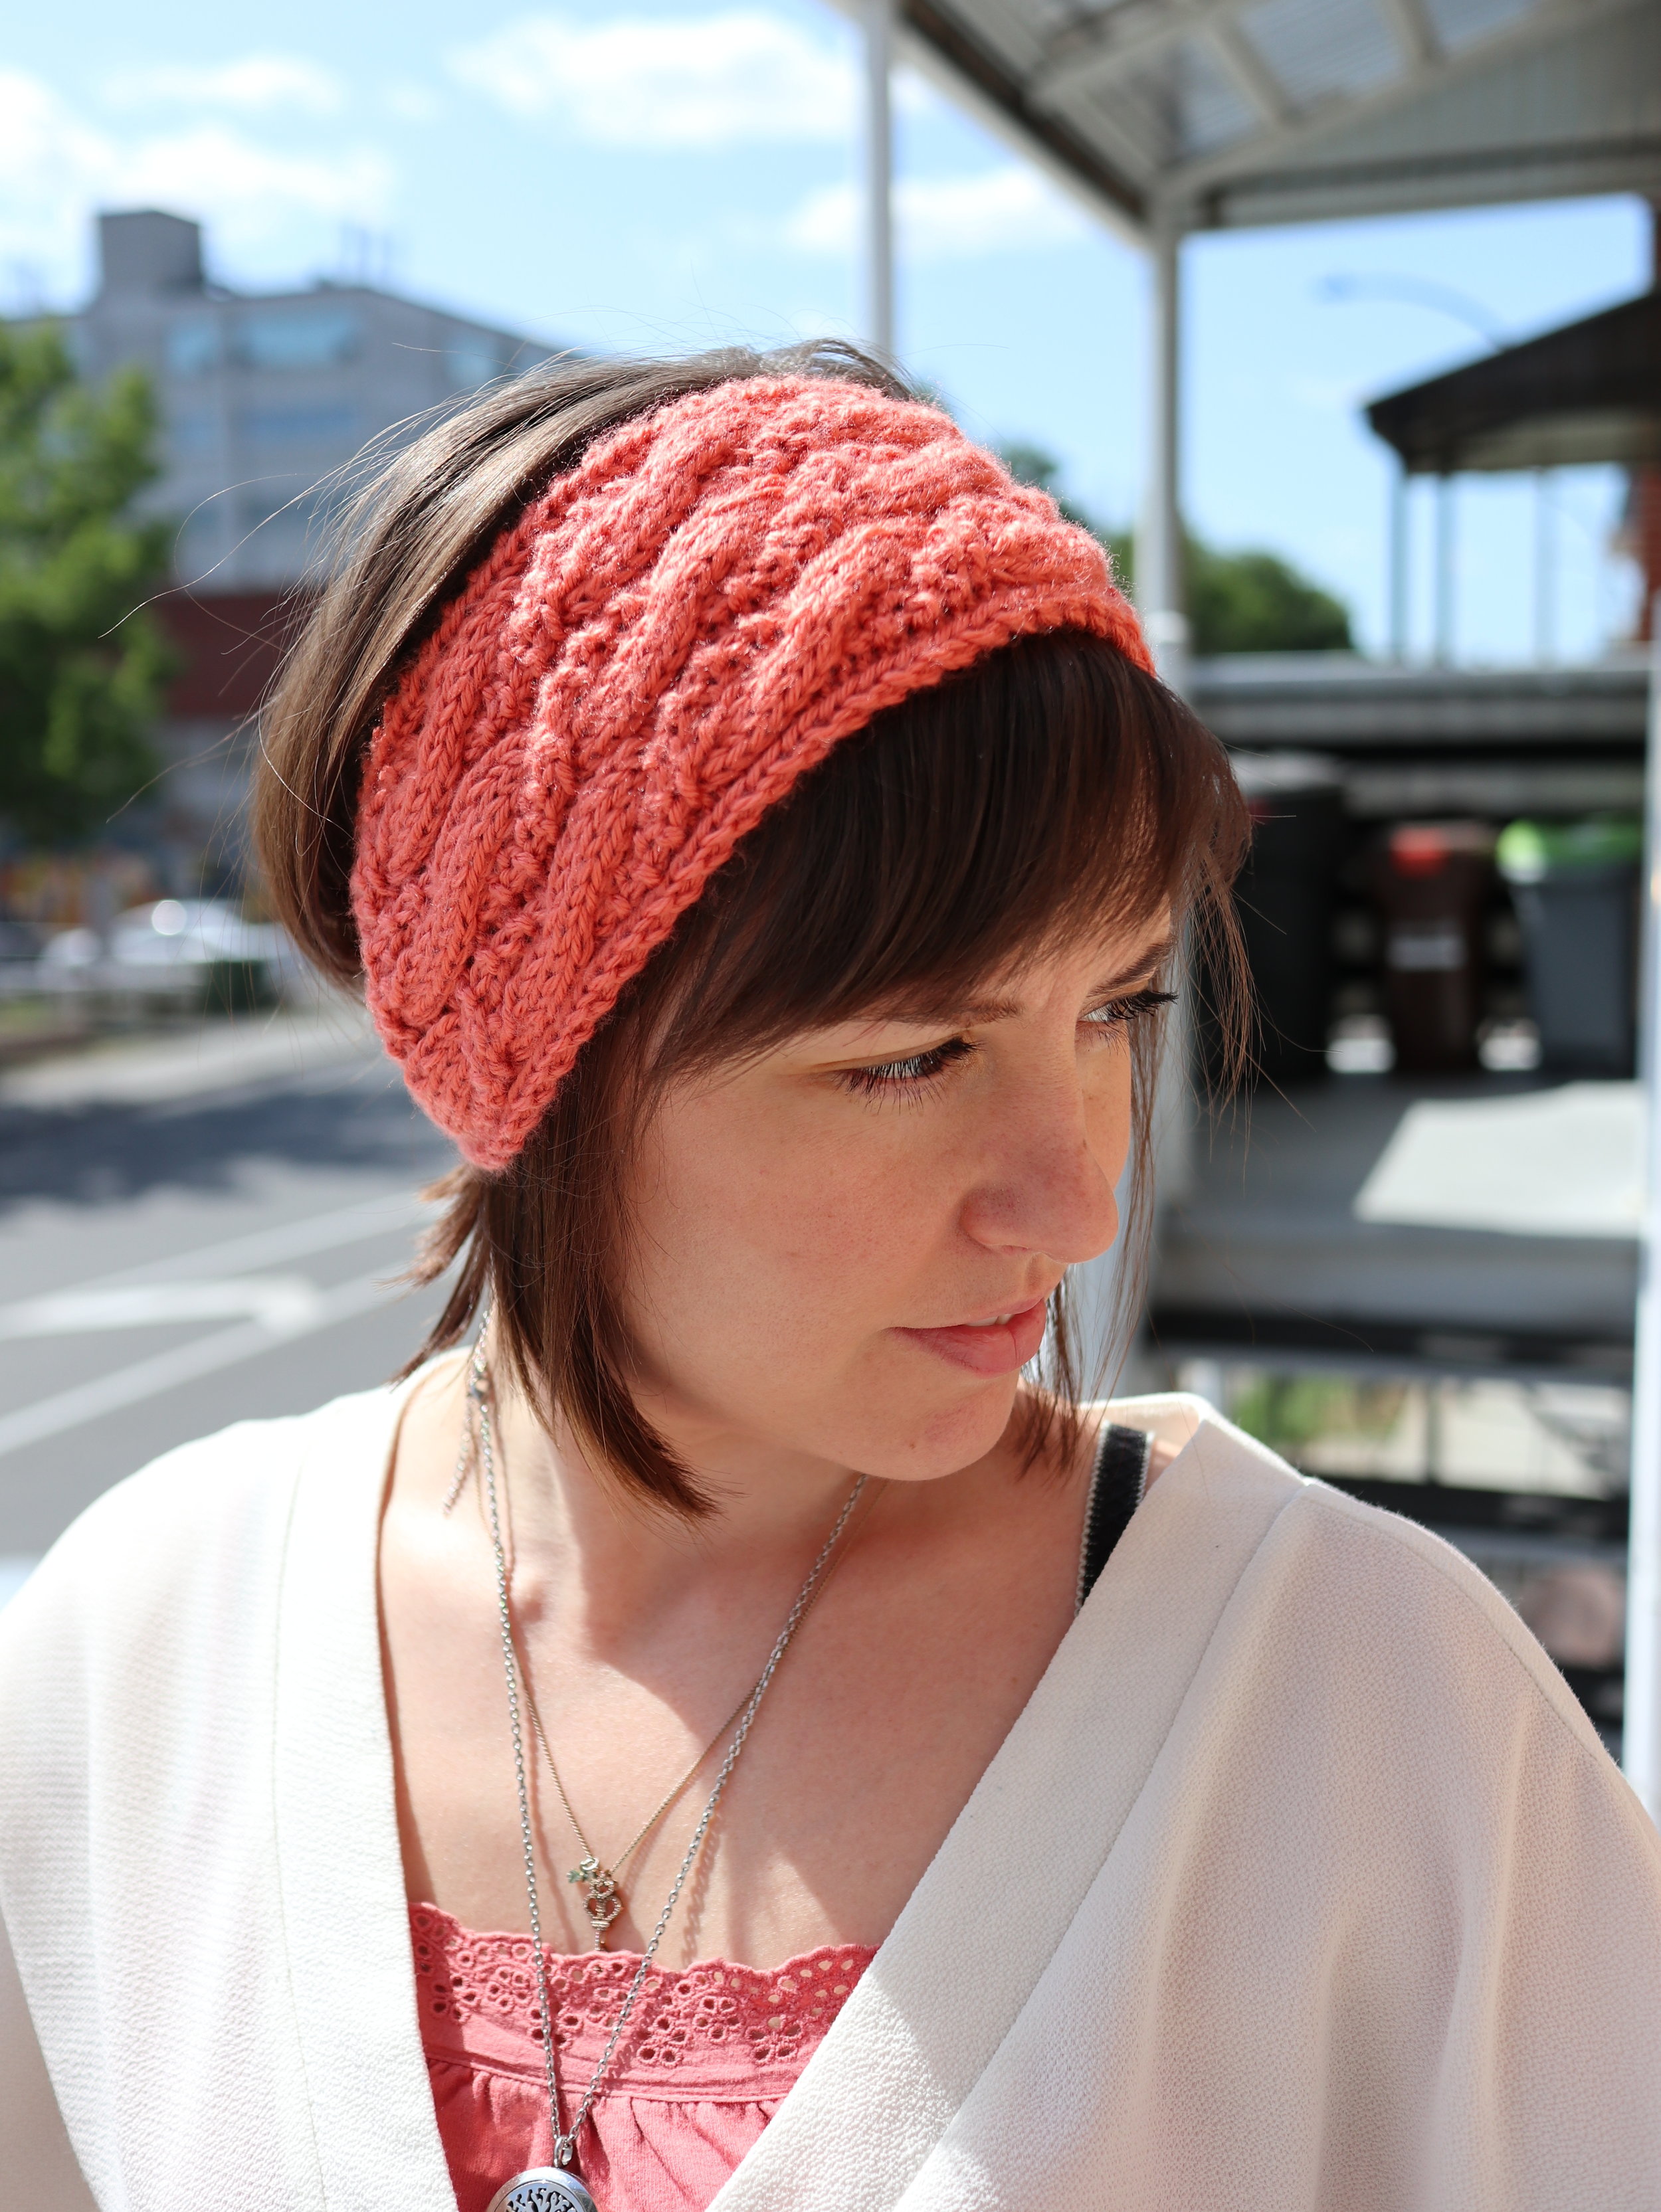
So, anyway. This week I’ve got a little something different. Since it’s been hot, I haven’t wanted to have most of my projects in my lap. So, I wanted to have something that was quick and easy and that I wouldn’t have to worry about heating me up too much. This is a fun and quick one skein headband I designed for my good friend. She often rides her bike to the train station to commute to work. I figured she’d like a cute, stylish headband she could wear that would both keep her ears warm and not muss her hair too terribly much. This is the design I came up with.
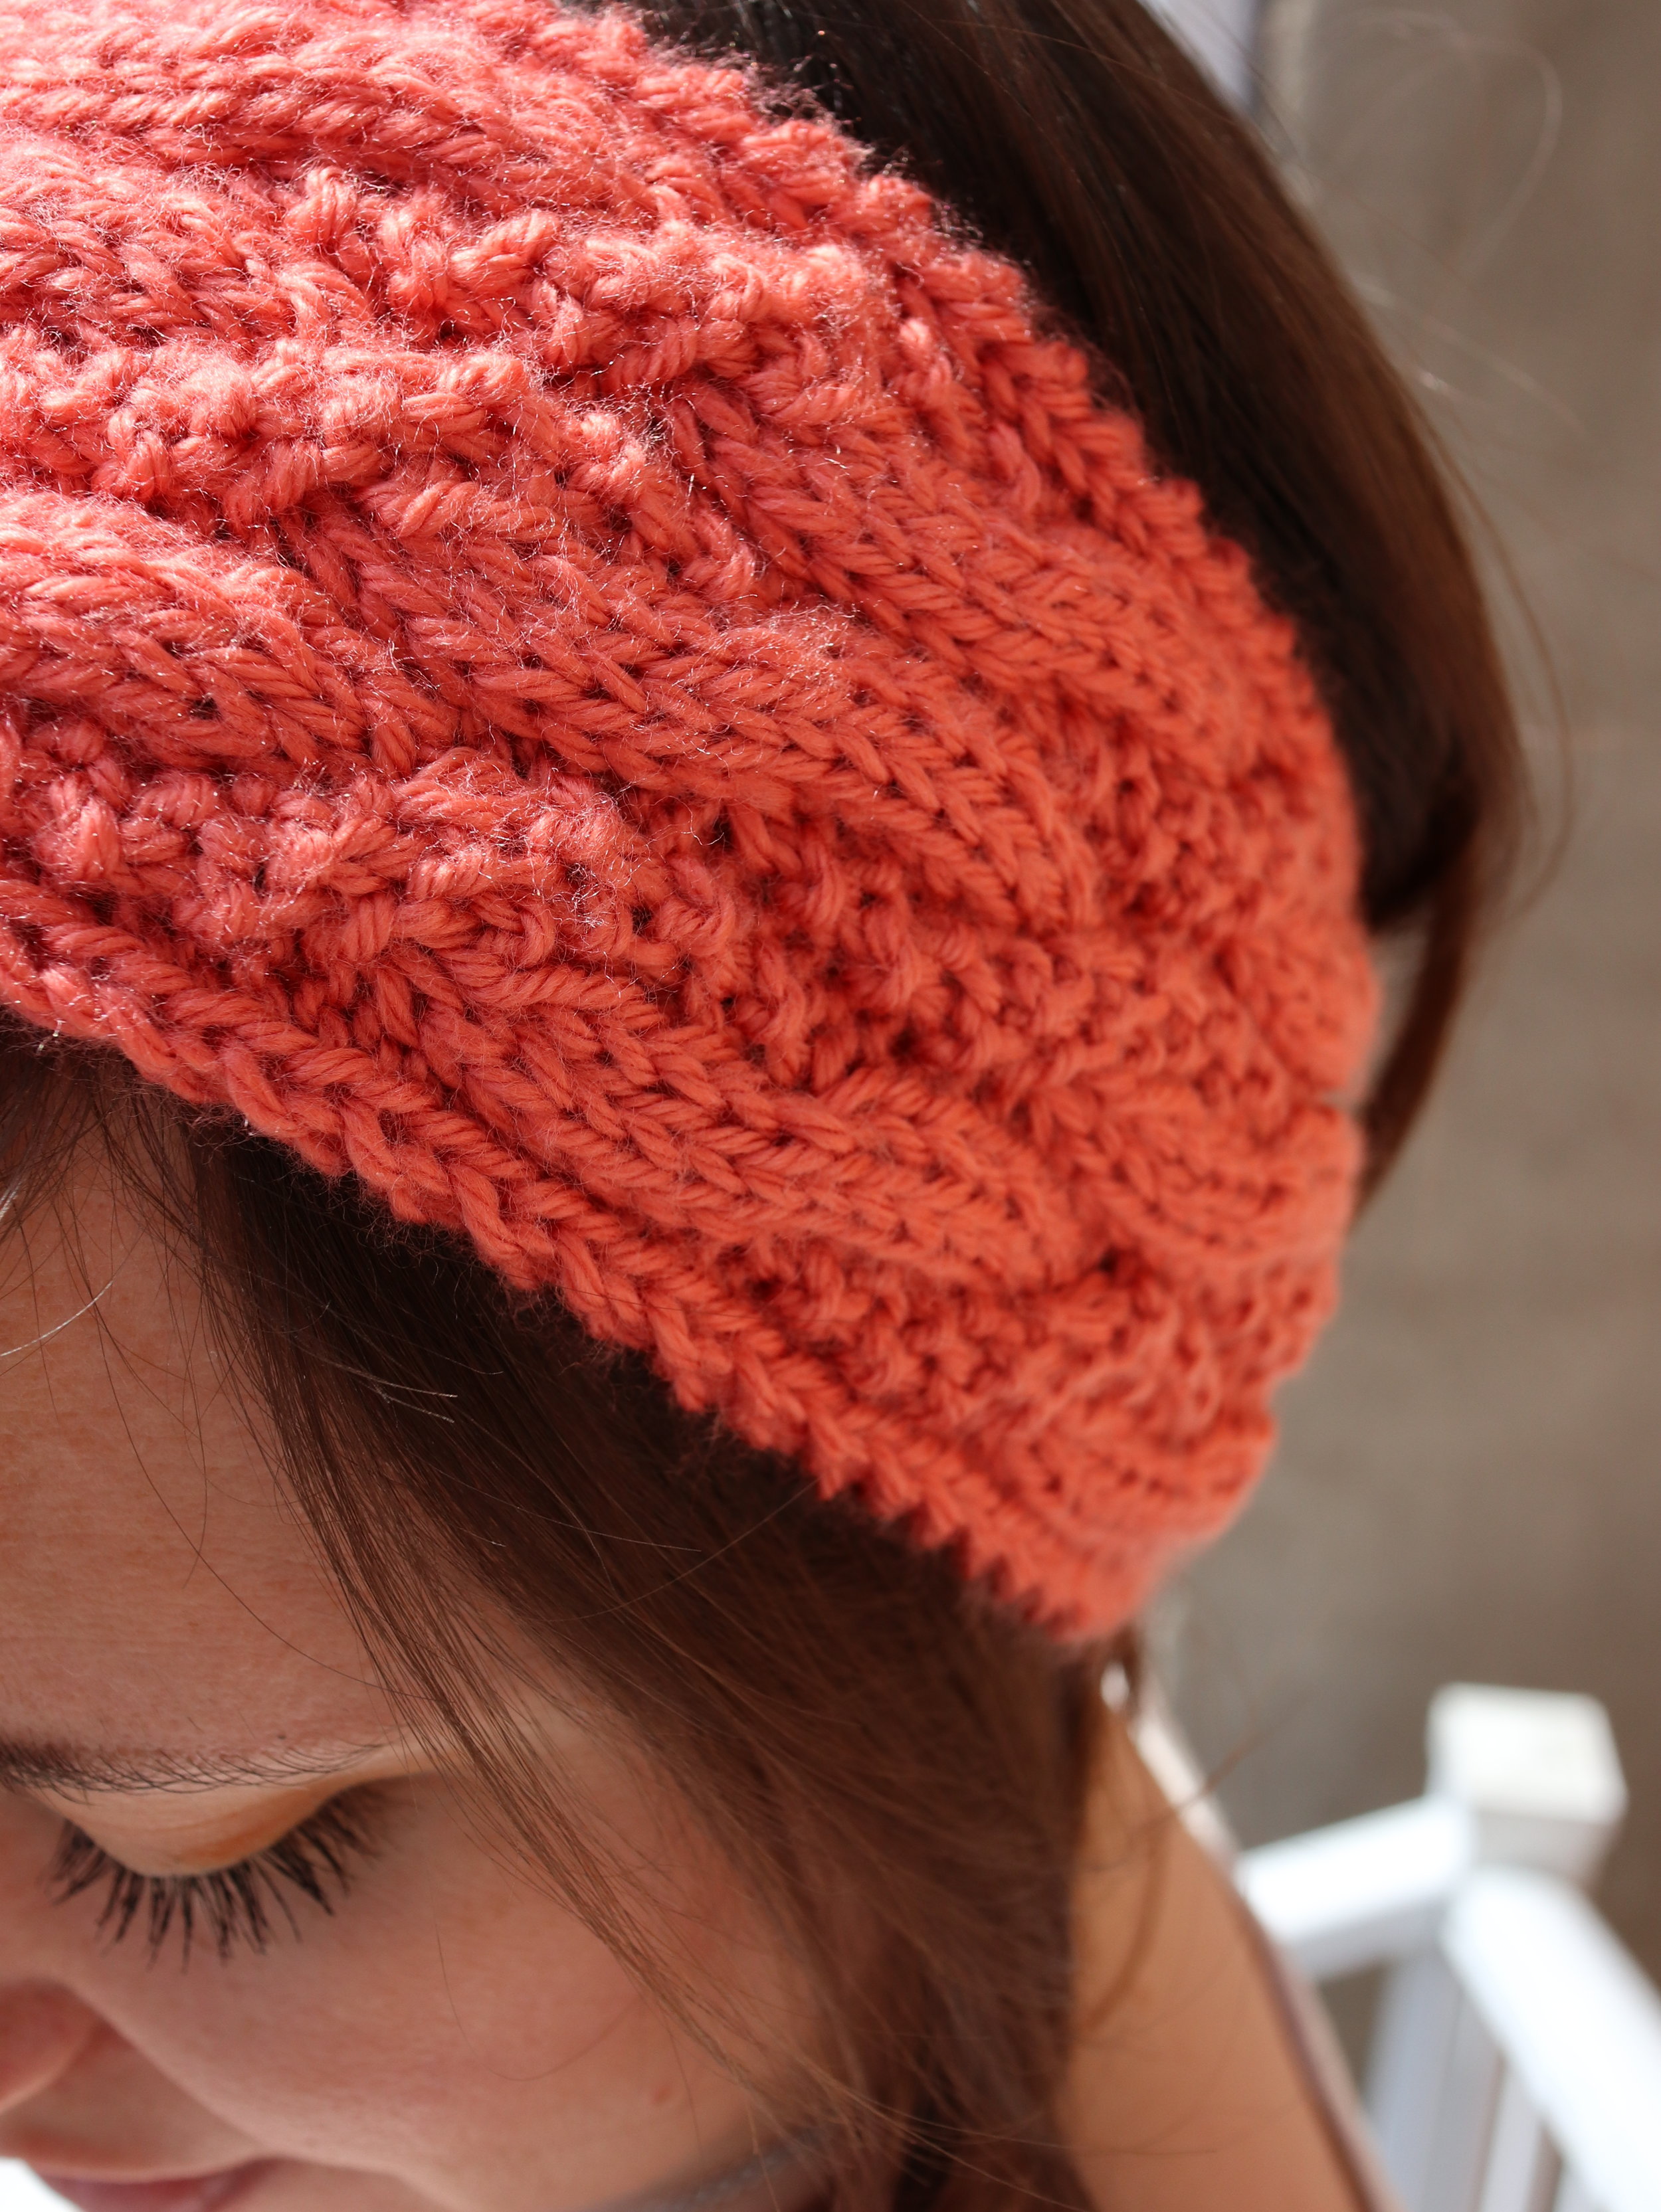
This headband uses a seed stitch cable design to create a wide headband that’s fun and stylish. It pairs well with both up and down dos to keep your ears nice and warm! It's perfect for anyone who doesn't like to wear a hat during winter time, or if you need some protection from the cold for your ears, but really don't want to muss your hair up!
I used Caron simply soft to make my headband, but really, this headband is very versatile and can be made in a variety of different types of yarn! Some good substitutes if you’d like to use a different yarn would be Lion Brand Yarnado, Red Heart Comfort, or Paintbox yarns simply DK.
But, don't limit yourself to only using the yarn I suggest! This accessory can be made in an unlimited variety of yarns from acrylic to marino wool! Best if made in a medium weight 4 worsted style yarn, but honestly, it would probably look gorgeous in an aran weight, or maybe even bulky weight!
I love to see what you create!
Please share your creations with the community on social media by tagging @ravinsekaidesigns and hashtag #SSCheadband
I can’t wait to see the beautiful things you come up with!
Facebook: Ravin Sekai Designs
Ravelry: RavinSekai
Etsy: Ravin Sekai Designs
Instagram: @ravinsekaidesigns
Pinterest: Ravin Sekai Designs
Patreon: Ravin Sekai Designs
What You Need
Needle Size: US7 / 4.5mm needles straight or circular, your choice
Yarn: Caron Simply Soft 100% acrylic yarn, 315 yrds per skein, Weight 4 light worsted weight. I used color Persimmon.
Gauge: gauge is not super important for this project but 32st/24 rows in seed stitch cable pattern = 4”
Finished Garment: depending on the size of your head, your measurement may be different. The sizing for this item is simple. Hold the CO edge of headband at the back of your head where you would wear it normally. When the working edge reaches just above your ear on the other side of your head, start decreasing. My headband ended up being 18.75 in long and 3.5 in wide.
Other: cable needle, button, tapestry needle
Skills Needed/Abbreviations
CO - Cast on, I use a long tail cast on, but it doesn't matter on this particular project.
BO - Bind off, just as the CO you can use your preference.
RS - right side of work, the side that everyone will see.
WS - wrong side of work, the backside.
K - Knit
P - Purl
St/sts - stitch/stitches
Sl1 - slip one st knitwise. with yarn in back, insert right needle in first st as if to knit it, instead, simply slip the st onto the right needle, cont. knitting.
K1fb - knit one front and back. This is an increase st. Simply knit the stitch as normal, but do not slip it off the left needle after knitting. Then, slip right needle through the back look of the same st and knit it again. Slip the st off the needle. If you prefer, you can M1L or M1R accordingly, but make sure you count your st in order to make sure you are knitting and purling the subsequent sts correctly.
k2tog - Knit two stitches together.
p2tog - Purl two stitches together
ssk - slip one stitch knitwise, slip another stitch knitwise, knit these 2 stitches together through the back loop (you can also do skp - slip one knitwise onto right needle, knit one, pass slipped stitch over knit stitch and off the right needle or any other left-leaning decrease.)
3x3 Seed Cable - Slip 3 sts onto cable needle and hold at front, k3, then k1, p1, k1 from cable needle.
3x3 Reverse Seed Cable - Slip 3 sts onto cable needle and hold at front, k1, p1, k1, then k3 from cable needle.
One row buttonhole
knit to start of buttonhole. Bring yarn in front (purl position); slip 1stitch purl-wise, bring yarn back to knit position.
Slip 1 next stitch on left needle to right needle purl-wise, pass first slipped stitch (step one) over second and off the needle. (repeat this part 2 more times. You will pass over 3 stitches total, for a 3-stitch buttonhole) Place last stitch back on left needle. Turn work over so you’re now working on the WS
Cable CO 4stitches
Turn work again(RS). Bring yarn to back; slip first st of left needle onto right needle and pass last CO st over it.
Pass the first stitch on right hand needle back to the left hand needle and continue in pattern.
The Pattern

For the free pattern of this garment please continue on this page. Please consider supporting me by purchasing the 100% ad free PDF download with full chart for this pattern on my Ravelry or ETSY pages. Or consider joining my Patreon for member perks.
Increase Rows
CO 6 stitches.
Set-up Row(WS): sl1kw, K across
Row 1 (RS): sl1, K1, k1fb, k1fb, K2 (8 Stitches)
Row 2: sl1, P6, K1
Row 3: sl1, K1, P1, k1fb, k1fb, P1, K2 (10 Stitches)
Row 4: sl1, P1, K2, P2, K2, P1, K1
Row 5: sl1, K1, P2, K1fb, k1fb, p2, k2(12 Stitches)
Row 6: sl1, P1, K2, P4, K2, P1, K1
Row 7: sl1, K1, P2, k1fb, K2, k1fb, P2, K2(14 Stitches)
Row 8: sl1, P1, K2, P3, K1, P1, K3, P1, K1
Row 9: sl1, K1, P2, k1fb, K4, k1fb, P2, K2 (16 Stitches)
Row 10: sl1, P1, K4, P1, K1, P3, K3, P1, K1
Row 11: sl1, K1, P2, k1fb, K4, P1, K1, k1fb, P2, K2(18 Stitches)
Row 12: sl1, P1, K5, P1, K1, P3, K4, P1, K1
Row 13: sl1, K1, P2, k1fb, P1, K4, P1, K1, P1, k1fb, P2, K2(20 Stitches)
Row 14: sl1, P1, K2, P1, K3, P1, K1, P3, K2, P1, K2, P1, K1
Row 15: sl1, K1, P2, k1fb, P2, K4, P1, K1, P2, k1fb, P2, K2 (22 Stitches)
Row 16: sl1, P1, K2, P2, K3, P1, K1, P3, K3, P1, K2, P1, K1
Row 17: sl1, K1, P2, k1fb, K1, P2, 3x3 Reverse seed cable, P2, K1, k1fb, P2, K2(24 Stitches)
Row 18: sl1, P1, K2, P3, K2, P3, K1, P1, K4, P1, K3, P1, K1
Row 19: sl1, K1, P2, k1fb, P1, K1, P2, K1, P1, K4, P2, K2, k1fb, P2, K2(26 Stitches)
Row 20: sl1, P1, K2, P4, K2, P3, K1, P1, K4, P1, K4, P1, K1
Row 21: sl1, K1, P2, k1fb, K3, P2, K1, P1, K4, P2, K3, k1fb, P2, K2(28 Stitches)
Row 22: sl1, P1, K2, P2, K1, P1, K3, P3, K1, P1, K3, P3, K1, P1, K2, P1, K1
Row 23: sl1, K1, P2, k1fb, K4, P2, K1, P1, K4, P2, K1, P1, K2, k1fb, P2, K2(30 Stitches)
Row 24: (WS): sl1, P1, k2, p3, k1, p1, k3, p3, k1, p1, k3, p3, k1, p1, k3, P1, K1
Start cabling
Row 1 (RS): sl1, K1, p2, k1, p1, k4, p2, 3×3 Seed Cable, p2, k1, p1, k4, p2, K2
Row 2: sl1, P1, k2, p3, k1, p1, k4, p1, k1, p3, k2, p3, k1, p1, k3, P1, K1
Row 3: sl1, K1, p2, k1, p1, k4, p2, k4, p1, k1, p2, k1, p1, k4, p2, K2
Row 4: sl1, P1, k2, p3, k1, p1, k4, p1, k1, p3, k2, p3, k1, p1, k3, P1, K1
Row 5: sl1, K1, p2, 3×3 Seed Cable, p2, k4, p1, k1, p2, 3×3 Seed Cable, p2, K2
Row 6: sl1, P1, k3, p1, k1, p3, k3, p1, k1, p3, k3, p1, k1, p3, k2, P1, K1
Row 7: sl1, K1, p2, k4, p1, k1, p2, k4, p1, k1, p2, k4, p1, k1, p2, K2
Row 8: sl1, P1, k3, p1, k1, p3, k3, p1, k1, p3, k3, p1, k1, p3, k2, P1, K1
Row 9: sl1, K1, p2, k4, p1, k1, p2, 3×3 Reverse Seed Cable, p2, k4, p1, k1, p2, K2
Row 10: sl1, P1, k3, p1, k1, p3, k2, p3, k1, p1, k4, p1, k1, p3, k2, P1, K1
Row 11: sl1, K1, p2, k4, p1, k1, p2, k1, p1, k4, p2, k4, p1, k1, p2, K2
Row 12: sl1, P1, k3, p1, k1, p3, k2, p3, k1, p1, k4, p1, k1, p3, k2, P1, K1
Row 13: sl1, K1, p2, 3×3 Reverse Seed Cable, p2, k1, p1, k4, p2, 3×3 Reverse Seed Cable, p2, K2
Row 14: sl1, P1, k2, p3, k1, p1, k3, p3, k1, p1, k3, p3, k1, p1, k3, P1, K1
Row 15: sl1, K1, p2, k1, p1, k4, p2, k1, p1, k4, p2, k1, p1, k4, p2, K2
Row 16: sl1, P1, k2, p3, k1, p1, k3, p3, k1, p1, k3, p3, k1, p1, k3, P1, K1
Repeat cable pattern till desired length (I repeated it 5 times).
How to know when to stop cable: hold the CO edge of headband at the back of your head where you would wear it normally. When the working edge reaches just above your ear on the other side of your head, start decrease.
Start decrease

Row 1 (RS): sl1, K1, P2, ssk, K4, P2, 3x3 Seed Cable, P2, K1, P1, K2, k2tog, P2, K2
Row 2: sl1, P1, K2, P5, K3, P1, K1, P3, K2, P5, K2, P1, K1
Row 3: sl1, K1, P2, ssk, K3, P2, K4, P1, K1, P2, K3, k2tog, P2, K2
Row 4: sl1, P1, K2, P4, K3, P1, K1, P3, K2, P4, K2, P1, K1
Row 5: sl1, K1, P2, ssk, K2, P2, K4, P1, K1, P2, K2, k2tog, P2, K2
Row 6: sl1, P1, K2, P3, K3, P1, K1, P3, K2, P3, K2, P1, K1
Row 7: sl1, K1, P2, ssk, K1, P2, K4, P1, K1, P2, K1, k2tog, P2, K2
Row 8: sl1, P1, K2, P2, K3, P1, K1, P3, K2, P2, K2, P1, K1
Row 9: sl1, K1, P2, ssk, P2, 3x3 Reverse Seed Cable, P2, k2tog, P2, K2
Row 10: sl1, P1, K2, P1, K2, P3, K1, P1, K3, P1, K2, P1, K1
Row 11: sl1, K1, P2, ssk, P1, K1, P1, K4, P1, k2tog, P2, K2
Row 12: sl1, P1, K2, P1, K1, P3, K1, P1, K2, P1, K2, P1, K1
Row 13: sl1, K1, P2, ssk, K1, P1, K4, k2tog, P2, K2
Row 14: sl1, P1, K2, P4, K1, P1, K1, P1, K2, P1, K1
Row 15: sl1, K1, P2, ssk, K4, k2tog, P2, K2
Row 16: sl1, P1, K2, P6, K2, P1, K1
Row 17: sl1, K1, P2, ssk, K2, k2tog, P2, K2
Row 18: sl1, P1, K2, P4, K2, P1, K1
Row 19: sl1, K1, P2, ssk, k2tog, P2, K2
Row 20: sl1, P1, K2, P2, K2, P1, K1
Row 21: sl1, K1, P2tog, [One row buttonhole], P1, K2
Row 22: sl1, P1, ssk, P1, k2tog, P1, K1
Row 23: sl1, ssk, K1, K2tog, k1
Row 24: BO 5 purlwise
Finishing
Weave in ends and sew the button of your choice to side without the buttonhole and ENJOY! Happy Knitting!
IF YOU LIKED THIS PATTERN, PLEASE SUPPORT ME ON PATREON OR BUY ME A COFFEE!

BUY ME A COFFEE
Support me on Patreon


I love to see what you create!
Please share your creations with the community on social media by tagging @ravinsekaidesigns and hashtag #SSCheadband
I can’t wait to see the beautiful things you come up with!
Facebook: Ravin Sekai Designs
Ravelry: RavinSekai
Instagram: @ravinsekaidesigns
Pinterest: Ravin Sekai Designs
Patreon: Ravin Sekai Designs
