Tuesday, April 30, 2024

Vanilla Knit Cowl Pattern


Tools Needed:

5mm (US 8) 16” circular needle
Tapestry Needle

Materials Needed:

Knit Picks Brava Worsted in Eggplant, 1 skein or approximately 218 yds (100g)


Pattern:

CO 136 sts. Join into a ring.

Round 1: Knit all stitches

Round 2: Purl all stitches.

Round 3: Knit all stitches

Round 4: Purl all stitches.

Round 5: Knit all stitches

Round 6: Purl all stitches.

Round 7: Knit all stitches

Round 8: Purl all stitches.

Round 9: Knit all stitches

Round 10: Purl all stitches.

Rounds 11 – 40: Knit all stitches.

Round 41: Purl all stitches

Round 42: Knit all stitches.

Round 43: Purl all stitches

Round 44: Knit all stitches.

Round 45: Purl all stitches

Round 46: Knit all stitches.

Round 47: Purl all stitches

Round 48: Knit all stitches.

Round 49: Purl all stitches

Round 50: Knit all stitches.


Bind off and weave in ends.


<<>><<>><<>><<>><<>><<>><<>><<>><<>><<>><<>><<>><<>><<>><<>>

I really hope that you enjoyed this pattern. Feel free to share this pattern with your friends, but please give me credit when you do so. You can also make and sell the items that you create, if you wish; just credit me with pattern creation

If you would like to support my endeavors, an Ad-Free printable PDF can be purchased in my shop.


Feel free to leave a comment below if you have any questions or if you have completed this pattern. I love seeing photos of completed works!

That’s all for now. Have a wonderful day, and God bless.

<<>><<>><<>><<>><<>><<>><<>><<>><<>><<>><<>><<>><<>><<>><<>>

Jessica Cauthon is an avid fiber artist and pattern designer. She’s been playing with yarn and fiber for over 25 years. She focuses mostly on knitting and crochet patterns, but she does occasionally design in other fiber arts and sell her own personal creations.

She’s also a homesteader and on a journey of self-sufficiency.  She will occasionally share recipes and processes for preserving food for your pantry, along with adventures from the homestead.

Her patterns can be purchased on:

Etsy: https://www.etsy.com/shop/chickadeetreecreates

Ribblr: https://www.ribblr.com/shop/chickadee-tree-creations

Her personal creations can be purchased on:

Etsy: https://www.etsy.com/shop/chickadeetreecreates


You can also find her on:


YOUTUBE:   https://www.youtube.com/channel/UCnM3eEvUwkv7PgPMdPEyl5g

INSTAGRAM:   https://www.instagram.com/chickadeetreecreations/

HER AMAZON STOREFRONT:   https://www.amazon.com/shop/jccauthon  (Personal Favorite Products & Tools, Books, Craft Storage Ideas, and More.  These are affiliate links. I earn a small commission. You do not pay more for the items.)

Tuesday, December 15, 2020

Pattern: Full-Size Christmas Stocking


Good morning, everyone!  I hope that you are having a merry holiday season.  As Christmas approaches here, the kids and I have been pulling out Christmas decorations and decking the halls, so to speak.  We found a bit of an unhappy surprise when I was unpacking our garlands and stockings.

We had a mouse.

Being on a farm and being surrounded by fields that are harvested every October and November, having a mouse in the house was nothing new.  But I've never had one get into our Christmas decorations before.  The lid of the plastic tub they were in didn't get closed well the year before, and well, mice can squeeze into the darnedest places.

So, I had to set to work crocheting new stockings for the kids and myself.  This is one of my first written patterns, but I thought I would share it here today since I am using it to make new stockings for everyone.

As always, the pattern is available for free down below, but if you want to purchase the ad-free version, click on the links below the pattern to purchase your very own PDF version of the pattern.

LARGE CROCHET CHRISTMAS STOCKING 

Size: Stocking is approximately 6 inches wide and approximately 15 inches long once completed.

Hook: 5.00 mm (H) hook

Yarn: 270 yards of any light #4 weight yarn (Red Heart Super Saver, Caron Simply Soft, or something similar), 100% Acrylic

Stitch Knowledge Needed:

CH – Chain

ST – Stitch

SL ST – Slip Stitch

DC – Double Crochet

DC2TOG – Double Crochet 2 Together

Special Stitches:

DC2TOG: YO, Insert hook into first stitch, YO and pull through stitch. YO and pull through two loops on hook. YO, Insert hook into second stitch, YO and pull through stitch. YO and pull through two loops on hook. YO again and pull through all remaining loops on hook.

Pattern

Starting at the toe:

Chain 4. Sl st ends together to form a ring. Chain 2.

Round 1: Crochet 10 DC into center of ring. Sl st round closed. Chain 2.

Round 2: DC in first stitch at base of Chain 2, and DCx2 in each stitch around. Sl st round closed. Chain 2.

Round 3: DC in first stitch at base of Chain 2, DC in next stitch. *DCx2 in the following stitch, DC in next stitch. Repeat from * around. Sl st round closed. Chain 2.

Round 4: DC in first stitch at base of Chain 2, DC in next two stitches. *DCx2 in the following stitch. DC in the next two stitches. Repeat from * around. Sl st round closed. Chain 2.

Round 5: DC in first stitch at base of Chain 2. DC in each stitch around. Sl st round closed. Chain 2. (42 stitches)

Round 6: DC in first stitch at base of Chain 2. DC in each stitch around. Sl st round closed. Chain 2.

Round 7: DC in first stitch at base of Chain 2. DC in each stitch around. Sl st round closed. Chain 2.

Round 8: DC in first stitch at base of Chain 2. DC in each stitch around. Sl st round closed. Chain 2.

Round 9: DC in first stitch at base of Chain 2. DC in each stitch around. Sl st round closed. Chain 2.

Round 10: DC in first stitch at base of Chain 2. DC in each stitch around. Sl st round closed. Chain 2.

Round 11: DC in first stitch at base of Chain 2. DC in each stitch around. Sl st round closed. Chain 2.

Round 12: DC in first stitch at base of Chain 2. DC in each stitch around. Sl st round closed. Chain 2.

Round 13: DC in first stitch at base of Chain 2. DC in each stitch around. Sl st round closed. Chain 2.

Round 14: DC in first stitch at base of Chain 2. DC in each stitch around. Sl st round closed. Chain 2.

Round 15: DC in first stitch at base of Chain 2. DC in each stitch around. Sl st round closed. Chain 2.

Round 16: DC in first stitch at base of Chain 2. DC in each stitch around. Sl st round closed. Chain 2.

Round 17: DC in first stitch at base of Chain 2. DC in each stitch around. Sl st round closed. Chain 2.

Round 18: DC in first stitch at base of Chain 2. DC in each stitch around. Sl st round closed. Chain 2.

Round 19: DC in first stitch at base of Chain 2. DC in each stitch around. Sl st round closed. Chain 2.


Heel:

Row 20: DC in stitch at base of Chain 2 and in each of the next 17 stitches. Chain 2 and TURN your work.

Row 21: DC2tog (stitch at base of Chain 2 and next stitch), DC across until you have two stitches left. DC2tog those two stitches. Chain 2 and TURN your work.

Row 22: DC2tog (stitch at base of Chain 2 and next stitch), DC across until you have two stitches left. DC2tog those two stitches. Chain 2 and TURN your work.

Row 23: DC2tog (stitch at base of Chain 2 and next stitch), DC across until you have two stitches left. DC2tog those two stitches. Chain 2 and TURN your work.

Row 24: DC2tog (stitch at base of Chain 2 and next stitch), DC across until you have two stitches left. DC2tog those two stitches. Chain 2 and TURN your work.

Row 25: DC2tog (stitch at base of Chain 2 and next stitch), DC across until you have two stitches left. DC2tog those two stitches. Chain 2 and TURN your work.

Row 26: DC2tog (including stitch at base of Chain 2) across.


Leg:

Round 27: Chain 2. Picking up stitches around the heel, DC around the edge of the heel. DC2tog where heel and Round 19 meet, then DC in each stitch around the top edge of the foot section until you reach the heel join again. DC2tog to connect the heel and foot. DC up the side of the heel and across the top. (42 stitches total, not including the Chain 2.) Sl st the round closed. Chain 2.

Round 28: DC in stitch at base of Chain 2 and in each stitch around. Sl st to close round. Chain 2.

Round 29: DC in stitch at base of Chain 2 and in each stitch around. Sl st to close round. Chain 2.

Round 30: DC in stitch at base of Chain 2 and in each stitch around. Sl st to close round. Chain 2.

Round 31: DC in stitch at base of Chain 2 and in each stitch around. Sl st to close round. Chain 2.

Round 32: DC in stitch at base of Chain 2 and in each stitch around. Sl st to close round. Chain 2.

Round 33: DC in stitch at base of Chain 2 and in each stitch around. Sl st to close round. Chain 2.

Round 34: DC in stitch at base of Chain 2 and in each stitch around. Sl st to close round. Chain 2.

Round 35: DC in stitch at base of Chain 2 and in each stitch around. Sl st to close round. Chain 2.

Round 36: DC in stitch at base of Chain 2 and in each stitch around. Sl st to close round. Chain 2.

Round 37: DC in stitch at base of Chain 2 and in each stitch around. Sl st to close round. Chain 2.

Round 38: DC in stitch at base of Chain 2 and in each stitch around. Sl st to close round. Chain 2.

Round 39: DC in stitch at base of Chain 2 and in each stitch around. Sl st to close round. Chain 2.

Round 40: DC in stitch at base of Chain 2 and in each stitch around. Sl st to close round. Chain 2.

Round 41: DC in stitch at base of Chain 2 and in each stitch around. Sl st to close round. Chain 2.

Round 42: DC in stitch at base of Chain 2 and in each stitch around. Sl st to close round. Chain 2.

Round 43: DC in stitch at base of Chain 2 and in each stitch around. Sl st to close round. Chain 2.

Round 44: DC in stitch at base of Chain 2 and in each stitch around. Sl st to close round. Chain 2.


** Lay stocking flat and find the two stitches that make up the back (calf-side) of the stocking. Slip stitch to those two stitches, chain 12-14 stitches and slip stitch into the same stitch to create a hanging loop. Chain 2. (Attach new color with Chain 2 if you want the cuff to be a different color.


Round 45: DC in stitch at base of Chain 2 and in each stitch around. Sl st to close round. Chain 2.

Round 46: DC in stitch at base of Chain 2 and in each stitch around. Sl st to close round. Chain 2.

Round 47: DC in stitch at base of Chain 2 and in each stitch around. Sl st to close round. Chain 2.

Round 48: DC in stitch at base of Chain 2 and in each stitch around. Sl st to close round. Chain 2.

Round 49: DC in stitch at base of Chain 2 and in each stitch around. Sl st to close round. Chain 2.

Round 50: DC in stitch at base of Chain 2 and in each stitch around. Sl st to close round. Chain 2.

Fasten off and weave in ends. Fold over cuff to expose the chain of 12-14 stitches to hang your stocking.

If you are interested in purchasing an ad-free PDF copy of this pattern, please use one of the links below.  I thank you for your support. 

Purchase on Gumroad Purchase on Payhip

Once again, I hope everyone has a wonderful holiday season, even with COVID-19.  Remember to love one another this holiday season, and stay safe.

Tuesday, September 15, 2020

Pattern: Rectangle Double-V Panel Shawl

Good morning, everyone!  It's a beautiful day here in eastern North Carolina.  It's still warm, but it's not blazing hot.  The sun is out, the garden is luscious and full of fruits and vegetables, and the animals are all happy.

And I'm inside canning more potatoes.  Hah!

Since I am sitting here watching the pressure canner, I thought I would take a minute and share one of my more recent patterns.  With the cool weather coming, this pattern is a definite must-make as I can wrap it around my shoulders or neck and get my chores done here on the farm.

As always, the pattern is available for free down below, but if you want to purchase the ad-free version, click on the links below the pattern to purchase your very own PDF version of the pattern. 

RECTANGLE DOUBLE-V PANEL SHAWL

Size: Finished shawl is approximately 25 inches wide and approximately 68 inches long once
completed.

Materials

Hook: 6.5 mm (K) hook

Yarn: 3 skeins of Red Heart Super Saver Ombre, 100% Acrylic, #4 Weight Yarn

Color:  Deep Teal

Stitch Knowledge Needed:

CH – Chain

ST – Stitch

FDC – Foundation Chain Double Crochet

DC – Double Crochet

Special Stitches:

FDC -   Make a slip knot and place your yarn on your hook.  Chain 4.  Yarn over and insert hook through the center of the first chain (4th chain from the hook), picking up 2 loops of the first chain.  Yarn over and pull the yarn through the first chain.  You should have 3 loops on your hook.  Yarn over again and pull through one loop on your hook.  Yarn over and drawn through the next two loops.  Yarn over once more and draw through the last 2 loops on hook.  To continue working, start each repetition by first yarning over, then insert your hook through the base stitch of the previous FDC.

Pattern:

Row 1:  FDC for 170 sts.

Row 2: Ch 1 and turn.  DC into st at base of ch and in each st across.

Repeat previous row 6 more times for a total of 8 rows of DC (including foundation row).

Row 9: Ch 1 and turn.  DC into st at base of ch 1.  Skip next st, DC 2 times in following st.  (Skip 1, 2 DC in next st).  Repeat across.  Two DC in final st.

Repeat previous row 7 times for a total of 8 rows of Double V Stitch.

Row 17:  Repeat Row 2 eight times.

Repeat the pattern of 8 rows of DC, 8 rows of Double V Stitch, and 8 rows of DC one more time to achieve the width of the shawl in the above photo, or you can repeat it two more times to make it wider.

Bind off and weave in ends.

** Note:  It took a little over two skeins of Red Heart Super Saver Ombre to complete this project with two repeats, but I used a hook size larger than the yarn called for, and I crochet loosely.  You may use less yarn for your project if you only do two repeats and crochet tighter with a smaller hook.

If you are interested in purchasing an ad-free PDF copy of this pattern, please use one of the links below.  I thank you for your support. 

Buy from Gumroad Buy from Payhip

Thank you for stopping in today.  I hope that you enjoy this shawl pattern and that it keeps you warm this winter.  As always, stay safe and protect yourself from COVID.  


Saturday, August 15, 2020

Pattern: Quick Puff Stitch Scarf

Good morning, my crafty friends.  Although we are in our hottest days of the year here in eastern North Carolina, I am already thinking ahead to the cold days of winter.  Our fall season starts here in a little over a month, but it doesn't get sufficiently cold for us until January.

But I like to be prepared.  My kids are always a) losing their hats, scarves, and gloves or b) they get them so dirty that I need multiple sets so I can wash one set while they wear another.  Either way, I try to keep a lot of different hats, scarves, and mittens/gloves on hand.

I wrote this pattern up a while back, but with it being so hot and being so busy with the garden and canning, I haven't been able to test-crochet it until recently.

 As always, the pattern is available for free down below, but if you want to purchase the ad-free version, click on the links below the pattern to purchase your very own PDF version of the pattern.

QUICK PUFF STITCH SCARF


Materials Needed:

Worsted Weight (#4) Yarn

H- Hook (5 mm)


Stitches:

HDC – Half Double Crochet

Puff Stitch

Ch - Chain

DC – Double Crochet


Special Stitches:

Foundation HDC: Chain 2.  YO and insert hook into the first chain/2nd chain from the hook.  YO and pull up a loop.  You should have three loops on your hook.  YO and pull through the first loop only.  This creates your “chain” stitch.  YO and pull through the remaining loops on your hook.  To make the next stitch (and all remaining stitches), YO and insert hook into the “chain” stitch you created in your previous HDC stitch. YO and pull up a loop.  You should have three loops on your hook.  YO and pull through the first loop only, then YO and pull through the remaining three loops on your hook.

Puff Stitch:  Yarn over and insert the hook into the stitch where you are creating your puff stitch. Yarn over again and draw through. There will be three loops on the hook.  Repeat four more times. Each time adds 2 more loops to the hook. There will be 11 loops on the hook for a 5 hdc puff stitch.  Yarn over and pull through all loops on the hook. 


Pattern


** This pattern is worked along the length of the scarf, not the width.

Row 1: Foundation Chain HDC 199 stitches.  (or any odd number of stitches to attain length of desired scarf.  Approximately 60 inches.)

Row 2:  Chain 3 (Counts as first DC and a chain 1).  Skip first stitch.  Puff stitch in second stitch from turning chain.  [Chain 1.  Skip one stitch and puff stitch in the next.]  Repeat [ ] until two stitches from the end.  Skip the next to last stitch and DC in the last stitch.  Chain 1 and turn.

Row 3:  Starting with the stitch at the base of the turning chain, HDC in every stitch across full length of scarf.  Chain 1 and turn.

Rows 4 – 5:  Repeat Row 3.

Row 6:  Repeat Row 2.

Rows 7 – 11:  Repeat Row 3.

Row 12:  Repeat Row 2.

Rows 13 – 15:  Repeat Row 3

Row 16:  Repeat Row 2

Row 17:  Repeat Row 3.

Fasten off and weave in ends.


If you are interested in purchasing an ad-free PDF copy of this pattern, please use one of the links below.  I thank you for your support. 

Buy from Gumroad Buy from Payhip

I hope that you enjoy crocheting this pattern, and I hope that the scarf you make keeps you plenty warm in the cooler days to come.  Have a great week, everyone, and stay safe as you go about your day.


Wednesday, July 15, 2020

Pattern: Sammy's Ridged Crochet Scarf

Good morning, beautiful people!  Even though summer is in full swing and it is hot enough to fry an egg on the hood of my truck, I am still thinking ahead to the upcoming winter.  Although we don't get snow (usually), it does get cold.  And I have four kids who always need hats, scarves, and gloves to wear.  

Sammy is in dire need of a new hat and scarf this year, which is why I sat down while the pressure canner was going and wrote up a new pattern.  The stitch looks complicated in the finished item photo, but I promise that it isn't.  It works up in a repeat, so it is easy to memorize.

As always, the pattern is available for free down below, but if you want to purchase the ad-free version, click on the links below the pattern to purchase your very own PDF version of the pattern.

Sammy's Ridged Scarf

Size: Scarf is approximately 6 inches wide and approximately 65 inches long (not including fringe) once completed.

Materials Needed:

Hook: 4.25 mm (G) hook

Yarn: 590 yards (1 Cake) Lionbrand Mandala Cake, 100% Acrylic, #3 Weight Yarn

Color: Spirit


Stitch Knowledge Needed:

CH – Chain

ST – Stitch

SC – Single Crochet

DC – Double Crochet

FPTC – Front Post Treble Crochet

Special Stitches:

FPTC = YO, YO, Insert Hook from Front to Back, between the posts of last and next sts; bring hook around back of post of the next st and to the front.  YO, Draw up a loop around the post, YO again and draw through two loops on hook, YO and pull through two loops on hook, and YO and pull through last two loops on hook.  Do not work the stitch behind the FPTC.


Pattern:

Chain 31. (An odd number of sts + 2)

Row 1: 1 DC in 4th chain from hook. Continue to DC in every chain until the end of the row. Turn your work.

Row 2: Ch 1. Skip the first stitch. SC in every stitch to end of row. SC in top of turning chain. Turn your work.

Row 3: Ch 3. Skip the first stitch. * For next stitch, reach below the SC to the DC row below. FPTC around the DC post. DC in the following SC. Repeat from the * to end of row. DC in the turning chain. Turn your work.

Row 4: Repeat Row 2.

Row 5: Ch 3. Skip the first stitch. * DC in the next SC. For the following SC, FPTC around the DC of the row below the SC. Repeat from the * to end of row. For last two stitches, DC in next to last stitch, then FPTC around the turning chain of the DC row below the SC.

Repeat Rows 2-5 until scarf is the desired length.

Bind off and weave in ends.

To purchase an ad-free version of this pattern, please visit my shops below:


Buy on Gumroad Buy on Payhip


I hope everyone is having a blessed day, and happy knitting/crocheting!


Wednesday, June 24, 2020

How to Can Green Beans

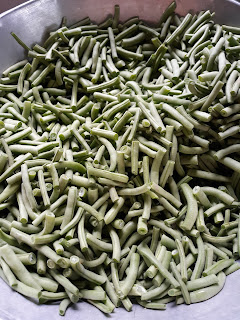
Yesterday, the kids and I canned the five and a half gallons of green beans that we had gotten from the gardens.  It was a lot of green beans, so I had trimmed, snapped, and gotten out the bad ones the day before.

I woke up early to wash and sterilize all my jars.

Then once the kids and I ate breakfast, we set to work.

Before you start to can green beans, or any vegetable for that matter, please note that all vegetables MUST be pressure-canned.  Water-bath canning does not get the vegetables in the jars hot enough to kill all the bacteria that can harm you.

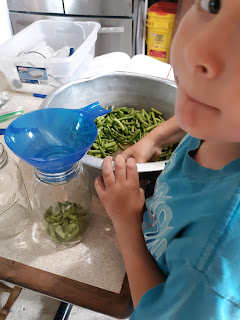
I set my youngest loose with the washing of the green beans.

How to Can Green Beans - Grindle Creek Homestead - #pressurecanning #foodpreservation #stockingup

While he was playing in the water, I set up the pressure canner on the stove.  Before you turn it on, make certain that the bottom insert is inside the pressure canner.  This keeps the jars off the bottom of the canner, which keeps them from blowing up inside the canner.  Also, check your lid well.  Make certain that the vent pipe is clear (that you can see through it to the other side from BOTH sides of the lid), and make certain that the nipple can freely rise and drop.

Fill your pressure canner with about three quarts of water.  You want enough water in the canner to be around the sides of your jars but you DO NOT want the tops of the jars covered like you do in a water-bath canner.  Since I was processing quart jars with this batch, I put in three quarts, but I use considerably less when I am processing smaller jars.

Also, before you begin, make certain that you have your rings and lids ready to go, and that all of your tools are on the counter and ready to use.  It never fails for me.  First time I can each year, I realize that I haven't gotten my tools out and cleaned them about the exact moment that I suddenly need my funnel.  So I have to stop the process and go prepare all my tools.

It's an every single year thing.

Okay, once all of that is done (and my son was done playing in the water), I set him to work packing the jars while a big pot of water came to a boil on the stove.  You will need this water to pour over your green beans before you seal them for canning.

How to Can Green Beans - Grindle Creek Homestead - #pressurecanning #foodpreservation #stockingup

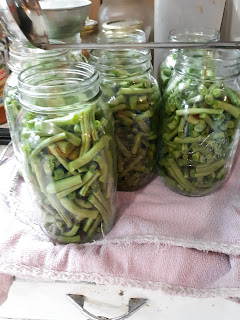
We packed nineteen jars with green beans, and we packed them tight.

I moved seven of them over to my "Ring and Lid" station.  I have a separate area for this for two main reasons.  One, I don't accidentally fill too many with hot water for one batch, and two, with the kids helping me, it puts the jars in a place where I can fill them with boiling water and the kids won't accidentally touch one.

How to Can Green Beans - Grindle Creek Homestead - #pressurecanning #foodpreservation #stockingup

So, once they are over at the Ring and Lid station, I fill them up to the neck with boiling hot water.  Then I take the Headspace Measuring Tool/ De-bubbler and I slide it down the sides inside the jar to knock any air bubbles loose.  If you knock some loose and the water level falls, you will need to add more water to that jar.  Make sure to leave a 1" headspace between the top of the jar and the top of the hot water.

Wipe the rims of the jars, and put your lid and ring on and tighten until finger tight.  You don't have to muscle these jars closed.  You turn it until you have to hold the jar to make it any tighter.  That's enough.

Place your seven jars in the canner.  You can pressure-can as few as 3 quart jars in a batch, so if you have less, don't worry.  Just put them in.  Put your lid on top and make sure it seals shut.  Then turn you pot on High heat.

This part takes the longest, especially the first batch.  You are coming from room temperature water to boiling.  It takes my pot about thirty to forty-five minutes to do this.  Once the steam is venting out the steam pipe in a steady flow, start your timer for 10 minutes.

When your timer goes off, put the weight or pressure regulator (depending on your model of pressure canner) on top of the vent pipe.  This allows the canner to start building pressure.  Watch your gauge now.  After a few minutes, it will start to climb.

Now, for my altitude, I pressure-can at 10 lbs of pressure.  If you are in a higher altitude than me (which most of the world is because I am at sea level), you will need to find out your altitude and check your canner's manual or the National Center for Home Food Preservation website to find your pounds of pressure for your altitude and how long you will need to process at that amount of pressure.

For me, it is 10 lbs of pressure for 25 minutes for quart jars of green beans.

Now, when you hit your amount of pressure, you will need to lower your heat under your pot to maintain that amount of pressure for your allotted amount of minutes.  For me, I go from High heat to Medium-Low heat, or about a 4 if you have a numbered dial.  If it goes one pound higher, that is fine, but if it goes below your pounds per pressure amount, you have to let it come back up to the pounds of pressure you need then restart your timer.

Just whatever you do, DO NOT REMOVE THE LID OR THE PRESSURE REGULATOR AT ANY POINT DURING THIS PROCESS.  I can't stress that enough.

DON'T DO IT.

Once your timer has gone off and you have processed your green beans for your allotted number of minutes at your specified pounds of pressure, turn the heat off.  Nothing else.  Just turn off the heat and let that pot depressurize.  For me, that takes about half an hour.  You will let that pot sit until the pressure gauge is back to zero and the nipple has dropped.  I let mine sit for five extra minutes once the nipple has dropped just to make sure.

When this has finally happened, you want to open the lid away from your face.  You want the steam to escape off the back of the pot, not the front.

That is not a facial steaming that you want, I promise you.

Remove your jars and place them on an old bath towel on a safe surface.  I use the other end of my kitchen table.  I prepare at one end and put my finished goods at the other to cool.

How to Can Green Beans - Grindle Creek Homestead - #pressurecanning #foodpreservation #stockingup

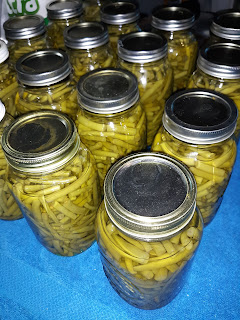
And there you have it.  Jars of canned green beans.

If you have to do multiple batches, just repeat the steps again.  The heating up process once you put the lid on won't be so long after the first batch because the water will still be fairly hot, but the steps are the same.

I hope this helps out everyone.  I know this year a lot of us are trying to preserve our own food due to Coronavirus, and some of us have never done this before.  If you have any questions, please feel free to leave me a comment.

Have fun canning!

Wednesday, June 17, 2020

Pattern: Quick and Easy Crochet Circular Coaster

Yesterday, we had more rain.  We stayed on schedule for the day, and my mom watched the kids (except for the Girl), and my Dad, the Girl, and I headed into town to take her to the dentist and do our every-other-week resupply.  She got through her dentist appointment okay, but her mouth will be sore for the couple of days.  It was still raining when we got home, so we unloaded everything and everyone went to their own homes and hunkered down for the day.

Which, for me, means I crocheted some more.  Ha!

I worked on my cotton scrap box while I chilled out in my chair with my hot tea.  Every year, I make an assortment of coasters and placemats for the Farmer's Market and my Etsy shop, so that's what I worked on yesterday afternoon.

These are simple round coasters.  If you can join a ring, double crochet, chain, and slip stitch, you can make these coasters easily.  I use Worsted Weight dishcloth cotton yarn for my projects along with an H-Hook (5.00 mm).  I also tend to crochet tight with cotton, so you may need to adjust your hook size for your project to lay flat.  With all of that being said, let's get to the pattern.


Quick and Easy Crochet Circular Coaster Pattern

Materials:


H - Hook (5.00 mm)
Worsted Weight Cotton Yarn  (any worsted weight will work, but cotton will be the most absorbent when it comes to condensation.)


Project Notes:

*  The (Chain 2) at the beginning of every round counts as the first stitch.
*  The first crocheted stitch of each round is always done in the same stitch as the turning chain.


*  The last stitch(es) of every round are always done in the top of the last stitch of the previous row, the one hiding beneath the turning chain.


Pattern:

Tie a slip knot around your hook.  Chain 4 and slip stitch into the first chain to make a circle.  Chain 2.

Round 1:  Remember that your (Chain 2) will always count as your first stitch.  DC x 11 into the center of the ring.  Slip Stitch in the top of the Chain 2 to close round.  (12 stitches)

Round 2:  Chain 2.  DC in the stitch at the base of the Chain 2.  DC 2 times into the next stitch and in the remaining 10 stitches, including the very last stitch tucked under the Chain 2.  Slip stitch in the top of the Chain 2 to close round.  (24 stitches)

Round 3:  Chain 2.  DC in base of Chain 2. DC in next stitch. (2 DC, 1 DC) around, ending with a 1 DC in the stitch tucked under the Chain 2.  Slip Stitch in top of the Chain 2 to close round.  (36 stitches)

Round 4.  Chain 2.  DC in base of the Chain 2.  DC in each of the next two stitches.  (2 DC, 1 DC, 1 DC) around circle, ending with a second 1 DC in the last stitch tucked under the Chain 2.  Slip stitch to the top of the Chain 2 to close the round.  (48 stitches)

Fasten off and weave in ends.