


Handspan, a free knitting pattern from Knitty.com. Free knitting pattern for a pair of bias-knit gloves using the SSGT technique.
INTRODUCTION
Handspan
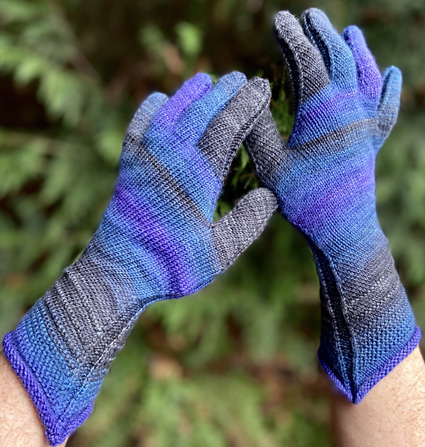 by Jeny Staiman

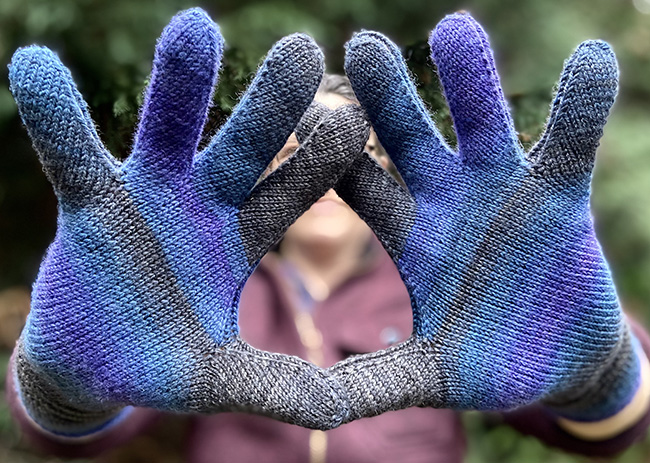
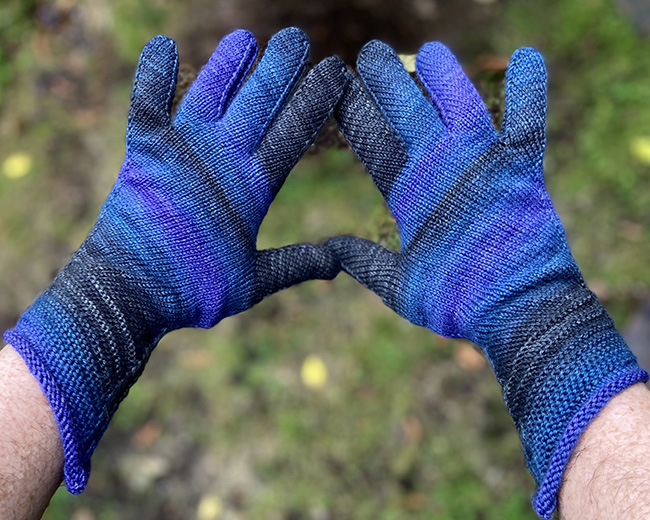
What I love most about knitting is how versatile it is. You can take a classic form and reinvent it in all kinds of different ways. I'm especially fond of knitting on the bias because I feel drawn to the aesthetic of bold diagonals. These bias-knit gloves are visually striking and also highly functional: the rounds line up perfectly across the thumb and pinky, and this provides superior elasticity right where you need it.
Many other designers share my appreciation for bias-knit hand wear, but the gloves in this pattern are unique in a number of ways. They are worked entirely in the round with no short rows. The anatomy of the hand drives the design. Bias direction is continuous from cuff to fingertips. The hand and all five fingers are worked in a single unbroken strand using the Single Strand Glove Technique as outlined in my Continuity pattern.
 photos: Jeny Staiman


SIZE
Adult S[M, L]
FINISHED MEASUREMENTS
Glove circumference (measured around the palm): 6[7, 8] in/ 15.5[18, 20.5] cm
Glove length (top of wrist to tip of longest finger): Length is adjustable
Note: Choose a size 0.5 to 1 inches/1 to 2.5 cm smaller than actual hand circumference.
MATERIALS
Yarn
![]() Twisted Fiber Art [80% Merino, 10% Cashmere, 10% Nylon; 365 yd/330 m per 3.5 oz/100g skein]; Color: Raven self-striping; 1 skein
Twisted Fiber Art [80% Merino, 10% Cashmere, 10% Nylon; 365 yd/330 m per 3.5 oz/100g skein]; Color: Raven self-striping; 1 skein
Yarn characteristics: This pattern looks best in a long-run self-striping yarn. Choose a plied yarn with a tight twist to ensure the gloves are hardwearing and warm. Approximately 225 yds/200 m required.
Recommended needle size
[always use a needle size that gives you the gauge listed below - every knitter's gauge is unique]
![]() 2 sets of US #1/2.5mm needles for small circumference in the round.
2 sets of US #1/2.5mm needles for small circumference in the round.
Note:
If you're working on Magic Loop or two circulars, you might find a set of DPNs easier for the second set.
Notions
![]() stitch markers
stitch markers
![]() yarn needle
yarn needle
GAUGE
32 sts/44 rounds = 4 inches/10 cm in stockinette stitch.
PATTERN NOTES
[Knitty's list of standard abbreviations and techniques can be found here.]
Techniques:
- Single Strand Glove Technique (SSGT)
- Provisional cast on
- Slipping sts: All sts are slipped purlwise, i.e., without changing the direction of stitch mount, unless otherwise noted.
These gloves are worked with paired increases on one side and paired decreases on the other. Shaping takes place on the sides.
Thumb position: Thumb is positioned exactly opposite the little finger. Because these gloves are highly elastic, they fit either hand equally well.
Construction Details
Gloves have a variety of details that are fiddly; the following are my recommendations for achieving the best results.
Use of cast ons between fingers: This pattern uses a provisional cast on method at the base of the fingers. This provides superior elasticity for areas of high tension.
Closing gaps between fingers: At the base of each finger you will pick up 4 sts, and there will be gaps between them and the main set. These gaps are closed as follows:
- Close gap leaning left: sl 1 st purlwise, pick up a loop in the gap from back to front, return both sts to left needle and work k2tog tbl.
- Close gap leaning right: pick up a loop in the gap from front to back, sl 1 st knitwise, return both sts to left needle and work k2tog.
Use of needles: Rather than having you repeatedly slip stitches to holders, the pattern uses a second set of needles to work the thumb and fingers. These rounds are fairly small, and you might find it easier to use short DPNs.
Span Pattern
The basic fabric is a two-round pattern. Note there will be a marker at the midpoint of the round.
- Round 1 (Bias): K1, m1L, k to 4 sts before marker, k2tog, p2, ssk, k to last 3 sts, m1R, k1, p2.
- Round 2 (Plain): K to 2 st before marker, p2, k to last 2 sts, p2
When pattern refers to "Span Pattern" rounds, use these rounds unless stated otherwise.
Note: the marker refers to the midpoint of the round – depending on how you divide your stitches up on your needles, you might not have an actual marker here, just a break between needles.Variations of Span Pattern Round 1 are used to shape the glove in various places by altering the stitch count – transitioning from wrist to hand, shaping the thumb, etc. These variations are:
- Span Pattern 2-stitch decrease: K1, m1L, k to 5 sts before marker, k3tog, p2, sssk, k to last 3 sts, m1R, k1, p2. 2 sts decreased.
- Span Pattern 2-stitch increase: K1, m1L, k to 2 st before marker, p2, k to last 3 sts, m1R, k1, p2. 2 sts increased.
- Span Pattern 4-stitch increase: K1, m1L, k to 3 sts before marker, m1R, k1, p2, k1, m1L, k to last 3 sts, m1R, k1, p2. 4 sts increased.
DIRECTIONS

Using your preferred stretchy method, cast on 52[60, 68] sts. Distribute across needles as you prefer and join for working in the round. Rounds begin on the "pinky" (little finger) side.
Cuff
Setup: K 24[28, 32] , p2, pm, k to last 2 sts, p2.
Work 7 rounds even in Span Pattern, starting and ending with Round 2.
Next, you'll work an adjusted Span Pattern to make a garter stitch band; Round 1 is purled instead of knitted, Round 2 is worked as per the standard Span Pattern.
Round 1, Purlwise Span Pattern Round 1: K1, m1L, p to 4 sts before marker, k2tog, p2, ssk, p to last 3 sts, m1R, k1, p2.
Round 2: Work as per Span Pattern Round 2.
Repeat the last 2 rounds 5 more times.
To transition from the garter band to stockinette for the remainder of the glove, work a 3-stage fade:
Stage 1
Work Span Pattern Round 1.
Next round, Purlwise Span Pattern Round 2: K1, p to 3 st before marker, k1, p2, k1, p to last 3 sts, k1, p2.Stage 2
Work 3 rounds in Span Pattern, starting and ending with Round 1, then work Purlwise Span Pattern Round 2.Stage 3
Work 4 rounds even in Span Pattern, work Purlwise Span Pattern Round 1, then Span Pattern Round 2.
Wrist
Next round, Span Pattern 2-stitch decrease: K1, m1L, k to 5 sts before marker, k3tog, p2, sssk, k to last 3 sts, m1R, k1, p2. 2 sts decreased.
Work 3 rounds in Span Pattern, starting and ending with Round 2.
Repeat the last four rounds 3 more times. 44[52, 60] ] sts.
Thumb Gusset
Round 1, Span Pattern 2-stitch increase: K1, m1L, k to 2 sts before marker, p2, k to last 3 sts, m1R, k1, p2. 2 sts increased.
Round 2: Span Pattern Round 2.
Repeat Rounds 1-2 three more times. 52[60, 68] sts.
Next round, Span Pattern 4-stitch increase: K1, m1L, k to 3 sts before marker, m1R, k1, p2, k1, m1L, k to last 3 sts, m1R, p2. 4 sts increased.
Next round: Span Pattern Round 2.
Repeat the last two rounds 3 more times. 68[76, 84] sts.
Next round: Span Pattern 2-stitch increase. 2 sts increased.
Next round: Span Pattern Round 2.
Repeat the last two rounds 5[6, 7] more times. 80[90, 100] sts.
Next round: Span Pattern Round 1.
Next round (half round): K to 2 st before marker, p2, remove marker. Stop here.
Thumb
Setup: Place the last 11[12, 13] sts worked onto needles from second set; with this new set, k 9[10, 11] , and CO 4 sts using a provisional cast on. 24[26, 28] thumb sts. Rem 60[68, 76] hand sts will be held for now – rearrange as you wish to keep them on the needles and out of your way.
From here the thumb is worked using the second set of needles. Distribute thumb sts as you prefer; do NOT join the round yet.
Draw a loop of working yarn from under the needle, as illustrated in Single Strand Glove Technique, then join the round.
Round 1, setup (half round): K 9[10, 11] , p2. This is the new start of the round.
Round 2: (K 10[11, 12] , p2) 2 times.
Round 3: Ssk, k 7[8, 9] , m1R, k1, p2, k1, m1L, k 7[8, 9] , k2tog, p2.
Repeat Rounds 2-3 until long side of finger tube measures approximately 0.25 inches/0.5 cm less than actual finger length, ending with Round 2.
To setup for fingertip decrease, place marker or divide stitches at the midpoint of the round.
Round 1, decrease: Ssk, k to 2 sts before midpoint, p2, k to last 4 sts, k2tog, p2. 2 sts decreased.
Round 2: K to 2 sts before midpoint, p2, k to last 2 sts, p2. .
Repeat Round 1-2 once more. 20[22, 24] sts.
Next round: Ssk, k to 4 sts before midpoint, k2tog, p2, ssk, k to last 4 sts, k2tog, p2. 16[18, 20] sts.
Repeat Round 2.
Next round: Ssk around, removing marker as you go. 8[9, 10] sts.
To close: Thread the loop of working yarn through a yarn needle. Draw through each of the stitches on the circular needle, snug, then thread through to the inside of the finger. As described in Single Strand Glove Technique, turn finger inside out, bring ball of yarn through the loop, and snug. Anchor working strand along the side of the finger.
Little Finger
Note: because the glove is worked on the bias and moves up the hand at an angle, the thumb and pinky are on opposite sides of the same round. Also, when you resume working the hand, you are not at the beginning of the round, but on the thumb side. 60[68, 76] sts active on the needles.
Setup 1 (half-round): Undo the provisional CO and place the 4 sts on a needle from your second set, in position to be worked. Sl 1, p2, pm, close gap leaning left as described in Construction Details section above, k to last 2 sts, p2. 64[72, 80] sts.
Setup 2: Place the last 9[10, 11] sts worked onto a needle from the second set. K 7[8, 9] , CO 4 using provisional cast on. 20[22, 24] little finger sts. Rem 48[54, 60] sts will be held for now – rearrange as needed to keep them out of your way.
From here the little finger is worked using the second set of needles. Distribute sts across needles as you prefer, but do NOT join the round yet.
Draw a loop of working yarn from under the working needle, as illustrated in Single Strand Glove Technique, then join the round.
Note: one gap still remains on the other side of the 4 newly picked-up sts at the base of the thumb; you will work back to this point after you finish the little finger.
Round 1: (half round): K 7[8, 9] , p2. This is the new start of the round.
Round 2: (K 8[9, 10] , p2) 2 times.
Round 3: K1, m1L, k 5[6, 7] , k2tog, p2, ssk, k 5[6, 7] , m1R, k1, p2.
Repeat Rounds 2-3 until long side of finger tube measures approximately 0.25 inches/0.5 cm less than actual finger length, ending with Round 2.
To setup for fingertip decrease, place marker or divide stitches at the midpoint of the round.
Round 1, decrease: K to 4 sts before midpoint, k2tog, p2, ssk, k to last 2 sts, p2. 2 sts decreased.
Round 2: K to 2 sts before midpoint, p2, k to last 2 sts, p2.
Repeat Round 1-2 once more. 16[18, 20] sts.
Next round: Ssk, k to 4 sts before midpoint, k2tog, p2, ssk, k to last 4 sts, k2tog, p2. 12[14, 16] sts.
Repeat Round 2.
Next round: Ssk around, removing marker as you go. 6[7, 8] sts.
Close as per Thumb.
Upper hand
Setup: Undo the provisional CO at the little finger and place the 4 sts in position to be worked. Sl 1 pw, p2, close gap leaning left as described in Construction Details section above; k to gap at base of thumb, close gap leaning right as described in Construction Details section above, p2, k to gap before newly picked-up sts at pinky, close gap leaning right, p2. If any sts remain on the left needle, move them onto the next needle. This will be the start of the round. 52[58, 64] sts.
Work even in Span Pattern until the upper hand reaches the base of the ring finger on the middle finger side.
Ring finger
Setup: Place the last 10[11, 12] sts worked onto a needle from the second set, k 8[9, 10] , CO 4 using provisional cast on. 22[24, 26] ring finger sts. Rem 34[38, 42] sts will be held for now – rearrange as needed to keep them out of your way.
From here the ring finger is worked using the second set of needles. Distribute sts across needles as you prefer, but do NOT join the round yet.
Draw a loop of working yarn from under the working needle, as illustrated in Single Strand Glove Technique, then join the round.
Round 1, (half-round): K 8[9, 10] , p2.
Round 2: (K 9[10, 11] , p2) 2 times.
Round 3: K1, m1L, k 6[7, 8] , k2tog, p2, ssk, k 6[7, 8] , m1R, k1, p2.
Repeat Rounds 2-3 until long side of finger tube measures approximately 0.25 inches/0.5 cm less than actual finger length, ending with Round 2.
To setup for fingertip decrease, place marker or divide stitches at the midpoint of the round.
Round 1, decrease: K to 4 sts before midpoint, k2tog, p2, ssk, k to last 2 sts, p2. 2 sts decreased.
Round 2: K to 2 sts before midpoint, p2, k to last 2 sts, p2.
Repeat Round 1-2 once more. 18[20, 22] sts.
Next round: Ssk, k to 4 sts before midpoint, k2tog, p2, ssk, k to last 4 sts, k2tog, p2. 14[16, 18] sts.
Repeat Round 2.
Next round: Ssk around, removing marker as you go. 7[8, 9] sts.
Close as per Thumb.
Middle Finger
Note: because the hand is worked at an angle, the fabric is not yet long enough to reach the base of the middle finger on the forefinger side. Before you separate and work the middle finger, you need to work a few more rounds.
Setup: Undo the provisional CO at the ring finger and place the 4 sts on a needle from your second set, in position to be worked. Sl 1 pw, p2, close gap leaning left as described in Construction Details section above, k to 2 sts before marker, p2, k 16[18, 20] , close gap leaning right as described in Construction Details section above, p2. This will be the start of the round. If any sts remain on the left needle, move them onto the next needle in the set. 38[42, 46] sts.
Work 3 rounds in Span Pattern, starting and ending with Round 1.
Finger separation
Setup: Place the last 11[12, 13] sts worked onto a needle from the second set, k 9[10, 11] , CO 4 using provisional cast on. 24[26, 28] middle finger sts. Rem 18[20, 22] sts will be held for now – rearrange as needed to keep them out of your way.
From here the middle finger is worked using the second set of needles. Distribute sts across needles as you prefer, but do NOT join the round yet.
Draw a loop of working yarn from under the working needle, as illustrated in Single Strand Glove Technique, then join the round.
Round 1, (half round): K 9[10, 11] , p2.
Round 2: (K 10[11, 12] , p2) 2 times.
Round 3: K1, m1L, k 7[8, 9] , k2tog, p2, ssk, k 7[8, 9] , m1R, k1, p2.
Repeat Round 2-3 until long side of finger is about 0.25 inch / 0.5 cm less than actual finger length, ending with Round 2.
To setup for fingertip decrease, place marker or divide stitches at the midpoint of the round.
Round 1, decrease: K to 4 sts before midpoint, k2tog, p2, ssk, k to last 2 sts, p2. 2 sts decreased.
Round 2: K to 2 sts before midpoint, p2, k to last 2 sts, p2.
Repeat Round 1-2 once more. 20[22, 24] sts.
Next round: Ssk, k to 4 sts before midpoint, k2tog, p2, ssk, k to last 4 sts, k2tog, p2. 16[18, 20] sts.
Repeat Round 2.
Next round: Ssk around. 8[9, 10] sts.
Close as per Thumb.
Forefinger
Setup: Undo the provisional CO at the middle finger and place the 4 sts on a needle from your second set, in position to be worked. Sl 1 pw, p2, close gap leaning left as described in Construction Details section above, kto 2 sts before marker, p2, k 8[9, 10] , close gap leaning right as described in Construction Details section above, p2. This will be the start of the round. If any sts remain on the left needle, move them onto the next needle. 22[24, 26] sts.
Work in Span Pattern until long side of finger tube measures approximately 0.25 inches/0.5 cm less than actual finger length.
To setup for fingertip decrease, place marker or divide stitches at the midpoint of the round.
Round 1, decrease: K to 4 sts before midpoint, k2tog, p2, ssk, k to last 2 sts, p2. 2 sts decreased.
Round 2: K to 2 sts before midpoint, p2, k to last 2 sts, p2.
Repeat Round 1-2 once more. 18[20, 22] sts.
Next round: Ssk, k to 4 sts before midpoint, k2tog, p2, ssk, k to last 4 sts, k2tog, p2. 14[16, 18] sts.
Repeat Round 2.
Next round: Ssk around. 7[8, 9] sts.
Close as per Thumb.
FINISHING
Wash and lay flat to dry.
Weave in the two ends on each glove. If there are any gaps in the fabric, close them by adjusting the tension on the adjacent sts and distributing any resulting slack across the row.
ABOUT THE DESIGNER
 Jeny spends her days outside with dogs, and her evenings inside with her family and her craft projects. She enjoys coming up with cool techniques and constructions in her knit designs.
Visit her on curiousknitter.com or on Ravelry as curiousjeny.
Pattern & images © 2021 Jeny Staiman