


Ellery the Elephant, a free knitting pattern from Knitty.com. Free knitting pattern for a knitted, felted elephant.
INTRODUCTION
Ellery the Elephant
 by Frances Gillespie

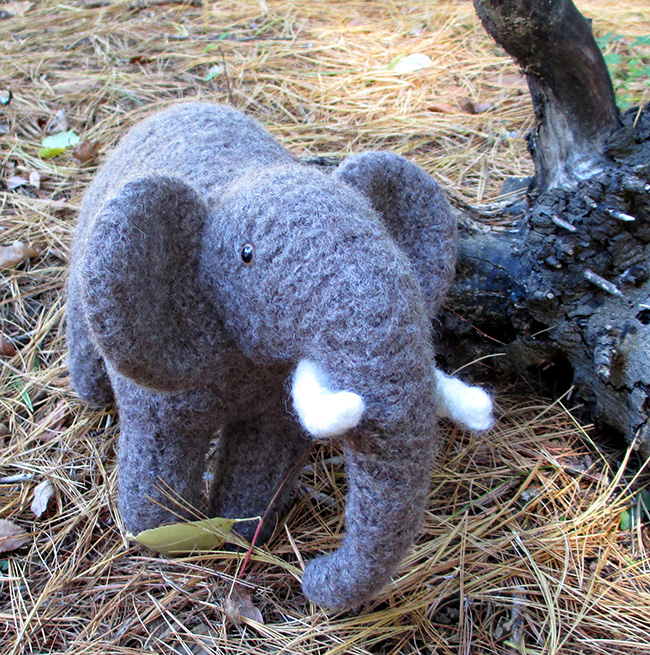
Ellery is a knitted and felted African elephant, inspired by my daughter's college semester in Botswana a couple of years ago. You may of course make her an Asian elephant by eliminating the tusks.
This pattern requires basic knitting skills but has a lot of steps; none are particularly difficult. Some experience in soft toy construction would be helpful.
 photos: Frances Gillespie


SIZE
One
FINISHED MEASUREMENTS
(after felting)
Height: 9 inches/23 cm
Length: 11 inches/28 cm
MATERIALS
Yarn
Patons Classic Wool [100% wool; 210 yd/192 m per 100g skein]
![]() [MC] Dark Gray Mix or Heath Heather; 1 skein
[MC] Dark Gray Mix or Heath Heather; 1 skein
![]() [CC] Aran; approx. 10 yds.
[CC] Aran; approx. 10 yds.
Yarn characteristics: Other pure wool yarns of a similar thickness will work perfectly, but do test knit and felt a swatch. Superwash wool does not felt! And of course, working with a yarn of a different thickness will work, but result in a different size finished elephant. If you are working with a different yarn, use needles a little larger than you might normally and do a test knit and felt to make sure you like the result. Specified yarns will make a lifelike elephant, but other colors are fine, too!
Recommended needle size
[always use a needle size that gives you the gauge listed below - every knitter's gauge is unique]
![]() US #9/5.5mm needles for working flat
US #9/5.5mm needles for working flat
Notions
![]() stitch markers
stitch markers
![]() stitch holders (or short lengths of waste yarn can be used)
stitch holders (or short lengths of waste yarn can be used)
![]() yarn needle
yarn needle
![]() sewing needle
sewing needle
![]() matching thread
matching thread
![]() two 9mm brown animal safety eyes
two 9mm brown animal safety eyes
![]() polyester fiberfill
polyester fiberfill
GAUGE
14 sts/18 rows = 4 inches/10cm (before felting)
Note: Gauge is not critical but should be loose enough to allow for shrinkage after felting.
PATTERN NOTES
[Knitty's list of standard abbreviations and techniques can be found here.]
Techniques:
- Short rows
Note: that there is no need to hide the wraps, as they disappear in the felted fabric.
DIRECTIONS
Upper Body
You will begin at the tail end and work toward the head.
Using MC, CO 17 st.
Row 1 [WS]: K
Row 2 [RS]: K6, (m1, k1) 5 times, m1, w&t. 23 sts.
Row 3: K11, w&t.
Row 4: K2, m1, k2, m1, k3, m1, k2, m1, k to end. 27 sts.
Row 5: Knit.
Row 6: K9, (m1, k2) 2 times, m1, k1, m1, (k2, m1) 2 times, k4, w&t.
Row 7: K23, w&t.
Row 8: K4, (m1, k3) 5 times, m1, k to end. 39 sts.
Row 9: Knit.
Row 10: K15, (m1, k2) 2 times, m1, k1, m1, (k2, m1) 2 times, k11, w&t.
Row 11: K37, w&t.
Row 12: K14, (m1, k3) 3 times, m1, k to end. 49 sts.
Row 13: Knit.
Row 14: K21, m1, k3, m1, k1, m1, k3, m1, k15, w&t.
Row 15: K41, w&t.
Row 16: K19, m1, k3, m1, k17, w&t.
Row 17: K39, w&t.
Row 18: Knit to end. 55 sts.
Row 19: Knit.
Row 20: K44, w&t.
Row 21: K33, w&t.
Row 22: K30, w&t.
Row 23: K27, w&t.
Row 24: K24, w&t.
Row 25: K21, w&t.
Row 26: K18, w&t.
Row 27: K15, w&t.
Row 28: K12, w&t.
Row 29: K9, w&t.
Row 30: K6, w&t.
Row 31: K3, w&t.
Row 32: Knit to end.
Row 33: Knit.
Row 34: Bind off 8 st, m1, k to end. 48 sts.
Row 35: Bind off 8 st, m1, k to end. 41 sts.
Rows 37-50: Knit 14 rows.
Row 51: Cast on 8 st, k to end. 49 sts.
Row 52: Cast on 8 st, k to end. 57 sts.
Row 53: K to last 5 sts, w&t.
Row 54: K to last 5 sts, w&t.
Row 55: Knit to end.
Row 56: Knit.
Row 57: K24 (these are for the front right side), bind off 9 st for neck opening, k to end. Put the first set of 24 st worked on a holder to be worked later, for the Right side.
Complete Left side:
Continuing on last 24 sts worked in previous row.
Row 1: Knit.
Row 2: K1, ssk, k18, W&T. 23 sts
Row 3: Knit.
Row 4: K1, ssk, k to end. 22 sts.
Rows 5-8: Knit.
Row 9: Bind off 8 st, k to end. 14 sts.
Row 10: K to last 3 sts, k2tog, k1. 1 st decreased.
Row 11: Knit.
Repeat the last 2 rows once more, and work the decrease row again. 11 sts.
Bind off all st. Cut yarn, leaving a tail about 12 inches/30 cm long. Put on yarn needle, thread through remaining sts and pull closed. Fasten off, leaving yarn tail for seaming.
Complete Right side:
Return 24 sts from holder to needles.
Row 1: Knit.
Row 2: K21, k2tog, k1. 23 sts.
Row 3: K20, W&T,
Row 4: K17, k2tog, k1. 22 sts.
Rows 5–8: Knit.
Row 9: Bind off 8 st, k to end. 14 sts.
Row 10: Knit.
Row 11: K1, ssk, k to end. 1 st decreased.
Repeat the last 2 rows twice more. 11 sts.
Bind off all st. Cut yarn, leaving a tail about 12 inches/30 cm long. Put on yarn needle, thread through remaining sts and pull closed. Fasten off, leaving yarn tail intact for seaming.

Head and Trunk:
With right side of work facing you, pick up and knit 40 sts around neck opening.
Row 1: K28, place remaining 12 st on holder (for left side of face). 28 sts.
Row 2: K16, and place last 12 st on holder (for right side of face). 16 sts.
Knit 24 rows.
Next row: K9, w&t.
Next row: K2, w&t.
Next row: K4, w&t.,
Next row: K6, w&t.
Next row: K8, w&t.
Next row: K10, w&t.
Next row: K12, w&t.
Next row: Knit.
Next row: K1, k2tog, k to last 3 sts, k2tog, k1. 2 sts decreased.
Knit 7 rows.
Repeat the last 8 rows three more times more. 8 sts.
Cut yarn, leaving a tail about 24 inches/60 cm long. Put on yarn needle, thread through remaining sts and pull closed. Fasten off, leaving yarn tail intact for seaming.
Left side of Face:
Return the 12 sts for left side of face from holder back on needle, and rejoin yarn ready to work RS.
Row 1 [RS]: K2tog, k to end. 1 st decreased.
Row 2: Knit.
Repeat the last 2 rows 4 more times. 7 sts.
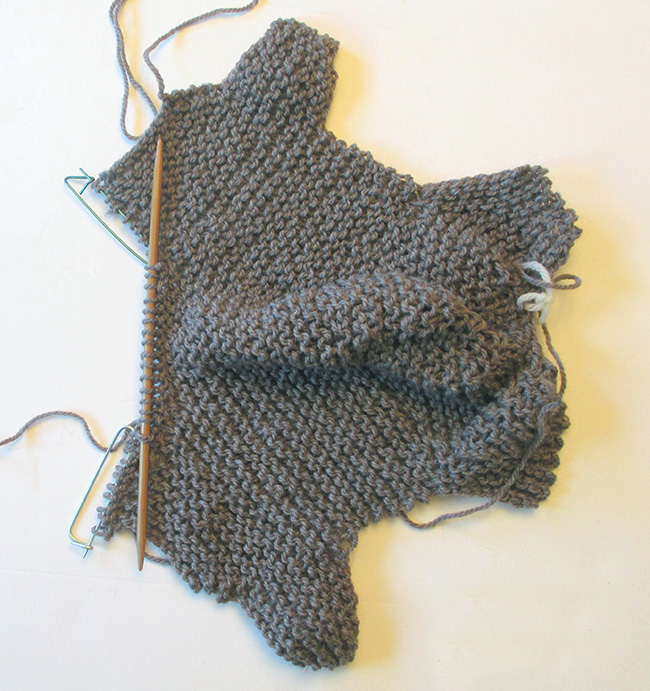
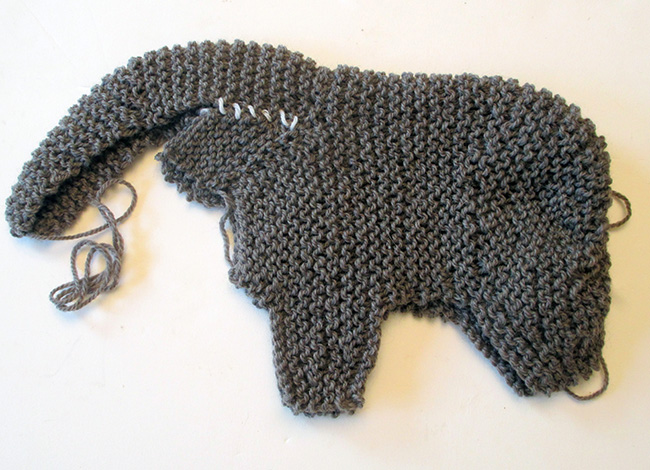
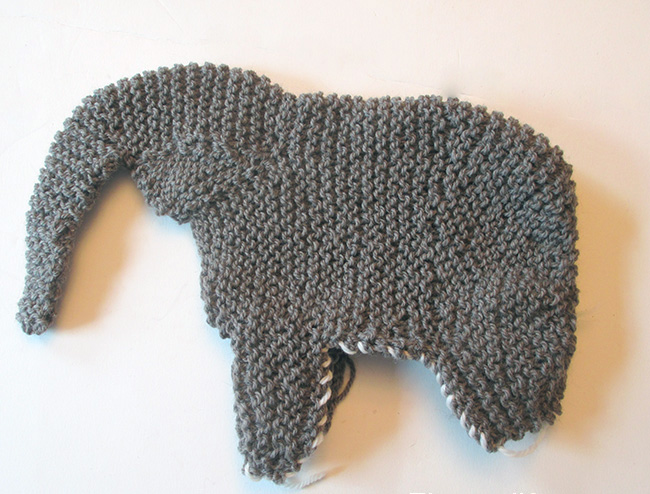
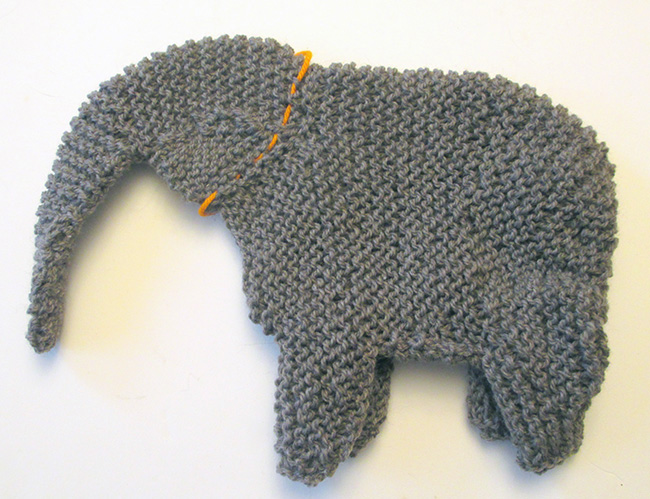
Bind off all sts. Cut yarn, leaving a tail about 12 inches/30 cm long. Thread yarn needle, and loosely seam the top edge of this left face side piece to the trunk. See below – seam is shown in white for clarity.
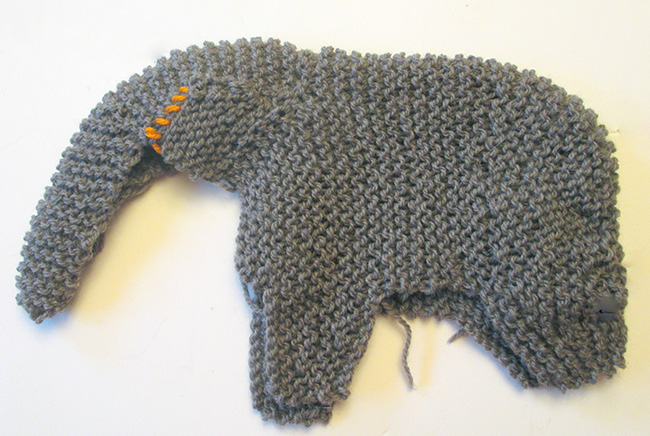
Continue seaming, sew the left edge of the left face side piece to trunk. See below – seam is shown in orange for clarity.
Right side of Face: Return the 12 sts for right side of face from holder back on needle, and rejoin yarn ready to work RS.
Row 1 [RS]: Knit.
Row 2: K2tog, k to end. 1 st decreased.
Repeat the last 2 rows 4 more times. 7 sts.
Bind off all sts. Cut yarn, leaving a tail about 12 inches/30 cm long. Thread yarn needle, and repeat the seams as for the left side of the face.
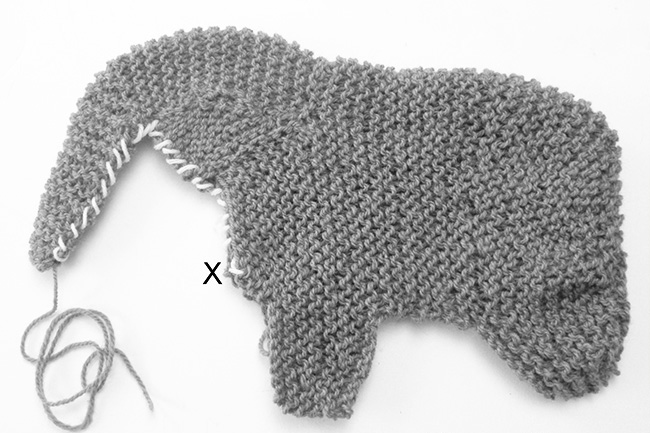
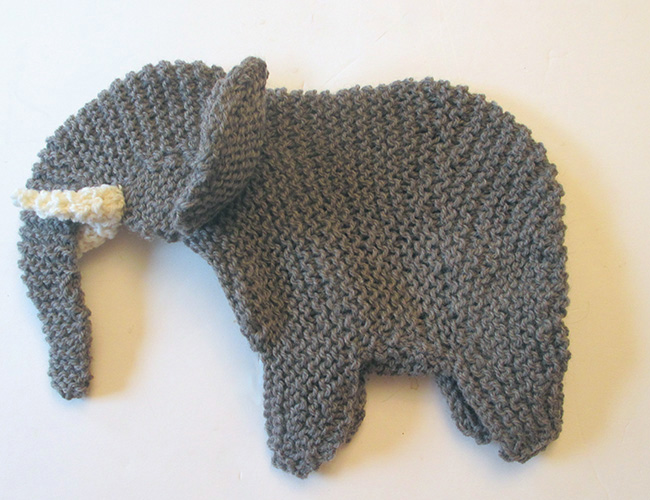
Sew the trunk seam beginning at the bottom of the trunk. Work up the trunk to chin, and down chest (see below – seam is shown in white for clarity).
LOWER BODY
You will begin at the tail end and work toward the head.
Using MC, CO 17 sts.
Row 1: K.
Row 2: K7, w&t.
Row 3: K to end.
Row 4: Knit.
Row 5: K7, w&t.
Row 6: K to end.
Row 7: K
Row 8: K8, m1, k1, m1, k8. 19 sts.
Row 9: K
Row 10: K7, w&t.
Row 11: K to end.
Row 12: K9, m1, k1, m1, k9. 21 sts.
Row 12: K7, w&t.
Row 14: Knit.
Row 15: Knit.
Rows 16: Bind off 8 st, m1, k to end. 14 sts.
Rows 17: Bind off 8 st, m1, k to end. 7 sts.
Rows 18–21: Knit.
Row 22: K2, m1, k3, m1, k2. 9 sts.
Rows 23–30: Knit
Row 31: K2, k2tog, k1, ssk, k2. 7 sts.
Row 32: CO 8 sts, k to end. 15 sts.
Row 33: CO 8 sts, k to end. 23 sts.
Row 34: K9, w&t.
Row 35: Knit to end.
Row 36: Knit.
Row 37: K9, w&t.
Row 38: k to end.
Row 39: Knit.
Repeat Rows 34-39 once more.
Row 46: Bind off 8 sts, k to end. 15 sts.
Row 47: Bind off 8 sts k to end. 7 sts.
Row 48: K2tog, k to last 2 sts, k2tog. 2 sts decreased
Row 49: Knit.
Repeat the last 2 rows once more. 3 sts.
Row 52: CDD. 1 st.
Cut yarn, leaving a tail about 24 inches/60 cm long. Put on yarn needle, thread through remaining st (this is the chest point) and pull closed. Fasten off, leaving yarn tail intact for seaming.

COMPLETING BODY:
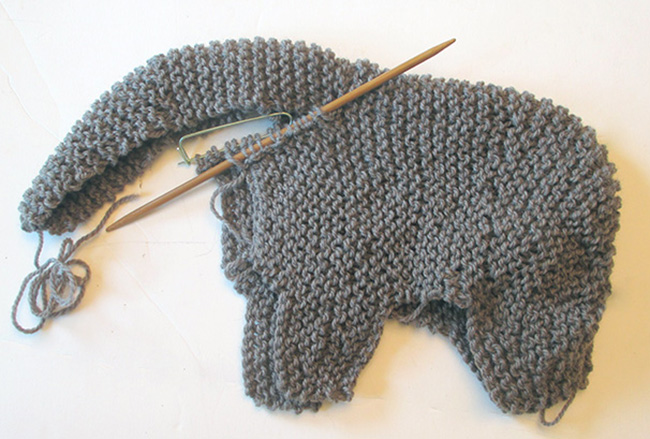
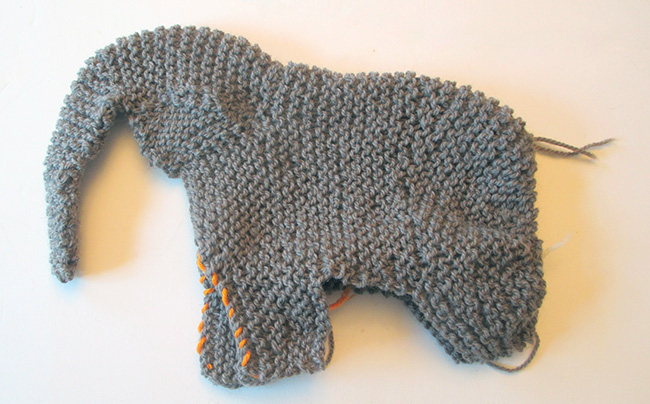
Line up the chest point of the lower body with the upper body (chest point aligns with ‘X' in Figure #6). Sew from this point down front legs but leave the bottom of the legs open (see below, seam shown in orange).
Row 1: Knit.
Row 2: (K1, k2tog) 4 times. 8 sts.
Bind off.
Cut yarn, leaving a tail about 24 inches/60 cm long, put on yarn needle. Fold the leg in half, seam across the bottom of the front foot, up the back of the front leg, body side seam, and down front seam of back leg, leaving the bottom of the back leg open. (See below – seam is shown in white for clarity). Leave a 2" opening along one body side seam for stuffing her later.
Open rear legs out flat; join MC and pick up and knit 14 sts evenly across the base of the leg.
Row 1: Knit.
Row 2: (K2, k2tog) 3 times, k2. 10 sts. Bind off all st; Cut yarn, leaving a tail about 24 inches/60 cm long, put on yarn needle. Fold rear leg in half, seam across the bottom of the rear foot, up the back of the rear leg. Close back opening and fasten off.
EARS (Make 4, they will be sewn together in pairs):
Using MC, CO 8 sts.
Row 1: Knit.
Row 2: K1, m1, k to last st, m1, k1. 2 sts increased.
Repeat the last 2 rows 3 more times. 16 sts.
Row 9: Knit.
Row 10: K1, m1, k to end. 1 st increased.
Repeat the last 2 rows 1 more time. 18 sts.
Knit 2 rows.
Next row, decrease: K2tog, k to last 2 sts, k2tog. 2 sts decreased.
Repeat the last row 1 more time. 14 sts.
Bind off.
Sew ears together in pairs. Sew ears to body using picture below as a guideline; ears are sewn along a slight C-curve, not a straight line.
TUSKS:
Using CC, CO 10 sts.
Knit 2 rows.
Next row, decrease: K2tog, k to last 2 st, k2tog. 2 sts decreased.
Repeat the last 3 rows 3 more times.2 sts.
Last row: k2tog. 1 st.
Cut yarn, leaving a tail about 12 inches/30 cm long, thread onto yarn needle and fasten off. You now have a knitted triangle. Roll the triangle into a cone and loosely stitch it in place so that it does not unroll. Sew the tusks into place on either side of the face using picture below as a guide. After felting you can shape the tusks into an upward point while still wet.
FINISHING
Fasten off all yarn ends. You are now ready to felt your elephant.
If you have a top-loading washing machine, place in a mesh bag, set on extra small load and hot water, and add a tiny pinch of laundry detergent. Start the machine. Check every five minutes or so until you reach the desired level of felting. (Be careful not to let it go through the spin cycle or it may get creases).
If you have a front-loading machine, use as short a cycle as you can, with a hot water wash and a cold rinse. You might need to run it through more than once. Check after each cycle before repeating.
Once sufficiently felted, remove from the bag, loosely stuff with newspaper and set somewhere warm to dry. When dry, remove the newspaper and attach the safety eyes, using photos as a guide for placement. Stuff firmly with polyester filling, and sew shut with matching thread. You may also need to secure any seams with needle and thread that did not completely close during felting.
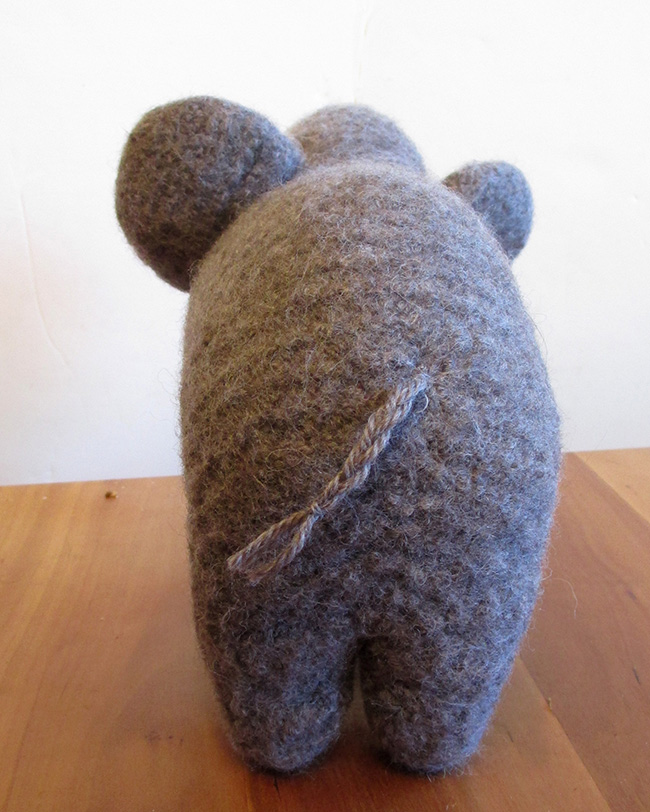
Make And Attach Tail:
Cut three pieces of MC yarn about 8 inches/20 cm long. Holding them together, tie a large knot in one end. Braid the three pieces for about 2 inches/5 cm. Tie a second, smaller knot and trim the ends to three-quarters of an inch/2 cm.
Make a small slit in the backside and push the large knot inside, leaving the rest of the tail hanging out. With sewing needle and matching thread, close up the opening, securing the tail to the rear end. The knot will hold the tail inside the body.
ABOUT THE DESIGNER
 I'm a longtime knitter who branched out into felting about 20 years ago. I'm fascinated with the process of designing the unusual, weird, and unloved critters.
Pattern & images © 2021 Frances Gillespie.