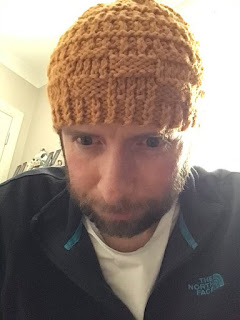
Knitting continues to keep me occupied, though this is the first time I've actually managed to knit 'something' rather than just knitting tons of different stitch swatches to 'test things out' - So I present my first ever knitting pattern for a beanie, I've nicknamed "The Salty Sea Dog" because it reminds me a bit of those Cornish fisherman's hats that you see trawler dudes wearing.
This was knitted using Stylecraft Chunky in "Gold" (my go-to for any kind of knitted work as it gives you nice big chunky knits). I used 5.5mm (US Size 9) needles.
NOTE! This pattern is knitted 'flat' and the seam is sewn from crown to brim, but because of the type of stitches I used, the seam is nicely hidden in amongst the pattern.
I got really frustrated that nearly every single pattern I found was for a 'seamless' hat knitted in the round, and as I really struggle to knit in the round for the required number of stitches for my big bonce, I figured that for a beginner this might be a good way to learn how to make a hat without either breaking your brain with a joined / circular needle, or worse, trying to knit with four needles!
Stitches you will need to know:
Knit, Purl, K2TOG (Knit 2 Together) - and that's it!
To begin:
Cast on (at least) 80 stitches (or for larger heads like mine, 90-100) using your favourite cast on (I'm a beginner so I just straight cast onto long needles)
Brim:
The brim is worked in the usual single rib so
Row 1: K1 (Edge), *K1, P1* (*Repeat to last stitch) then K1 (Edge)
Row 2: P1 (Edge), *P1, K1* (*Repeat to last stitch) then P1 (Edge)
Continue to alternate between row 1 and 2 for around 1-1.5 inches (or around 3-4cm)
Middle:
The middle section of the hat is worked in Checker Stitch. This is a really gorgeous patterned stitch worked in rows of 5.
Row 1: K1 (Edge), *K5, P5* (*Repeat to last two stitches) then K1, K1 (Edge)
Row 2-5: Work each stitch in the manner in which it is presented (in other words, purl the purls, knit the knits!)
Row 6-10: P1 (Edge), *P5, K5* (*Repeat to last two stitches) then P1, P1 (Edge)
I would say do three sets of the above (ie 30 rows in total) or use your best judgement to build up the checker pattern to suit
Crown / Top:
This is where things get fun. I used Grid Stitch for the crown / top, purely because I wanted the hat to have a bit of stretch, and also to cater for the later decreases (K2TOGs) that you'll be using nearer the top.
Row 1: K1 (Edge), *K1, P1* (*Repeat to last two stitches) then K1, K1 (Edge)
Row 2: Work each stitch in the manner in which it is presented (in other words, purl the purls, knit the knits!)
3rd and 4th Rows: Knit all stitches
When you've done around 12 rows of the above you need to start your decreases. As you decrease, you'll notice your hat starts to curl nicely in on itself, which is handy!
Decrease rows:
Row 1: K1 (Edge), *K2 TOG (Knit two together), K2 TOG, K4* (*Repeat to last stitch) then K1 (Edge)
Row 2: Knit all stitches
Alternate the two above rows until you get down to your last 2 stitches. Pass these over to your right needle, pull the right hand stitch over the left, and tie off.
Constructing your hat
You should end up with a nice 'wedge shaped' piece of fabric, which starts with the broad brim them comes to a broad point at the crown. At this point you can decide which side of your work looks best (because of the nature of the stitches, you can pretty much choose to use either 'working side' of your hat to suit your tastes).
Using your favourite embroidery stitch (or even a crochet hook), you can sew from crown to brim, passing your needle evenly with tight stitches along the edge to bring the hat together as a nice bowl shape.
Keep your 'bad side' out when sewing, then turn the hat inside out so the best side is 'out'.
And that's it! You've knitted your first hat! With the type of yarn I used, I found that a quick wash helped to 'settle' the hat down and get all those stitches nicely tight, but that's entirely optional.
Have a go, see how you get on, and do feedback via the comments below if you manage to make one.

Comments
Post a Comment