


Frondescence: a hat with a hybrid bind off, a free knitting pattern from Knitty.com. Free knitting pattern for a DETAILS HERE.
INTRODUCTION
Frondescence
by Elizabeth Felgate

Frondescence: the process or period of putting forth leaves.
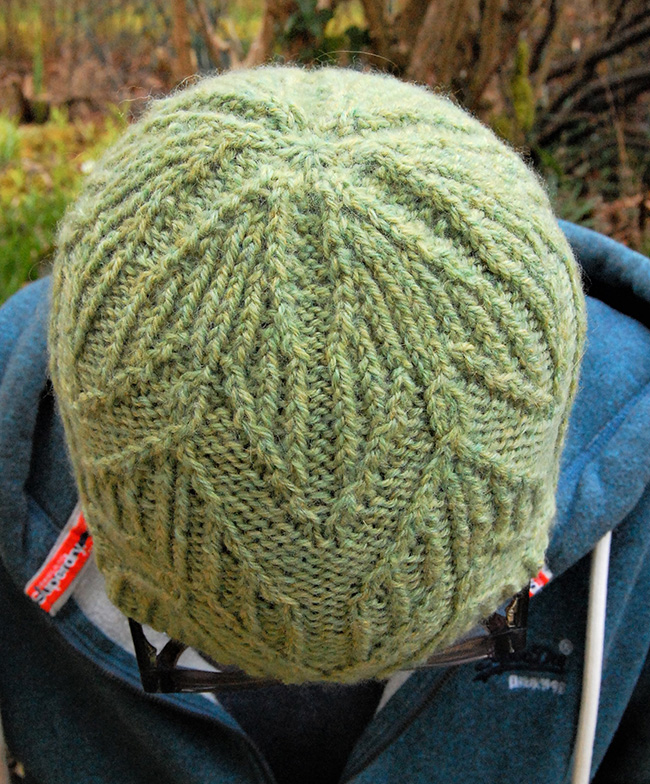
This top-down cabled hat has a lovely cabled motifs that unfurl from a top-down cast on like the opening of leaves in spring. It's also a great small project to try out a new bind off. I actually developed the Hybrid Bind Off as a solution for top down sweaters, where I needed a finish that was sufficiently stretchy not to be uncomfortably constricting, but not so stretchy that it caused an unattractive flare at the bottom of a garment. It is now my go-to bind off for this situation. I also like it for sweater cuffs and the edge of picked up necklines and, of course, top down hats.
As the name suggests, this bind off was created by combining two well-known bind offs; one firm (a basic bind off) and one stretchy (the lace bind off). It's one of those things that seems so obvious as a solution that you think it must be out there already. And, probably, it is. But as I couldn't personally find it in any published material, I thought it well worth putting out there for those other knitters who haven't thought of it yet.
As well as being very simple and easy to remember, it has the great advantage of being adjustable in terms of how much stretch you need for a certain project. I usually use this bind off as written here with one stitch bound off with the firm bind off method, followed by one stretchy. This is great for ribbing. You can, however, move the dial towards more stretch or firmness by working a different ratio of the two methods – for example a firmer bind off could be created by working two basic bind offs followed by a stretchy one. Try it out on other stitches and see what works for you!
 photos: Elizabeth Felgate


SIZE
Age approx. 18 mo–4 years[4 years–adult S, adult L]
to fit head circumference of approximately 17.75-20.5[20.75-21.75, 22-24] inches/ 45-52[53-55, 56-61] cm
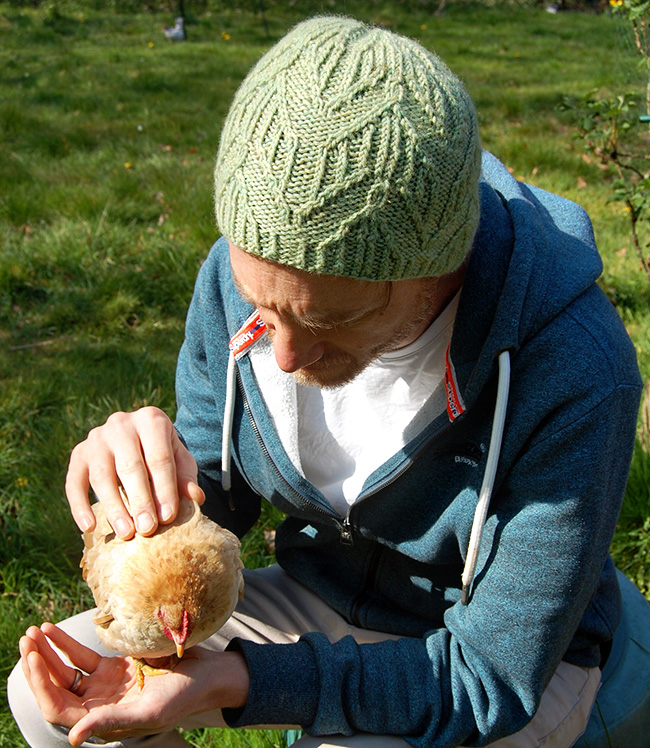
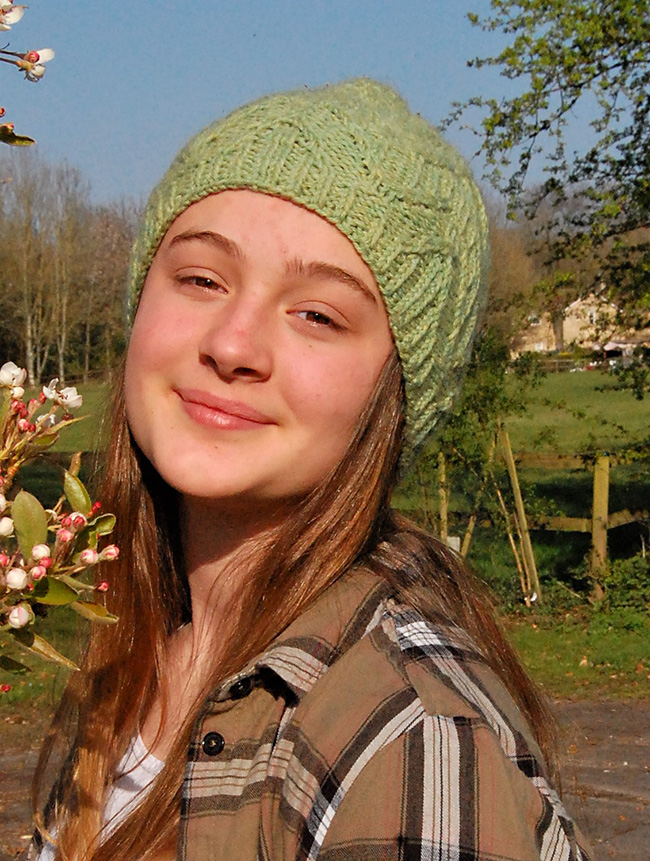
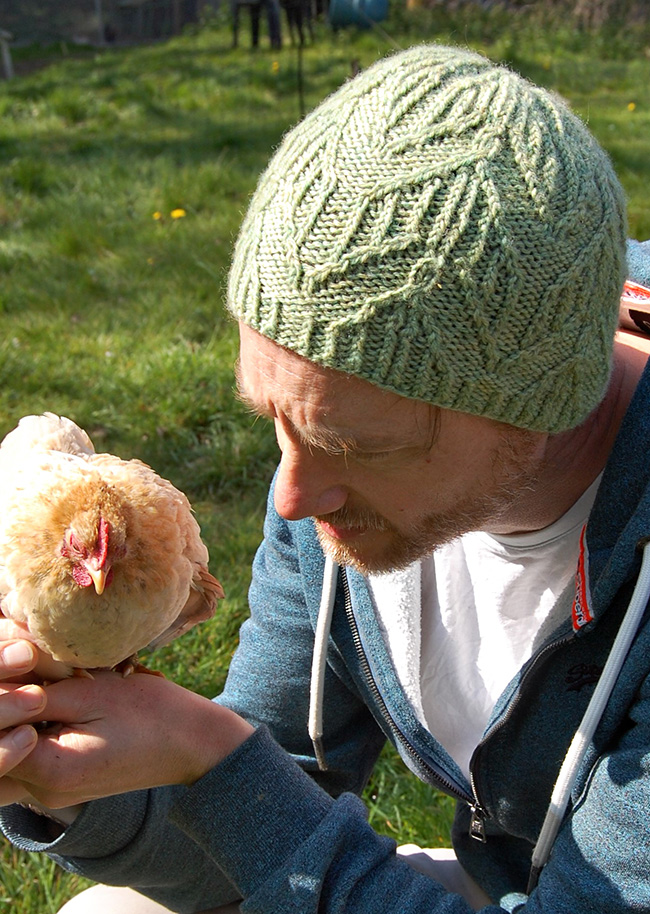
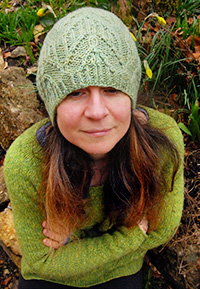
shown in size age 4–adult S on head of 21.5inches/55cm (above, male model)
and 20.75 inches/53cm (below, female model)
FINISHED MEASUREMENTS
Head circumference: 15[18, 21] inches/ 38[46, 53.5] cm
Length: 6.5[8.25, 9.25] inches/ 16.5[21, 23.5] cm, adjustable to fit – see Patterns Notes below
MATERIALS
Yarn
![]() Cascade Yarns, Cascade 220[100% wool; 220 yds/200 m per 3.53 oz/100 g skein]; color: Celery; 1 skein or approx. 85[128, 167] yds or 77[117, 153] m
Cascade Yarns, Cascade 220[100% wool; 220 yds/200 m per 3.53 oz/100 g skein]; color: Celery; 1 skein or approx. 85[128, 167] yds or 77[117, 153] m
Yarn Characteristics:
The sample shown uses a worsted-weight, worsted spun, 100% wool yarn which is next-to-skin soft. Choose a yarn with good stitch definition and which you find comfortable next to the skin. The patterning looks best with a solid or nearly-solid color; busy variegated yarns could hide it.
Recommended needle size
[always use a needle size that gives you the gauge listed below - every knitter's gauge is unique]
![]() US #7/4.5mm needles for small circumference in the round
US #7/4.5mm needles for small circumference in the round
![]() US #7/4.5mm 16 inch/40 cm25 circular needle
US #7/4.5mm 16 inch/40 cm25 circular needle
![]() US #6/4mm 16 inch/40 cm circular needle
US #6/4mm 16 inch/40 cm circular needle
Notions
![]() stitch markers – at least 1 removeable
stitch markers – at least 1 removeable
![]() cable needle
cable needle
![]() yarn needle
yarn needle
GAUGE
20 sts/25 rounds = 4 inches/10 cm in stockinette stitch
21 sts/25 rounds = 4 inches/10 cm in pattern stitch
Note: gauge is always taken after blocking.
PATTERN NOTES
[Knitty's list of standard abbreviations and techniques can be found here.]
Adjusting Hat Length: To customise the hat length, measure from the top of your crown to the point below your ear where you would like the hat to rest. You can adjust length by working additional (or fewer) pattern rounds, or changing the length of the ribbing.
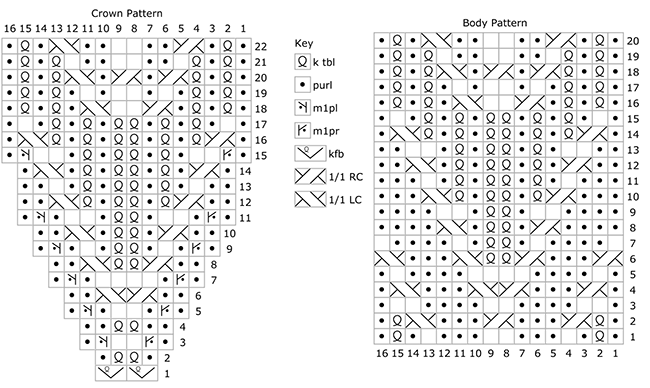
CHARTS
M1pr [Make 1 Purl Right]: Insert left needle, from back to front, under strand of yarn which runs between next stitch on left needle and last stitch on right needle; purl this stitch through front loop. 1 stitch increased.
M1pl [Make 1 Purl Left]: Insert left needle, from front to back, under strand of yarn which runs between next stitch on left needle and last stitch on right needle; purl this stitch through back loop. 1 stitch increased.
1/1 RC [2 Stitch Cable Right Cross]: Slip next stitch to cable needle and hold at back of work; k1, then k1 from cable needle.
1/1 LC [2 Stitch Cable Left Cross]: Slip next stitch to cable needle and hold at front of work; k1, then k1 from cable needle.
Crown Pattern
Work from chart or written instructions as you prefer.
Round 1: Kfb 2 times. 4 sts per repeat.
Round 2: P1, k2 tbl, p1.
Round 3: P1, m1pr, k2, m1pl, p1. 6 sts per repeat.
Round 4: P2, k1 tbl, p2.
Round 5: P1, m1pr, p1, k2, p1, m1pl, p1. 8 sts per repeat.
Round 6: P2, 1/1 RC, 1/1 LC, p2.
Round 7: P1, m1pr, p1, k4, p1, m1pl, p1. 10 sts per repeat.
Round 8: P2, 1/1 RC, k2 tbl, 1/1 LC, p2.
Round 9: P1, m1pr, p1, k1, p1, k2 tbl, p1, k1, p1, m1pl, p1. 12 sts per repeat.
Round 10: P2, 1/1 RC, p1, k2 tbl, p1, 1/1 LC, p2.
Round 11: P1, m1pr, p1, k2, p1, k2 tbl, p1, k2, p1, m1pl, p1. 14 sts per repeat.
Round 12: P2, 1/1 RC, k1 tbl, p1, k2 tbl, p1, k1 tbl, 1/1 LC, p2.
Round 13: P2, k1, p1, k1 tbl, p1, k2 tbl, p1, k1 tbl, p1, k1, p2.
Round 14: P1, 1/1 RC, p1, k1 tbl, p1, k2 tbl, p1, k1 tbl, p1, 1/1 LC, p1.
Round 15: P1, m1pr, k2, p1, k1 tbl, p1, k2 tbl, p1, k1 tbl, p1, k2, m1pl, p1. 16 sts per repeat.
Round 16: P1, 1/1 RC, [k1 tbl, p1] 2 times, k2 tbl, [p1, k1 tbl] 2 times, 1/1 LC, p1.
Round 17: P1, k1, (p1, k1 tbl) 2 times, p1, k2 tbl, (p1, k1 tbl) 2 times, p1, k1, p1.
Round 18: [P1, k1 tbl] 2 times, p1, 1/1 RC, k2, 1/1 LC, [p1, k1 tbl] 2 times, p1.
Round 19: [P1, k1 tbl] 2 times, [p1, k1] 2 times, [k1, p1] 2 times, [k1 tbl, p1] 2 times.
Round 20: [P1, k1 tbl] 2 times, [1/1 RC, p1] 2 times, 1/1 LC, [k1 tbl, p1] 2 times.
Round 21: [P1, k1 tbl] 2 times, k1, p2, k2, p2, k1, [k1 tbl, p1]2 times.
Round 22: P1, k1 tbl, p1, 1/1 RC, p2, k2, p2, 1/1 LC, p1, k1 tbl, p1.
Body Pattern
Work from chart or written instructions as you prefer.
Round 1: P1, k1 tbl, p1, k1, p3, k2, p3, k1, p1, k1 tbl, p1.
Round 2: P1, k1 tbl, [1/1 RC, p3] 2 times, 1/1 LC, k1 tbl, p1.
Round 3: P1, [k2, p4] 2 times, k2, p1.
Round 4: P1, 1/1 RC, p3, 1/1 RC, 1/1 LC, p3, 1/1 LC, p1.
Round 5: P1, k1, p4, k4, p4, k1, p1.
Round 6: 1/1 RC, p3, 1/1 RC, k2 tbl, 1/1 LC, p3, 1/1 LC.
Round 7: K1, p4, k1, p1, k2 tbl, p1, k1, p4, k1.
Round 8: P4, 1/1 RC, p1, k2 tbl, p1, 1/1 LC, p4.
Round 9: P4, k2, p1, k2 tbl, p1, k2, p4.
Round 10: P3, 1/1 RC, k1 tbl, p1, k2 tbl, p1, k1 tbl, 1/1 LC, p3.
Round 11: P3, k1, p1, k1 tbl, p1, k2 tbl, p1, k1 tbl, p1, k1, p3.
Round 12: P2, 1/1 RC, p1, k1 tbl, p1, k2 tbl, p1, k1 tbl, p1, 1/1 LC, p2.
Round 13: P2, k2, p1, k1 tbl, p1, k2 tbl, p1, k1 tbl, p1, k2, p2.
Round 14: P1, 1/1 RC, [k1 tbl, p1] 2 times, k2 tbl, [p1, k1 tbl] 2 times, 1/1 LC, p1.
Round 15: P1, k1, (p1, k1 tbl) 3 times, (k1 tbl, p1) 3 times, k1, p1.
Round 16: [P1, k1 tbl] 2 times, p1, 1/1 RC, k2, 1/1 LC, [p1, k1 tbl] 2 times, p1.
Round 17: [P1, k1 tbl] 2 times, [p1, k1] 2 times, [k1, p1] 2 times, [k1 tbl, p1] 2 times.
Round 18: [P1, k1 tbl] 2 times, [1/1 RC, p1] 2 times, 1/1 LC, [k1 tbl, p1] 2 times.
Round 19: [P1, k1 tbl] 2 times, k1, p2, k2, p2, k1, [k1 tbl, p1]
2 times.
Round 20: P1, k1 tbl, p1, 1/1 RC, p2, k2, p2, 1/1 LC, p1, k1 tbl, p1.
DIRECTIONS
Top
Using larger needles for small circumference in the round, CO 10[12, 14] stitches using a vanishing circular cast on such as the Disappearing Circular cast on.
Round 1: Knit, placing a stitch marker in the fabric to indicate the start of round.
Crown
Crown Round: Work Crown Pattern 5[6, 7] times around.
Work as set until Crown Pattern is complete. 80[96, 112] sts after Round 15.
Body
Body Round: Work Body Pattern 5[6, 7] times around.
Work in pattern as set until your hat measures 5.5[7.25, 8.25] inches/ 14[18.5, 21] cm from the top of the crown to the bottom of your knitting without stretching (or is desired length before ribbing). You can stop after any chart round – the sample stopped on row 17 – but for best effect try to stop on an odd numbered round. Particularly attractive transitions to the ribbing can be achieved if you can engineer an end point on rounds 1, 3, 5, 11, 15, 17 or 19.
Ribbing
Change to smaller circular needle.
Ribbing Rnd: [(P1, k1 tbl) 4 times (k1 tbl, p1) 4 times] 5[6, 7] times around.
Work Ribbing Rnd as set for 1 inch/2.5cm, or to desired length.
Bind off
Step 1: Work the first two stitches in pattern (that is, knit the knit stitches and purl the purl stitches as they appear). Pass your first stitch on the right-hand needle over the second.
Step 2: Work one further stitch. Transfer your two worked stitches back to your left-hand needle and knit them together through the back loop.
Step 3: Work a stitch in pattern. Pass your first stitch on the left-hand needle over the second.
Repeat Steps 2 & 3 until one stitch remains.
Cut your yarn and pull through your remaining stitch.
FINISHING
To block, wash and dry your hat according to your yarn manufacturer's guidelines (sample was handwashed in warm water and mild shampoo and dried flat). Weave in ends.
ABOUT THE DESIGNER
 Elizabeth Felgate is an independent designer living in a stone cottage in rural Wiltshire in the UK, with eight walnut trees in the garden and roses around the windows. She is slightly obsessed with aquilegias and serama bantams. When not knitting, she is a marketing consultant and mother of two.
She likes designing from first principles. Many of her patterns feature custom-designed lace patterns or unusual construction methods like her gaugeless sweaters. She loves aran weight jumpers and airy lace.
Her Ravelry username is lizjuk. You can also find her on Instagram. Her patterns are available on Ravelry at Elizabeth Felgate, or on Payhip.com.
Pattern & images © 2021 Elizabeth Felgate