


Spot On, a free knitting pattern from Knitty.com.
INTRODUCTION
Spot On
 by Jeny Staiman

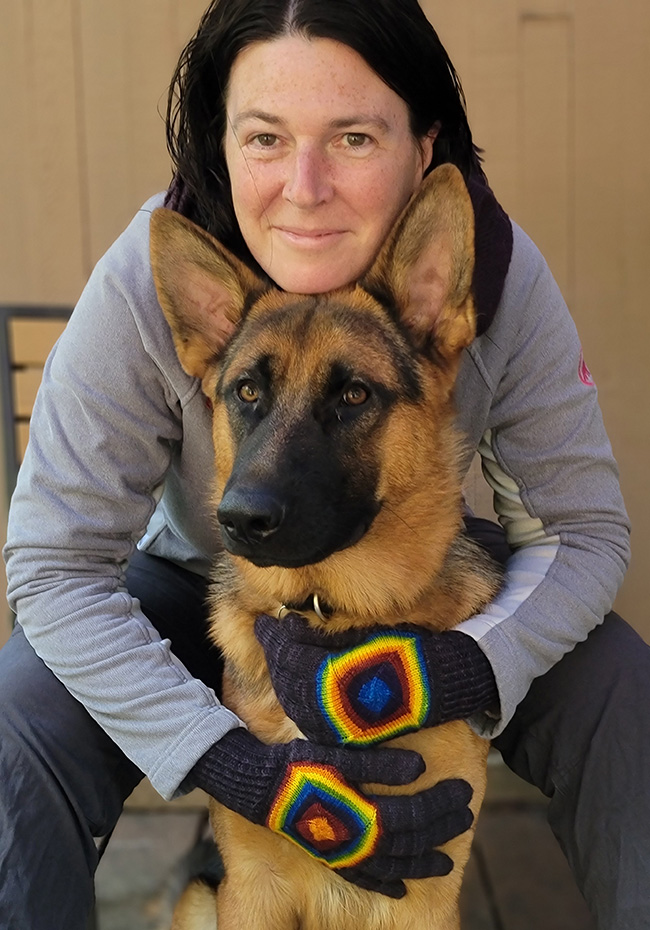
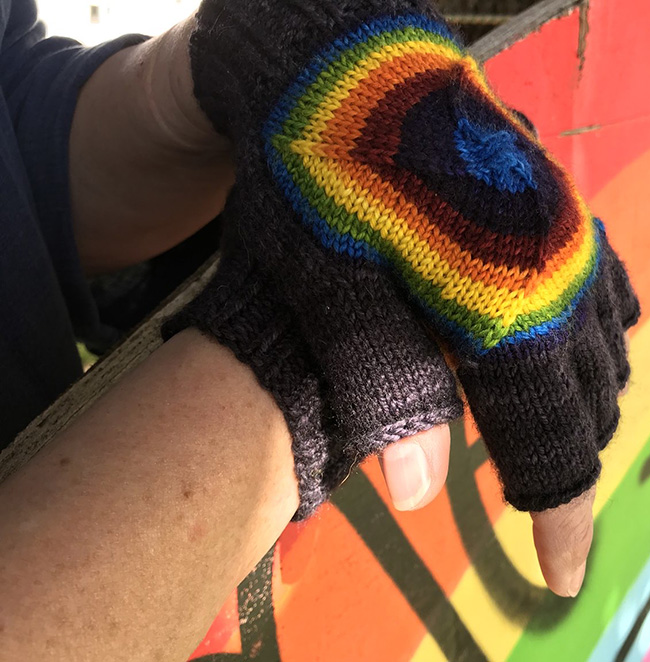
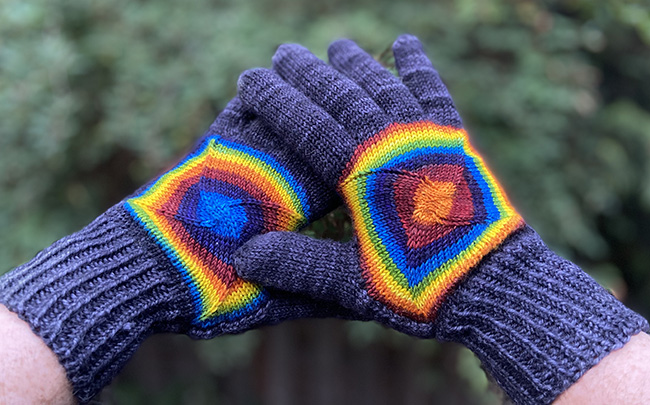
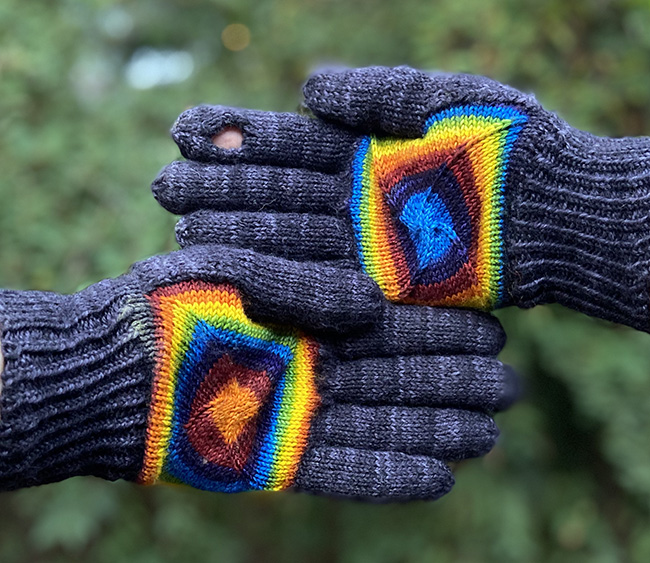
These gloves are eye-catching and fun to knit. They are a great way to show off your favorite self-striping yarns or use up small amounts of leftovers. They look great as identical gloves, fraternal twins, or a set of extended relatives.
I dreamed about these gloves for a long time before I figured out how to make them. For me, the key was realizing that I could knit the hand first as a closed form. Then I could open it up as I would an afterthought heel, in order to add the cuff, thumb and fingers.
The instructions for working the joints in these gloves are extremely precise. One of the things about knitting gloves that has always made me crazy is that it's difficult to know exactly how to how to work the joints so they will be tidy, gap-free, and identical across all the fingers. In this pattern I offer you methods I am finally happy with.
 models: Jeny Staiman, Brenda Dayne
photos: Jeff Staiman, Tonia Clarke


SIZE
Adult S[M, L]
FINISHED MEASUREMENTS
Glove circumference (measured around the palm): 6[7, 8] in/ 15.5[18, 20.5] cm
Glove length (top of wrist to tip of longest finger): Finger length is adjustable
Cuff length: 2.5 inches/6.5 cm (all sizes)
Choose a size about 0.5 to 1 inches/1-2 cm smaller than actual hand circumference.
MATERIALS
![]() [MC] Biscotte Yarns Bis Sock [85% Merino, 15% Nylon; 435 yd/400 m per 3.5 oz/100g skein]; Color: Rainbow, 1 skein
[MC] Biscotte Yarns Bis Sock [85% Merino, 15% Nylon; 435 yd/400 m per 3.5 oz/100g skein]; Color: Rainbow, 1 skein
Approximately 45 yds/40 m required to make the pair
![]() [CC] Madelinetosh Euro Sock [100% Superwash Merino Wool; 435 yd/397 m per 3.5 oz/100g skein]; Color: Thunderstorm, 1 skein
[CC] Madelinetosh Euro Sock [100% Superwash Merino Wool; 435 yd/397 m per 3.5 oz/100g skein]; Color: Thunderstorm, 1 skein
Approximately 58 yds/52 m required to make the pair
Recommended needle size
[always use a needle size that gives you the gauge listed below - every knitter's gauge is unique]
![]() 1 set each of US #1/2.5mm and US #0/2mm needles for small circumference in the round
1 set each of US #1/2.5mm and US #0/2mm needles for small circumference in the round
![]() Stitch holder, additional set of US#1/2.5mm or #0/2mm needles, or scrap yarn for holding sts
Stitch holder, additional set of US#1/2.5mm or #0/2mm needles, or scrap yarn for holding sts
![]() Scrap yarn for provisional cast on and lifelines (about 2 m/2 yd total; 4 different colors recommended).
Scrap yarn for provisional cast on and lifelines (about 2 m/2 yd total; 4 different colors recommended).
Notions
![]() stitch markers
stitch markers
![]() yarn needle
yarn needle
GAUGE
32 sts/44 rounds = 4 inches/10 cm in stockinette stitch.
PATTERN NOTES
[Knitty's list of standard abbreviations and techniques can be found here.]
This pattern has been meticulously engineered; the instructions in some places may seem counter-intuitive, but if you follow them closely you should have excellent results.
Techniques:
- JMCO: This pattern uses a variant of the original Judy's Magic Cast On that starts on the bottom needle and ends on the top needle. Please visit this post on my blog for an illustrated tutorial.
- Single Strand Glove Technique (SSGT): This technique was first introduced as part of the knitty pattern Continuity. Step-by-step instructions are also available on my blog. The video is here.
- M1L Increase: Be sure to execute this increase exactly as described in the Knitty standard definitions list.
- Provisional cast on: They're the best way to add sts between fingers because they allow for invisible joins, and they also provide high elasticity right where it is needed. This tutorial demonstrates three different methods of casting on provisionally; Instructions in this pattern are written for the first method shown.
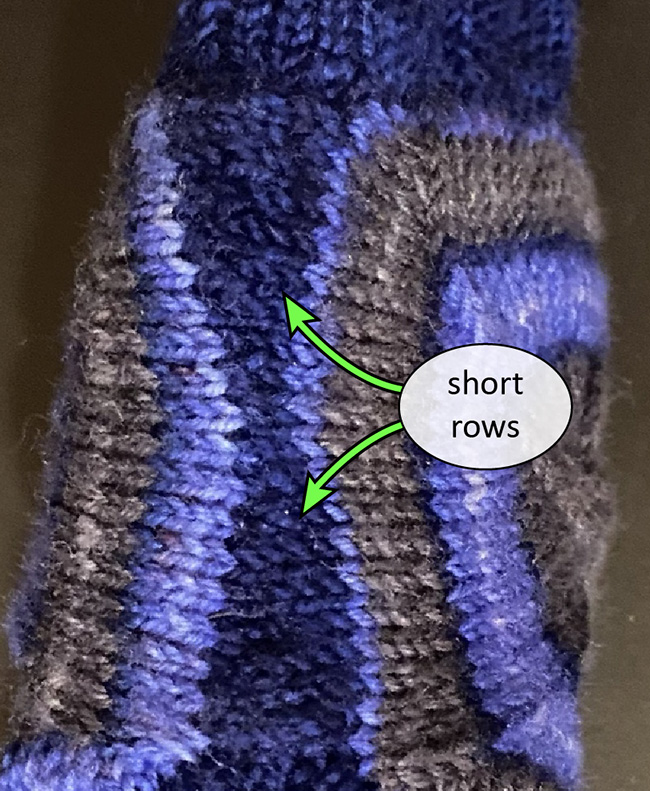
- Short rows: This pattern is written for the German short row method. Tutorials for this and several other common short row methods are available in this knitty article.
- "Afterthought" stitch pickup: This pattern uses a technique common in sock knitting, in which scrap yarn is used to mark the location of the heel, then later removed so that the rows on either side of the opening can be worked. This tutorial on my blog focuses on how to get tidy joints when using this technique.
- Tidy joints with twisted stitches: A simple but effective trick for hiding gaps at a fabric joint is to twist sts as you work them. There are many joints in this glove, and twisted stitches are used throughout. To twist a stitch to the left, simply k tbl. To twist a stitch to the right, orient it so that it sits left leg forward on the needle, then knit through left (front) leg.
- Variation for full length fingers: You may wish to create openings on some fingertips for quick access to screens, as shown in the pictures. Once the finger tube reaches the base of the last joint, work back and forth at desired location for opening until the flap is about 1/8 inch/3 mm below the fingertip. Resume working in the round, knit 2 rounds, then ssk around until you have 6 sts left. Finish as with tapered fingers.
Pro-tip: If you are comfortable knitting from left to right, I recommend doing so on the WS rows rather than turning and purling.
DIRECTIONS
Hand
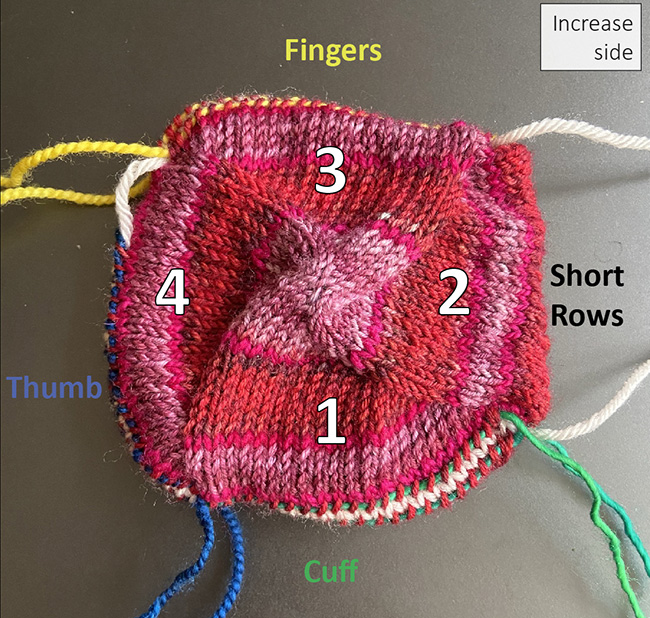
Instructions are identical for both hands. Rounds in the hand are composed of quadrants. A single marker is used to keep track of one area in the last quadrant that differs from the first three. When shaping here, you will knit right up to this marker, then form an increase or decrease, and then slip the marker. Instructions explicitly state this sequence.
Increase Side
All sizes
See Pattern Notes for details on starting JMCO on the bottom needle.
Using MC and JMCO, starting on the bottom needle of the smaller set, CO 8 sts (4 sts on each needle), then yo on top needle only (twist strands so the yo will be anchored). 9 sts
Setup (half round): K4, yo. 10 sts
Round 1: (K2, m1L, k2, k1 tbl) twice. 12 sts
Important: At this point, the instructions will divide the stitches into four quadrants of 3 stitches each. If you find it helpful, divide your stitches across your needles and/or place markers to help you keep track. Increases are worked at the end of each quadrant – keep those increases with the previous stitches. Note that the last quadrant will be worked a little differently from the first three, so the stitch counts will not always be the same in all the quadrants. Instructions below list the count for each quadrant.
Switch to larger set of needles.
Round 2: (K to end of quadrant, m1L) 4 times. 4 sts increased; 4 sts per quadrant.
Repeat Round 2 once more. 4 sts increased; 5 sts per quadrant.
Round 4: (K to end of quadrant, m1L) 3 times; k3, m1L, pm, k2, m1L. 5 sts increased (6|6|6|7).
Repeat Round 2 5 more times. 45 sts (11|11|11|12).
Round 10: (K to end of quadrant, m1L) 3 times; k to marker, m1L, sl m, k to end, m1L. 5 sts increased (12|12|12|14).
Repeat Round 2 5 more times. 70 sts (17|17|17|19).
Next round: Repeat Round 10. 75 sts (18|18|18|21).
Next round: Repeat Round 2 once more. 79 sts (19|19|19|22)
Size M only: Repeat Round 2 3 more times. 91 sts (22|22|22|25)
Size L only: Repeat Round 2 6 more times. 103 sts (25|25|25|28)
Transition Area
This part of the hand has 4 stages:
- The last 2 increase rounds, which temporarily break the established quadrant pattern;
- Short rows, which refine the shape of the outside of the hand;
- Setup for afterthought sections, which will be opened up later;
- Thread lifelines, which will hold live sts when you open the afterthought areas.
Round 1: K to end of first quadrant, m1L, k to end of third quadrant, m1L, k to end, m1L. 3 sts increased. (Quadrants: 20|19|20|23 for size S, 23|22|23|26 for size M, 26|25|26|29 for size L.)
Round 2: K to end of first quadrant, m1L. Stop here. 1 st increased. (Quadrants: 21|19|20|23 for size S, 24|22|23|26 for size M, 27|25|26|29 for size L.)
Setup for short rows: Starting at current position of the working yarn (start of second quadrant), k 18[20, 22] , turn. For the time being, move the remaining 1[2, 3] sts in second quadrant to the beginning of the third quadrant; they will not be worked into the short rows. This temporarily adjusts your quadrant count to 21|18|21|23 for size S, 24|20|25|26 for size M, 27|22|29|29 for size L.
SR1 (WS): P4, turn.
SR2 (RS): DS, k3, turn.
SR3 (WS): P8, working both legs of DS together when you encounter them, turn.
SR4 (RS): DS, k7, turn.
SR5 (WS): P 18[20, 22] to beginning of second quadrant, working both legs of DS together when you encounter them, turn.
SR6 (RS): K4, turn.
SR7 (WS): DS, p3 to beginning of quadrant, turn.
SR8 (RS): K8, working both legs of DS together when you encounter them, turn.
SR9 (WS): DS, p7 to beginning of quadrant, turn.
SR10 (RS): K 18[20, 22] , working both legs of DS together when you encounter them.
To work the afterthought sections:
The diagram of a completed hand shows how the quadrants correspond to the sections that will be opened up to create cuff, thumb, and fingers. Instructions are written for threading lifelines into the rows below, not into the sts on the needles.
Current stitch count is 83[95, 107] , 21|18|21|23 for size S, 24|20|25|26 for size M, 27|22|29|29 for size L.
Round 1 (half-round): Starting at current position of working yarn, use scrap yarn to complete the round as follows: k 19[23, 27] , k2tog, sl 6[7, 8] sts purlwise, k 15[17, 19] , k2tog. 2 sts decreased (21|18|20|22 for size S, 24|20|24|25 for size M, 27|22|28|28 for size L).
Note: that in the following round, there will be a k3tog in place of a k2tog.
Round 2: Continuing with the scrap yarn, k 19[22, 25] , k3tog, then drop the scrap yarn and slip sts in short row area until you reach the parked working yarn. With working yarn, k to end of round. 2 sts decreased (19|18|20|22 for size S, 22|20|24|25 for size M, 25|22|28|28 for size L). There will be large gaps at the sides of the short row section; these will be closed later when you work the cuff and fingers openings.
Round 3: Knit.
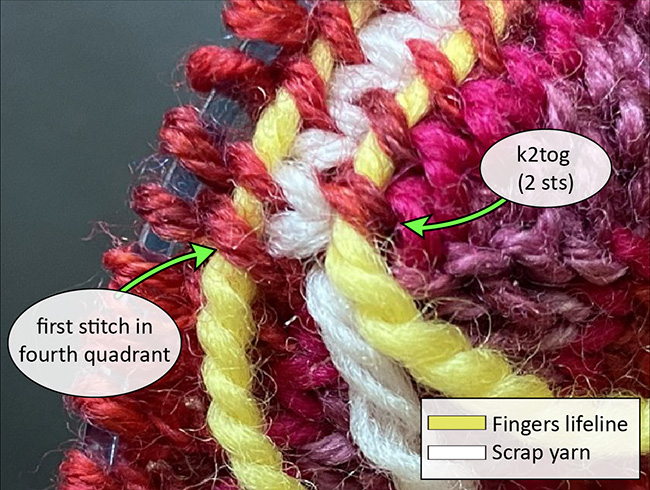
When threading lifelines, you may find it useful to use different colored pieces of scrap yarn for each quadrant, to more easily differentiate between them.
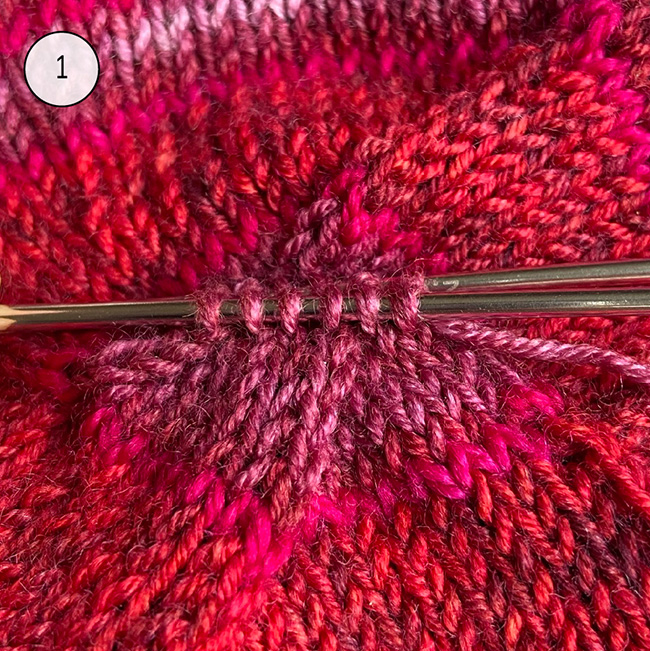
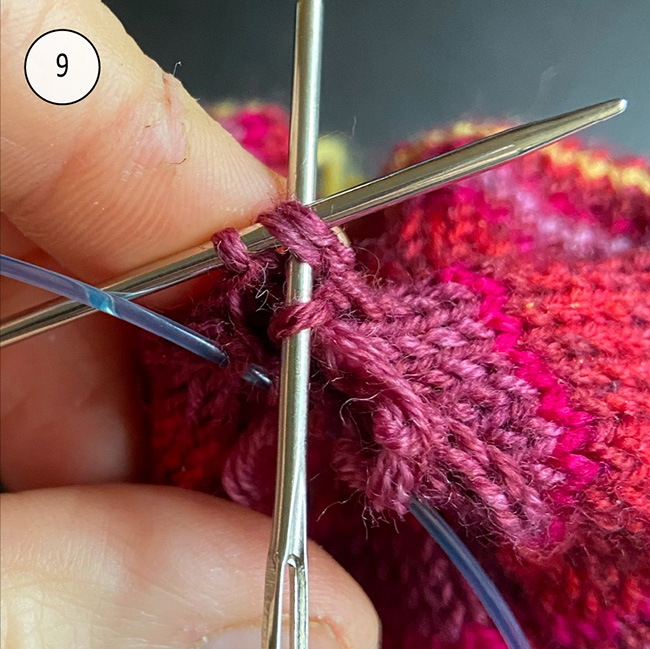
Start with the third quadrant, which will later become the opening for the fingers. Using a new piece of scrap yarn, thread a lifeline through each of the 21[25, 29] stitches in the third quadrant, in the round below the scrap. Be sure to thread through both sts in the k2tog – this counts as 2 sts. Now thread through the 20[24, 28] sts in this quadrant, in the round above the scrap. Then thread through the next stitch – the first stitch in the fourth quadrant. (Note this stitch is not worked on top of scrap.) Lifeline now holds 21[25, 29] sts above the scrap, 21[25, 29] below; 42[50, 58] sts total.
The image below shows how this lifeline will look when threaded through both sts of the k2 on the bottom, and the first stitch in the fourth quadrant on top.
Continue to the fourth quadrant, which will later be opened for the thumb. Disregard the first 6[7, 8] sts, as they are not worked with scrap yarn. Thread a lifeline through the remaining 17[19, 21] sts in the round below the scrap (the k2tog counts as 2 sts). Then thread through the 16[18, 20] above the scrap, and then the first stitch in the first quadrant. Lifeline holds 17[19, 21] sts above the scrap, 17[19, 21] below; 34[38, 42] sts total.
Continue to the first quadrant, which will later be opened for the cuff. Thread a lifeline through each of the 21[24, 27] sts in the round below the scrap. Take care to thread through all 3 sts in the k3tog – this counts as 3 sts. Then thread through the 19[22, 25] sts above the scrap, and then the first stitch in the second quadrant. (Note that above the scrap, the first stitch in the first quadrant has already been threaded with the lifeline for the fourth quadrant; both lifelines overlap in this stitch.) Lifeline holds 20[23, 26] sts above the scrap, 21[24, 27] below; 41[47, 53] sts total.
Decrease Side
Before you begin decreasing, move the first 1[2, 3] sts after the short rows back to the end of the second quadrant. This changes your quadrant count to 19|19|19|22 for size S, 22|22|22|25 for size M, 25|25|25|28 for size L.
Sizes M & L only
Round 1: (K –[20, 23] , k2tog) 3 times, k to last 2 sts, k2tog. 4 sts decreased. (21|21|21|24 for size M, 24|24|24|27 for size L)
Round 2: (K to last 2 sts in the quadrant, k2tog) 4 times. 4 sts decreased.
Repeat the last round –[1, 4] more times. For both sizes: 79 sts (19|19|19|22).
All sizes
Round 1: (K17, k2tog) 3 times, k to 2 sts before marker, k2tog, k to last 2 sts, k2tog. 5 sts decreased. (18|18|18|20)
Round 2: (K to last 2 sts in the quadrant, k2tog) 4 times. 4 sts decreased.
Repeat the last round 4 more times. 54 sts (13|13|13|15).
Round 7: (K to last 2 sts in the quadrant, k2tog) 3 times, k to 2 sts before marker, k2tog, k to last 2 sts, k2tog. 5 sts deceased.
Repeat Round 2 5 more times. 29 sts (7|7|7|8).
Next round: Repeat Round 7, removing the marker in the fourth quadrant as you go. 5 sts decreased, 6 sts per quadrant.
Repeat Round 2 once more. 4 sts decreased.
Switch to smaller needles and repeat Round 2 2 more times. 12 sts.
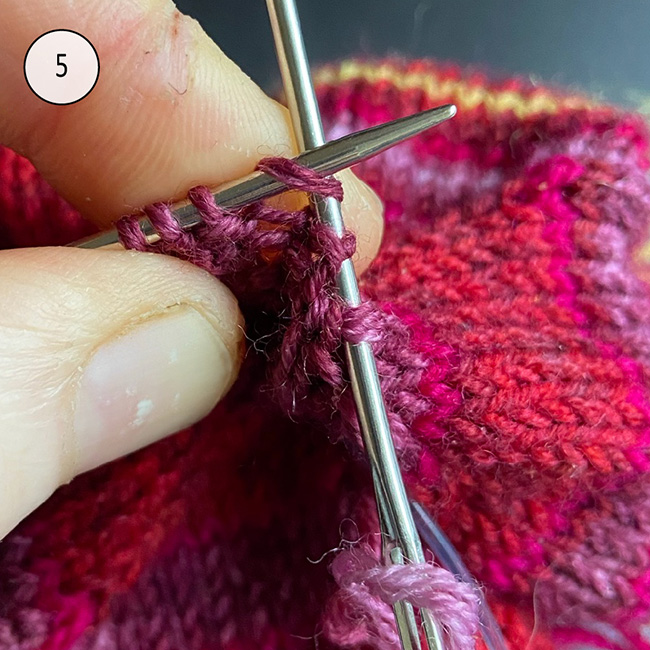
Break yarn, leaving a tail approximately 12 in/30 cm to graft the remaining 12 sts. You will work decreases as you graft.
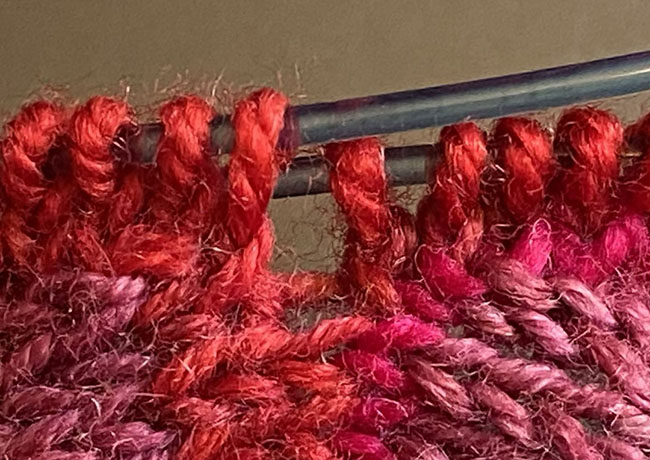
Before grafting, the work looks like this:
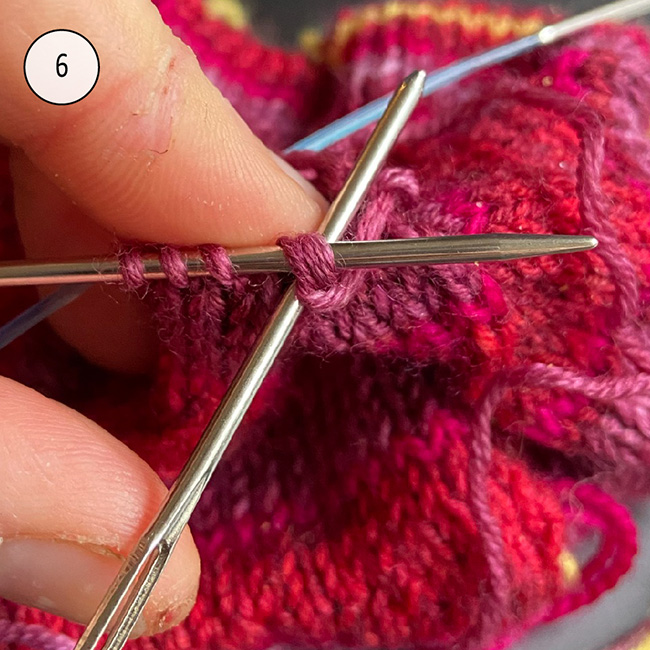
Insert yarn needle (YN) knitwise into first stitch on front/bottom knitting needle: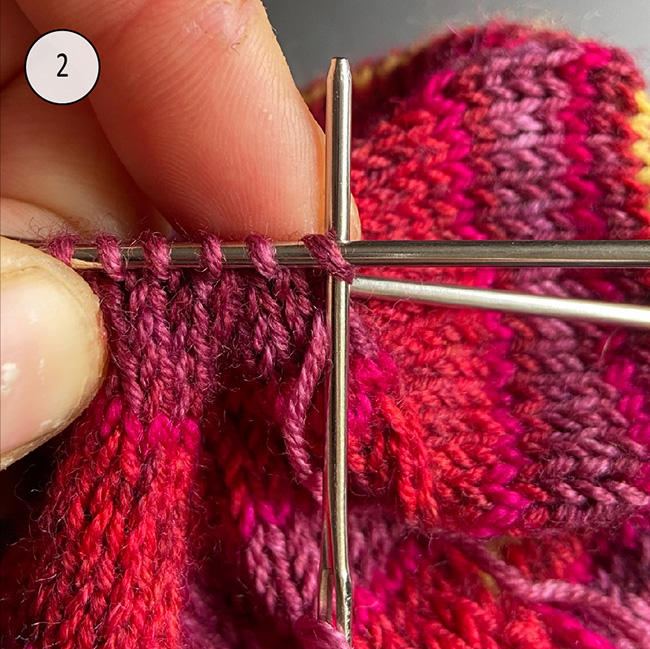
Slip the first stitch off knitting needle but leave on YN, and insert YN purlwise into next 2 stitches.
Leave these 2 stitches on knitting needle and pull yarn through:
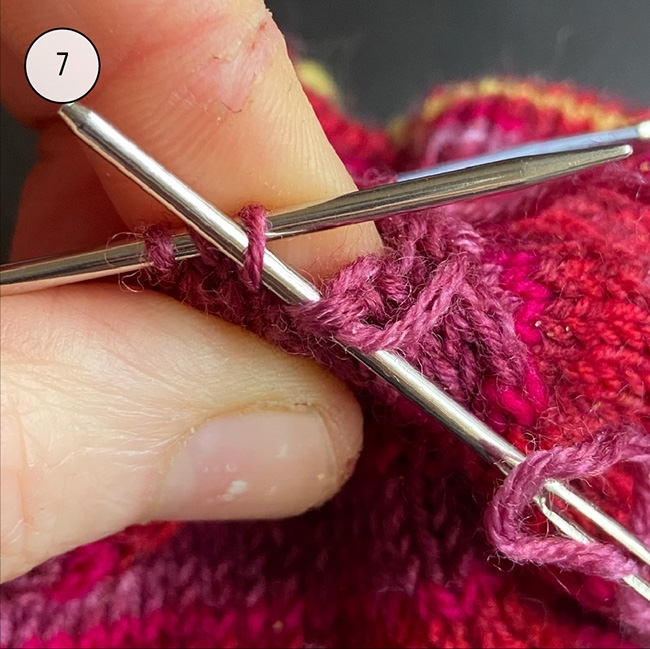
On the back/top knitting needle, insert YN purlwise into first 2 stitches:
Slip these 2 stitches off knitting needle but leave on YN, and insert YN knitwise into next stitch.
Leave this stitch on knitting needle and pull yarn through:
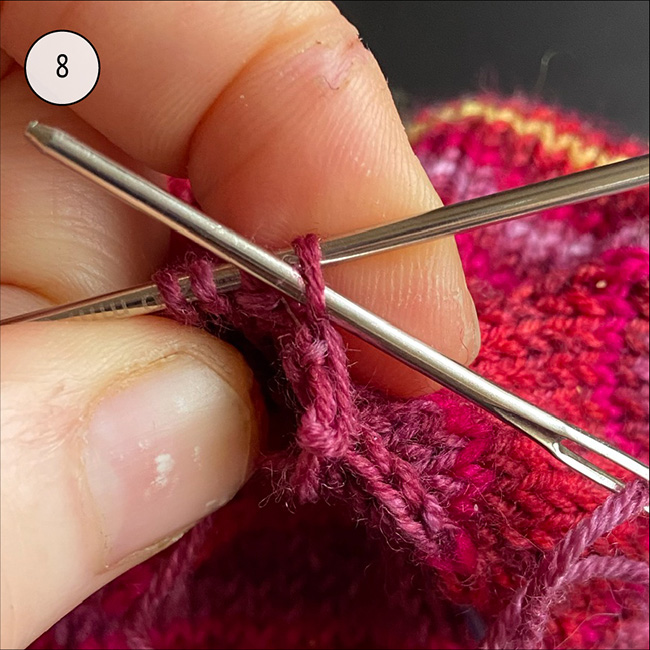
On the front/bottom needle, insert YN knitwise into first 2 stitches:
Slip these 2 stitches off knitting needle but leave on YN, and insert YN purlwise into next stitch.
Leave this stitch on knitting needle and pull yarn through:
On the back/top needle, insert YN purlwise into first stitch:
Slip the first stitch off knitting needle but leave on YN, and insert YN knitwise into the next 2 stitches.
Leave these 2 stitches on knitting needle and pull yarn through:
Following the basic steps above, finish the graft:
On the front/bottom needle, repeat steps 2 and 3.
On the back/top needle, repeat steps 4 and 5, then slip all 3 remaining stitches off knitting needle and pull yarn through.
On the front/bottom needle, repeat step 6, then slip the 2 remaining stitches off knitting needle and pull yarn through.
Adjust tension of the graft so that it matches that of the neighboring stitches.
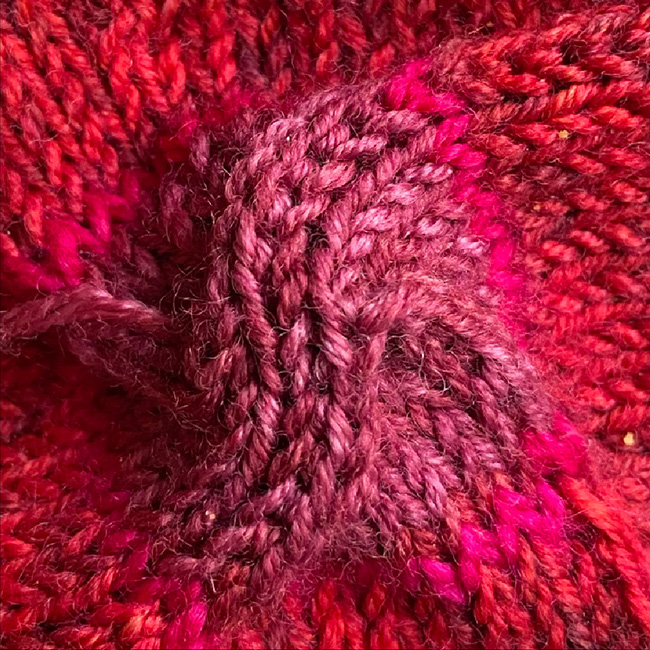
When finished, the graft should look like this:
Cuff, Thumb, and Fingers
Now you will open up the sections worked with scrap yarn so that the cuff, thumb and fingers can be added.
Instructions for the remainder of the glove follow the Single Strand Glove Technique, which I unvented and published in 2020. You may choose to use this method or not, as you prefer.
With lifelines holding the sts on either side of the scrap yarn, unpick scrap yarn and open up the hand form. There should be 41[47, 53] sts on the cuff lifeline, 42[50, 58] sts on the fingers lifeline, and 34[38, 42] sts on the thumb lifeline.
Opened up, this is how the form sits on the right hand. (It can be worn on either hand.)
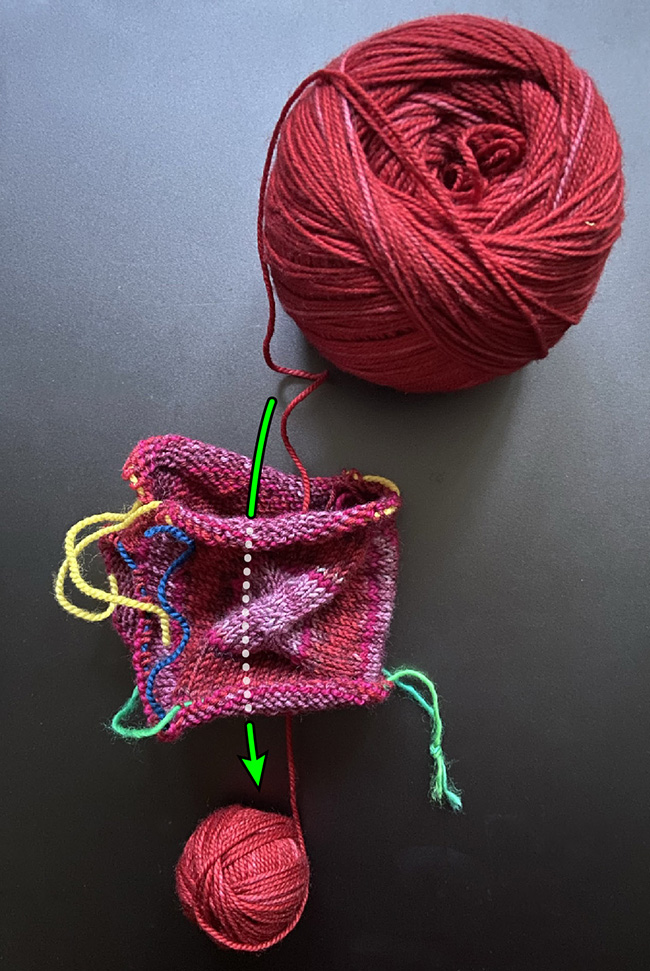
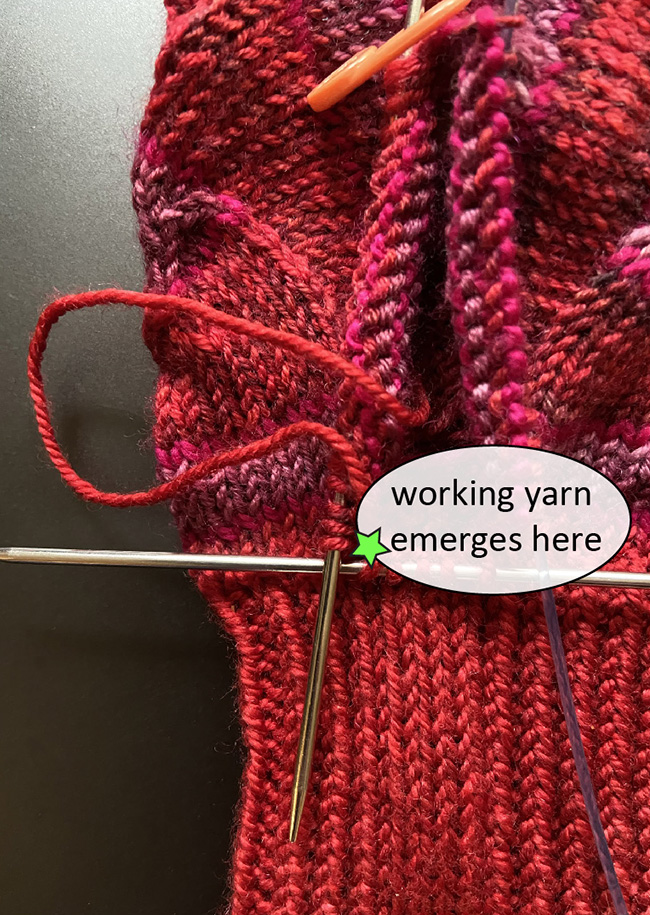
Single Strand Glove Technique (SSGT) overview: SSGT works a little differently with this design as it would with a traditional one. Because the center of the glove is already worked, you have to work down with the cuff, then up with the thumb. To avoid breaking the yarn, you'll start working the cuff not from the end of the ball of yarn, but from about 22 yd/20 m inside it. When the cuff is finished, resume work with strand that emerges from where you began.
Cuff
Setup: Move all sts held with lifeline onto larger needles; remove lifeline. 41[47, 53] sts. Arrange sts so that the round will begin on the thumb side. Note that the thumb lifeline will still be threaded through one cuff stitch. Wind off about 18[21, 23] m/ 20[23, 25] yd of CC yarn. Do not cut. Reach through the hand from the cuff side, grasp the small ball of yarn and pull it back through. You will now work the cuff using the strand running between the balls of yarn. Be sure your work draws from the small ball, not the large one:
Round 1: CO 4 sts onto the working needle using the provisional method specified in Pattern Notes, then k 21[24, 27] , pick up and k tbl 5 sts along the short row edge, k to end. 50[56, 62] sts.
Round 2: Join the round; k the 4 sts cast on in the previous round, then k 20[23, 26] , k2tog, k1, pm, k1, ssk, k to end. 48[54, 60] sts.
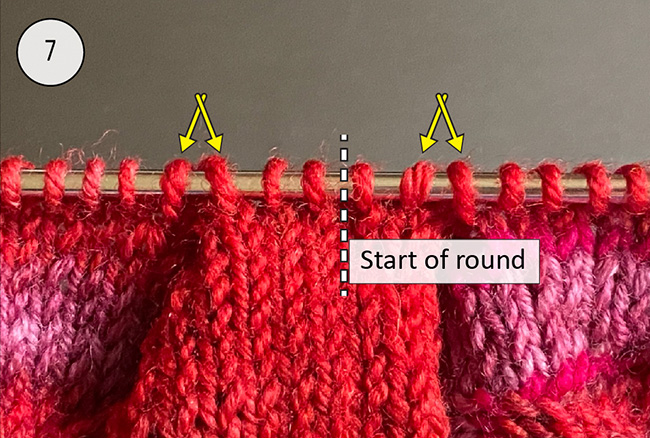
Round 3: Knit around, then k2 sts from start of next round. This is the new start of round position.
Round 4: K to 3 sts before marker, k2tog, k2, ssk, k to end. 2 sts decreased; 46[52, 58 sts] .
Sizes M and L:
Repeat Round 4 –[once, twice] more. –[2, 4] sts decreased; –[50, 54] sts.
All sizes:
Next round: K2, p1, (k1 tbl, p1) to 2 sts before marker, k4, p1, (k1 tbl, p1) to last 2 sts, k2.
Repeat last round until cuff is desired length or about 1 yd/1 m of working yarn remains. Remove marker and bind off using a stretchy bindoff of your choice. My default is my own Interlock Bindoff; JSSBO would also work nicely here, but in that case you need about 2 m/2 yd to work the bindoff.

Thumb
Setup: Undo the provisional CO and place 5 sts onto working (smaller) needles; these are the underside of the 4 sts you cast on earlier for the cuff, shifted over by 1/2 stitch. The 1st and 5th sts will each have a strand running through them. Move the first 17[19, 21] sts held with thumb lifeline onto working needle, pm, move the remaining 17[19, 21] sts onto needle, then remove lifeline. 39[43, 47] sts. Sl 4 sts pw; this will be the start of the round. Pull a loop of working yarn through the opening in order to work the thumb:
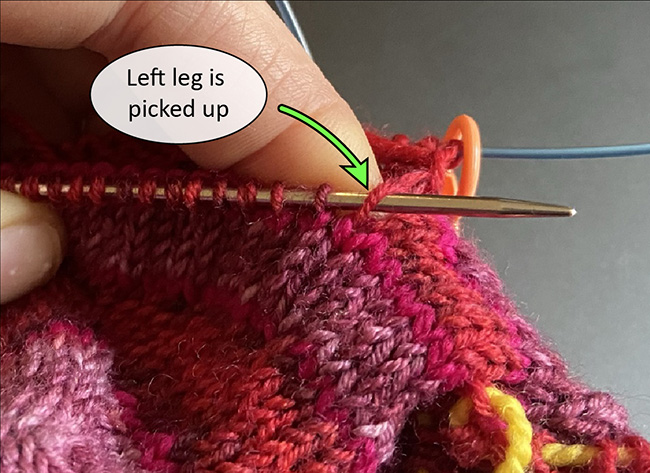
Round 1: K2tog tbl; k to 1 st before marker, k1 tbl, sl marker; pick up 1 st by inserting the left-hand needle into the back of the st to its right so it sits on the needle left leg forward, as shown below; knit this picked-up st together with the next st, k 15[17, 19] , k2tog, k3. 37[41, 45] sts.
From here, the thumb gusset is worked back and forth as you connect the two sides of the glove.
Start with a 5-stitch band at the base:
Row 1 (RS): K2tog tbl, turn. 1 st decreased.
Row 2 (WS): P4, p2tog, turn. 1 st decreased. 15[17, 19] sts remain on either side between band and marker. 35[39, 43] sts.
Next you will increase the band to 7 sts and continue working back and forth:
Row 3 (RS): K2, m1R, k1, m1L, k1, ssk, turn. 1 st increased.
Row 4 (WS): P6, p2tog, turn. 1 st decreased.
Row 5 (RS): K6, ssk, turn. 1 st decreased.
Repeat last 2 rows 2 more times, then repeat Row 4 once more. 11[13, 15] sts remain on either side between band and marker. 29[33, 37] sts.
Next you will increase the band to 9 sts and continue working back and forth:
Row 11 (RS): K2, m1R, k3, m1L, k1, ssk, turn. 1 st increased.
Row 12 (WS): P8, p2tog, turn. 1 st decreased.
Row 13 (RS): K8, ssk, turn. 1 st decreased.
Repeat last 2 rows 2 more times, then repeat Row 12 once more. 7[9, 11] sts remain on either side between band and marker. 23[27, 31] sts.
Sizes M and L:
Next you will increase band to 11 sts and continue working back and forth:
Row 19 (RS): K2, m1R, k5, m1L, k1, ssk, turn. 1 st increased.
Row 20 (WS): P10, p2tog, turn. 1 st decreased.
Row 21 (RS): K10, ssk, turn. 1 st decreased.
Repeat Row 20 once more. –[7, 9] sts remain on either side between band and marker. –[25, 29] sts.
Size L:
Repeat Rows 20-21 once more. 8 sts remain on either side between band and marker. 27 sts.
All Sizes:
Switch to larger needles and resume knitting in the round.
Round 1: K 8[10, 10] , ssk, k 4[4, 5] , k2tog, remove marker, ssk, k 4[4, 5] , k2tog last st with first st of round; this position is the new start of round. 19[21, 23] sts.
Round 2: Knit.
For open fingers:
Continue working in the round until thumb reaches desired length, then work one half-round so that working yarn is on the forefinger side.
Next round: K 7[8, 9] , k2tog, k 8[9, 10] , k2tog. 17[19, 21] sts.
Bind off using a method that yields a moderately firm edge, such as [k2tbl, return st to left-hand needle], repeat.
For full-length fingers:
Continue working in the round until finger tube reaches the base of the last finger joint, then begin taper or work the variation for open fingertips in Pattern Notes.
To work the taper:
Round 1: Ssk, k to end. 1 st decreased.
Round 2: Knit.
Round 3: K to midpoint of round, ssk, k to end. 1 st decreased.
Rounds 4-5: Knit.
Repeat Rounds 1-5 until finger tube just barely reaches fingertip. Ssk around continuously until you have 6 sts left.
Finishing the finger: Pull out a loop of working yarn and thread this through the last bound-off sts if working open fingers, or remaining 6 sts if working closed fingers. As demonstrated in SSGT, turn finger inside out and draw main ball of yarn through this loop to secure it.
Anchor the float of yarn in the middle and at the base of the thumb: bring a loop of yarn through a stitch, expand the loop enough that the main ball of yarn can pass through it, then gently snug:

Upper fingers
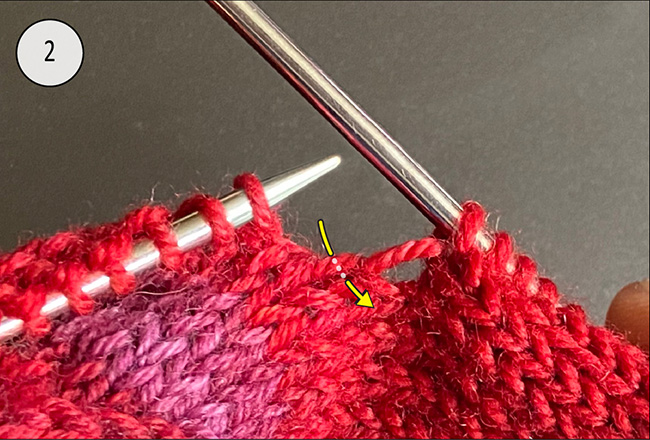
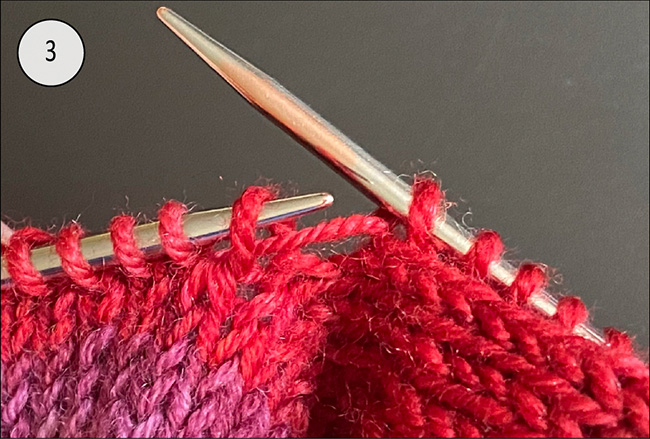
Setup: Move all sts held with lifeline onto larger needles and remove lifeline. 42[50, 58] sts. (Note: the first stitch on the L needle should be left leg forward; when knitted, it will twist to the right.) Draw a loop of working yarn through the fingers opening.
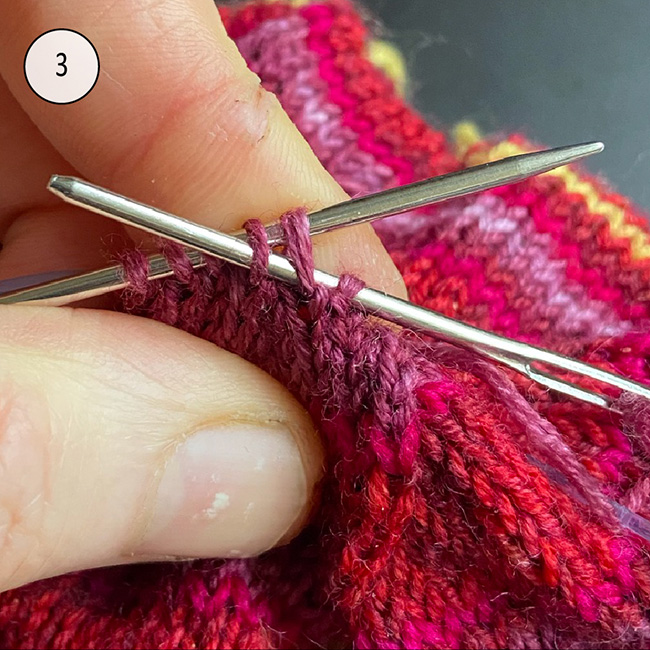
Round 1: K 20[24, 28] , k1 tbl, pick up and k tbl 5 sts along the edge of the short row section, k to end, pick up the right leg of the stitch in the gap below and k tbl. 48[56, 64] sts. Photos below illustrate specifically where and how to pick up the stitch in the gap.
Insert left needle into the back of the stitch in the gap, as indicated by the arrow, then knit tbl:

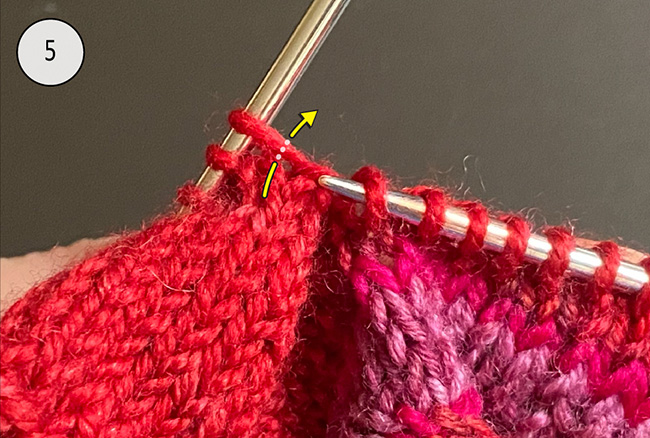
The gap is closed.
Next round: Knit.
Forefinger
Round 1: K 7[8, 9] , slip next 34[40, 46] sts onto a stitch holder or second set of needles, CO 4 sts onto the working needle using the provisional method specified in Pattern Notes, pull a loop of working yarn through the inside of the finger and join the round; k the remaining 7[8, 9] sts. 18[20, 22] sts for forefinger.
Round 2: Knit.
Continue knitting in the round, finishing the finger as desired, as you did for the thumb. Bring the working strand back down to the hand from the inside. If desired, anchor strand to the inside of the finger tube.
Middle finger
Setup: Undo the provisional CO at the base of the forefinger and place 5 sts onto your working needles, as you did for the thumb. On either side of these 5 sts, move 6[7, 8] sts from main set to working needles. Follow the steps below for setup flow and then begin working Round 1.
Gaps between the picked-up stitches and those in the main set:

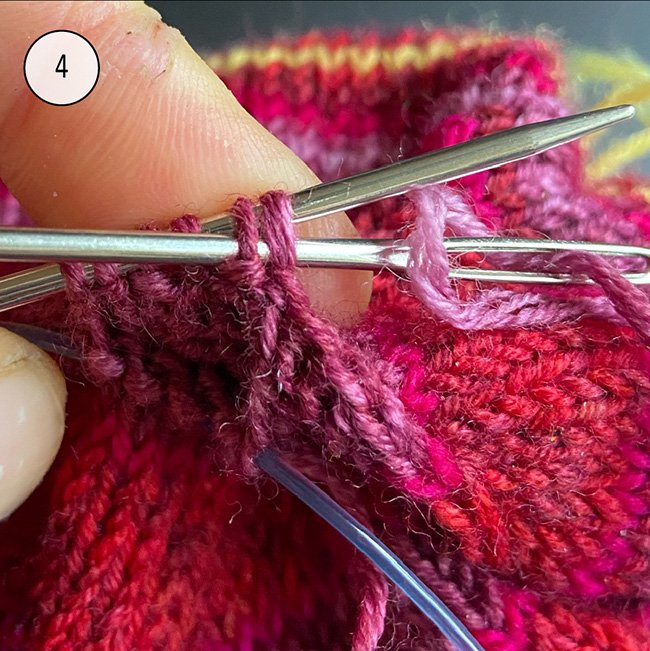
Slip over to gap on the left. Insert left needle into back of stitch indicated, and pick it up from its left leg:
The new stitch sits on the left needle, left leg forward. A strand runs through this stitch and its neighbor to the right:
Slip over to the gap on the right. Insert right needle into back of stitch indicated, and pick it up from its right leg: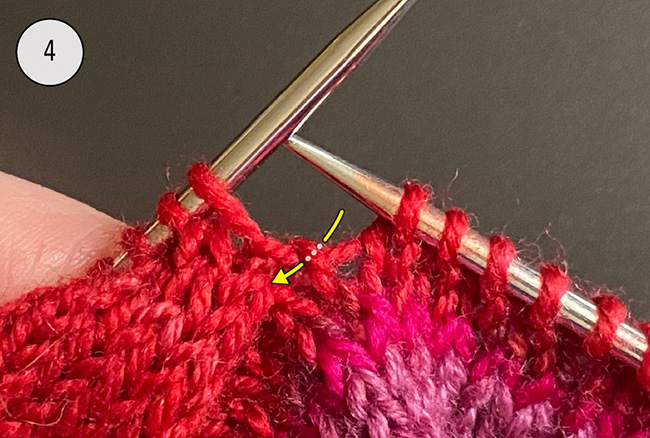
The new stitch sits on the right needle, right leg forward. Slip the next stitch onto the right needle knitwise:
The slipped stitch now sits on the right needle, left leg forward. A strand runs through this stitch and its neighbor to the right:
Gaps are filled in, stitches positioned. There are two pair of stitches leaning towards each other.
Slip to start of round and begin Round 1 of new finger:
Round 1: K2, k1 tbl, k 7[8, 9] , CO 4 sts onto the working needle using the provisional method specified in Pattern Notes, pull a loop of working yarn through the inside of the finger and join the round; k 6[7, 8] , k1 tbl, k2. (Be sure that the 2 sts that sit left leg forward are knitted through their left/front leg, so they twist.) 23[25, 27] sts.
Round 2: K3, k2tog, k to last 4 sts, ssk, k2. 21[23, 25] sts.
Round 3: K2, k2tog, k to end. 20[22, 24] sts.
Next round: Knit.
Continue knitting in the round, finishing the finger as desired, as you did for the thumb. Bring the working strand back down to the hand from the inside. If desired, anchor strand to the inside of the finger tube.
Ring finger
Note: Setup is the same as middle finger except has a different stitch count.
Setup: Undo the provisional CO at the base of the middle finger and place 5 sts onto your working needles, as you did with the thumb. On either side of these 5 sts, move 5[6, 7] sts from main set to working needles. Follow the setup flow. 23[25, 27] sts.
Round 1: K2, k1tbl, k 7[8, 9] , CO 4 sts onto the working needle using the provisional method specified in Pattern Notes, pull a loop of working yarn through the inside of the finger and join the round; k 5[6, 7] , k1 tbl, k2. 21[23, 25] sts.
Round 2: K3, k2tog, k to last 4 sts, ssk, k2. 19[21, 23] sts.
Round 3: K2, k2tog, k to end. 18[20, 22] sts.
Next round: Knit.
Continue knitting in the round, finishing the finger as desired, as you did for the thumb.
Bring the working strand back down to the hand from the inside. If desired, anchor strand to the inside of the finger tube.
Little finger
Setup: Undo the provisional CO at the base of the ring finger and place 5 sts onto your working needles, as you did with the thumb. From the main set, move the remaining 12[14, 16] sts to the working needles. Follow the setup flow. 21[23, 25] sts.
Round 1: K2, k1tbl, k to last 3 sts, k1tbl, k2. 19[21, 23] sts.
Round 2: K3, k2tog, k to last 4 sts, ssk, k2. 17[19, 21] sts.
Round 3: K2, k2tog, k to end. 16[18, 20] sts.
Next round: Knit.
Continue knitting in the round, finishing the finger as desired, as you did for the thumb.
FINISHING
Wash and lay flat to dry.Weave in the ends. If there are any gaps in the fabric, close them by adjusting the tension on the adjacent sts and distributing any resulting slack across the row.
ABOUT THE DESIGNER
 Jeny spends her days outside with dogs, and her evenings inside with her family and her craft projects. She enjoys coming up with cool techniques and constructions in her knit designs.
Visit her website or find her on Ravelry as curiousjeny.
Pattern & images © 2021 Jeny Staiman