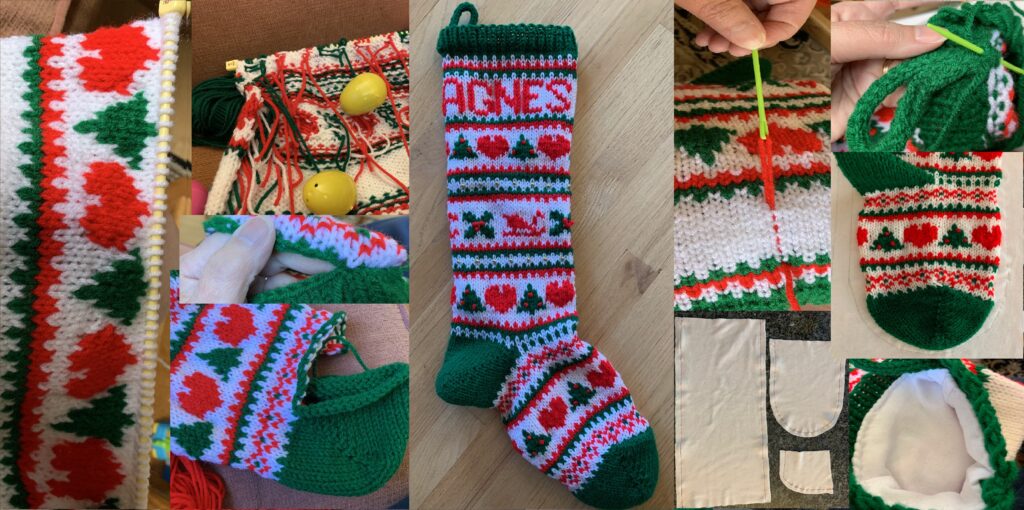
Knit your own Christmas Stocking using a pattern created with the Grid Designer! In this post I show how I made a Christmas stocking that I designed in the Grid Designer. The stocking is large and roomy with an optional lining that can be sewn in. I have made these for members of the family; this year I am making one for myself and my husband. The free pattern is shared here (free for personal use), as well as all the instructions to make your own stocking from start to finish.
You can jump directly to the pattern below by clicking here, or you can continue to read and find out how you can use plastic eggs as yarn bobbins!
What is Grid Designer?
The Grid Designer is a new, free, on-line tool for drawing and creating colored craft charts for your own patterns. Create your own designs for knitting, crochet graphgans, C2C crochet, latch hook, cross stitch and more, using the Grid Designer! Read more about the Grid Designer.
The Stocking
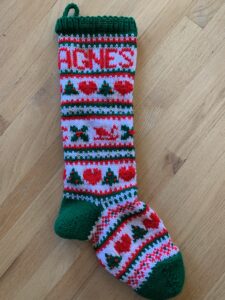
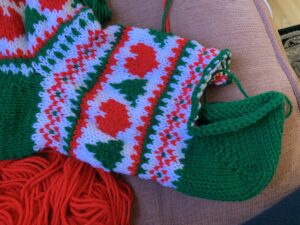
This large, roomy Christmas stocking measures about 7 inches by 26 inches when complete. It is knit on straight knitting needles and has a seam in the center back.
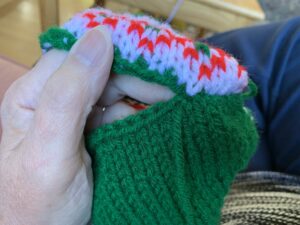
It is knit from the top down starting with a few rows of k1/p1 ribbing. There are two colorwork patterns, one for the top of the stocking and one for the bottom. The heel and toe are knit in the same way and a seam is sewn to attach the top of the toe to the top of the foot.
An optional lining can be made from jersey knit fabric. The lining is then attached at the top inside of the stocking and tacked to the back of the heel and toe to keep its placement in the stocking.
I have knit several of these with different patterns for members of the family. I will share those patterns on my blog over time. Last year I made this stocking for my husband and myself. This year I have made a Santa stocking for my youngest grandson. You can see that stocking and the free pattern for it here ( includes 7 other alternate patterns for the stocking top!).
The Colorwork
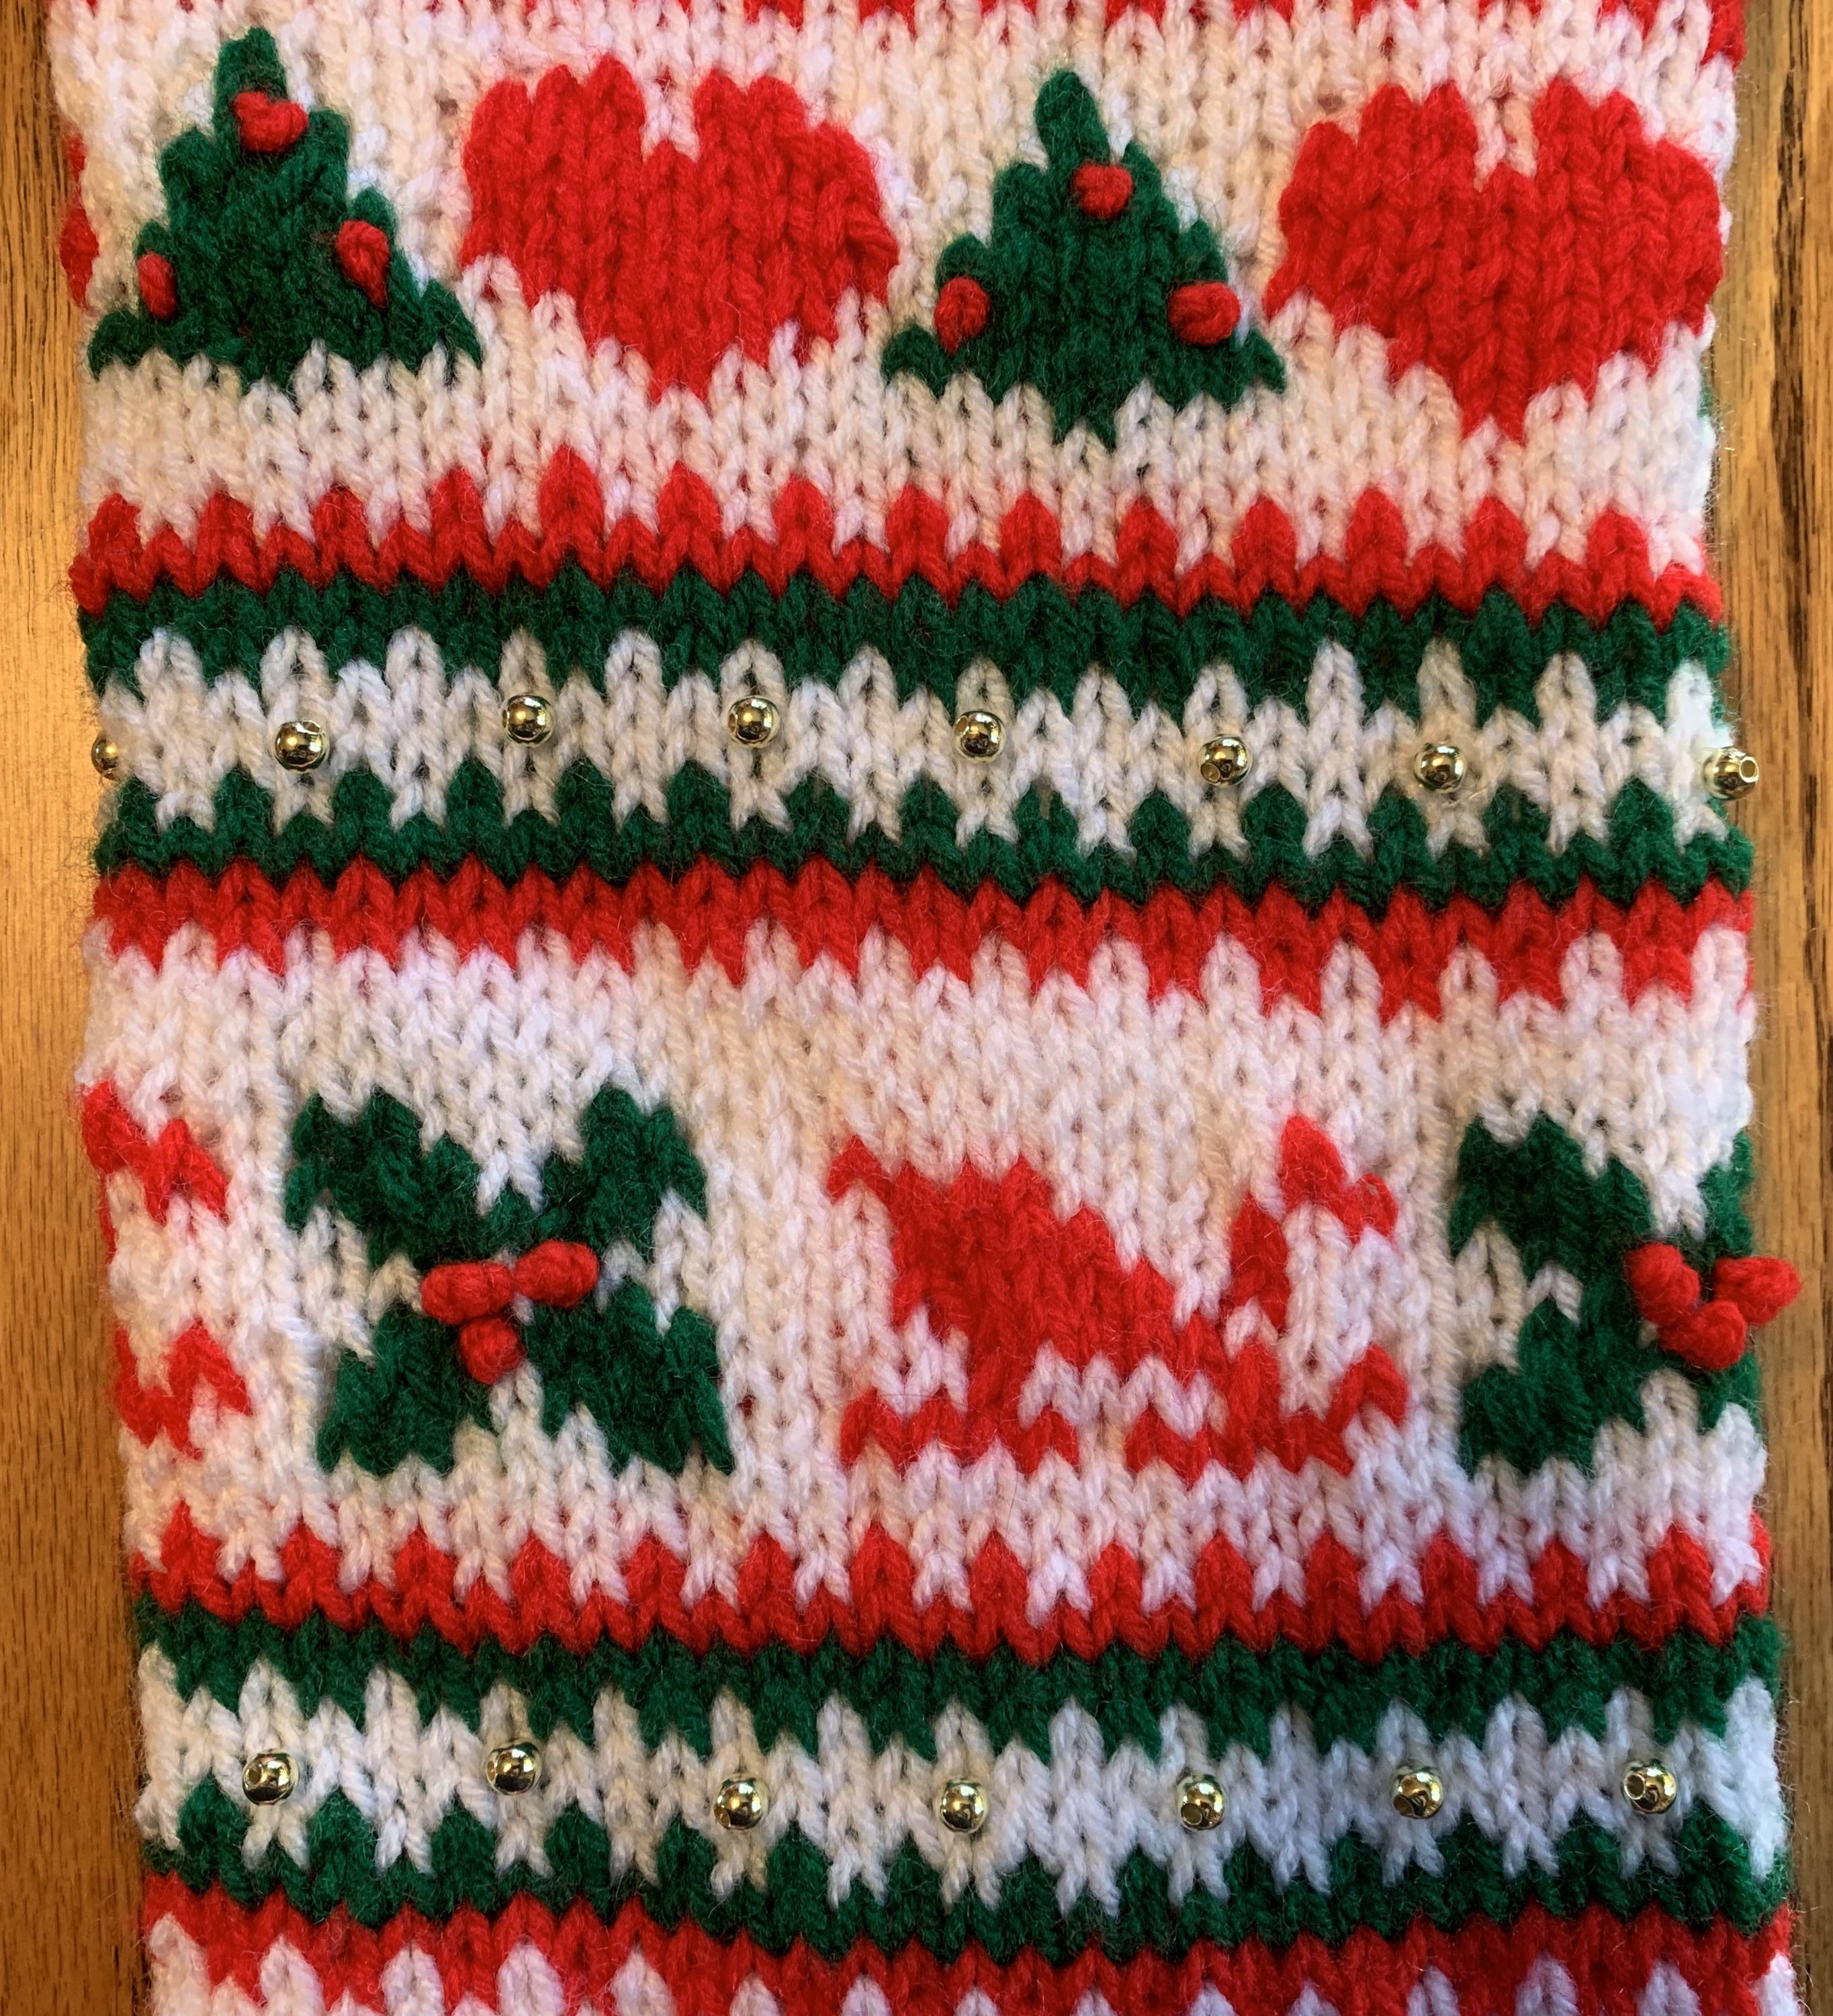
The colorwork on this stocking uses some Fair Isle knitting, where 2 colors are used throughout the row with floats on the back side.
However, the hearts with trees, and holly with sleighs, are knitted using 3 colors. At first I thought I could knit them as intarsia with white bobbins also for the spaces between, but then decided it was simpler to just carry the white all the way across the back. Then, I just needed red and green bobbins for the motifs along the way. I then twisted the bobbin yarn around the white yarn so that no holes would appear around the motifs.
On the foot are two lines of red diamonds with centers of green. When knitting the row in the center of these I carried 3 colors across the work: white, green and red. My tension was a little off here and these diamonds are knitted a little tighter than the other rows. Hopefully, I can to better on the next stocking for my hubby.
I duplicate-stitched the name on the top of the stocking where I left a white space large enough for that. Then I added 3 holly berries to each holly motif by doing 3 French knots (yarn wrapped 3 times around needle for each). I added 3 red ornaments to each tree by doing 3 French knots (yarn wrapped once around needle for each). I then added some gold beads to the white spaces on the stocking top. All of these are optional, of course.
The Bobbins
I hadn’t done any colorwork knitting for a while. I have some bobbins somewhere in the house, but I don’t know where they are. We have one room designated as my craft room, but it is mostly filled with whatever junk we are trying to keep and don’t know where to put. I searched there, high and low, with no success. I know they can be made of cardboard, but I just didn’t want to do that.
Then, on top of a stack of boxes, I saw a package of plastic Easter eggs I purchased for my grandchildren last Easter. I bought a package of 100 as it was cheap and I thought I could use them for several years. These eggs have a small plastic piece connecting the two halves of the egg when it is opened. I thought, you know, those might make good bobbins for my stocking. I thought I could roll up a small ball of yarn to place in each one and click the egg shut to hold it. There were also some small holes in the ends that I thought I could pass the yarn through, but these proved too large to really hold the yarn tightly in place.

So, that’s what I did. I chose a different color egg for each color of yarn and made red and green yarn bobbins by making small balls of yarn to place inside, as many as I needed to work around the stocking. One yarn bobbin for each red or green motif. They worked great.
With one hand I could press the crack area of the egg to open it, pull to lengthen the yarn, then press the ends of the egg to shut it. Best bobbins I ever used! And a package of 100 of them was just a few dollars on Amazon.
This is what I plan to do going forward. Will work great for my crochet projects too!
The Pattern
Now for the real meat of this post, the pattern!
Materials
The stocking is worked in Red Heart Super Saver yarn, medium/worsted weight. Three colors, one 7 oz skein of each will do: white, paddy green and hot red. (I had one full skein of white and about half of it was used. I had partial skeins of hot red and paddy green and still have some left over.)
I used size 8 needles, gauge was 17 sts and 23 rows in a 4 inch square. Keep in mind that the gauge of the stocking does not matter as you are not needing to make it a specific size, as you would do for something that is going to be worn. My stocking was 7 inches by 26 inches.
You will also need a tapestry needle and bobbins (or easter eggs!).
Knitting Directions
These knitting directions are also available in the form of a pdf file. The pdf can be loaded in other apps, such as knitcompanion, that aid in tracking progress. View and download the pdf by clicking here.
You should be able to download the file once it opens in your browser, by using the download button in your pdf plug-in. If that is not working for you, right-click on the link above, for the pdf, and select “Save link as…” from the context menu. That should start the download.
Ribbing
Cast on 62 stitches with paddy green.
k1, p1 across for 6 rows
Stocking Top Pattern
Knit in stockinette stitch for the length of the “stocking top” pattern (below) with the first row being a knit row. When you are looking at the pattern, know that only the center 30 stitches will appear on the front of the stocking, the sides of the stocking will wrap around and will be seamed on the center back.
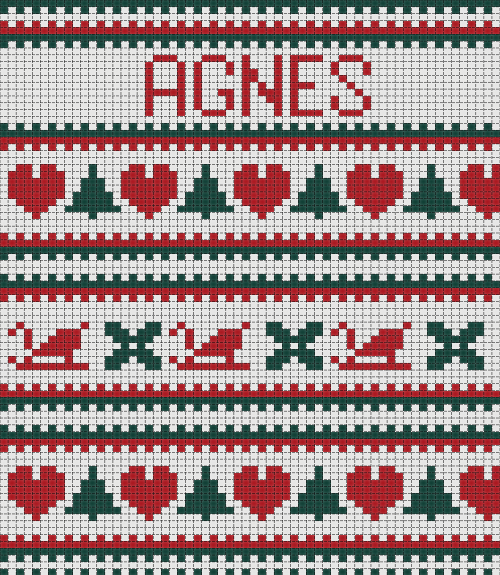
Remember you are knitting your pattern rows from the top down. Remember to turn your pattern upside-down.
Of course you want to add your name instead of mine to the top of the stocking either by knitting it in or using duplicate stitch or embroidery.
If you want to modify the pattern, for instance to add your name, or use the Grid Designer to print the pattern, see the following section.
Modify the Pattern
If you would like to use the Grid Designer to modify the pattern, for instance to edit in your own name, or change the design, watch this YouTube video Modify Stocking Pattern video or follow these steps:
- Click here to open the shared project “stocking top”.
- Click the “Load project” link at the bottom of the page that is displayed.
- The Grid Designer will open in your browser and ask you if you want to load the project. The Grid Designer is free and requires no login. Click the Load button.
- The project will load your own private copy of the pattern. Make any changes you would like with the editor. See the overview playlist for information on how to edit.
- You can print it with Project -> Print.
- If you want to change the display grid, add numbering, etc. use the options under the Display menu. Also see the Print and Download YouTube video showing all the ways you can print and download a graph from the Grid Designer.
Heel
This section is used both for knitting the heel and knitting the toe.
With paddy green:
Row 1 – sl1, k30, YTF, sl1, YTB, turn
Row 2 – sl1, p29, YTB, sl1, YTF, turn
Row 3 – sl1, k28, YTF, sl1, YTB, turn
Row 4 – sl1, p27, YTB, sl1, YTF, turn
Row 5 – sl1, k26, YTF, sl1, YTB, turn
Row 6 – sl1, p25, YTB, sl1, YTF, turn
Row 7 – sl1, k24, YTF, sl1, YTB, turn
Row 8 – sl1, p23, YTB, sl1, YTF, turn
Row 9 – sl1, k22, YTF, sl1, YTB, turn
Row 10 – sl1, p21, YTB, sl1, YTF, turn
Row 11 – sl1, k20, YTF, sl1, YTB, turn
Row 12 – sl1, p19, YTB, sl1, YTF, turn
Row 13 – sl1, k18, YTF, sl1, YTB, turn
Row 14 – sl1, p17, YTB, sl1, YTF, turn
Row 15 – sl1, k16, YTF, sl1, YTB, turn
Row 16 – sl1, p15, YTB, sl1, YTF, turn
Row 17 – sl1, k14, YTF, sl1, YTB, turn
Row 18 – sl1, p13, YTB, sl1, YTF, turn
Row 19 – sl1, k12, YTF, sl1, YTB, turn
Row 20 – sl1, p12, YTB, sl1, YTF, turn
Row 21 – sl1, k13, YTF, sl1, YTB, turn
Row 22 – sl1, p14, YTB, sl1, YTF, turn
Row 23 – sl1, k15, YTF, sl1, YTB, turn
Row 24 – sl1, p16, YTB, sl1, YTF, turn
Row 25 – sl1, k17, YTF, sl1, YTB, turn
Row 26 – sl1, p18, YTB, sl1, YTF, turn
Row 27 – sl1, k19, YTF, sl1, YTB, turn
Row 28 – sl1, p20, YTB, sl1, YTF, turn
Row 29 – sl1, k21, YTF, sl1, YTB, turn
Row 30 – sl1, p22, YTB, sl1, YTF, turn
Row 31 – sl1, k23, YTF, sl1, YTB, turn
Row 32 – sl1, p24, YTB, sl1, YTF, turn
Row 33 – sl1, k25, YTF, sl1, YTB, turn
Row 34 – sl1, p26, YTB, sl1, YTF, turn
Row 35 – sl1, k27, YTF, sl1, YTB, turn
Row 36 – sl1, p28, YTB, sl1, YTF, turn
Row 37 – sl1, k29, YTF, sl1, YTB, turn
Row 38 – sl1, p30, YTB, sl1, YTF, turn
Stocking Bottom Pattern
Knit in stockinette stitch for the length of the “stocking bottom” pattern for the foot (below), with the first row being a knit row.
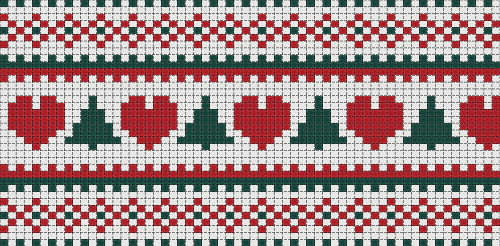
Remember that you are knitting the pattern from the top down, turn the pattern upside down to follow it.
If you would like to modify the pattern using the Grid Designer, you can load it in the Grid Designer by clicking this link and doing the same steps as for the “stocking top” pattern in this section.
See also the Modify Stocking Pattern video to see what you can change.
Toe
The toe is knitted in exactly the same way as the heel. The top of the toe is then stitched to the top of the foot.
To knit the toe, follow exactly the same instructions used for the heel in the Heel Section above.
After Row 38, knit and cast off all 62 stitches, leaving a tail long enough to stitch the top of the toe to the foot. Your toe should now look like the toe in the picture.
Half of the cast-off stitches will make the end of the foot section, the other half will make the top of the toe. These two sections now need to be stitched together to make a seam across the top of the toe/foot.
Toe Seam
Stitch this seam by weaving the knitting together as in this YouTube video: Shoulder Seam – Bind off Edge Knit Seam.
As you stitch, the cast-off edges will turn under and the toe and foot will look like they were knitted all-together.
Add Decorations/Embroidery
At this point, if you are planning on adding any duplicate stitching, embroidery or other embellishments (beads, ribbons, etc) to the stocking, now is the time to do that, before stitching up the back seam. For my stocking, I did the following:
In each holly motif I created 3 French knots. I wanted these to be fairly large so I wrapped the yarn 3-times around the needle. Here is a youtube video showing how to create a french knot over knitting.
In each tree motif I created 3 French knots. I wanted these to be very flat so I wrapped the yarn only once around the needle.
In the white spaces surrounded by green, I added some gold beads I found at Michael’s. They are 6mm beads by Hildie and Joe. I attached them with nylon thread and only put them on the front, as I did not want the thread to prevent the stocking from stretching width-wise.
Weave in Ends
Even if you add the lining described below, you will still need to weave in ends to make sure that nothing comes loose. Weave in any ends you need to at this time.
Here are some videos on weaving in tails for reference.
- Reverse Duplicate Stitch // Technique Tuesday by Roxanne Richardson
- Knitting Help – Weaving in Ends by VeryPink Knits
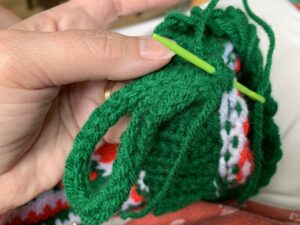
Sew Back Seam
Once all decoration or embroidery is done, stitch up the back seam. The stocking is knit so that there is a full stitch on each side that can be enclosed in the seam. You can do either the half-stitch or full-stitch weave to sew the seam. See this video if you are new to stitching seams: Sweater Finishing: Perfect Sweater Seams. Weave in the ends of the yarn you are stitching with.
Add Hanging Loop
Create 3-stitch I cord that is 30 rows or so long (Here is a YouTube video showing how to make a 3-stitch I-cord with circular needles. Here is a YouTube video showing how to make I-cord with straight needles). Since I also crochet, I sometimes make a simple loop made from chaining, this will work also for the loop.
Knit and cast off the last row leaving a tail long enough to use to stitch the loop to the stocking.
Fold the I-cord to make a loop and sew the bottom edges inside the top left edge of the stocking just below the ribbing.
Lining Instructions (optional)
I personally like to add a lining to knitted stockings, especially if they are intended to be really used to hold small presents on Christmas Eve. Linings are particularly good in stockings made for children, as the presents can’t get caught on any of the knitting floats on the back side of the stocking.
Here are my directions for making the lining. I have placed these into a separate page that I can reference for all my stockings in the future.
To create the lining follow the instructions here.
Have a question? Leave a comment below.
If you make the stocking, I would love to see a picture of it 🙂
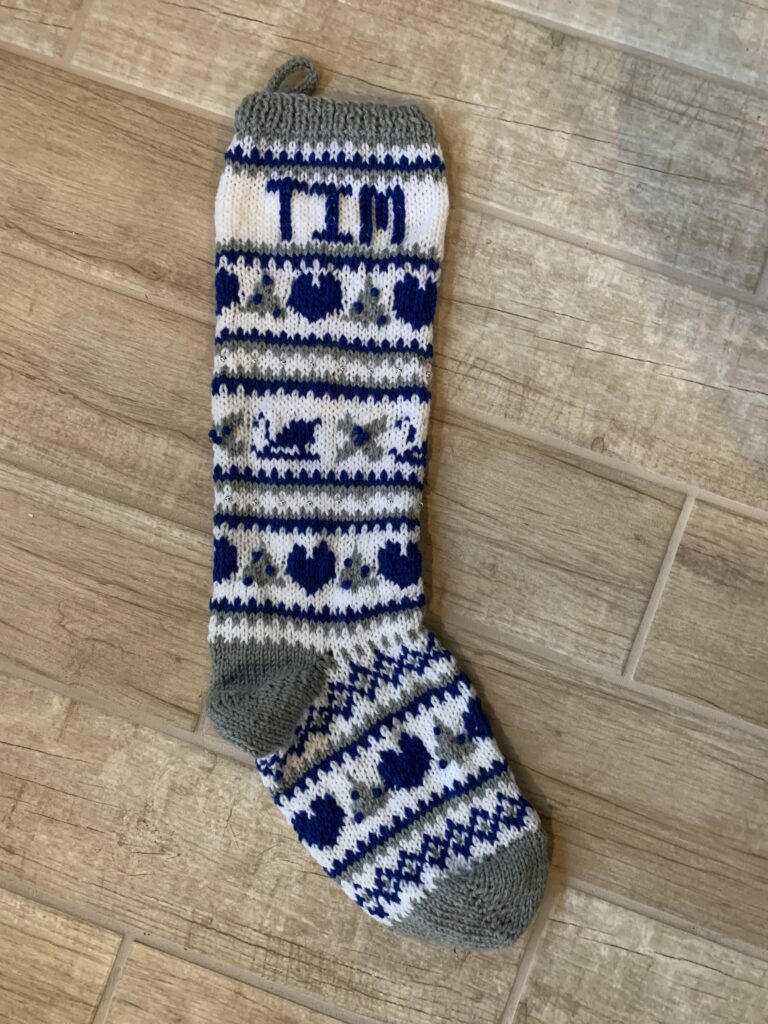
Here is the finished stocking in blue/gray/white for my husband. The color changes I made in the pattern were done in the YouTube video Modify Stocking Pattern video I mentioned above.
Have a very Merry Christmas everyone!!
More Info
See the Overview playlist on youTube for more information on the Grid Designer.
If you are ready to start the Grid Designer to create your own project, click here.
As always, if you have any questions or comments, leave me a message below or go to my contact page to email me.
See my other Christmas stocking patterns by clicking here.
Trying to knit Xmas stocking for my new great grandson. I need written copy please. Won’t download. Ill buy a copy from you ?
No problem. I replied to your email and sent the pdf for the pattern. Let me know how it goes. Love to see a picture when you get it done.
Could I also get a copy of the pattern, Thanks.
I sent a copy of the file to your email. Have a great day and a Merry Christmas!