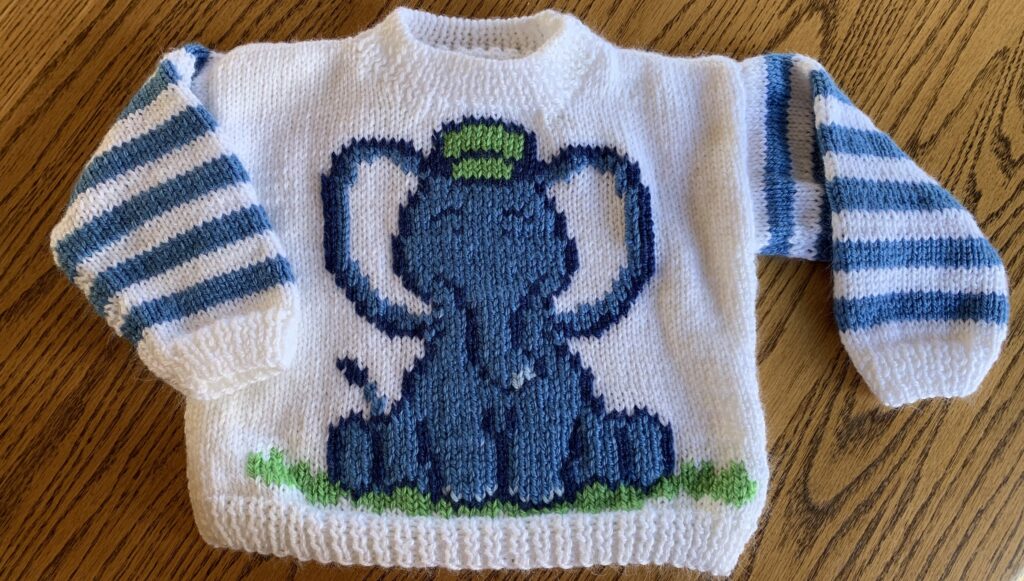
Customize a sweater for a little one with your own picture! In this post I show you how I created a simple sweater pattern and added a picture of a baby elephant that I drew in the Grid Designer. The simple sweater pattern is below; it is sized for a 12 month old. The elephant on the front was drawn in the Grid Designer and added with duplicate stitch. To see how it was drawn watch this video.
The entire pattern is free for personal, non-commercial use.
What is Grid Designer?
The Grid Designer is a new, free, on-line tool for drawing and creating colored craft charts for your own patterns. Create your own designs for knitting, crochet graphgans, C2C crochet, latch hook, cross stitch and more, using the Grid Designer! Read more about the Grid Designer.
I was a software developer for 30 years. Grid Designer is my retirement project. It is completely free to use! No login, no email, no nothing! Just open it up and use it.
Creating the Baby Elephant Sweater
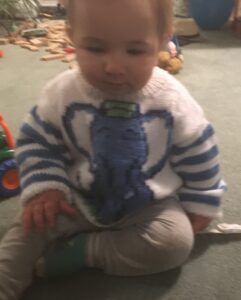
I wanted to create some sweaters for my grandsons. This post is about the first of those two sweaters.
For my youngest grandson I looked for something cute to put on the front of the sweater, finally deciding on a baby elephant. I then used the Grid Designer to draw the baby elephant. I knitted the sweater with a plain white front, then used duplicate stitch to embroider the elephant on the front.
This post includes a basic sweater pattern for a 12-month-old and the elephant pattern created on the front. Also included below, I have a lion and a cat pattern suitable for the front of the sweater, if you are interested in another drawing for the front of the sweater.
You can also create your own pattern for the front of the sweater using the Grid Designer. Here are two YouTube videos showing how you can create your own pattern, either by drawing one yourself or by digitizing a picture.
Simple Pattern Drawing for Knitting using the Grid Designer; Simple Digitization for Knitting using the Grid Designer.
Simple 12-month-old Sweater Pattern
I looked on-line to find a simple pattern with a straight front and back with no shaping at the sleeves to keep my knitting pattern simple. I found several and created a general pattern for 12 months. My youngest grandson was 9 months when I got it done, so plenty of room to grow into it. I also wanted it to be a bit big so that it could be worn over his clothes to go outside on cool days. Stripes seem to be pretty common on the sleeves of the patterns I looked at, so I decided that would be a simple thing to do and they could coordinate with the picture I drew for the front.
I knew what yarn I would use, as I had some leftovers from previous projects: Bernat Baby Softee. My knitting sample swatch worked up at 28 rows and 21 stitches for a 4 inch x 4 inch square with size 6 needles, so I was ready to go, I just needed a pattern.
Pattern Pieces
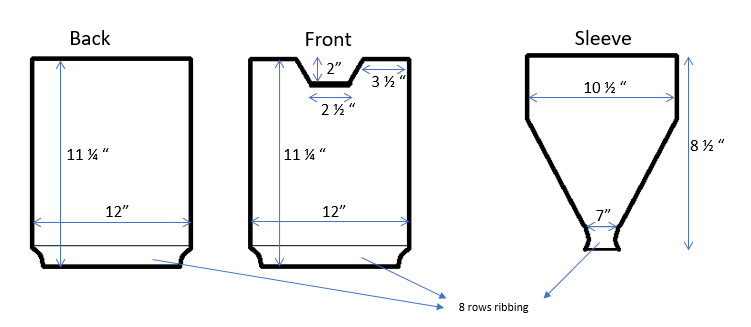
Looking at multiple patterns in 12 month size, I drew up the general size of each piece in inches. See the figure below.
Pattern in Inches
Then, I converted the inches in each dimension into rows and stitches using my sample swatch and gauge.
28 rows per 4 inches, means 28 / 4 = 7 rows per inch.
21 stitches per 4 inches, means 21 / 4 = 5.25 stitches per inch.
Then I multiplied the number of rows or stitches per inch to get each value.
For example, the back and front are each 11 1/4″ tall, so that is 11.25 inches * 7 rows/inch = 78.75 or 79 rows.
The back and front are both 12″ across, so that is 12 inches * 5.25 stitches/inch = 63 stitches across. Converting the other values from inches to rows and stitches, I updated my diagram. Now I had a diagram with rows and stitches for each dimension that corresponds to my gauge.
You can use the diagrams above to apply your own knitting gauge and come up with the number of rows/stitches for each dimension.
Pattern in Rows and Stitches
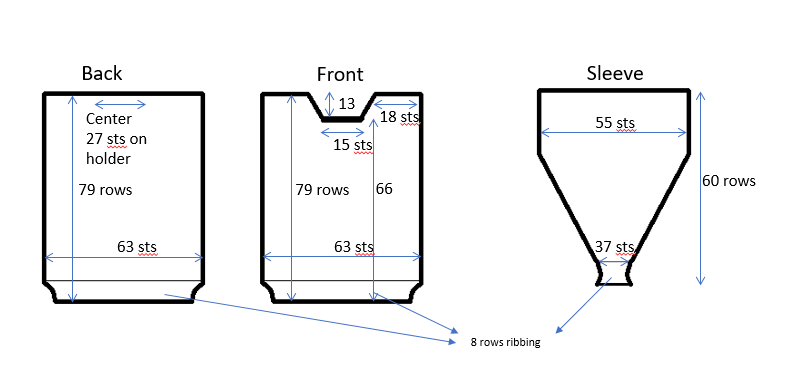
To get the number of center stitches in the back that belong on a holder, waiting for the neck to be finished, it’s 63 stitches minus 2 * 18 stitches (each shoulder in the front) = 27 left on the holder.
When making the front, I will knit 66 rows, then the shaping for the neck starts.
Starting with 15 sts in the center of the neck, I will need to increase the opening until the opening is as wide as 27 sts to match up with the back 27 sts on the holder.
The neck will be 13 rows deep, so, over 13 rows I decrease each side equally to make up the difference between 27 and 15 sts. That’s 27 – 15 = 12 sts to decrease in total, so 6 decreases on each side over 13 rows. One decrease every other row will do it, until we have done 6 decreases on each side.
Basic Sweater Directions
The sweater is first knit with a plain white front, then the elephant is added using duplicate stitch. This section provides the directions for knitting the basic sweater with a plain white front.
Gauge: 28 rows and 21 stitches for a 4 inch x 4 inch square with size 6 needles, Bernat Softee Baby.
I used one 5 oz skein of White almost completely, you may want to by two as this yarn has a dye lot. One 5 oz skein of Blue Jeans for the stripes (and the elephant to be added later), small amounts of Grass Green and Pale Blue were also used in the elephant.
You will need two yarn colors if you are making stripes on the sleeves. I will refer to the base color, white in my sweater, as W and the stripe color, Blue Jeans in my sweater, as S. Two sets of needles, the larger set is what you use to make the gauge swatch (For me, size 6). The smaller set is used for the ribbing (I used size 5). You will also need a tapestry needle for finishing the neck using a ribbed bind-off stitch to allow it to stretch.
BACK:
Using smaller needles, cast on 63 sts,
Rows 1-8: work k1, p1 rib for 8 rows,
Rows 9-78: switch to larger needles, work in Stockinette (St) stitch through row 78, the first row should be a knit row
Row 79: The 79th row should be a knit row, knit and bind off 18, k next 27 and place on holder, knit and bind off remaining 18 sts.
FRONT:
Using smaller needles, cast on 63 sts,
Rows 1-8: work k1, p1 rib for 8 rows,
Rows 9-66: switch to larger needles, work in Stockinette (St) stitch through row 66, starting with the first row a knit row, row 67 should then be a knit row also.
Right Shoulder:
Row 67: k24, place next 15 sts on holder, place remaining 24 sts on another holder, turn to work on shoulder
Row 68: p24
Row 69: k22, k2Tog (1 decrease)
Row 70: p23,
Row 71: k21, k2Tog (2 decreases)
Row 72: p22,
Row 73: k20, k2Tog (3 decreases)
Row 74: p21,
Row 75: k19, k2Tog (4 decreases)
Row 76: p20,
Row 77: k18, k2Tog (5 decreases)
Row 78: p19,
Row 79: knit and bind off until there are 2 stitches left, k2Tog (6 decreases) and bind off this last stitch
Left Shoulder:
With right side facing you, place the first 15 sts on a separate holder (these are center sts). We will work the remaining 24 sts for the left shoulder, place these onto a needle. Working from right to left (from center to left edge) with the right side facing you:
Row 67: k24
Row 68: p24
Row 69: k2Tog (1 decrease), k22
Row 70: p23,
Row 71: k2Tog (2 decreases), k21
Row 72: p22,
Row 73: k2Tog (3 decreases), k20
Row 74: p21,
Row 75: k2Tog (4 decreases), k19
Row 76: p20,
Row 77: k2Tog (5 decreases), k18
Row 78: p19,
Row 79: k2Tog (6 decreases) and bind off, knit and bind off remaining sts
SLEEVES:
Make 2 of these. I’ve written all the color changes and increases out in long-form below. But, the basics are to increase 4 evenly in the first row past the ribbing, then increase 1 st each side every 6 rows until reaching 55 sts across, change colors every 4 rows, starting 4 rows after the ribbing ends.
Using smaller needles, cast on 37 sts with W.
Rows 1-8: Work k1, p1 rib for 8 rows
Row 9: Switch to larger needles. Knit row, increasing by 4 stitches evenly spaced across row
Row 10: p41
Row 11: k41
Row 12: p41
Begin Stripes and Increases
Row 13: With S color, knit across row, increasing 1 st at beginning and end of row.
Row 14: p43
Row 15: k43
Row 16: p43
Row 17: With W color, k43
Row 18: p43
Row 19: Knit across row, increasing 1 st at beginning and end of row.
Row 20: p45
Row 21: With S color, k45
Row 22: p45
Row 23: k45
Row 24: p45
Row 25: With W color, knit across row, increasing 1 st at beginning and end of row.
Row 26: p47
Row 27: k47
Row 28: p47
Row 29: With S color, k47
Row 30: p47
Row 31: knit across row, increasing 1 st at beginning and end of row.
Row 32: p49
Row 33: With color W, k49
Row 34: p49
Row 35: k49
Row 36: p49
Row 37: With color S, knit across row, increasing 1 st at beginning and end of row
Row 38: p51
Row 39: k51
Row 40: p51
Row 41: With color W, k51
Row 42: p51
Row 43: knit across row, increasing 1 st at beginning and end of row
Row 44: p53
Row 45: With color S, k53
Row 46: p53
Row 47: k53
Row 48: p53
Row 49: With color W, knit across row, increasing 1 st at beginning and end of row, (last increase)
Knit Even
Row 50: p55
Rows 51-59: Continue in stockinette st with W
Row: 60: pearl and bind off across row
Neck Ribbing
Block pieces if needed.
Sew left shoulder seam.
Here’s a shoulder seam video – Shoulder Seam – Bind off Edge Knit Seam.
With right side facing and smaller needles, pick up stitches evenly around neckband. This will include 27 sts in the center back and 15 stitches in center front that are on holders. Pick up 14 sts from each side area of the front neck opening. This should be 70 stitches in all. (If you are modifying the pattern, make sure to pick up an even number of sts here for the ribbing. This will make the ribbed sewn bind-off below easier.)
Total of stitches: back neck: 27 sts, left neck side: 14 sts, front neck: 15 sts, right neck side: 14 sts == total of 70 sts.
Work k1, p1 rib for 7 rows. Bind off the rib using this sewn rib bind-off. This sewn bind-off will make the neckline completely stretchy and look very professional. How to is here in this you-tube video: Ribbed Sewn Bind-off (Purl Soho). Watch the video before you cut your yarn as you need a good sized yarn tail to do the stitching.
NOTE: If you modify the pattern above for your own gauge, you need to make sure that the number of rib stitches around the neckline is an even number and start your k1, p1 ribbing with the knit stitch. This will ensure that the video above for the bind off, works for you.
Assembly
Sew second shoulder and neckband seam.
Here’s a shoulder seam video – Shoulder Seam – Bind off Edge Knit Seam. Use this for the bound off edges, then use the half-stitch weave on the ribbing, video here: Sweater Finishing: Perfect Sweater Seams.
Fold each arm in half lengthwise and tack the fold (top of the arm) to the shoulder seams for each. Sew top edge of the sleeve to the body.
At this point, before sewing the under arm seam from the bottom of the sweater to the cuff on the sleeve, it’s a good time to add the Duplicate Stitch Elephant or other duplicate stitch design to the front of the sweater. It will be easier to work on the front before the side seams are sewn.
Duplicate Stitch Front
Now is the time to add any duplicate stitch design to the front of the sweater, before the underarm seams are sewn. Add your own design or add the elephant design shown for this sweater.
Elephant Pattern
The elephant design I used can be loaded in the Grid Designer and printed from here. Click on the link “here” in the previous sentence, click the Load Project link at the bottom of the page, Grid Designer will open in your browser and ask if you want to load the pattern, say yes, then select Project > Print from the project menu on the upper left. Grid Designer is a free tool that runs in your browser, no email or login is required.
Or you can use the image below:
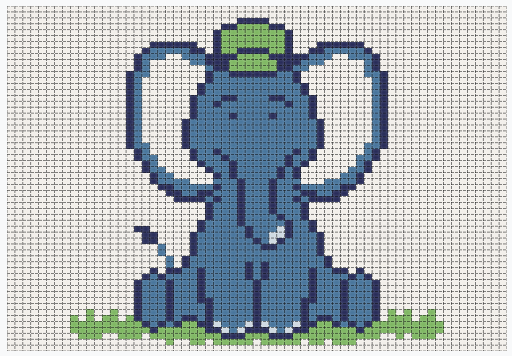
I show how I drew the design in the Grid Designer in this YouTube video. The pattern created during the recording of the video is also available here, if you prefer to use it.
See the Grid Designer video on Printing and Download here to print out or download any pattern from the Grid Designer.
Alternate Patterns
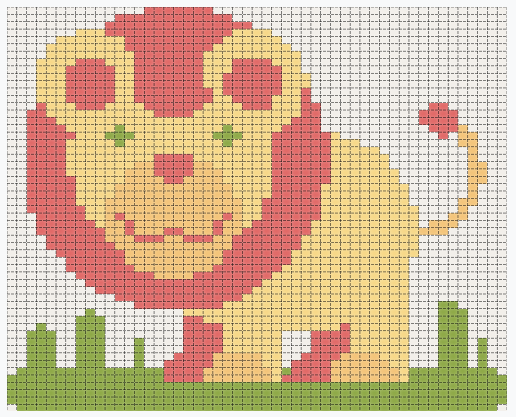
Here are some alternate designs I made along the way. You may like one of these patterns better for the front of the sweater:
Lion Pattern – created from design by user “ptra” on pixabay.com.
Cat Pattern – created from design by user “ptra” on pixabay.com.
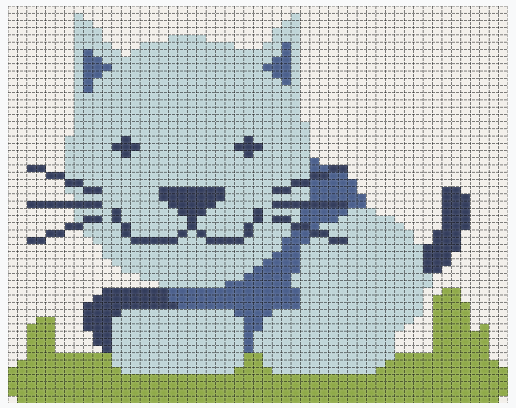
Pixabay is great for uploading free images. See how I digitized the Lion and Cat patterns in this YouTube Video – Simple Digitization for Knitting.
Make My Own Pattern
You can make your own pattern for the front of the sweater. The available space on the front is 63 stitches wide and 58 rows high. This is the maximum space, you want your pattern to have a little border on the edges to fit nicely inside that area.
See how I drew the elephant in Grid Designer by watching this YouTube video.
See how I digitized the lion and cat patterns by watching this YouTube video.
How to Duplicate Stitch
If you are not familiar with duplicate stitch, here are a couple of videos that will show you how this is done. Duplicate stitch is an embroidery stitch for knitted fabric that follows the knitting pattern of the fabric. It results in a colored surface that looks the same as knitting but sits on top of the existing knitting. Here are a couple of good videos on duplicate stitch.
- Duplicate Stitch by Knit Purl Hunter
- Everything You Need to Know About Duplicate Stitch Knitting by Two of Wands
To help guide you in placing your pattern on the sweater, use a tapestry needle to place some guide threads in the center and/or edges of where your design should go on the sweater. You can then easily count stitches from your guide threads to determine where you are in your pattern.
Of course, you can also use intarsia to knit your picture directly into the fabric. Intarsia does take some practice, duplicate stitch is a simpler way of applying the picture to the knitting, I feel. But, it does add to the bulk of the fabric.
Sew Underarm Seam
After adding any duplicate stitch to the front, sew underarm seam from bottom of sweater to the end of the sleeve.
Here’s a video showing the stitching of a seam like this: Sweater Finishing: Perfect Sweater Seams.
Hide thread tails by working them into the fabric with a tapestry needle. Here are some videos on weaving in tails.
- Reverse Duplicate Stitch // Technique Tuesday by Roxanne Richardson
- Knitting Help – Weaving in Ends by VeryPink Knits
Have any questions? Leave me a comment below an I’ll get back to you.
Hope your little one enjoys their sweater!
More Info
See the Overview playlist on youTube for more information on the Grid Designer.
If you are ready to start the Grid Designer to create your own project, click here.
As always, if you have any questions or comments, leave me a message below or go to my contact page to email me.
Beautiful patterns, thank yo for sharing them.
Thank you very much!