
Making the Claudia Top: A free tutorial
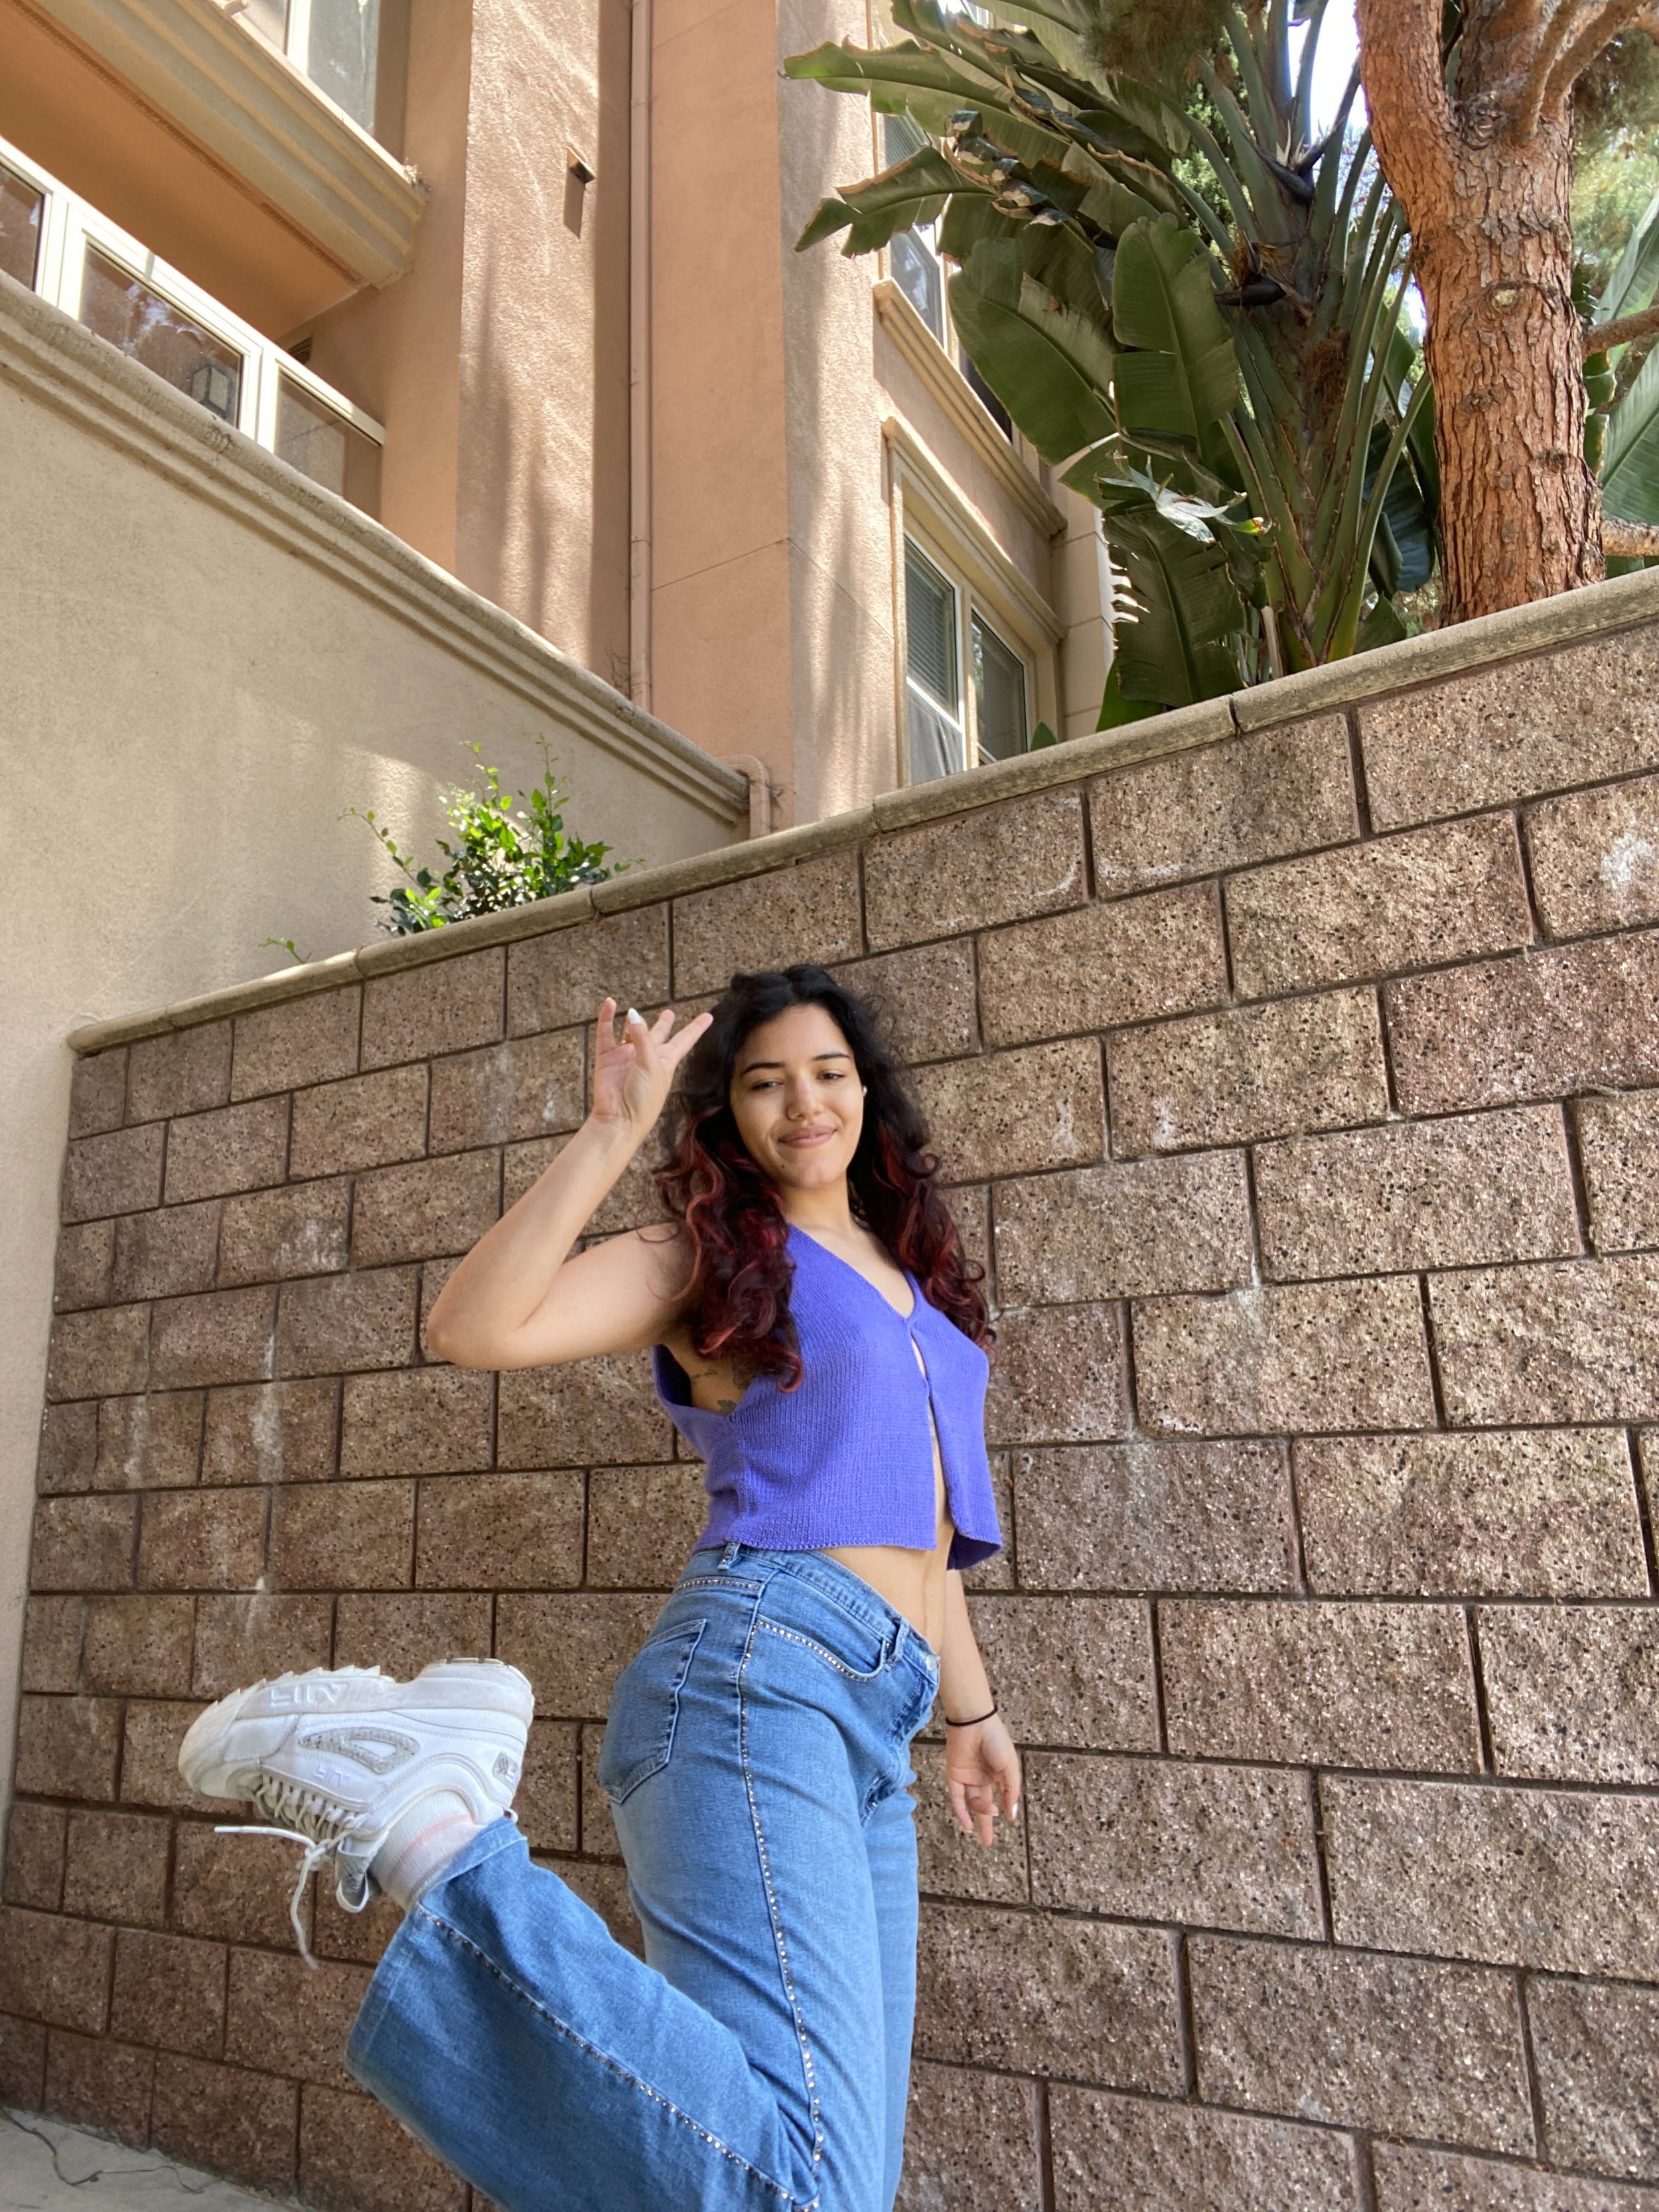
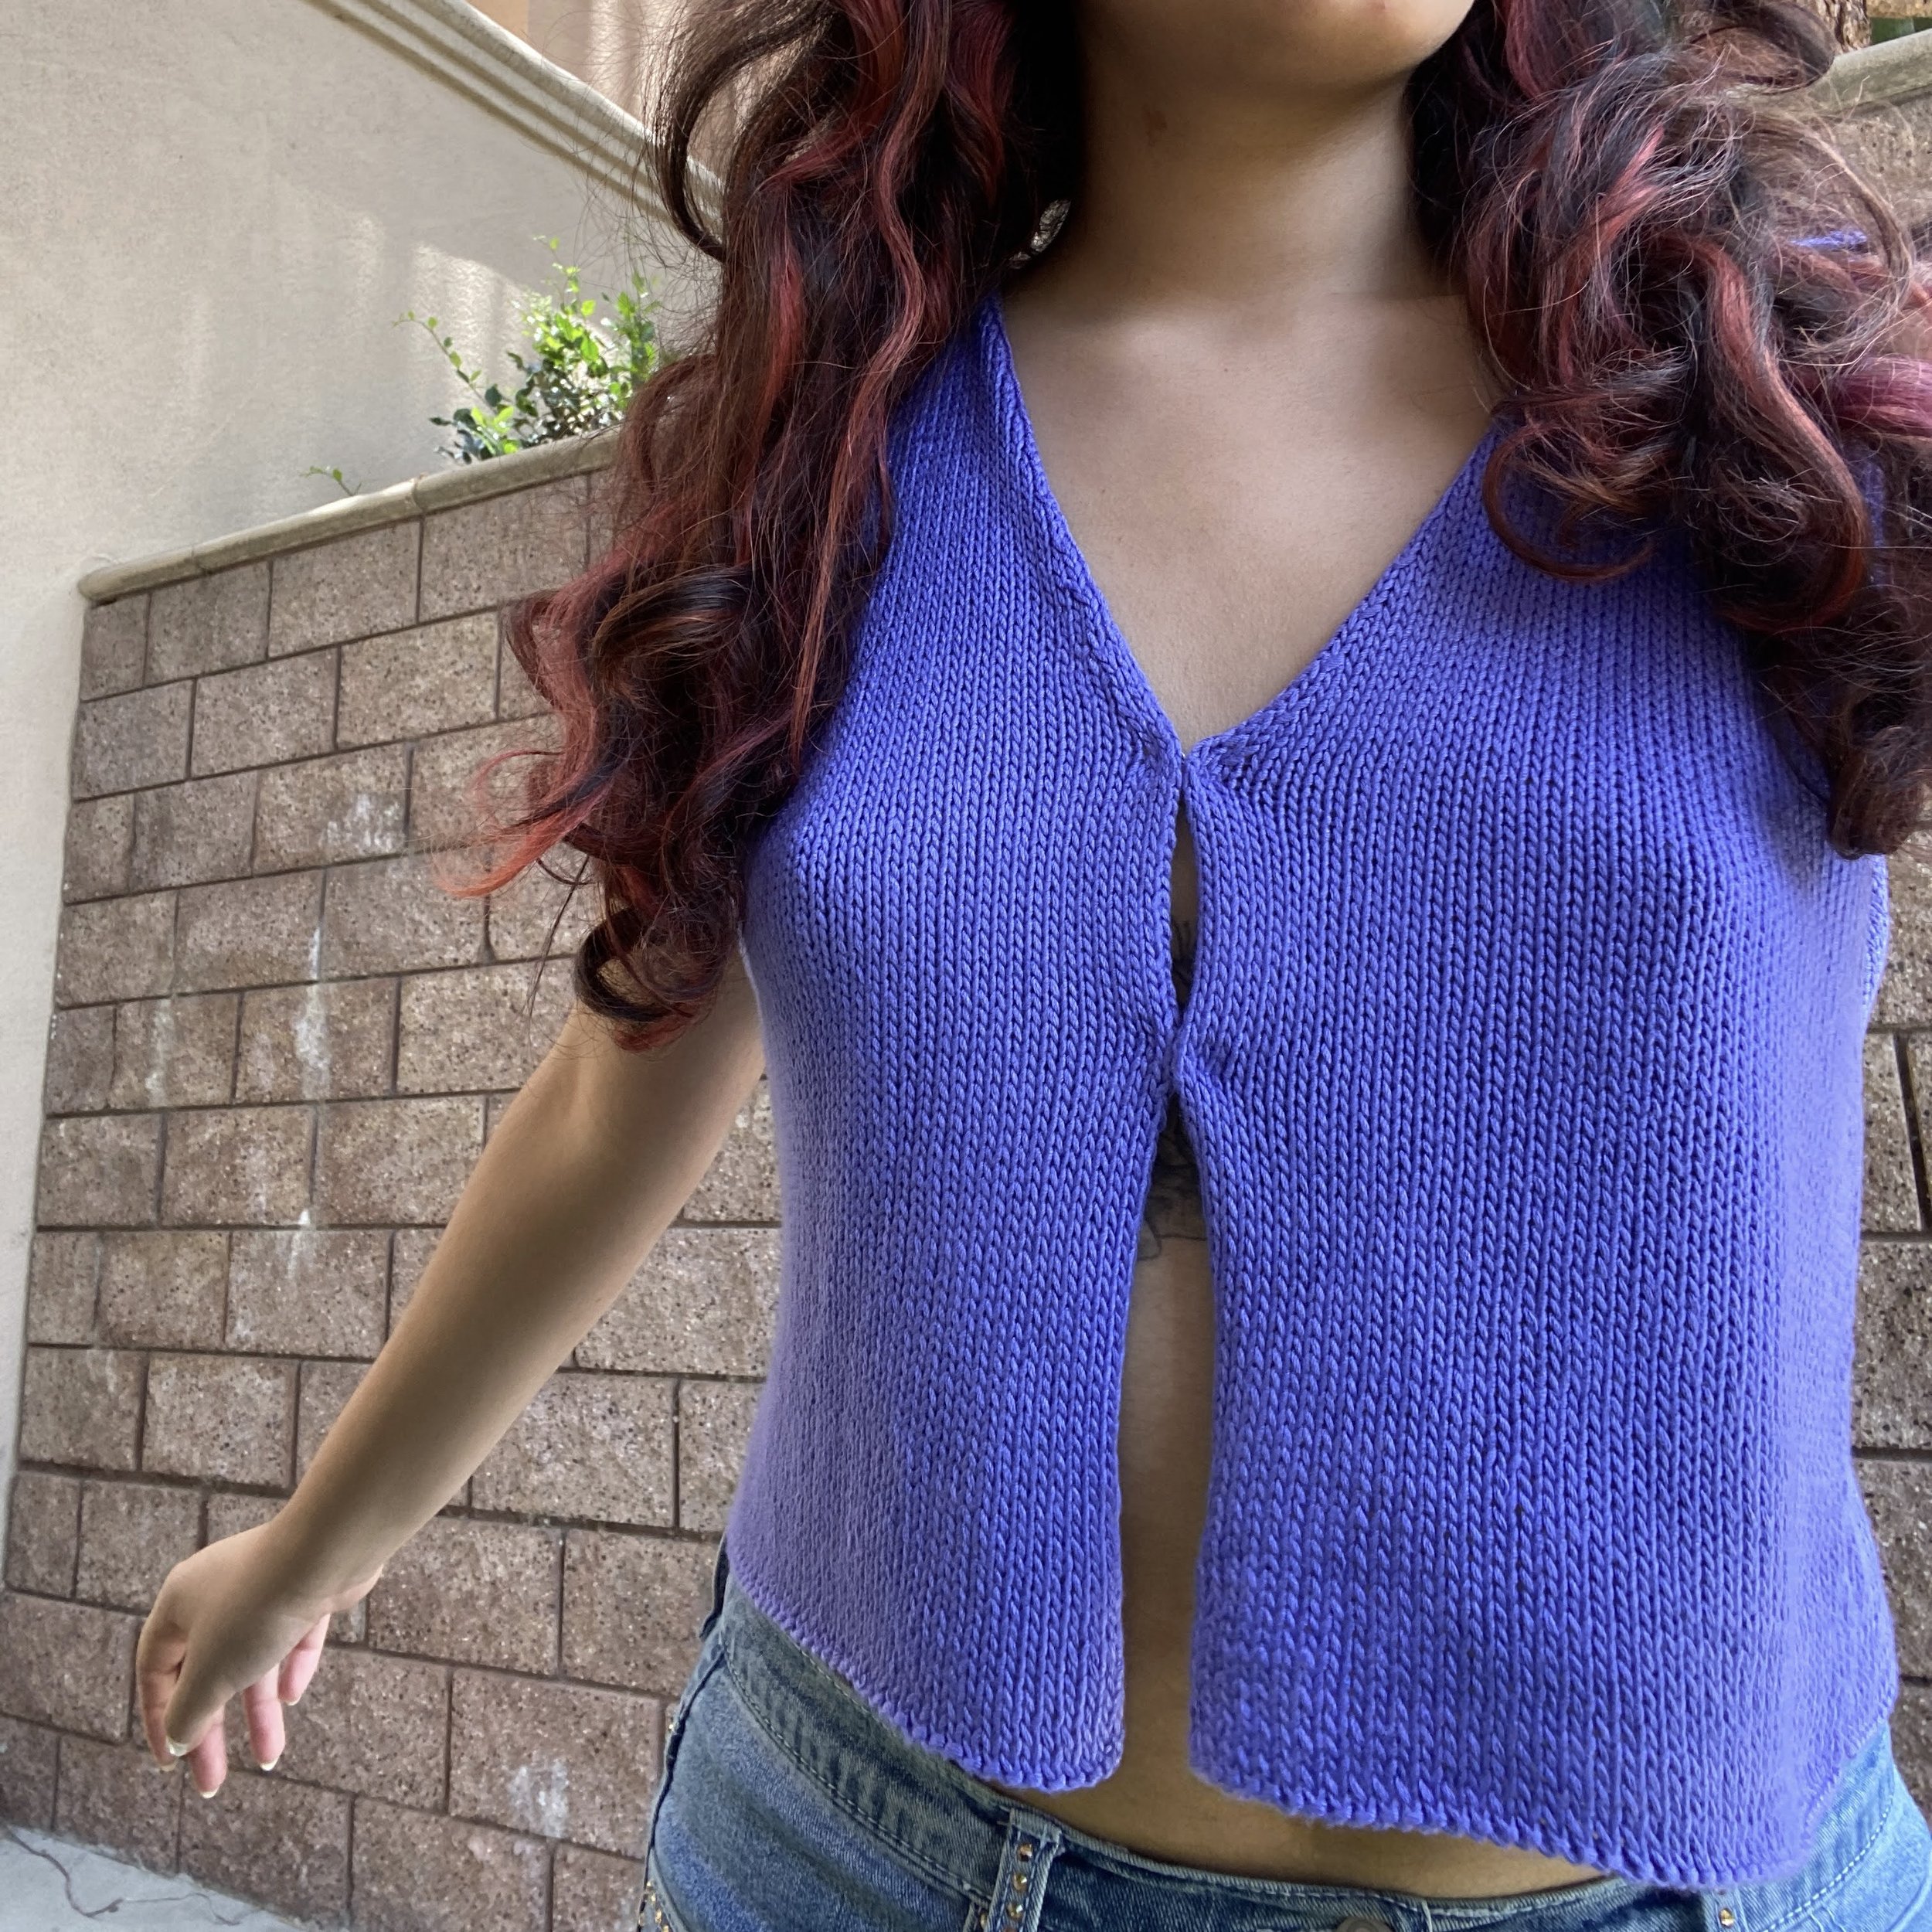
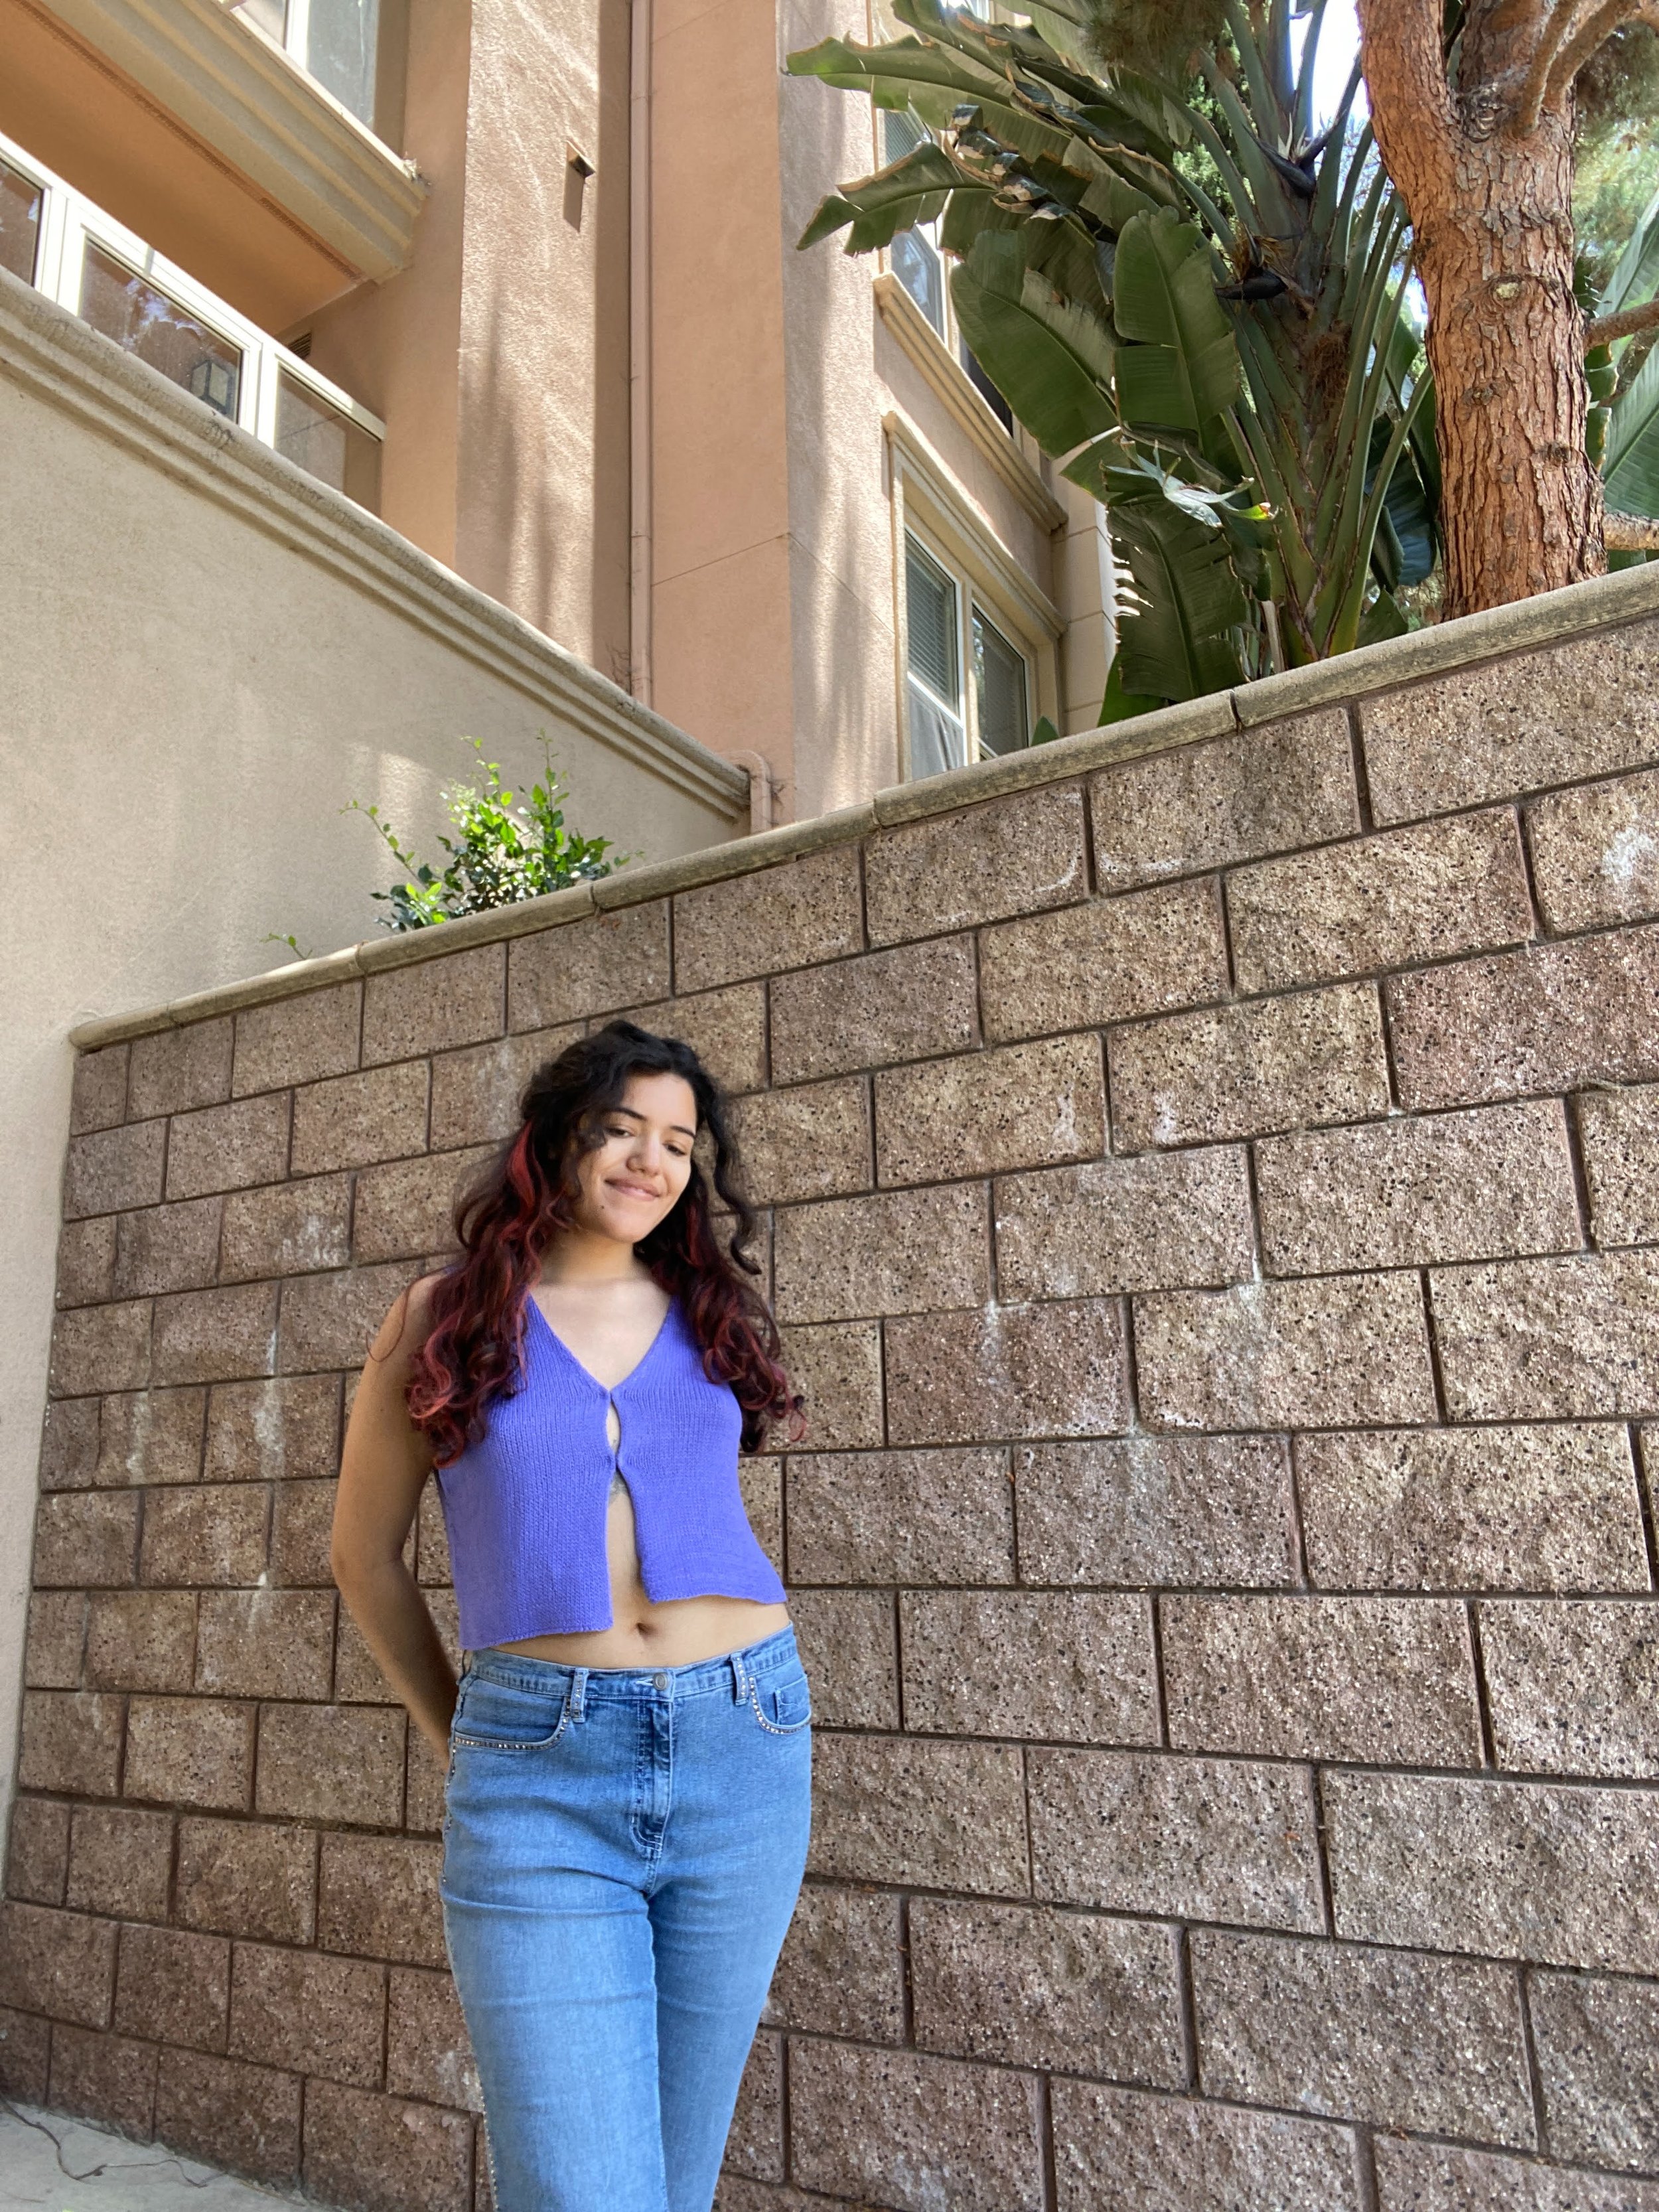
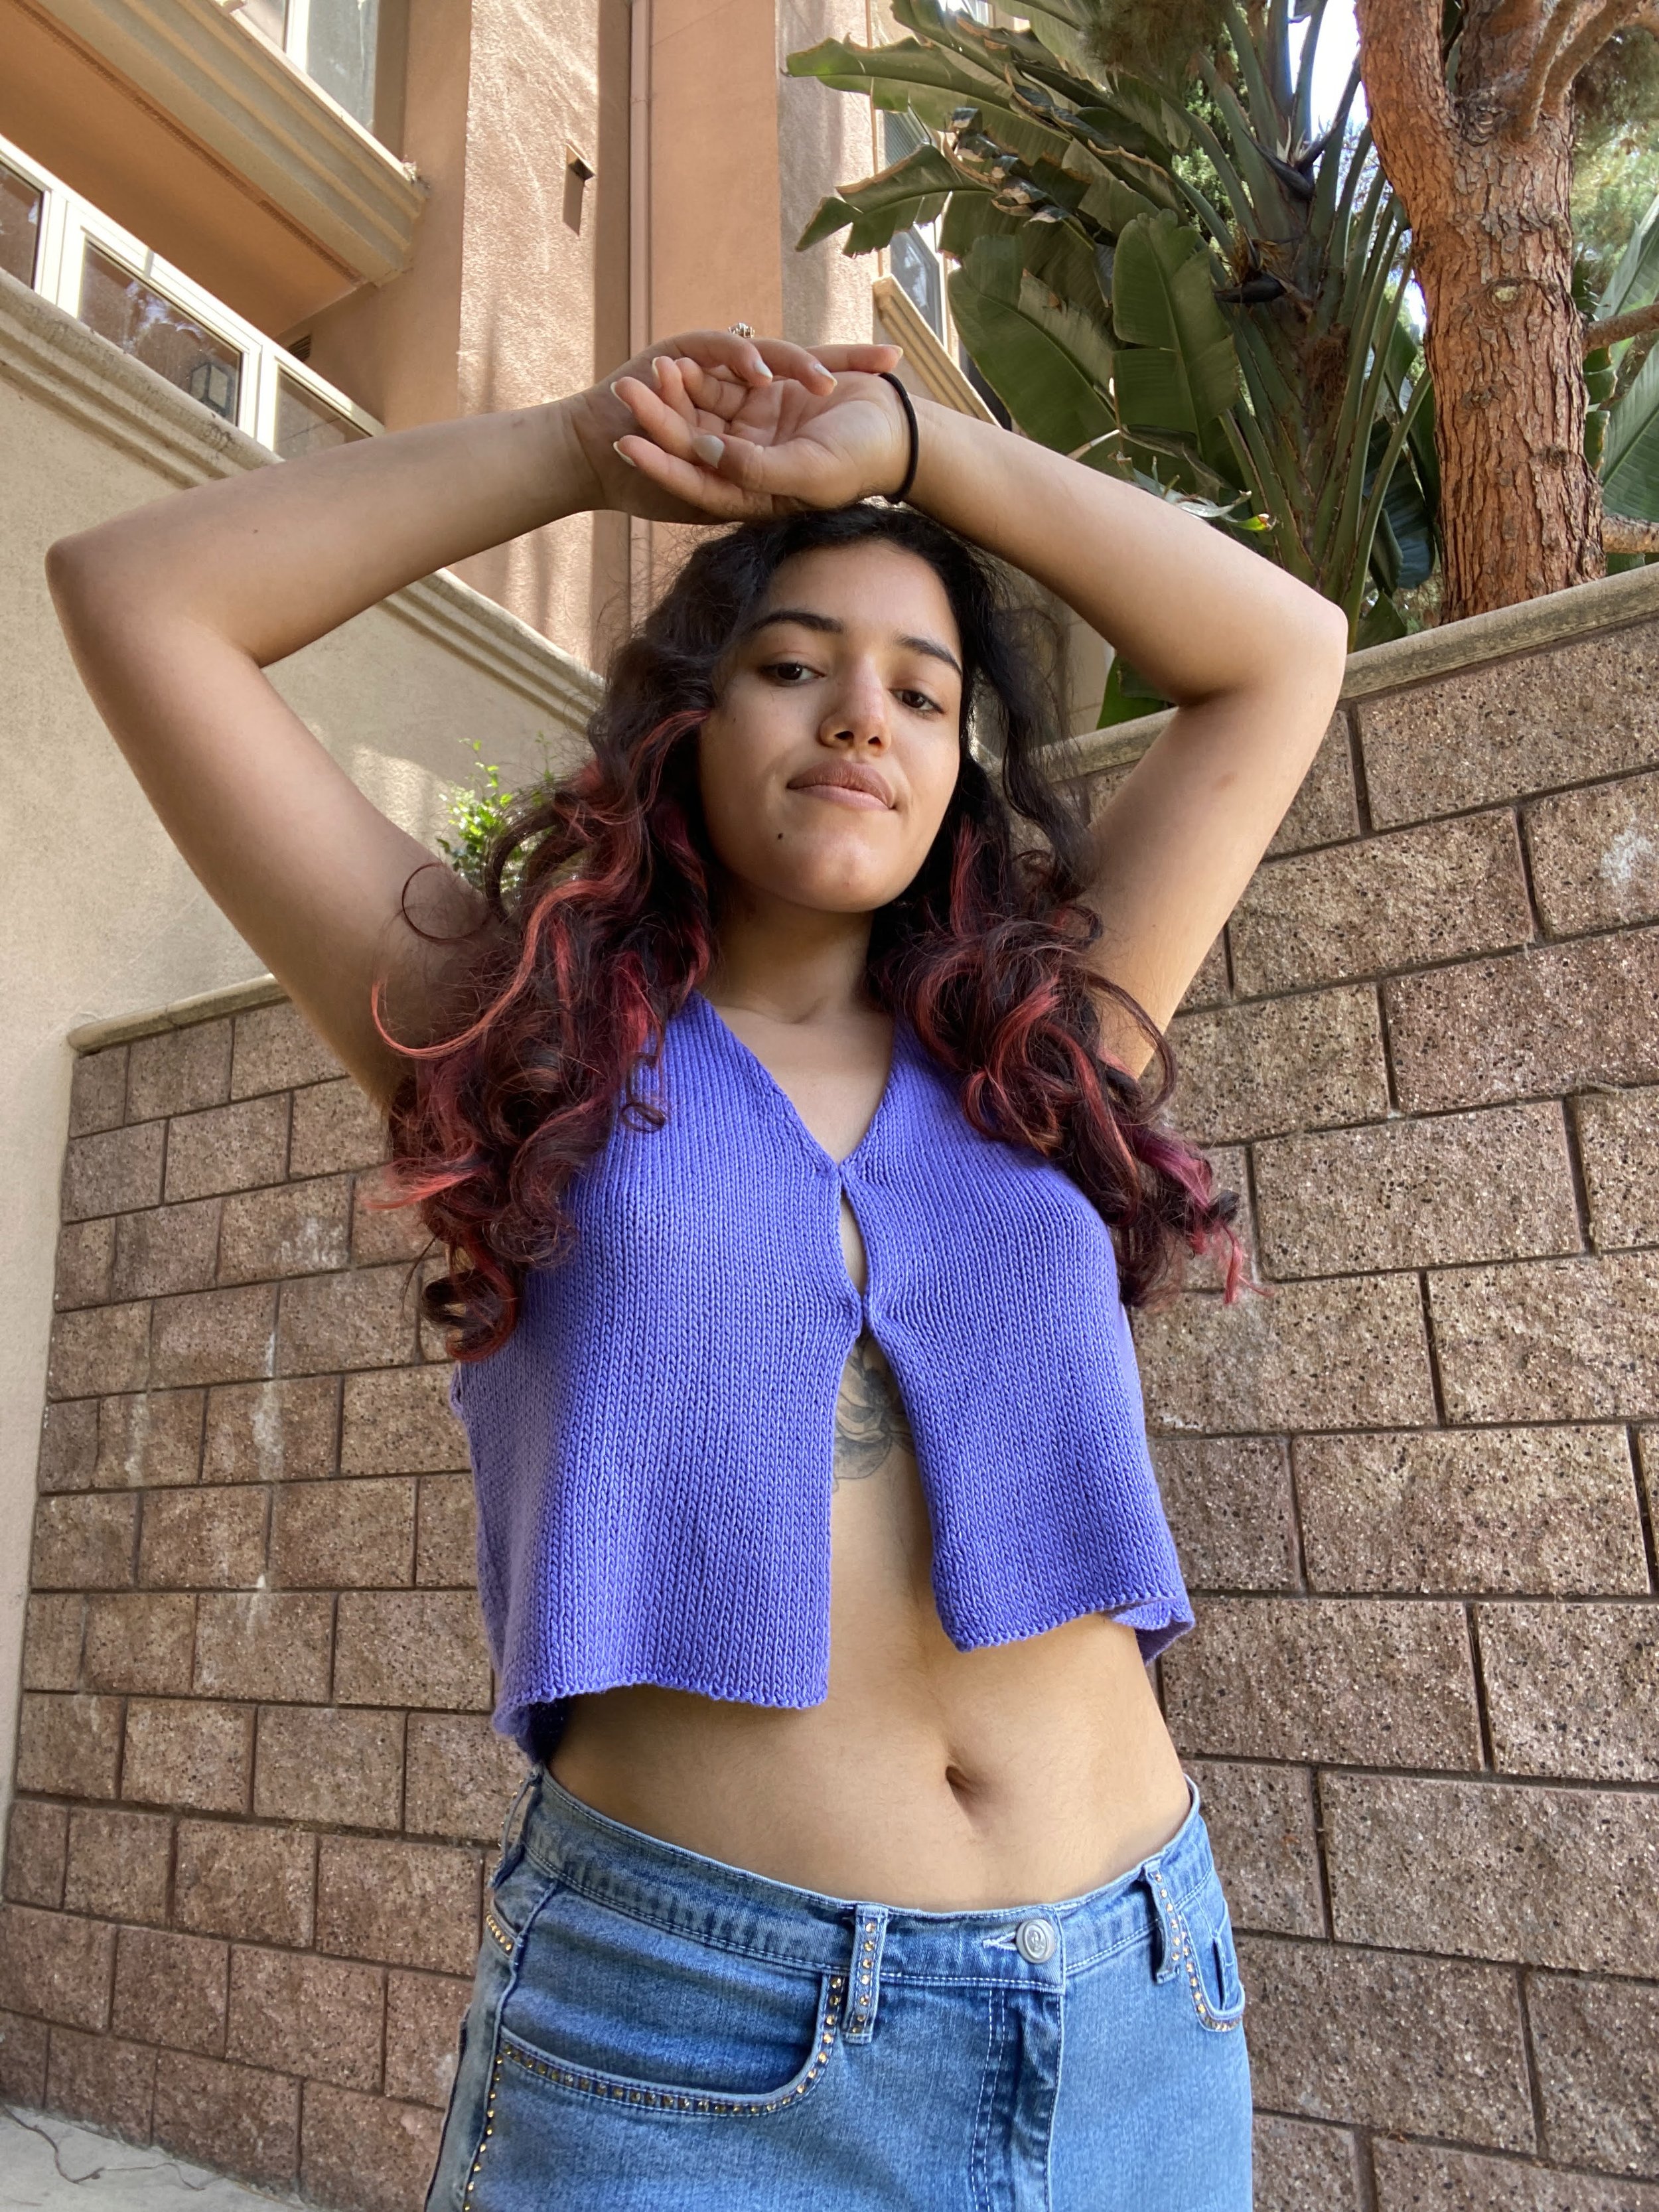
My bestie came to me with a commission idea a month or so ago: a basic slinky and drapey top with hook and eye closures in the front. Honestly, sometimes these simple projects are the most satisfying to make and I want you guys to be able to make one as well! I’ll be outlining how I did it. Hopefully, you can use these steps to help you draft and knit your own and to help you understand drafting your own patterns in general. I highly recommend that you read through everything before getting started on your own!
NOTE (7/5/23): Before you get started I wanted to jump in and say this is very much written in a tutorial style. My goal here is to teach you my thought process behind knitting simple garments with no pattern. You will need to be comfortable with doing some math and going through some trial and error, but that’s the fun in designing!

Making this top is going to be way easier than you think! It’s perfect for the beginner who’s ready to take on seaming and some basic decreases.
First, let’s go over what materials you’ll need and skills you’ll need to know to complete this top!
MATERIALS
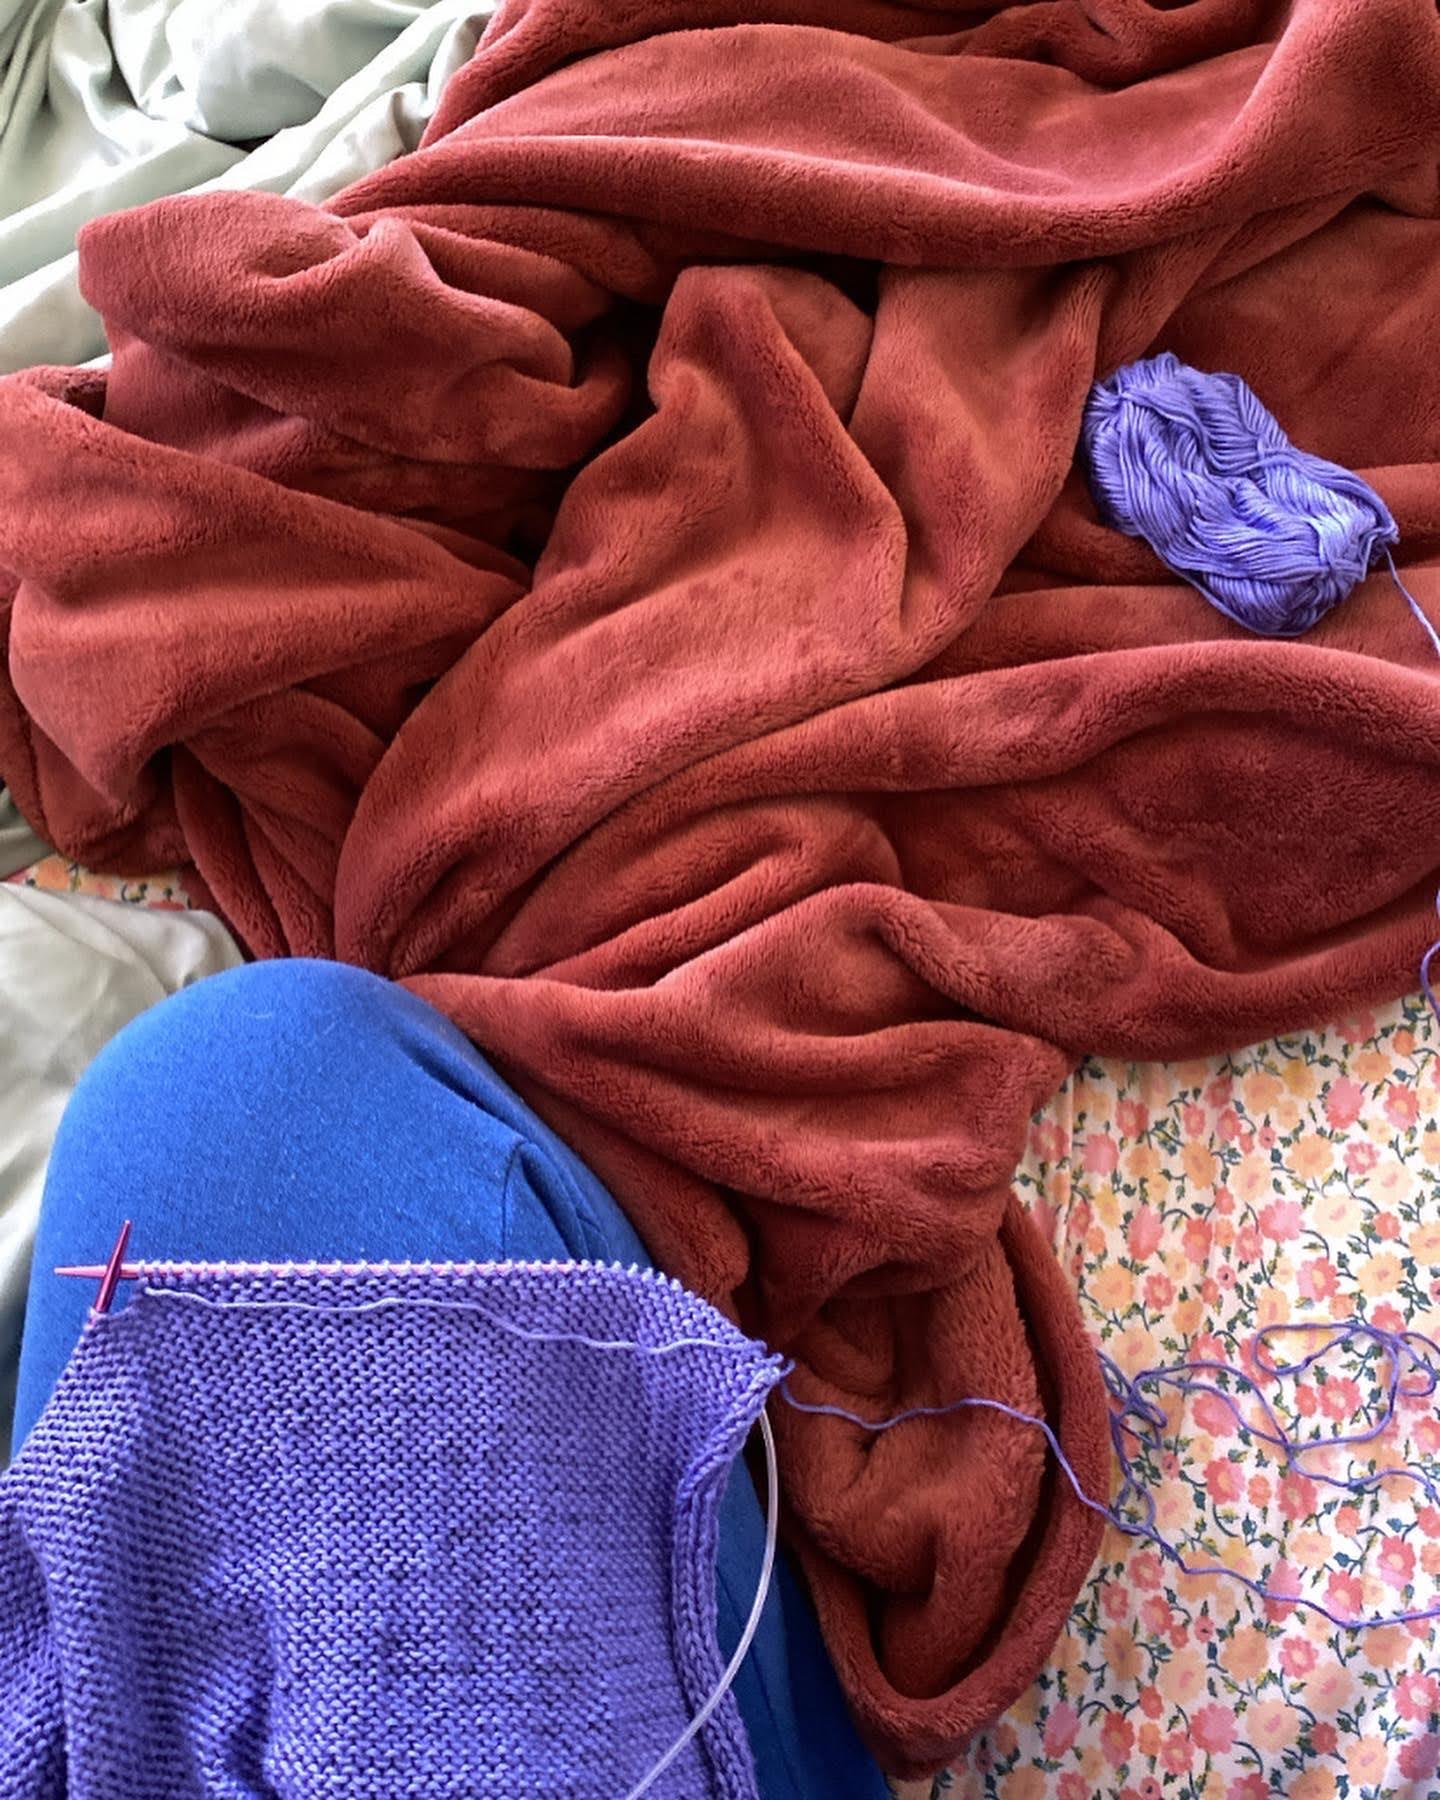
A DK weight yarn of your choice. I used Berroco Modern Cotton DK (a cotton/viscose blend will give a great drape!) for the white top. But for this example, I’ll be using some Lion Brand Truboo I had in my stash. Amount needed will vary based on how long/loose you want your top, but 2 skeins would be a good rule of thumb!
4.00 mm needles (or needles needed to meet gauge/desired effect with your yarn, I used 3.75mm for the white top version)
tapestry needle/scissors
2 hook and eye closures + needle & thread
measuring tape
stitch markers (at least 4)
patience and self-confidence!! You’re a maker and you’ve got this <3
GAUGE: 23st x 28 rows = 4”x4”
Your gauge doesn’t have to match mine exactly as I’ll be showing you how to use yours. However I do recommend keeping it similar if your a beginner!
MEASUREMENTS (using mine as an example):
Chest: 36”
Desired total length (from shoulder): 18”
Length from shoulder to desired start of neckline: 9”
Length from shoulder to armpit: 11”
Skills Needed
These skills will be quite straightforward and basic, if you know how to knit and purl, I’m sure you can figure everything out! I’ll be linking my favorite videos for each technique in case you’re not familiar.
long tail cast on (https://www.youtube.com/watch?v=sN9cNEozOLc)
knit stitch (https://www.youtube.com/watch?v=esEtUaa-Pwg )
purl stitch ( https://www.youtube.com/watch?v=7ePhLqw6HDM )
ssk - slip slip knit (https://www.youtube.com/watch?v=FCOto5XVawY&t=161s )
k2tog - knit two together (https://www.youtube.com/watch?v=10Ko-GJ8Vbk )
Mattress stitch (https://www.youtube.com/watch?v=46IUyefCkXA )
Sewing a hook and eye closure ( https://www.youtube.com/watch?v=-32aRfZHk0g )
Overview
Take a deep breath, it’s time for some math. First off, to get that carefree, drapey fit you’re going to want to add some ease. So let’s go ahead and add 2” to your chest measurement.
36” + 2” = 38” —> 19” back panel, 9.5” each front panel
Now we’re going to convert this to a number of stitches using our gauge! For example…
19”/4”(gauge) = 4.75 x 23 st = 109.25st —> 109 st back panel cast on
9.5”/4” = 2.375 x 23 st = 54.6 st —> 54 st front panels cast on
I like to do a small modification here to make the little gap between the hook and eye closures more prominent. To make this happen I’m going to remove a few stitches from the front panels so I’ll actually be casting on 50 st for the front panels. Without this modification, there will be slightly more coverage.
If we happen to have the same or similar measurements then lucky you! I have summarized exactly what I’ve done in some tables which you can easily follow to make your own. I also have some rough notes for a 34” bust on my Ravelry project page that you can use as reference! I recommend you follow the general guidelines for shaping if you’re new to designing.
Just so we’re on the same page, let’s summarize what pieces we’re going to be knitting…
2 front panels; mirror images of each other
1 back panel
Front Panels
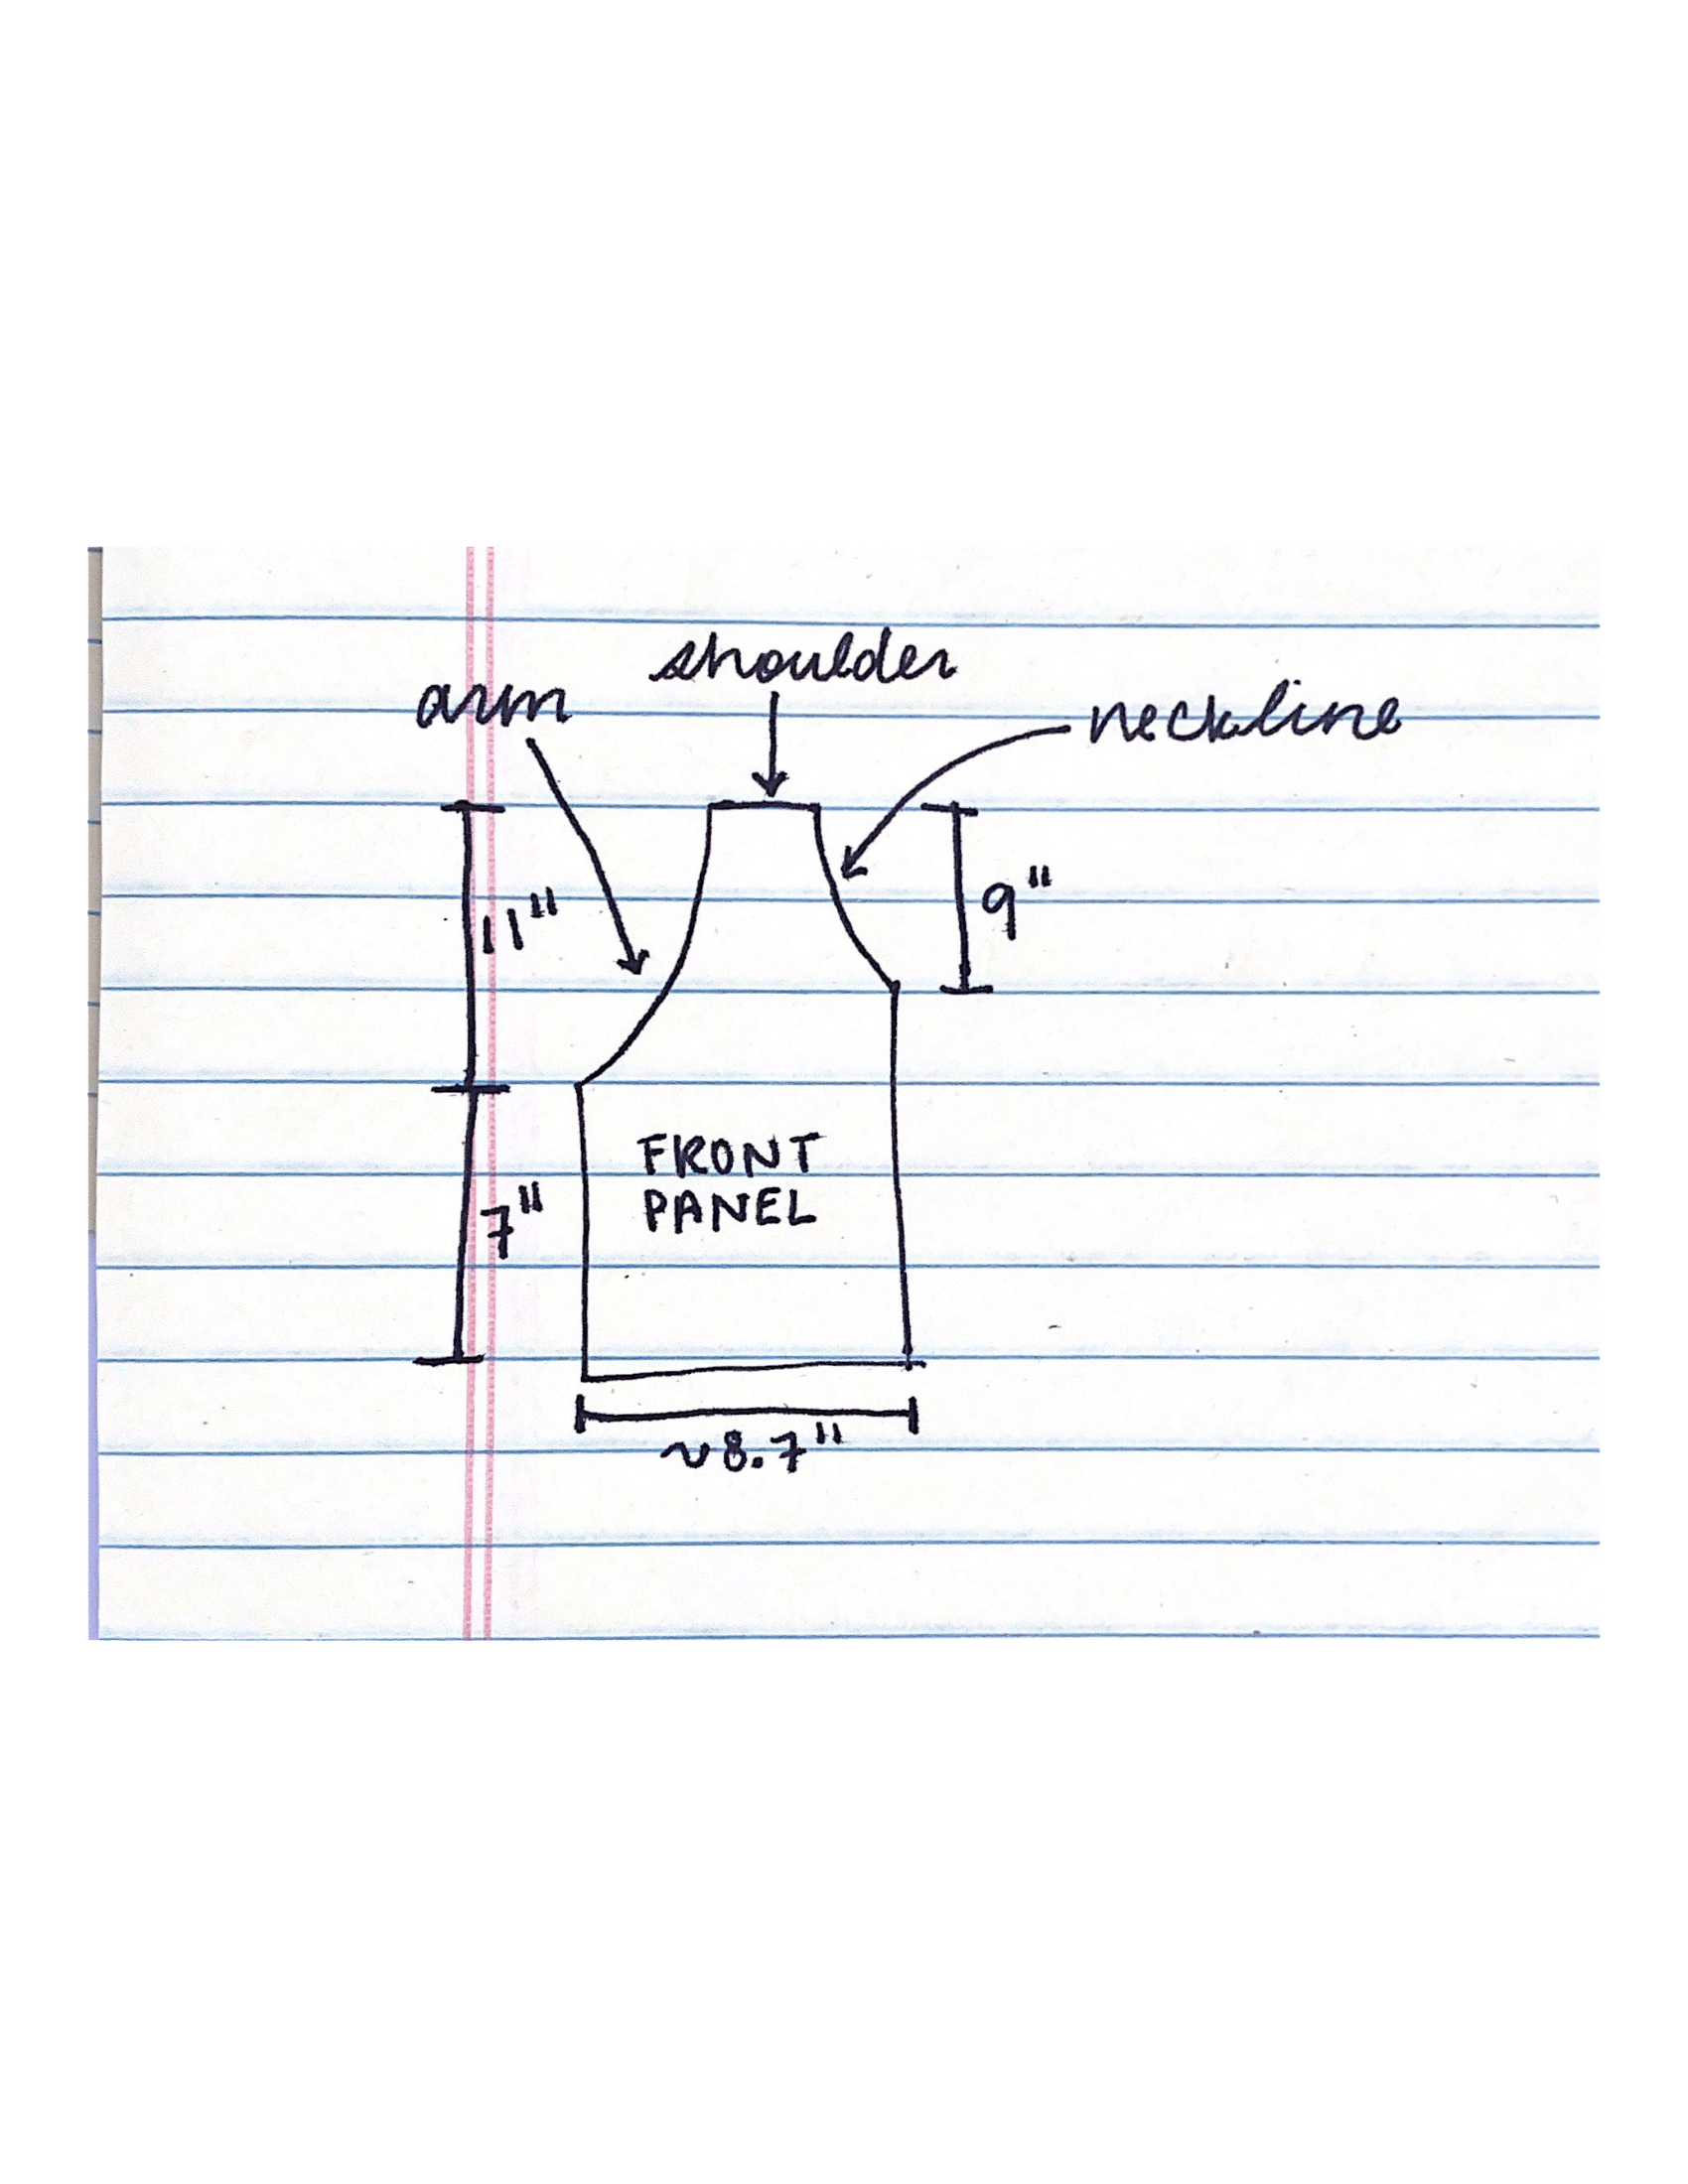
Alright girlbosses (or boybosses, or theybosses), it’s time to cast on! We’ll be starting with the front panel since the back will be based on this. Go ahead and cast on (my favorite method is long tail) and start knitting in stockinette. How long you ask? Take your total desired length for the top and subtract the length from shoulder to armpit (see picture above)
18” (total length) - 11” (armpit length) = 7”, so I will be knitting 7” of stockinette making sure to end on a purl row
You can keep track of the exact number of rows if you want to ensure your pieces are perfectly equal :)
Now it’s time to begin the arm shaping, but before we get into the math of it all I want to make sure to emphasize something. Never underestimate how helpful holding something up to yourself as you go can be. Math is great to help you get a feel of what you’ll be working with, but in the end, your body is the best way to measure… your body. The best thing you can do when you get started is to take lots of notes. Write down what worked, what didn’t work, and why something didn’t work. Never assume you’ll remember something you did because sooner or later you’ll forget.
Ok, let’s get into the math! You’ll want to determine the space between when your arm shaping starts and when your neckline shaping starts. To do that follow this formula…
18” (total length) - 9” ( neckline length) - 7” (stockinette length) = 2” / 4” (gauge) = 0.5 x 28 rows = 14 rows between arm shaping and neckline shaping.
We need this to be a number that when divided by 2 is still an even number so let’s round to 12 rows (because I’m lazy and know this yarn tends to stretch). The reason we need this to be even is that we’re working in stockinette stitch which is a 2-row repeat (1 knit row, 1 purl row).
NOTE: To see all my steps summarized, scroll down to the bottom of this section!
This is where understanding gauge is a great tool. The more rows in your gauge, the more control you will have with how steep of a slope you have on the sides. In other words, you’ll have more chances to make changes (incr/decr) in the same number of inches. I want this initial shaping to not be too steeply sloped so I’m going to do 1 dcr every 6 rows, twice for a total of 12 rows.
How are we going to make these decreases? For simplicity, let’s recreate the front panel I’ve drawn for you. With arm shaping on the left side (sloping inwards towards the right) and the neckline shaping on the right side (sloping inwards towards the left). There are 2 types of decreases that we’ll be using
K2tog - Knit two together, this is a right-leaning decrease. Now, you can just memorize this but the way I like to remember is to take note of which way your needle is going when you make your stitch. When you go through the front loop, your needle is going left to right, thus forming a right-leaning decrease.
Ssk - slip slip knit, this is a left-leaning decrease. You can apply the same guidelines to remember this as you did with k2tog. Needle going in back loop, right to left, thus forming a left-leaning decrease.
Now on this panel, we’ll be forming a right-leaning decrease on the left side. I like to form my decrease a couple of stitches away from the edge to form a little border. So here’s what I’ll be doing
R1 (decr row): Knit across until 4 stitches remain. k2tog, knit 2
R2-6: Continue in stockinette stitch. Repeat R1-R6 once more for 12 rows total
Ok, how are we feeling? Are we doing good? Now that your initial arm decreases are taken care of it's time to move on to shaping the neckline as well. We’re going to be shaping them both at the same time and it’s going to require a little bit of intuition with the help of some math. First, let’s figure out roughly how many rows we’re gonna need for our neckline to shoulder measurement.
9” (shoulder to neckline) / 4” (gauge) = 2.25 x 28 rows = 63 rows, which of course we’ll need to round to an even number later on.
Here’s where you’ll need to work a little bit intuitively. After holding the work up to myself, I know I want to keep making decreases on my arms and I want my neckline decreases to be steeper than my arm decreases. So I’m going to keep doing 1 decr every 6 rows for my arms, and I’ll do 1 decrease every 4 rows for my neckline. Since I want to keep the math easy for myself I’m going to do this over 24 rows (6x4 = 24) so that the sets end at the same time. Here’s what that’s going to look like…
Neckline Decr: 1 decr every 4 rows (6x) = 24 rows total
R1: K2, ssk, knit til end
R2 - 4: continue in stockinette
Arm Decr: 1 decr every 6 rows (4x) = 24 rows total
NOTE: You will sometimes have to make 2 decreases on the same row. Don’t be afraid to use as many stitch markers and note pads as you want to help you keep track!
This will give me just under 4” on my neckline which means I still have plenty of space to play around with the neckline as we keep going! If you hold the work up to yourself and realize you’d like more coverage on your chest, or maybe you need your armhole to slope in a bit more, simply adjust the spacing between your decrease rows to get the right slope. Don’t be frustrated if this takes a couple of tries, having to frog your work is just another step in the right direction!
After doing these 24 rows, I’m going to hold the work up to myself again and see how I’m feeling about it. I’ve decided that I want to bring the arm in a bit more steeply to comfortably fit my shoulder and I want to keep the neckline slope the same. Here’s what that is going to look like
1 decr every 4 rows on both neckline and armhole (3x) for 12 rows total. This puts our total neckline row count at: 24 + 12 = 36 rows
Ok, you know the drill by now! I held it up to myself and was super happy with how it was sitting on the front of my shoulder. Now I just want to narrow it out to a better size for the strap. So for me, that’ll look like…
1decr every 2 rows on both sides (4x) for 8 rows total. This puts our total row count at: 36 + 8 = 44 rows
Alrighty, so now it’s time to focus on forming the shoulder strap. For me, the top is currently sitting maybe about 2 inches away from the top of my shoulder. Looking at the top, I think having the strap be about 20 st would be ideal for my frame. Currently, I have 24 stitches on the needles. Since I’m pretty happy with how the armhole is fitting me, I’m going to do the rest of my decreases on just my neckline which will look like…
1 decr every 2 rows, neckline only (4x) for 8 rows total. This puts the total row count at: 44 + 8 = 52 rows and 20st
Now that I’m at 20 stitches, I’m going to do a few rows of plain stockinette for a little extra length. Holding it up to myself, 4 rows should do the trick for me! That’ll look like…
4 rows of stockinette. This puts the total row count at 52 + 4 = 56 rows.
That’s definitely less than the 63 rows that we calculated earlier but I’m happy with the fit and the shape and that’s much more important than the math. Plus, we can always do a little bit of shaping when we get to the blocking phase if need be. At this point, you’re all set to bind off your work. Congratulations!! You just completed the first front panel :)
Now it’s time to take out your notes and make a mirror of this front panel for the other side. So this time you’ll be making your arm decrease on the right side with left-leaning decreases and making your neck decrease on the left with right-leaning decreases. For reference, here’s a cleaned-up copy of how my notes.

I find making a table like this is the easiest way for me to keep track of my decreases without having to specify which front panel the pattern belongs to.
Just make sure to change the way your decreases lean to fit the side that you’re working on!
Back Panel
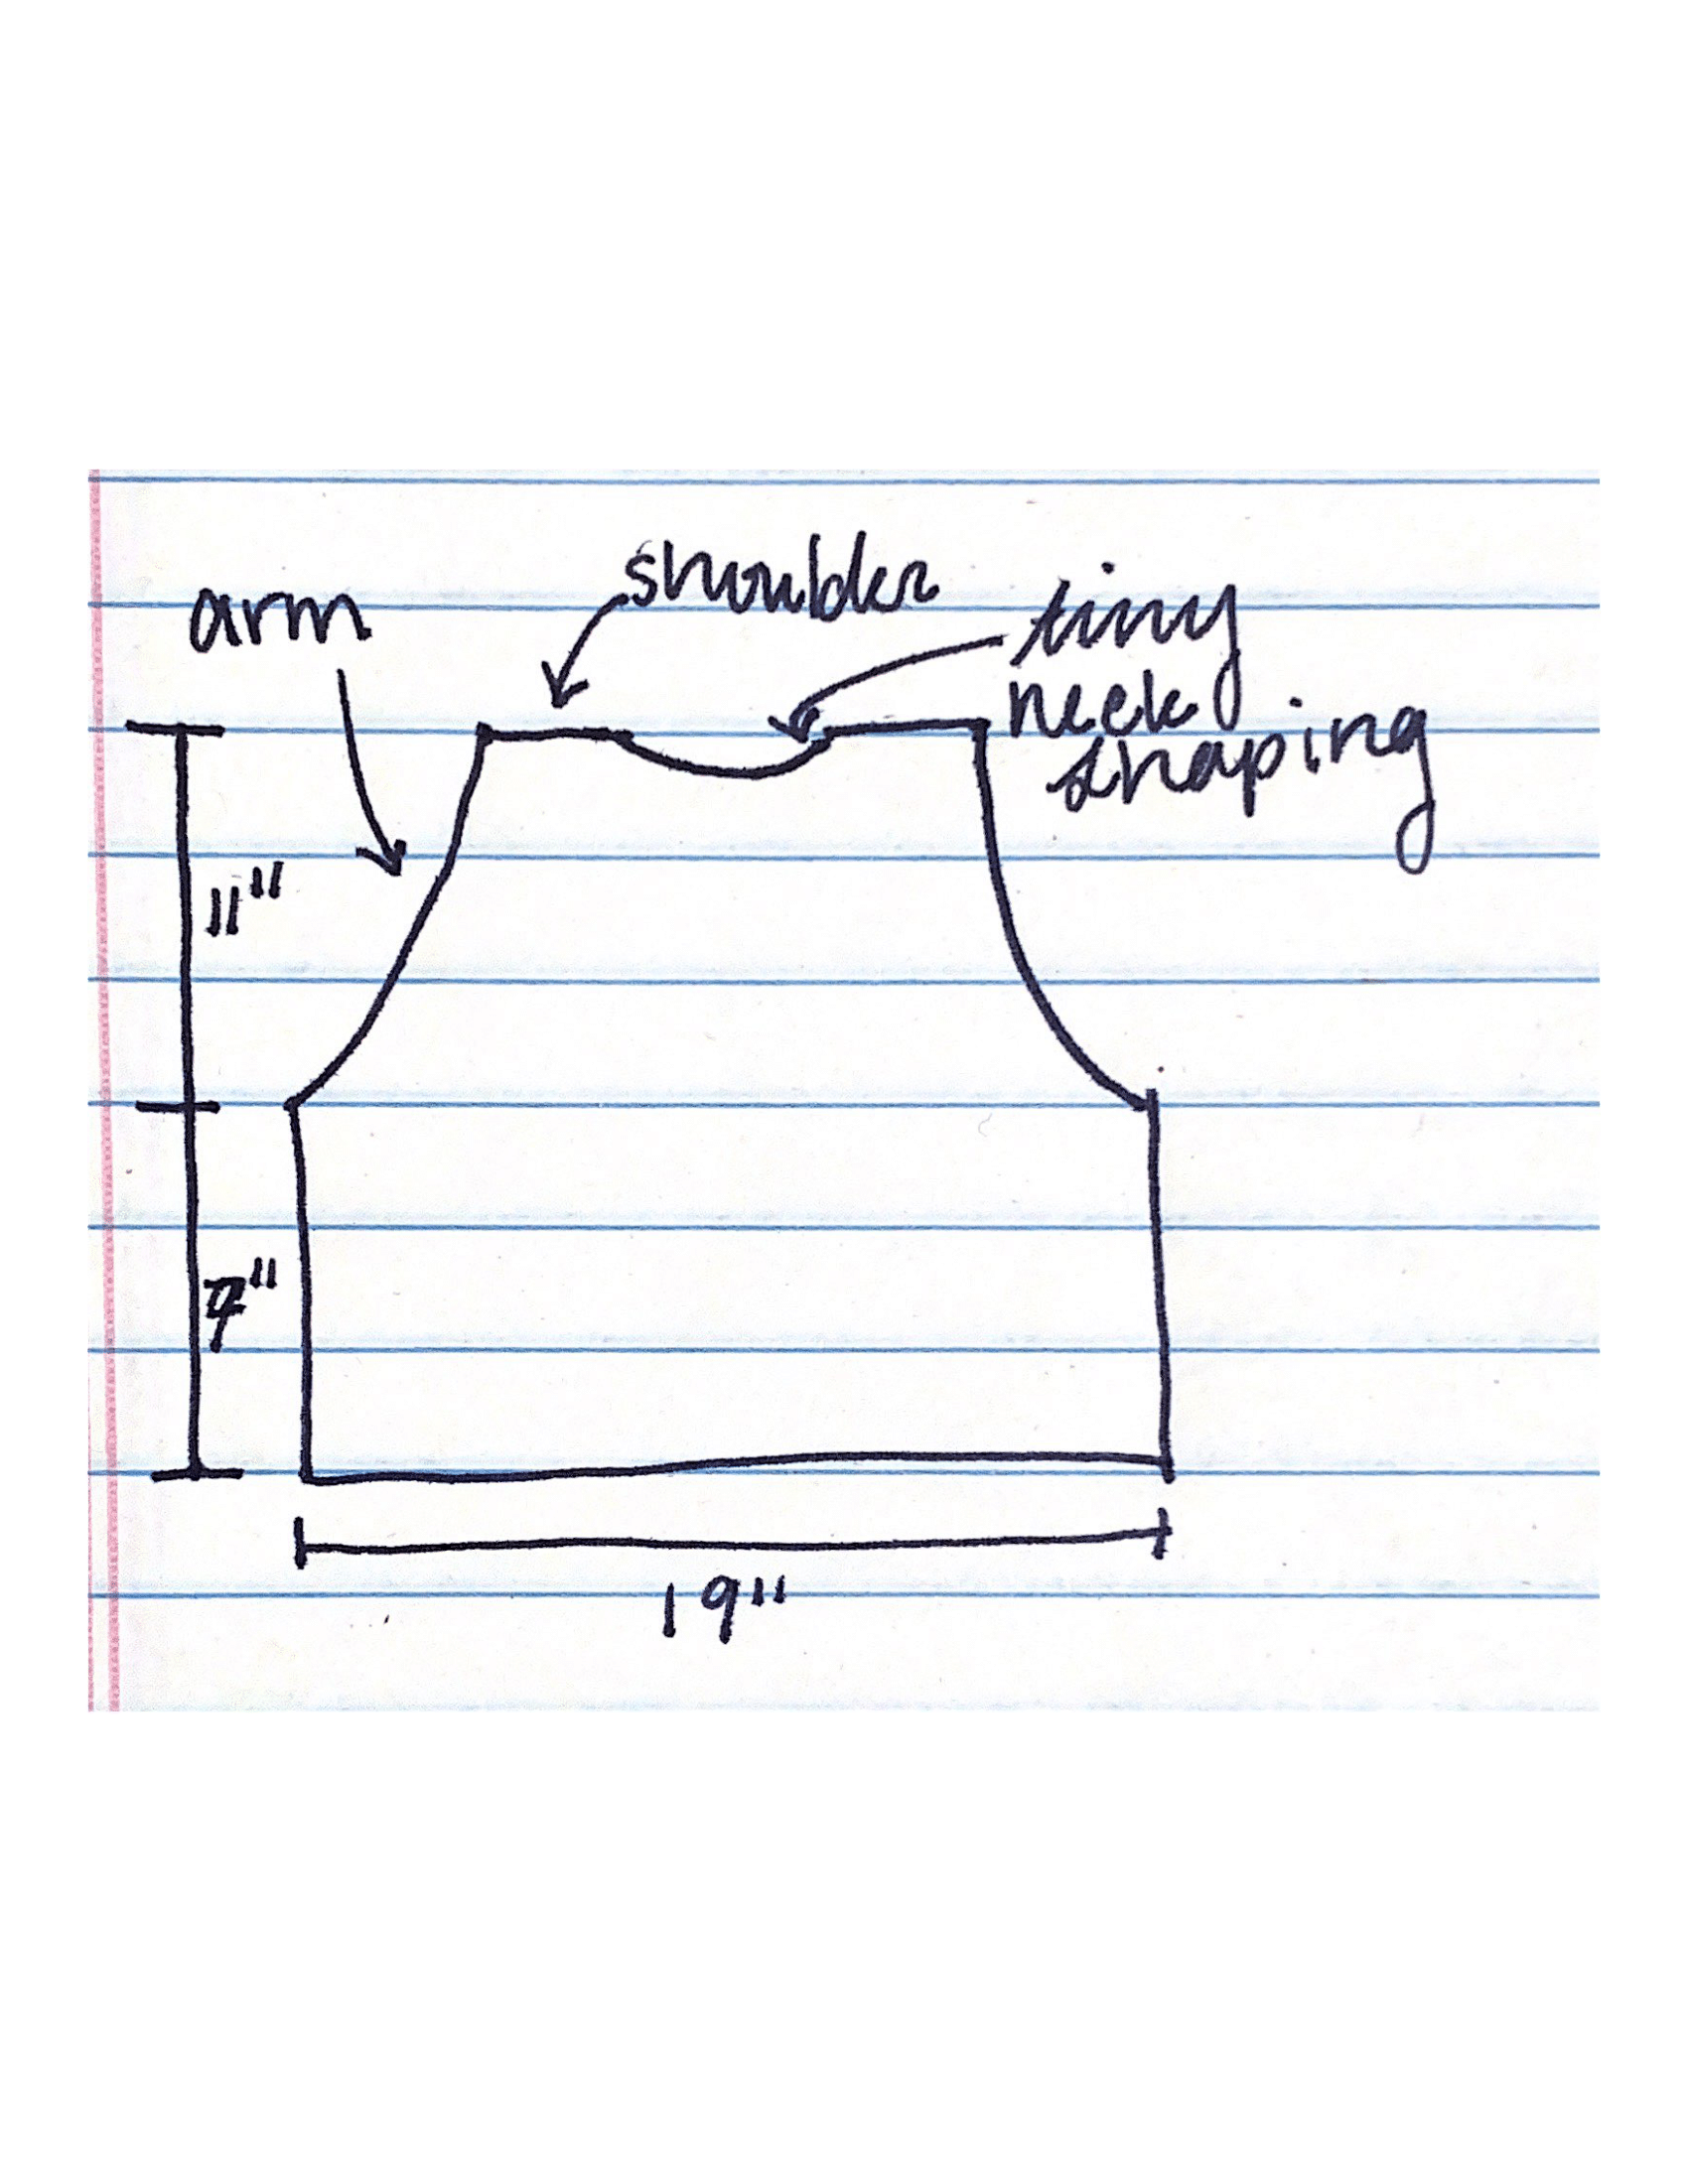
Ok, remember how I said that our back panel is going to be based on our front panel? It’s essentially going to be the same decreases with a little bit of a neckline shaping right at the top. So go ahead and cast on your stitches (for me it was 109st) and work your stockinette portion (7” for mine).
Since you don’t have a neckline in the middle of your back, we’re only going to worry about the armhole decreases which go from rows 1-56 in the table above. Essentially, you’re going to be only working the decreases until you get to the point where you’re only decreasing on the neckline side. Make sure to end on a purl row!

I know I explained that part quickly, so here’s a layout to help you get a better visual.
At this point you’ll have just the trapezoid shape part (up through the arm decreases) done!
Ok! Now that we’re on the same page let’s move on to the last shaping part. To make sure this sits comfortably on the shoulders we’re going to do some decreases along the inside of the neckline. Remember the last few decreases I made to get the shoulder strap width where I wanted it? We’re going to follow those decreases to get this shaping. Here’s how we’re going to do that…
Strap = 20 st wide; 4 decreases leading up to it. We’re going to need to account for these decreases when we go to shape the neckline.
So we’re going to place 2 stitch markers, 24 stitches in from either edge of the work.
For me, this row looked like…
knit until 4 stitches before the first marker, k2tog, knit 2. You can place these stitches on a stitch holder, or if you’re using circular needles, just leave them on the cable!
bind off all stitches between markers
knit 2, ssk, knit till end.
work the remaining decrease rows and 4 stockinette rows on that shoulder, bind off
Now it’s time to reattach your yarn to the other shoulder. You’ll be starting with the purl row after the first decrease you did. Go ahead and complete the rest of the decreases and stockinette, then you’re ready to bind off. Congratulations!! You’ve just completed all your pieces!!!
I highly recommend that you block your pieces before moving on to any seaming. I’m impatient and don’t want to wait for it to dry so I’ll just be doing a light steam blocking. If you think that a full wet-blocking would be better for your yarn go ahead and do that!
Seaming and Finishing
Luckily, seaming for this top is quick and painless. All you need to seam together is the shoulder straps and sides. I recommend using a mattress stitch for the best results! This is also a great time to go ahead and weave in all your ends :)
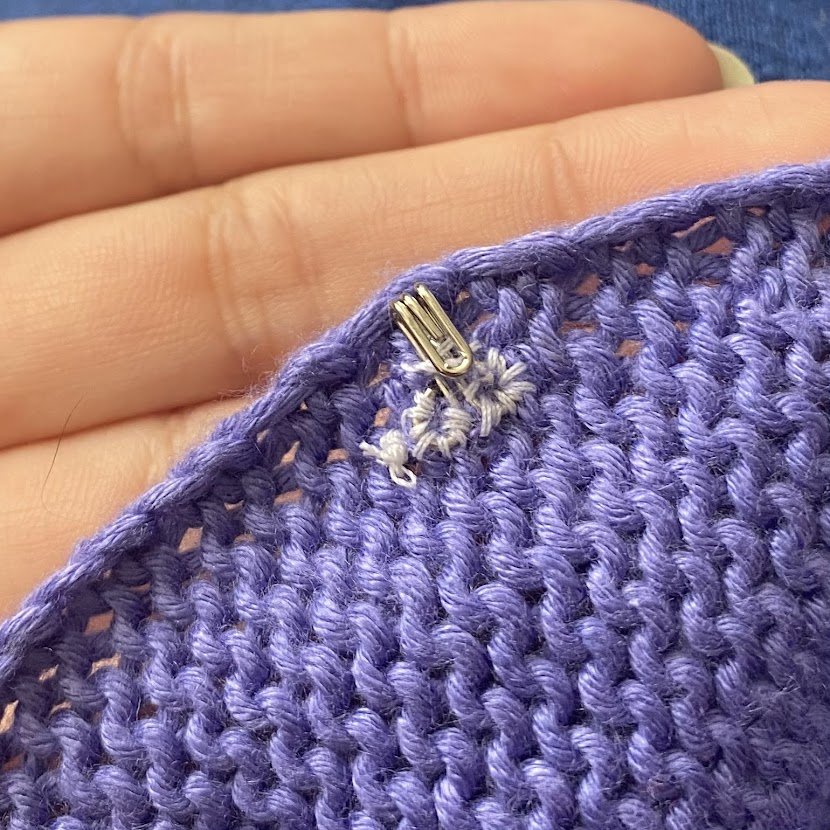
To add your hook and eye closures, find your first neckline decrease and mark with a stitch marker. Measure about 3” down (or whatever is to your liking) and place another marker for the second closure. Repeat on the other side and ensure they line up before sewing on your closures. Hook them together and ta-da! You’re done!
I can’t wait to see what you create from this tutorial, be sure to tag me in any posts so I can see and share your work <3
Modifications
Wanting to modify this top into a cardigan? Check out my Ravelry project page for all my notes on making the Claudia Cardi!
Want to leave a little thank you for the pattern? Click on the button below!

Terms and Conditions
Thank you so much for all the love on this design, your support means the world to me and helps my small business so much. I can’t wait to see what you create!
This pattern is made strictly for personal use only. The copying, distributing, or commercial use of any part of this pattern is strictly prohibited. Including the filming of any videos based on this pattern. Please always give credit to me (@theyarnbitch) as the pattern designer. I am more than happy to share the beautiful work you create and hope you respect mine as well.
As this is a free pattern, you are not allowed to sell products created from this pattern. I hope that you use the techniques you learn from this pattern to create your own original designs!
Thank you and much love!
xx Dani