Free Summer Poncho Knitting Pattern
This post may contain affiliate links. Please read my disclosure policy.
Quick & easy 1 rectangle + 1 seam summer poncho knitting pattern.
Knit this free beginner poncho pattern for some summer fun.

If you love this pattern and want to add it to your collection, it’s available to purchase {ad-free} on Etsy, Ravelry & LoveCrafts. Then you can view it on any & all of your devices where ever you are, anywhere in the world… enjoying your love of knitting!
OR you can view the full FREE pattern below!
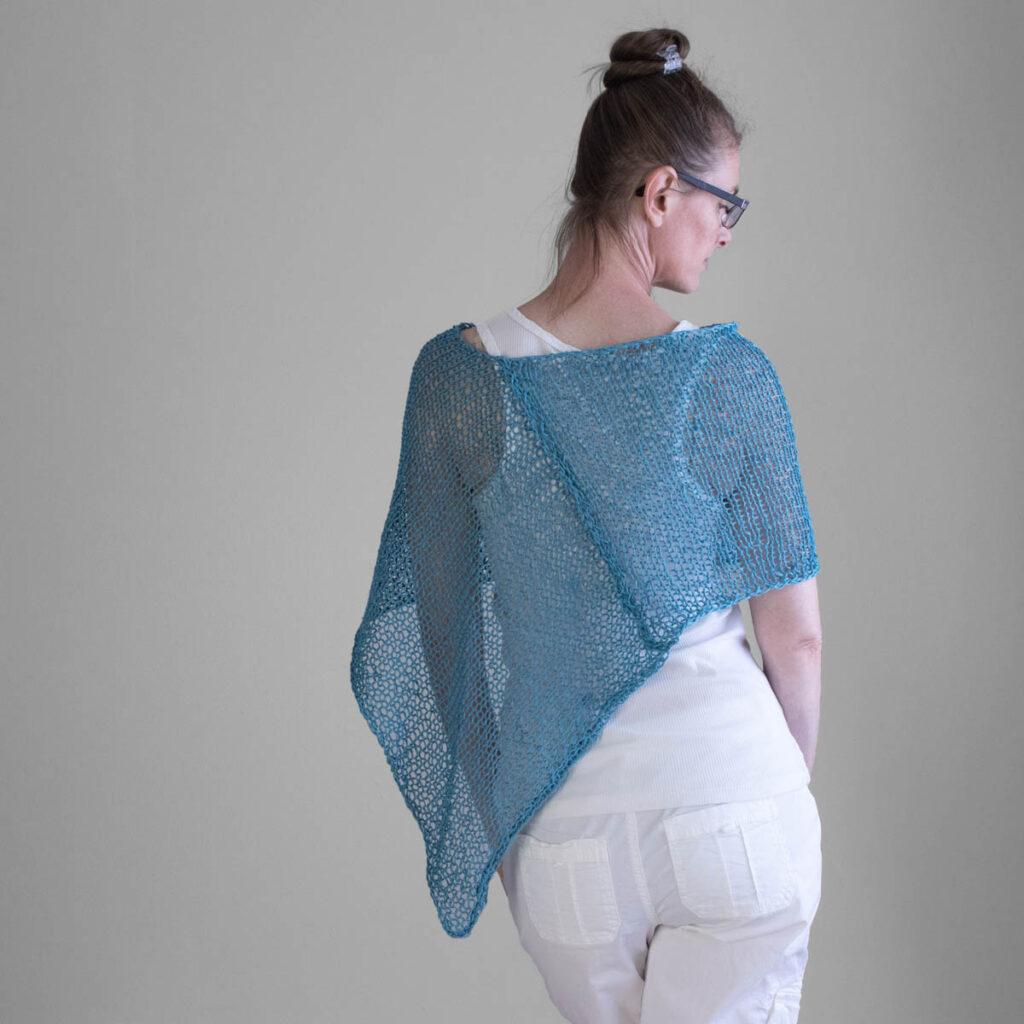
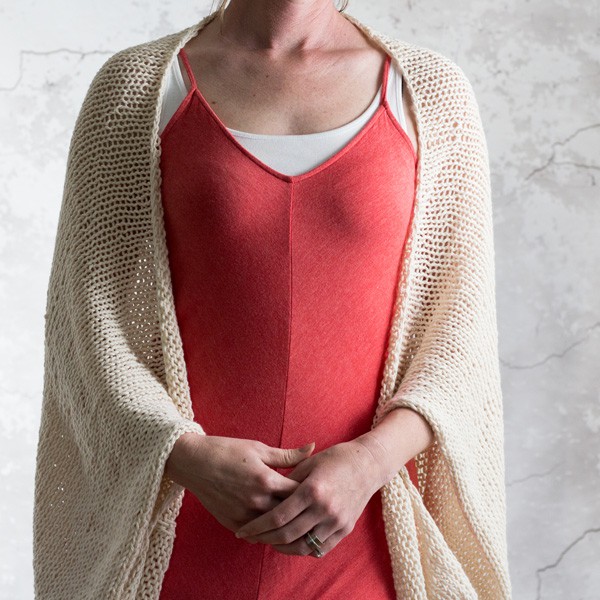
This summer poncho knitting pattern is my new favorite piece and the perfect accessory for your summer wardrobe!
This isn’t lace knitting per se, because there aren’t any slipped stitch, decreased stitches and you’re not creating any yarn-overs, but you’re getting a bit of the lace look by using an oversized needle with a lace weight yarn. ;)
Featuring a simple boatneck design using linen yarn is the perfect summer poncho knitting pattern for walking along the beach or at the pool.
What I Love About This Knitted Poncho
It’s a super simple knit! It’s knit in a rectangle, in stockinette stitch, knit flat {back & forth} and then sew 1 seam.
Once rectangle + 1 seam = perfect summer poncho knitting pattern!
It’s super easy to pick up… not so easy to put down, if you know what I mean. Because it’s a quick knit, so it’s tempting to just keep knitting until it’s finished. :)
The loose stitches are easy on my hands, so I can knit for longer periods of time.
It’s not itchy. at. all! It’s not silky smooth soft, it feels soft and durable like putting on your favorite pair of worn jeans. Ya know, that pair that you’ve had for more years than you’d like to admit and you can’t bring yourself to throw away. {I feel your pain.}
I feel sexy wearing it. {Need I say more?!}
I like that it has a little bit of weight to it without being too bulky, so it stays in place & doesn’t shift or move or twist around while I’m wearing it.
I’m not usually a fan of wearing color {I love my neutrals!}, but this is a lovely shade of blue. It reminds me of Narnia Prince Caspian and the scene where the ocean pours out of the picture on the wall. It would be terrifying if that were to happen in real life, but the magic of the scene & the trust that they have despite their world falling apart around them absolutely captivates me.
I love wearing this lightweight summer poncho with all white or jeans and a tank top because I can choose to knit it in any color {or every color} and it’ll look good and I’ll feel good too. I think I might just need one in wool for fall too!
I love the light layer of warmth and cuteness without any restriction {unless I raise my hands above my head, then I need to readjust} But, I’m not going to drop it, it’s not going to slip off my shoulder and that makes my body feel more relaxed when I’m wearing it. Ahhh, it’s the little things.
About
Available Sizes: 19 {28″- 64″ Bust}
Pattern Format: Written Pattern, No Chart
Pattern Language: English
Skill Level: Beginner & Advanced Beginner
PDF Format: Printer & Mobile Friendly
Bonus: Video
Pattern Name: Easy Breezy
Techniques
Knit Flat {Back & Forth}
Knit & Purl Stitches
Clean Edge {Advanced Beginner pattern only}
Materials
Yarn Weight: Lace
Yardage: 390 – 580 yards {356 – 560 meters}
Suggested Yarn: Katia Lino, Light Jeans
Needle Size: US 13 {9mm} Circular Needles with a 24″ {60cm} Cable, or longer
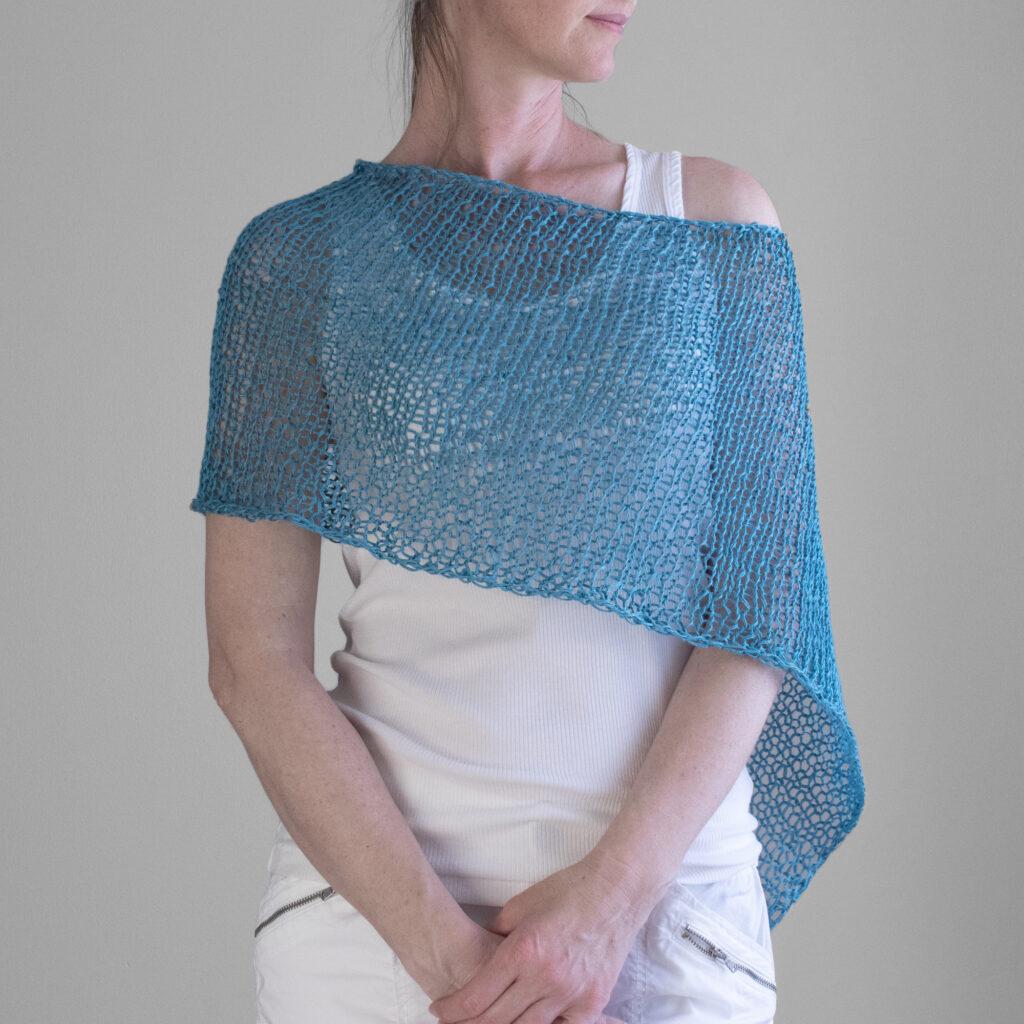
Photo Details
Model height: 5’9″ {175cm}
Model weight: 130lbs {59kg}
Model bust: 35″ {88cm}
Model waist: 25″ {63cm}
# of CO stitches: 103
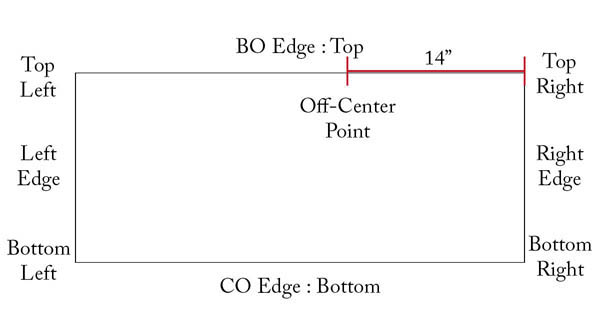
Measurements, after blocking: 42″ wide x 14″ {107cm x 36cm}
Gauge: 8.5 STS & 15 rows per 4” {10cm} square, knit in stockinette stitch
Weight: 4.6oz {130g}
Size Chart
| Bust Size: | Number of CO Stitches: | Suggested Yarn Amount* |
| 28″ {71cm} | 89 | 390 – 400 yards {356 – 366m} |
| 30″ {76cm} | 93 | 400 – 410 yards {366 – 375m} |
| 32″ {81cm} | 97 | 410 – 420 yards {375 – 384m} |
| 34″ {86cm} | 101 | 420 – 430 yards {384 – 393m} |
| 36″ {91cm} | 105 | 430 – 440 yards {393 – 402m} |
| 38″ {97cm} | 109 | 440 – 450 yards {402 – 411m} |
| 40″ {102cm} | 113 | 450 – 460 yards {411 – 421m} |
| 42″ {107cm} | 117 | 460 – 470 yards {421 – 430m} |
| 44″ {112cm} | 121 | 470 – 480 yards {430 – 439m} |
| 46″ {117cm} | 125 | 480 – 490 yards {439 – 448m} |
| 48″ {122cm} | 129 | 490 – 500 yards {448 – 457m} |
| 50″ {127cm} | 133 | 500 – 510 yards {457 – 466m} |
| 52″ {132cm} | 137 | 510 – 520 yards {466 – 475m} |
| 54″ {137cm} | 141 | 520 – 530 yards {475 – 485m} |
| 56″ {142cm} | 145 | 530 – 540 yards {485 – 494m} |
| 58″ {147cm} | 149 | 540 – 550 yards {494 – 503m} |
| 60″ {152cm} | 153 | 550 – 560 yards {503 – 512m} |
| 62″ {157cm} | 157 | 560 – 570 yards {512 – 521m} |
| 64″ {163cm} | 161 | 570 – 580 yards {521 – 530m} |
*This is the amount of yarn you’ll need if you’re knitting it 14″ in length. If not, you’ll need more yarn than suggested, if you’re making it longer and you’ll need less yarn than suggested if you’re making it shorter.
Notes
Not reversible. However, I think it looks cute inside out too!
Knit using the stockinette stitch.
The cast-on edge is the width.
Knit flat, back & forth using circular needles.
Circular needles are used to accommodate the large number of CO stitches.
Knit holding 2 strands of yarn together throughout.
Get the FREE Summer Poncho Knitting Pattern below or purchase the ad-free, downloadable & printable PDF on Etsy, Ravelry & LoveCrafts.
Beginner Poncho Pattern
Knit Flat {Back & Forth}
CO the number of STS from the chart above
Row 1 {WS}: *P*
Row 2 {RS}: *K*
Repeat rows 1-2, 51 times, or until desired length.
To end:
Weave in the ends.
For best results, steam-block lightly.
How to sew the seam:
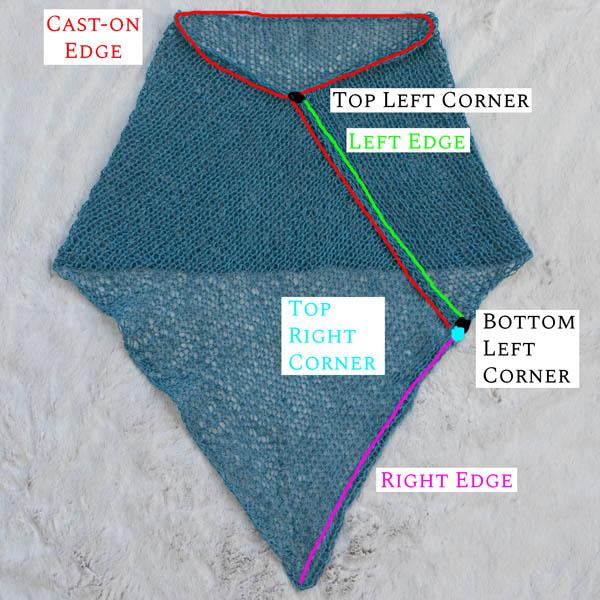
Lay it flat with the right side facing up, grab the top left corner and place it on the “off-center point.” Grab the bottom left corner and place it on the top right corner and then sew the left edge to the top edge between the right & left corners. Be careful not to twist the fabric. See the info-graph below.

Advanced Beginner Poncho Pattern
Knit Flat {Back & Forth}
CO the number of STS from the chart above
Row 1 {WS}: WYIF S1PW *P* WYIF S1PW
Row 2 {RS}: K1TBL *K* K1TBL
Repeat rows 1-2, 51 times, or until desired length.
To end:
Weave in the ends.
For best results, steam-block lightly.
How to sew the seam:
Lay it flat with the right side facing up, grab the top left corner and place it on the “off-center point.” Grab the bottom left corner and place it on the top right corner and then sew the left edge to the top edge between the right & left corners. Be careful not to twist the fabric. See the info-graph below:
Video Tutorial
Abbreviations
* – * – repeat between *
BO – bind-off in pattern
CO – cast-on {long-tail cast-on method}
K – knit stitches {K1 means to knit 1 stitch}
K1TBL – knit 1 stitch through the back loop
P – purl stitches {P2 means to purl 2 stitches}
RS – right side
S1PW – slip one stitch purl-wise
STS – stitches
WS – wrong side
WYIF – with yarn in front
Gauge
FAQ
Q: Can I knit it with cotton?
A: Short answer, yes.
Long answer / Things to consider:
Linen is more durable than cotton.
Cotton is more flexible than linen.
Cotton is softer than linen, especially pima cotton, which is silky smooth.
Linen gets softer with each wear and wash and will out last cotton, by up to 30 years according to this cotton vs linen masterclass article.
Another great article to read is Nobleknits 10 Questions You Should Ask Before Knitting with Linen Yarn.
Cotton keeps you warmer than linen. So, If you’re going grocery shopping in the produce section, you may want to use cotton.
It depends on what you use it for. If your going to the beach, linen is a better wicking material & it holds it’s shape better than cotton, so it would be better to wear to the beach, lake, pool or dancing in the rain.
If you work in a cold office, you may want to use wool, maybe even a worsted-weight yarn. :) Just sayin’!
Q: How do you knit a one rectangle poncho?
A: It’s all in how you seam it together! ;) The trick is to seam one of the side edges to the cast-on edge. So, lay it flat with the right side facing up, grab the top left corner and place it on the “off-center point.” Grab the bottom left corner and place it on the top right corner and then sew the left edge to the top edge between the right & left corners. Be careful not to twist the fabric. Clear as mud? I gotcha covered, there’s a video above :)
Q: Can I make the poncho longer?
Yes, just knit more rows. :) Keep in mind that knitting it longer might make it more restrictive for your arms.
Q: Can I cast-on so that the cast-on edge is the height instead of the width?
A: Definitely! Just keep in mind that the stitch definition will be sideways.
Modification Options
If you don’t want the curl… Create a ribbed edge. For the first 3-7 rows *K1, P1* or *K2, P2* depending on what works for the number of stitch you have on your needs or the style you’d like to have. Knit in stockinette until it’s about the size that you want and create the same ribbing that you created at the beginning using the same pattern and same number of rows and bind-off in pattern.
To make it less see-through, use a smaller needle size and cast-on more stitches. :)
Care instructions
Hand wash your summer poncho in cold water, pat out the excess water with a clean towel {a kitchen linen towel works great}, lay flat to dry, steam iron before wearing.
As I’m typing that out I’m thinking “WOW. That sounds like a lot of work!” Well… a lot of work went into the growing of the flax {what linen is made from}, the harvesting, the prepping, the spinning, the dying, the marketing, the shopping {that’s the easy part}, the shipping, choosing the perfect pattern and the time it takes to knit each and every stitch with love. Yeah, it is a lot of work and I love each and every step and I’m so thankful for the people that love their step in this intricate process, so that I can create a sustainable wardrobe.
This research led me down a rabbit hole… just in case you need a distraction, here’s a video on how linen is made, it’s super informative, but the comments are even better. :)
Cons
I had to CO and knit a few rows and test try it on a few times to get the size just right {which is true for most patterns, it’s just part of knitting, so is it a con really? I feel like it just part of the creating process}.
Expert tips
BO with a larger needle size. It didn’t matter how loosely I tried to bind-off with the needle used for knitting it, the stitch wasn’t as consistent or relaxed as when using a larger needle size.
Holding 2 strands of yarn can be tricky because they can get tangled up. To prevent tangling use 2 yarn bowls, or whatever containers you have, to keep them separate. This will save you a lot of time & frustration. You’re welcome in advance!
Because this summer poncho knitting pattern is knit using all stockinette stitches it has a slight curl at the top. If you want to get rid of that curl, pull it down your shoulder a little bit, pulling it taught. If you can’t get it taught enough you might need to make it a little smaller. Meaning, cast-on fewer stitches. Plus, blocking helps significantly! There was hardly any curl left after I steamed it.
Read all the instructions before you get started.
Find it Here
- Buy the ad-free, printer-friendly pattern on Etsy, Ravelry & LoveCrafts.
More Summer Knitting Patterns You’ll Love
Get the FREE Summer Poncho Knitting Pattern below or purchase the ad-free, downloadable & printable PDF on Etsy, Ravelry & LoveCrafts.