When you come into the Real Life Shop, you'll probably notice it's quite cold in here. It normally hovers around 10-12ºc on a good day, and with the ever-rising cost of energy, I've had to think on how the team and I can stay warm without putting expensive heaters on for every single minute of the day.
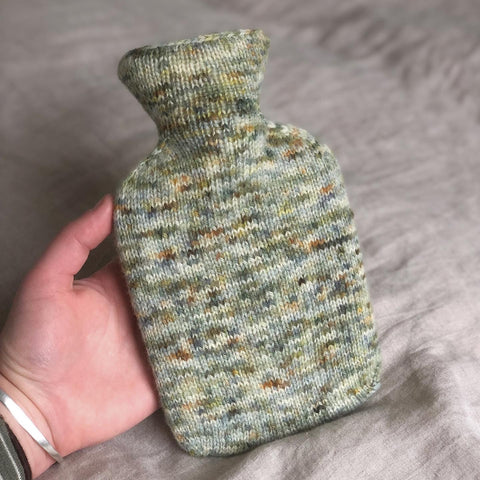
Our solution to this problem is a tiny hot water bottle, only 0.5L, in a little cosy case, which sits nice and snugly in the back of your trousers, under your layers and layers. Now, we all know that hot water bottles need covers to stop you being burnt by them, and we just couldn't find a good pattern for one, so here was born The Shopkeeper's Friend.
This pattern is probably best suited for those who have knitted in the round before, or who are competent knitters just waiting to give it a try. In the Real Life Shop we'd normally suggest that by the time you get to this, you will have knitted some swatches and a snood, maybe even a hat. There will be quite a few techniques in here that may be a bit tricky, but I've tried to include videos for each step you may find tricky, or need a refresher on. As usual, read the whole pattern through before you start so there are no surprises, and if you don't glue with the particular video linked, try searching the technique to find one you do get on with.
So, here we go!
The Shopkeeper's Friend
To fit a mini hot water bottle (500 ml capacity), measuring around 12 cm wide, 21 cm from bottom to top, and neck-base (where the neck meets the bottle) circumference of 14 cm. You can buy a perfectly matching hot water bottle from us here. You also can often find uncovered hot water bottles at independent pharmacies and hardware shops too, your local sell-it-all store.
Gauge: 28 sts x 38 rows per 10 cm in stockinette on a 2.5mm needle (or whatever size is required to meet gauge)
Materials:
Approximately 85 m of 4ply/ fingering weight yarn. I used 23 g of WoolMatters Ethical Sock Yarn 4ply (360 m/100 g). Other suitable yarns may be Regia Premium Merino Yak Sock Yarn, Kremke Eco Cashmere or other slightly bulkier 4ply/fingering weight yarns.
2.5 mm 80 cm circular needle (or whatever size needed to meet gauge - my gauge is quite loose so you may need larger needles.) We try to have both wood and metal in stock as standard.
2x different clip-on stitch markers (one for beginning of round, one for halfway round). Our stitch markers come in a mixed-colour tin, perfect for this.
Abbreviations:
BOR = Beginning of Round
HRM = Half Round Marker
K = Knit
K2tog = Knit two stitches together
K3tog = Knit three stitches together.
M1L = Make 1 Left (a video tutorial for both M1L and M1R can be found here)
M1R = Make 1 Right
SSK = slip, slip, knit those stitches together
S3K = Slip three stitches, knit those three stitches together
Pattern:
Body
Cast on 60 stitches using Judy’s Magic Cast On (picture tutorial here, video tutorial here), spreading the stitches evenly over both the needles.
K to end of round using magic loop technique, placing a clip-on marker ON YOUR KNITTING (not on the needle, they can get lost on the loop when working magic loop) after 30 stitches at your halfway point, then also place the BOR marker on your knitting after the next 30 stitches.
Note: If you find it easy to work without markers when working with magic loop, you don’t have to place the markers, however you will need to know which side is the BOR and which is where the HRM should be. If you have never worked on Magic Loop before, I’d recommend using markers.
Round 1: K1, M1L, K to 1 stitch before HRM, M1R, K2, M1L, K to 1 stitch before BOR marker, M1R, K1. (+4 stitches)
Round 2: K to end of round.
Repeat rounds 1 and 2 a further three times. (you’ve increased by 16 stitches, total is now 76 stitches).
Knit every stitch until the piece measures 16cm, moving both your markers (if using) up as often as you feel you need to. I would move them up every 5cm or so, but you can move more or less.
Shape Shoulders
Shoulder Round 1: K1, SSK, K until 3 stitches remain before HRM, K2tog, K2, SSK, K until 3 stitches remain before BOR marker, K2tog, K1. (-4 stitches)
Shoulder Round 2: K to end.
Repeat Shoulder Rounds 1 and 2 a further two times. (you’ve decreased by 12 stitches, total is now 64 stitches)
Shoulder Round 3: K1, S3K, K until 4 stitches remain before HRM, K3tog, K2, S3K, K until 4 stitches remain before BOR marker, K3tog, K1. (-8 stitches)
Repeat Shoulder Round 3 a further three times. (you’ve decreased by 24 stitches, total is now 32 stitches).
Shape Neck
Knit five rounds.
Neck Round 1: K1, M1L, K to 1 stitch before HRM, M1R, K2, M1L, K to 1 stitch before BOR marker, M1R, K1. (+4 stitches)
Neck Round 2: K to end.
Neck Round 3: K to end.
Repeat Neck Round 1-3 a further five times. (you’ve increased by 24 stitches, total is now 56 stitches)
To cast off, work a three-stitch i-cord bind off (tutorial found here). Use the yarn tail to bind the i-cord stitches and ‘cast on’ edge together to form a round.
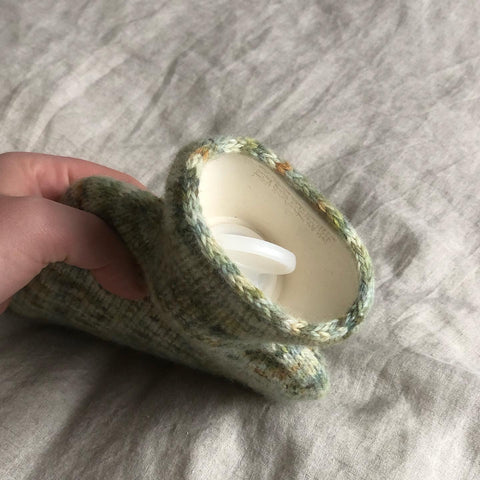
If you do not want your Shopkeeper’s Friend having a tighter top edge that slightly grips the hot water bottle’s top (as pictured here), use Jeny’s Surprisingly Stretchy Cast-Off (tutorial here) instead. This cast-off will curl more, but you could use it as a design feature.
Finishing
Sew in your ends.
Wash your cover, then block it over the hot water bottle itself for best results. You can feel like you're hacking the washing-blocking system
Enjoy!
When you're done, share your project on Ravelry here!
To insert your hot water bottle…
- Fold the hot water bottle into three length-ways, sides to middle, like a burrito wrap.
- Wriggle this tube of hot water bottle into the cover through the neck opening and let the hot water bottle unfold inside the case when past the neck and shoulder shaping in the case.
- Now the bottle is in the case, shimmy the bottle into place into the corners you’ve made in the cover.
- Fill and empty the hot water bottle through the opening at the top of the neck. You may want to fold the ‘collar’ down to do this if it grips over the top of the hot water bottle’s neck.
What have I learnt?
Well, in this pattern you will have learnt quite a few new skills! After this pattern, we'd say you're primed and ready to do your first sweater. The skills used in this pattern are:
- Magic Loop in the round (small circumference knitting, in the round, on a long cable)
- Judy's Magic Cast On
- Directional increases
- Directional decreases
- I-cord bind off