


Light of the Valkyrie, a free knitting pattern from Knitty.com.
INTRODUCTION
Light of the Valkyrie
 by Kim McBrien Evans

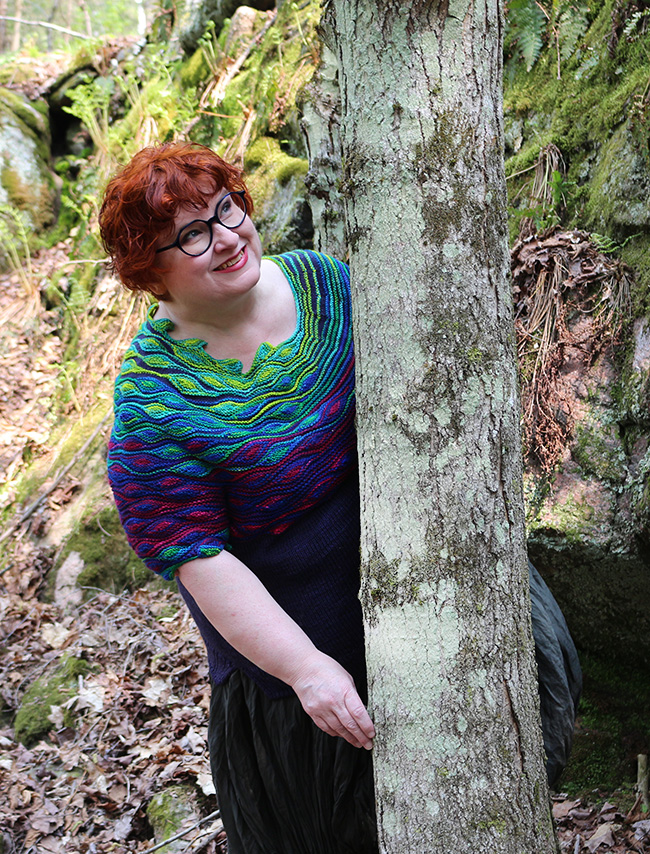
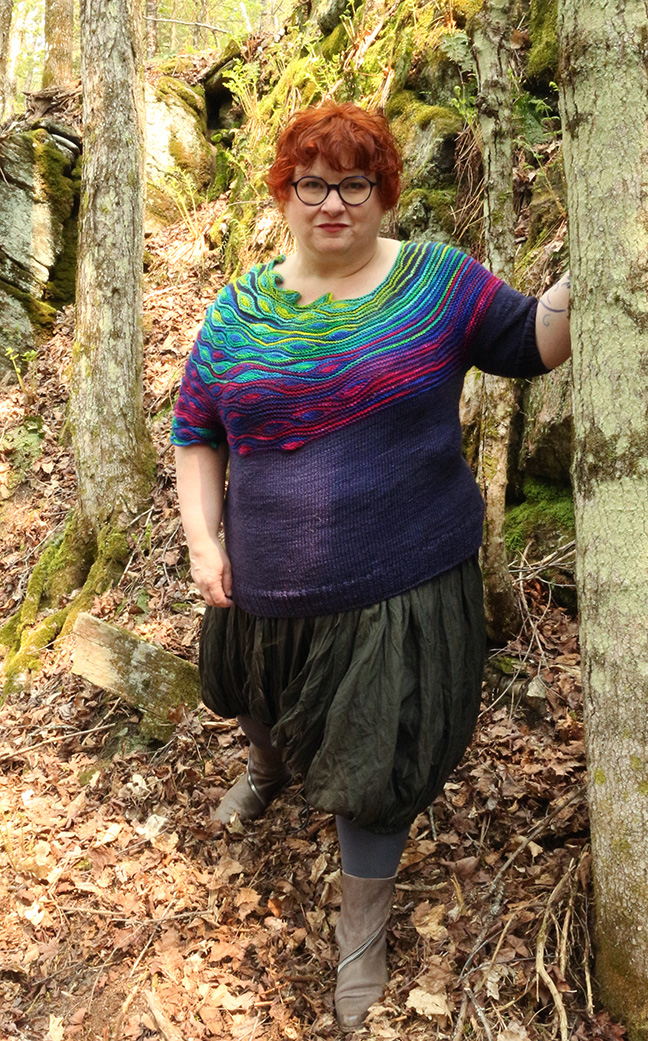
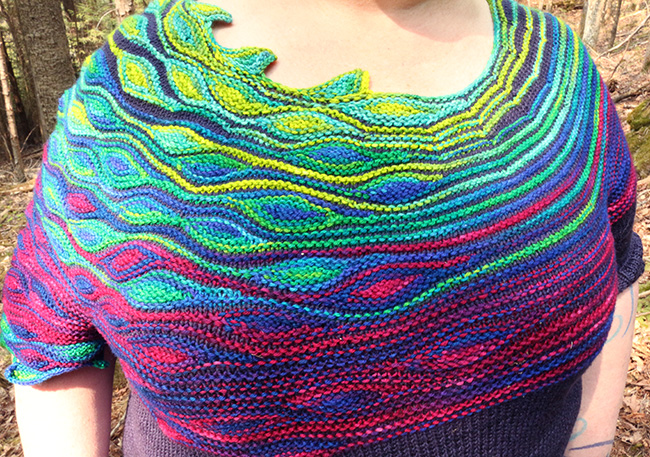
It's said that the Northern Lights are the reflection of the armor and shields of the Valkyrie as they led fallen warriors to Odin. I believe handmade clothing is armor that shields us and protects us.
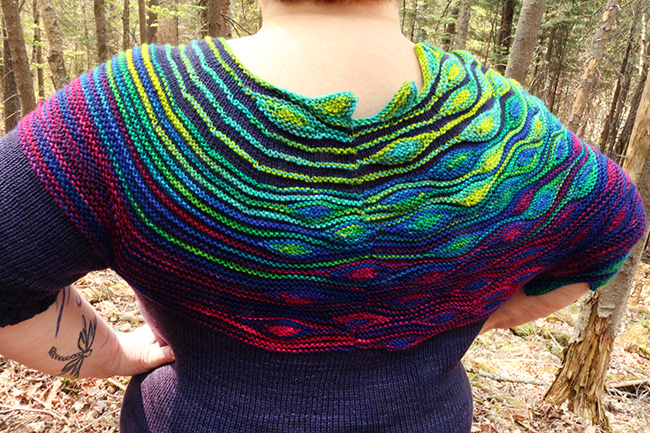
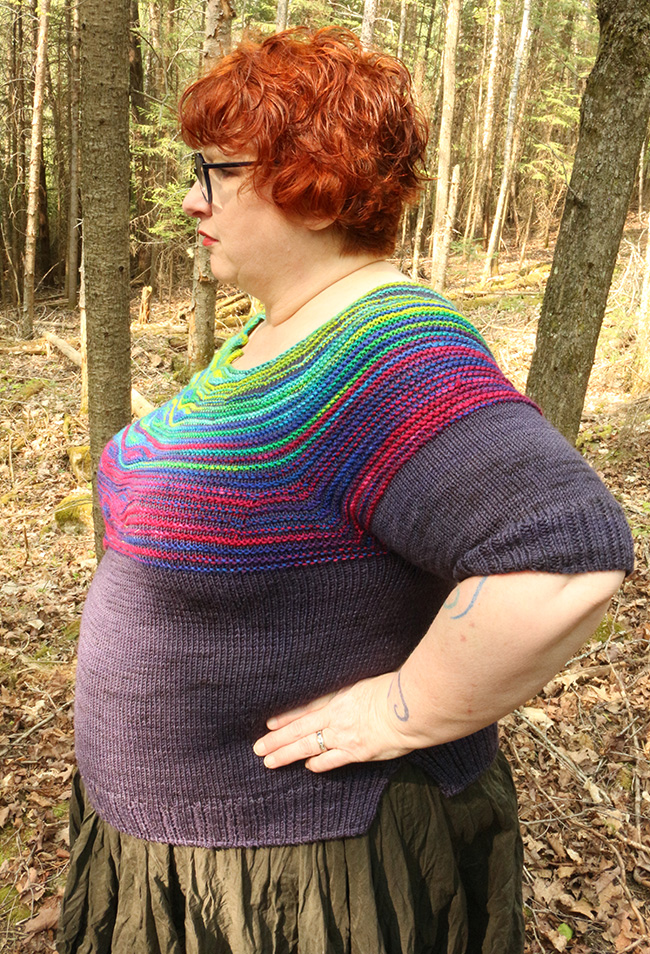
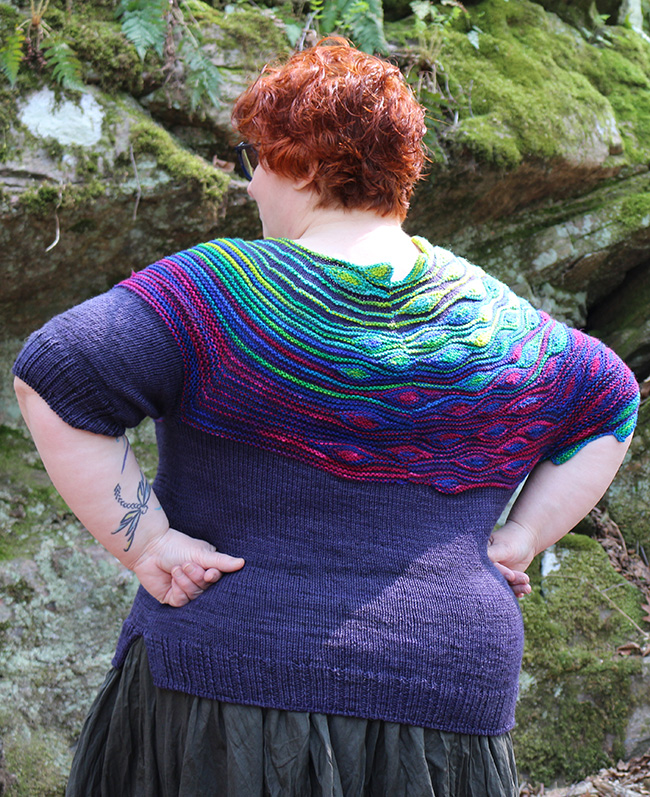
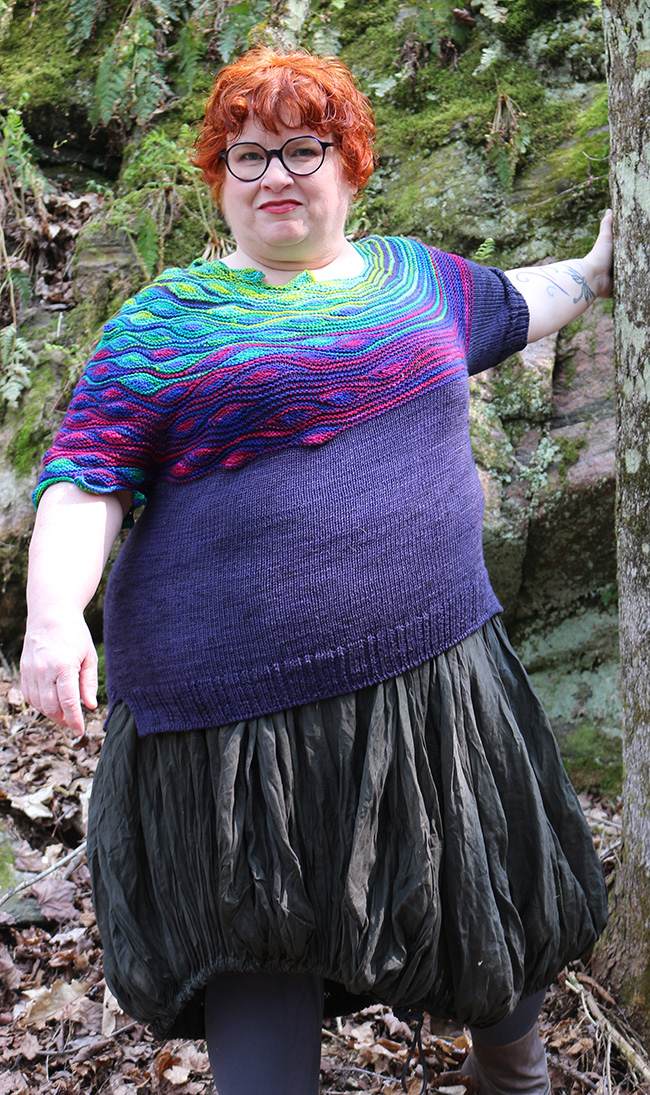
I wanted to create a sweater that illustrated the bold, dynamic intensity of the Northern Lights, from quiet ribbons of color that seem rooted to the earth, to the wild chromatic dance of light sweeping freely through the sky. I started with the yarn: handpainting to echo the intensity of the Lights dancing through the dark night sky. Then the stitch pattern, borrowed from previous designs, but with an asymmetrical twist that is echoed through to the sleeves and hem. The "lights" start quietly over the left shoulder and end in a cape-like riot of colour and texture over the right shoulder and sleeve.
 model: Kim McBrien Evans
photos: Indigodragonfly


SIZE
Women's XS[S, M, L, 1X, 2X, 3X, 4X, 5X, 6X, 7X]
Choose a size that's 2-6 inches/5-15 cm larger than your upper torso. Additional information about modifying circular yoke sweaters for your bust, upper arms, hips, etc.– including the full bust adjustment – can be found in my ebook Yoke Sweater Fit.
shown in size L with 3 inches/7.5 cm of ease at upper bust plus a 2 inch/5 cm Full Bust Adjustment
FINISHED MEASUREMENTS
Chest circumference at underarm: 32[36.25, 37.5, 41, 45.25, 46, 50.75, 52.25, 55.75, 57.75, 60.5] inches/ 81.5[92, 95.5, 104, 115, 117, 129, 132.5, 141.5, 146, 153.5] cm
Length at Back Marker C (shorter side): 15.75[16, 17, 18.75, 19.25, 20.5, 20.75, 21.75, 22.25, 23, 23] inches/ 40[40.5, 43, 47.5, 49, 52, 52.5, 55, 56.5, 58.5, 58.5] cm
MATERIALS
Yarn
Indigodragonfly DK Matter [100% superwash merino; 280 yd/256 m per 3.5
![]() [MC] Ernui and Boredt, The Nihilist Muppets; 3[3, 3, 4, 4, 5, 5, 5, 6, 6, 7] skeins
[MC] Ernui and Boredt, The Nihilist Muppets; 3[3, 3, 4, 4, 5, 5, 5, 6, 6, 7] skeins
CC colors: Light of the Valkyrie 3-color set
![]() [CC1] 1 skein
[CC1] 1 skein
![]() [CC2] 1[1, 1, 1, 1, 1, 1, 1, 1, 2, 2]
[CC2] 1[1, 1, 1, 1, 1, 1, 1, 1, 2, 2]
![]() [CC3] 1[1, 1, 2, 2, 2, 2, 2, 2, 3, 3]
[CC3] 1[1, 1, 2, 2, 2, 2, 2, 2, 3, 3]
Yarn Characteristics
![]() The sample shown uses a 3-ply DK weight merino. The yarn is round and smooth.
The sample shown uses a 3-ply DK weight merino. The yarn is round and smooth.
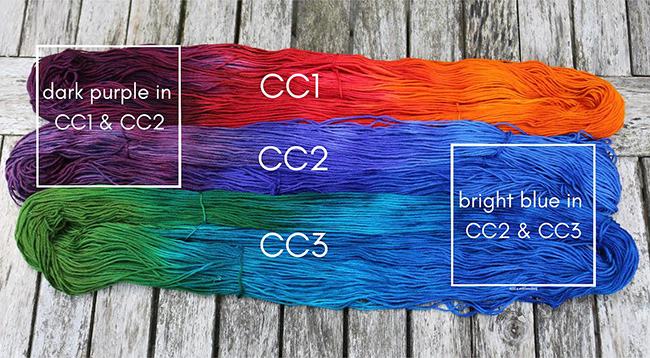
Yoke (CC1, CC2, CC3): Look for variegated yarns with color repeats that range from 5-10 inches/13-25 cm long. The 3 yoke colors should fade easily into each other. Look for colorways that have a common color between them. In the sample, CC1 and CC2 have the same blue-green, and CC2 and CC3 have the same deep blue-violet.
Body: should be a semi-solid. Kits are available here.
Below is an example using Valkyrie Set 2. In this example, the dark purple is present in both CC1 and CC2. The bright blue is present in CC2 and CC3. This is what helps connect these three colourways and makes them work beautifully in this pattern.
Recommended needle size
[always use a needle size that gives you the gauge listed below - every knitter's gauge is unique]
![]() 1 US #3/3.25 mm circular needle, 16-inch/40-cm for starting the yoke
1 US #3/3.25 mm circular needle, 16-inch/40-cm for starting the yoke
![]() 1 US #3/3.25 mm circular needle, minimum 28-inch/60-cm for body
1 US #3/3.25 mm circular needle, minimum 28-inch/60-cm for body
![]() 1 set US #3/3.25 mm your preferred needle for working a small circumference in the round
1 set US #3/3.25 mm your preferred needle for working a small circumference in the round
Notions
![]() 11 stitch markers in a variety of colors/styles as follows: 1 BOR marker, 2 markers for section A, 2 markers for section C, 4 markers for raglan shaping, 2 markers for bust darts (optional), removeable stitch markers (for marking wave placement)
11 stitch markers in a variety of colors/styles as follows: 1 BOR marker, 2 markers for section A, 2 markers for section C, 4 markers for raglan shaping, 2 markers for bust darts (optional), removeable stitch markers (for marking wave placement)
![]() Scrap yarn, stitch holders or sweater cords for holding stitches
Scrap yarn, stitch holders or sweater cords for holding stitches
![]() Tapestry needle for weaving in ends
Tapestry needle for weaving in ends
GAUGE
23 sts/32 rounds = 4 inches/10 cm in stockinette stitch (body and sleeves)
23 sts/43 rounds = 4 inches/10 cm in Garter ridge pattern (yoke)
PATTERN NOTES
[Knitty's list of standard abbreviations and techniques can be found here.]
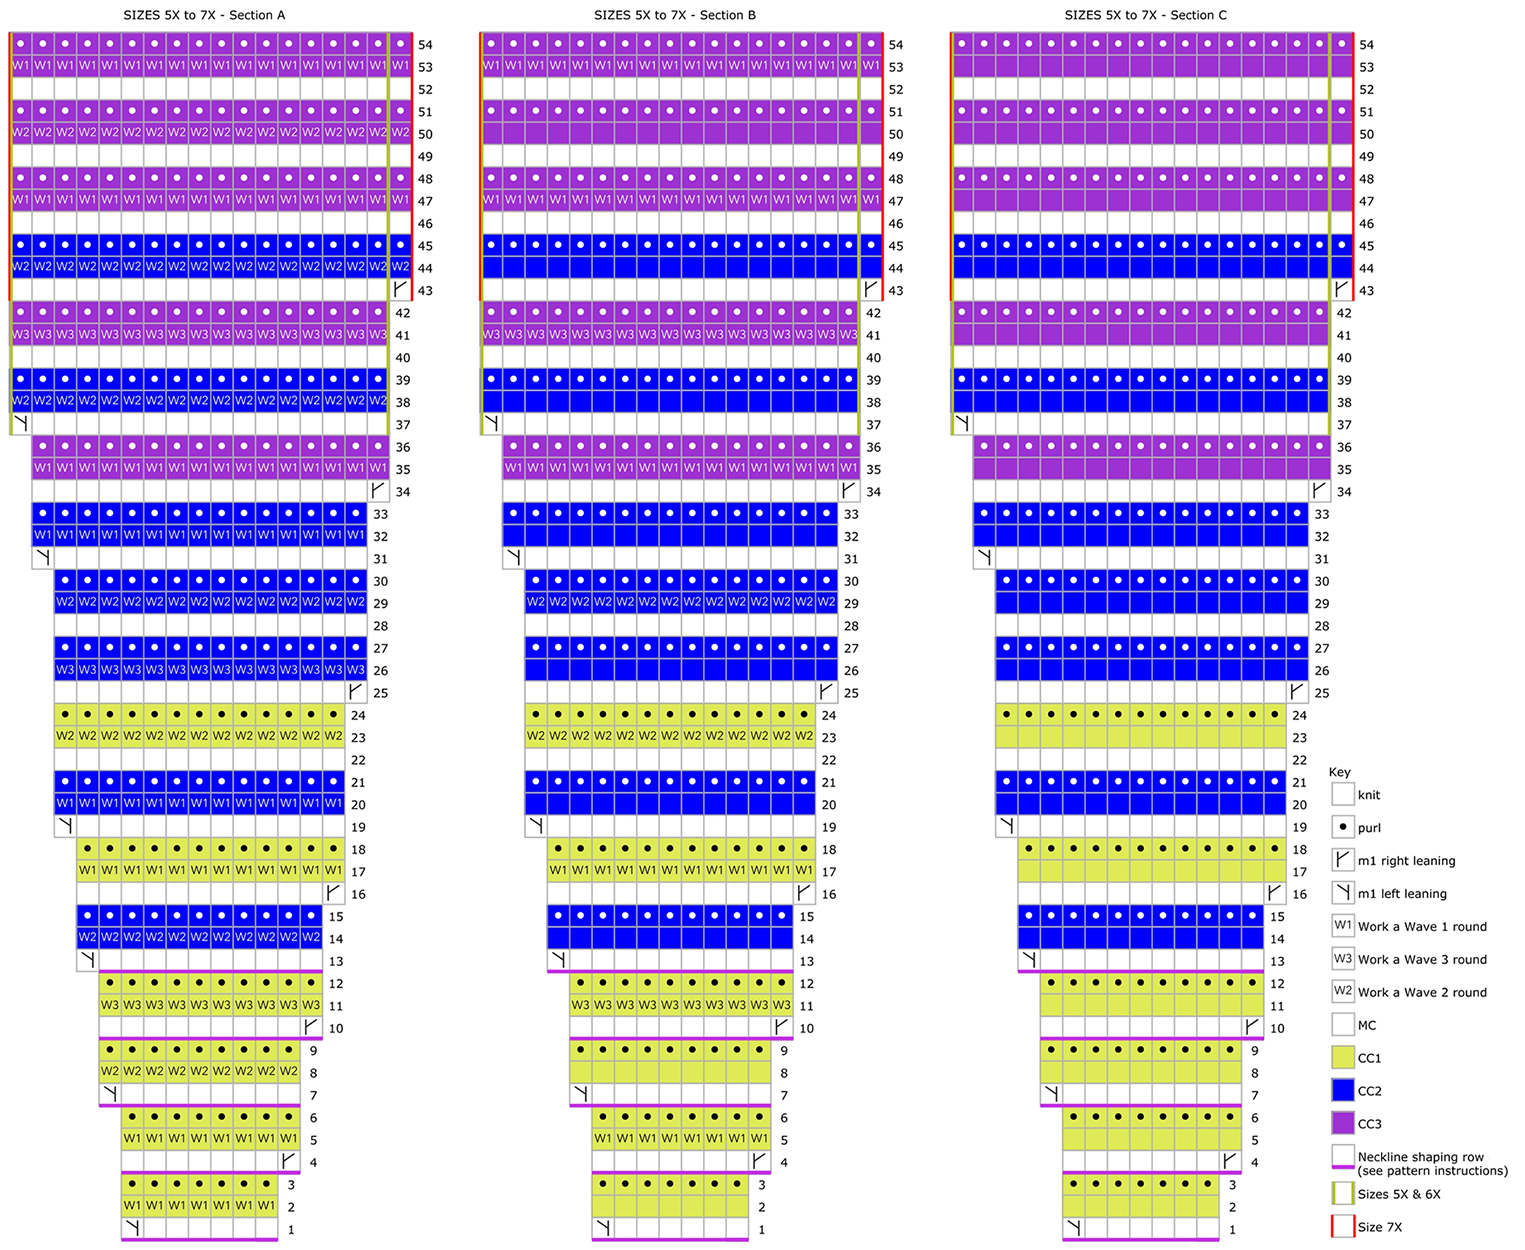
Construction method: This sweater is worked seamlessly in the round from the neckline to the hem. Sleeves are worked in the round after the body is completed. The asymmetric quality of the yoke in this pattern is created by changing the stitch pattern laterally through the yoke. Approximately 1/3 of the yoke stitches are worked in the Garter ridge pattern (Section C); 1/3 are worked in the Variable Wave Pattern (Section A); and 1/3 are worked alternating both patterns (Section B).
Garter Ridge Pattern:
Round 1: With MC, knit.
Round 2: With CC1-3 as assigned, knit.
Round 3: With CC1-3 as assigned, purl.
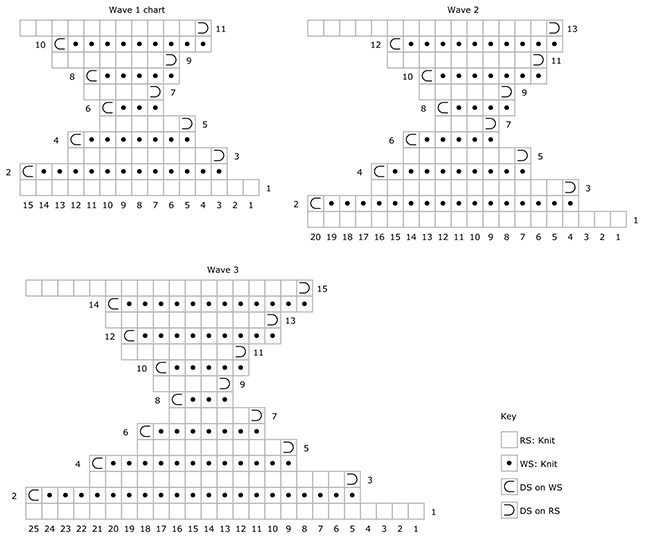
Variable Wave Pattern:
The wave stitch creates a series of randomized waves throughout the yoke of your sweater. Three different sizes of waves are worked in the yoke of this sweater: Wave 1 (W1), Wave 2 (W2), and Wave 3 (W3). Before you start a Wave Round, determine where you would like to see waves and mark their placement around your yoke with a removeable marker placed where you would like the wave to start, as follows:
W1 (W2, W3): Before starting a W1 (W2, W3) round, prepare your work by placing removeable markers randomly throughout the stitches. Your removeable markers should be at least 20 (25, 30) sts apart but can be more. Work a W1 (W2, W3) r dound by knitting to each m, then working the W1 (W2, W3) chart starting at each removeable m. Remove markers after finishing each chart.
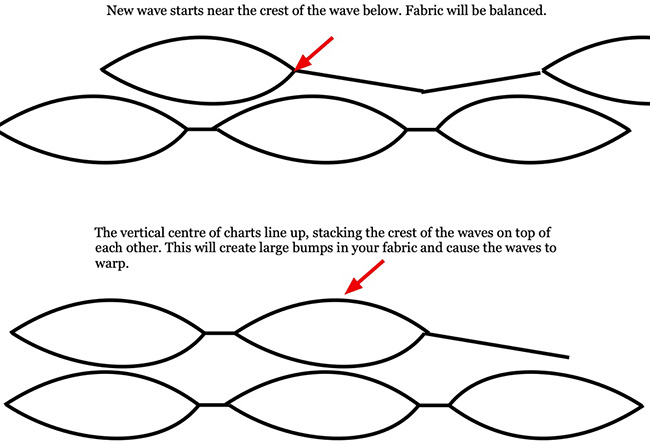
Wave Placement Tips: I like starting my wave charts at the crest or the trough of a wave from a previous round. This ensures that the deepest part of the wave—the vertical center of the chart—falls in the hollow between 2 waves from a previous round and prevents waves from stacking too high and creating lumps in the yoke fabric. See image below.
Techniques: (list techniques used and provide links to photo and/or video tutorials for each)
- DS/German Short Rows
- Cable Cast On
- knitting backwards: text tutorial | video tutorial
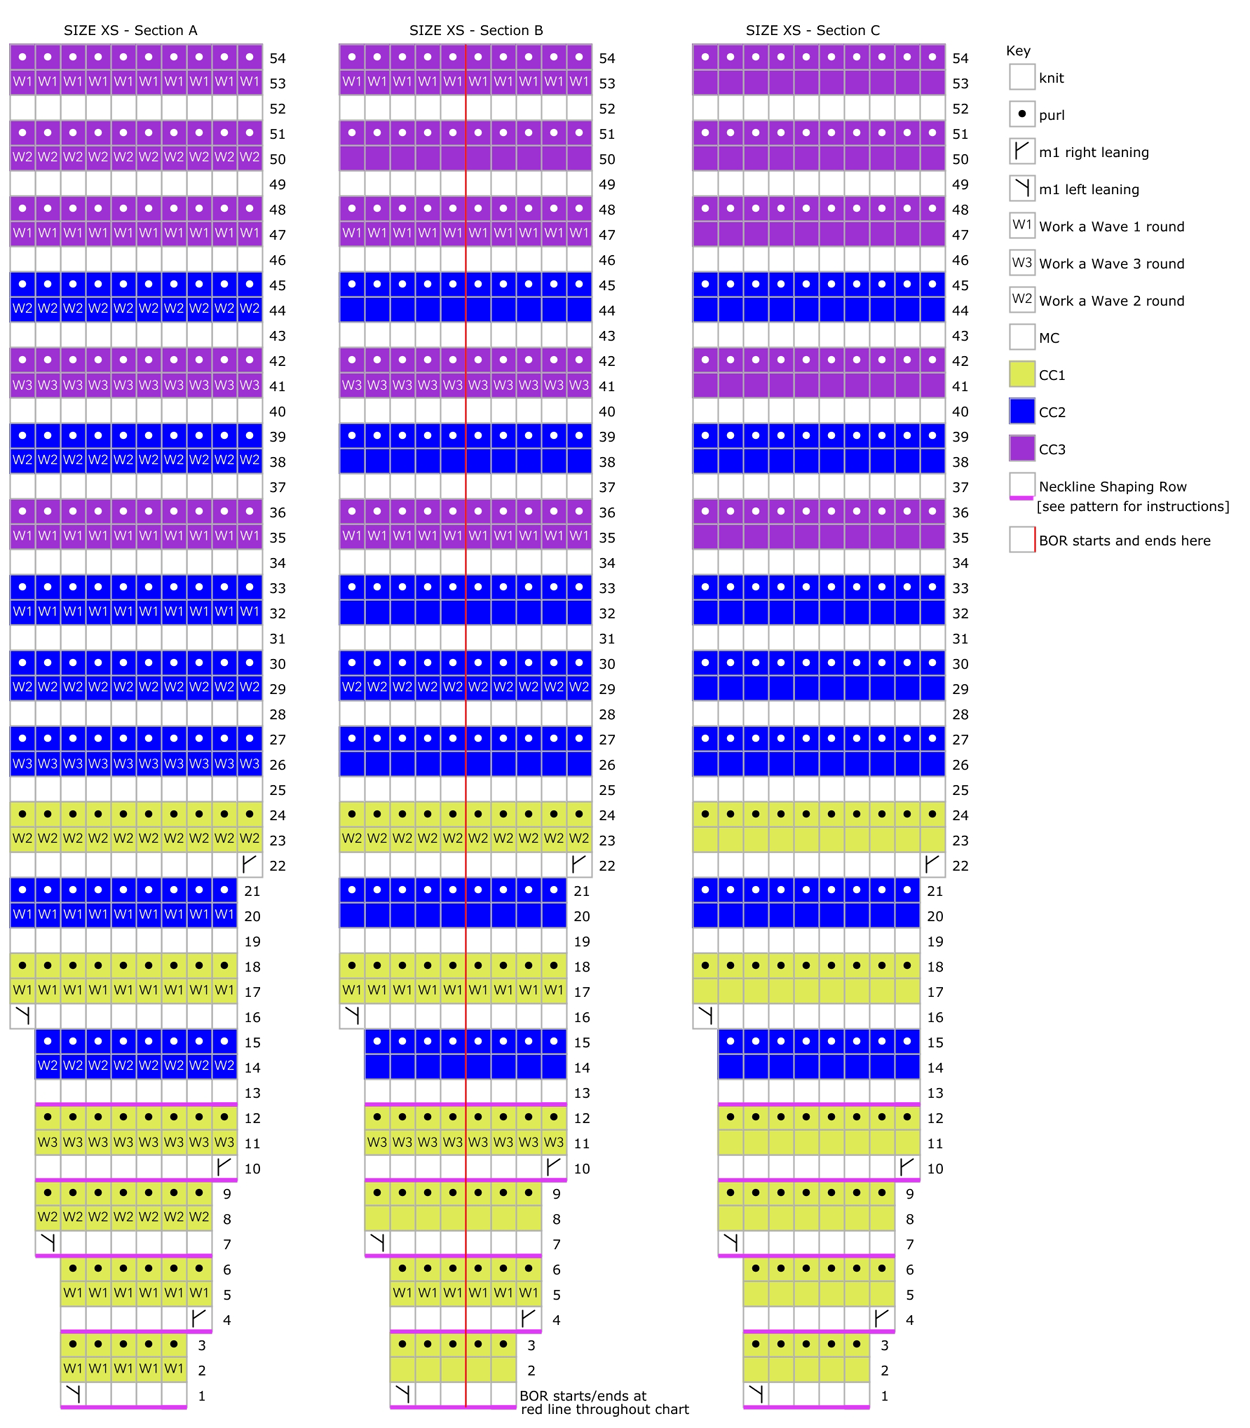
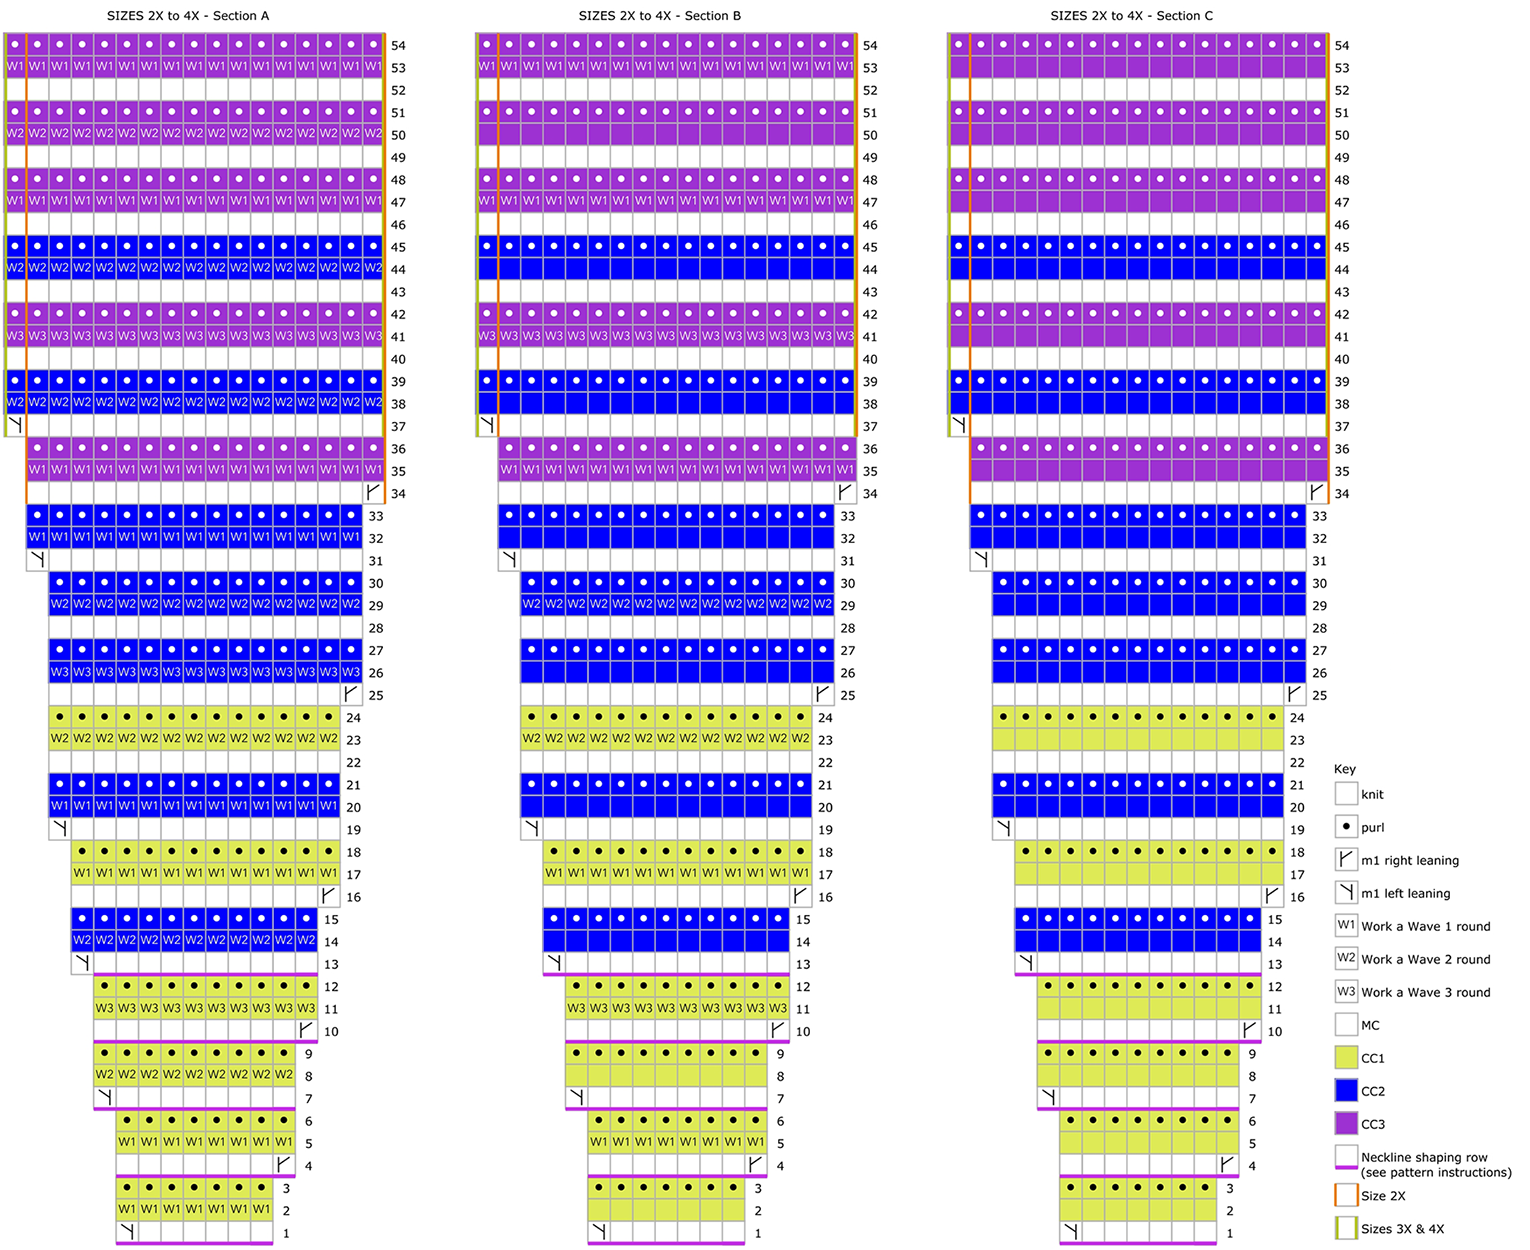
CHARTS
View and download the appropriate CHART for the size you're knitting:
DIRECTIONS
NECKLINE
With CC1, CO 15 sts using the Cable CO method.
Work Wave Edging Set as follows:
Short Row 1 [WS]: K12, turn work.
Short Row 2 [RS]: DS, k9, turn work.
Short Row 3: DS, k7, turn work.
Short Row 4: DS, k5, turn work.
Short Row 5: DS, k3, turn work.
Short Row 6: DS, k4, turn work.
Short Row 7: DS, k5, turn work.
Short Row 8: DS, k7, turn work.
Short Row 9: DS, k9, turn work.
Short Row 10: DS, knit to end of row.
Short Row 11: BO 5, k3, turn work. 5 sts dec'd.
Short row 12: DS, k2 sl 1 wyif, turn work, CO 20. 20 sts inc'd. 30 sts on needle.
Work Wave Edging Set 2[3, 3, 4, 4, 5, 5, 5, 5, 5, 5] times total. 45[60, 60, 75, 75, 90, 90, 90, 90, 90, 90] sts. CO 51[48, 48, 45, 45, 42, 42, 54, 54, 54, 54] sts to complete neckline edge. 96[108, 108, 120, 120, 132, 132, 144, 144, 144, 144] sts.
Turn work with RS facing, then join to work in the round, being careful not to twist your work. P 6[10, 10, 10, 10, 12, 12, 12, 12, 12, 12] , place BOR m.
Work Yoke setup and Front Neckline shaping: To create the asymmetric yoke, markers are placed to divide the yoke into 3 sections, A, B, and C (see illustration below which represents the yoke when looking down from above with the front of the yoke at the bottom of the diagram. Arrow indicates direction you will be working).
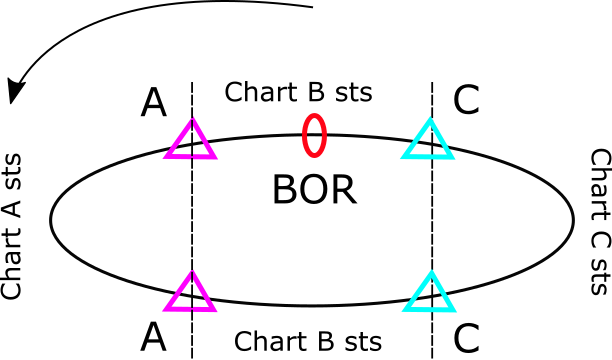
The A markers indicate the beginning and end of Section A (right shoulder). The C markers indicate the beginning and end of Section C (left shoulder). The BOR marker indicates the center back of the sweater. Section markers are named mA, mC, mBOR.
Sizes S, M, 2X & 3X only:
Neckline increase rnd: *K -[9, 9, -, -, 11, 11, -, -, -, -] , m1L; rep from * to end of round. -[120, 120, -, -, 144, 144, -, -, -, -] sts.
All sizes:
Marker placement rnd: P 6[10, 10, 10, 10, 12, 12, 12, 12, 12, 12] , place mA, p 36[40, 40, 40, 40, 48, 48, 48, 48, 48, 48] , place mA, p 12[20, 20, 20, 20, 24, 24, 24, 24, 24, ] , place mC, p 36[40, 40, 40, 40, 48, 48, 48, 48, 48, 48] , place mC, purl to end of rnd. 4 markers placed.
Switch to MC and work Neckline shaping as follows:
Short Row 1 [RS]: K 24[30, 30, 30, 30, 36, 36, 36, 36, 36, 36] , turn work.
Short Row 2 [WS]: DS, purl to mBOR, k 24[30, 30, 30, 30, 36, 36, 36, 36, 36, 36] , turn work.
Short Row 3: DS, knit to mBOR.
Chart setup rnd: Work Rnd 1 of chart B to first mA (starting from mBORif provided), work Rnd 1 of chart A to second mA, work Rnd 1 of chart B to first mC, work Rnd 1 of chart C to second mC, work Rnd 1 of chart B to end of rnd. 120[144, 144, 144, 144, 168, 168, 168, 168, 168, 168] sts.
Work Rnds 2-3 of the charts, as established.
Short Row 4 [RS]: With MC, k 35[42, 42, 42, 42, 49, 49, 49, 49, 49, 49] , turn work.
Short Row 5 [WS]: DS, purl to mBOR, k 35[42, 42, 42, 42, 49, 49, 49, 49, 49, 49] , turn work.
Short Row 6: DS, knit to mBOR.
Work Rnds 4-6 of the charts, as established. 144[168, 168, 168, 168, 192, 192, 192, 192, 192, 192] sts.
Short Row 7 [RS]: With MC, k 48[56, 56, 56, 56, 64, 64, 64, 64, 64, 64] , turn work.
Short Row 8 [WS]: DS, purl to mBOR, k 48[56, 56, 56, 56, 64, 64, 64, 64, 64, 64] , turn work.
Short Row 9: DS, knit to mBOR .
Work Rnds 7-9 of the charts, as established. 168[192, 192, 192, 192, 216, 216, 216, 216, 216, 216] sts.
Short Row 10 [RS]: With MC, k 63[72, 72, 72, 72, 81, 81, 81, 81, 81, 81] , turn work.
Short Row 11 [WS]: DS, purl to BOR m, k 63[72, 72, 72, 72, 81, 81, 81, 81, 81, 81] , turn work.
Short Row 12: DS, knit to mBOR.
Work Rnds 10-12 of the charts, as established. 192[216, 216, 216, 216, 240, 240, 240, 240, 240, 240] sts.
Short Row 13 [RS]: With MC, k 80[90, 90, 90, 90, 100, 100, 100, 100, 100, 100] , turn work.
Short Row 14 [WS]: DS, purl to mBOR, k 80[90, 90, 90, 90, 100, 100, 100, 100, 100, 100] , turn work.
Short Row 15: DS, knit to mBOR.
Continue working charts as set until Rnd 45 is complete. 264[312, 312, 360, 384, 384, 408, 408, 408, 408, 432] sts.
Measure length of Yoke on the back, at the second mC (where there are no waves). If yoke measures 5.25[5.5, 6.5, 6.75, 7, 7, 7.25, 7.25, 7.25, 7, 7] inches/
/ 13.5[14, 16.5, 17, 18, 18, 18.5, 18.5, 18.5, 18, 18] cm, proceed to Raglan Armhole shaping.
If yoke needs to be longer, work Rnds 46-54 to the length listed for your size, or, if you have a preferred yoke depth, 1.5[1.5, 1.5, 2, 2.25, 2.25, 2.25, 2.25, 2.75, 2.75, 2.75] inches/ 4[4, 4, 5, 5.5, 5.5, 5.5, 5.5, 7, 7, 7] cm shorter than your preferred yoke depth. End with a Wave rnd.
Work raglan armhole shaping:
Choose 4 markers that are a different color/style than mA and mC.
IMPORTANT Note: Continue working in garter stripe/wave pattern (Rnds 46-54 of the charts) as established, until raglan armhole shaping is complete.
Raglan marker placement rnd (purl round): P 42[48, 48, 54, 60, 60, 66, 66, 68, 70, 74] back sts, pm, p 48[60, 60, 72, 72, 72, 72, 72, 68, 66, 68] sleeve sts, pm, p 84[96, 96, 108, 120, 120, 132, 132, 136, 140, 148] front sts, pm, p 48[60, 60, 72, 72, 72, 72, 72, 68, 66, 68] sleeve sts, pm, purl to mBOR (remaining back sts). 4 raglan markers placed.
Raglan increase rnd: (Work to 1 st before m, m1R, k2, m1L) four times, work to end of round. 8 sts inc'd.
Work 6[6, 2, 4, 5, 3, 4, 2, 1, 1, 1] rnds even.
Work these 7[7, 3, 5, 6, 4, 5, 3, 2, 2, 2] rnds 2[2, 4, 3, 3, 4, 5, 7, 10, 11, 11] times total. 16[16, 32, 24, 24, 32, 40, 56, 80, 88, 88] sts added in raglan. 280[328, 344, 384, 408, 416, 448, 464, 488, 496, 520] sts. Work evenly until raglan section is: 1.5[1.5, 1.5, 2, 2.25, 2.5, 2.5, 2.5, 3, 3, 3] inches/ 4[4, 4, 5, 5.5, 6.5, 6.5, 6.5, 6.5, 7.5, 7.5] cm deep, ending with a purl rnd.
Remove all mA and mC in this rnd.
Separate Body and Sleeves:
Note: if you need more space in the body and sleeves, you can cast on additional stitches at each underarm. Where instructions ask you to "CO2, pm, CO2", you can replace "2" with 3-4 stitches if you prefer. Switch to MC.
Next rnd: Knit to first raglan m, place all sts between the first and second raglan markers on scrap yarn/stitch holder, removing both markers, CO 2, pm to indicate side seam, CO 2 sts; knit to the third raglan marker, place all stitches between the third and fourth raglan markers on scrap yarn/stitch holder, removing both markers, CO 2, pm to indicate side seam, CO 2 sts; knit to the end of the rnd. 184[208, 216, 236, 260, 264, 292, 300, 320, 332, 348] sts in body. 52[64, 68, 78, 78, 80, 82, 86, 88, 88, 90] sts held on stitch holder for each sleeve.
BODY
Knit every row with no shaping for 1 inch/2.5 cm.
Increase rnd: (Knit to 1 st before m, M1R, k1, sm, k1, M1L) twice, knit to mBOR. 4 sts inc'd.
Work 6[7, 4, 5, 6, 5, 5, 5, 5, 5, 5] rounds even, with no shaping.
Work these 7[8, 5, 6, 7, 6, 6, 6, 6, 6, 6] rnds 9[8, 12, 13, 11, 13, 14, 15, 15, 16, 15] times total. 220[240, 264, 288, 304, 316, 348, 360, 380, 396, 408] sts. Knit every row with no further shaping until body measures 9[9, 9, 10, 10.5, 11, 11, 12, 12, 13, 13] inches/ 23[23, 23, 25.5, 25.5, 28, 28, 30.5, 30.5, 33, 33] cm from armhole, or until body is 2 inches/5 cm from the final length you wish.
Note about determining ideal length: The left side of the sweater should sit at your high hip (top of your pelvic bone) before you start the hem treatment.
Sizes L, 3X, 6X & 7X:
Proceed to Split Hem instructions. -[-, -, 288, -, -, 348, -, -, 396, 408] sts.
Sizes XS, S, 4X & 5X:
Decrease rnd: (K 37[30, -, -, -, -, -, 60, 95, -, -] , k2tog) 2[3, -, -, -, -, -, 2, 1, -, -] time(s), knit to side seam m, sm, (k 37[30, -, -, -, -, -, 60, 95, -, -] , k2tog) 2[3, -, -, -, -, -, 2, 1, -, 3] time(s), knit to end of rnd. 216[234, -, -, -, -, -, 360, 378, -, -] sts.
Sizes M, 1X & 2X:
Increase round: (K -[-, 33, -, 76, 32, -, -, -, -, -] , m1) -[-, 3, -, 1, 4, -, -, -, -, -] , times, knit to side seam, sm, (k -[-, 33, -, 76, 32, -, -, -, -, -] , m1) -[-, 3, -, 1, 4, -, -, -, -, -] , times, knit to end of rnd. -[-, 270, -, 306, 324, -, -, -, -, -] sts.
Work Split Hem:
Place all front sts on scrap yarn or a spare needle. You will work only the back stitches. Before you continue, ensure you have an equal number of sts for the back and front hem.
Hem row 1 [RS]: Sl 1 kw wyib, k2, *p1, k1, p1, k3; rep from * to last 3 sts, k3.
Hem row 2 [WS]: Sl 1 pw wyif, p2, *k1, p1, k1, p3; rep from * to last 3 sts, p3.
Work these 2 rows 9 times total, ending with a WS row. BO in pattern.
Repeat for front sts.
RIGHT SLEEVE
Move all stitches held on scrap yarn/stitch holder to a needle. 52[64, 68, 78, 78, 80, 82, 86, 88, 88, 90] sts
With MC, pick up 4 sts from the cast on stitches at the underarm, placing a mBOR at the center point of these stitches. 56[68, 72, 82, 82, 84, 86, 90, 92, 92, 94] sleeve sts
Rnd 1: With MC, knit.
Rnd 2: With CC2, work a W2 round with 2-3 waves placed as desired.
Rnd 3: Purl.
Rnd 4: With MC, knit.
Rnd 5: With CC3, work a W1 round with 2-3 waves placed as desired.
Rnd 6: Purl.
Short row 1 [RS]: With CC2, BO5, k10, turn work. 5 sts dec'd.
Short row 2 [WS]: DS, knit to last st, sl 1 purlwise wyif, turn work and CO 5 using cable cast on method. RS is facing you for the cast on, however these 5 sts are an extension of Short row 2. Do not turn work.
Short row 3: K12, turn work. 5 sts inc'd.
Short row 4: DS, k9, turn work.
Short row 5: DS, k7, turn work.
Short row 6: DS, k5, turn work.
Short row 7: DS, k3, turn work.
Short row 8: DS, k4, turn work.
Short row 9: DS, k5, turn work.
Short row 10: DS, k7, turn work.
Short row 11: DS, knit to end of wave shape.
Work Short rows 1-11 until there are less than 15 unworked sts left in the round. BO all sts.
LEFT SLEEVE
Place left sleeve stitches on needle. 52[64, 68, 78, 78, 80, 82, 86, 88, 88, 90] sts
With MC, pick up sts from the cast on stitches at the underarm, placing a mBOR at the center point of these stitches. 56[68, 72, 82, 82, 84, 86, 90, 92, 92, 94] sleeve sts
Knit every round with no shaping until sleeve is 4[4, 4, 5, 5, 5, 6, 6, 6, 6.5, 6.5] inches/ 10[10, 10, 13, 13, 13, 15, 15, 15, 16.5, 16.5] cm long, or desired length, minus 2 inches/5 cm.
Size M, 2X, 3X & 4X:
Next rnd: Knit. -[-, 72, -, -, 84, 90, 90, -, -, -] sts
Size XS, S, 5X, 6X & 7X:
Next rnd: (K 18[22, -, -, -, -, -, -, 28, 28, 19] , k2tog) 2[2, -, -, -, -, -, -, 2, 2, 4] times. 54[66, -, -, -, -, -, -, 90, 90, 90] sts
Size L & 1X:
Next rnd: (K -[-, -, 28, 28, -, -, -, -, -, -] , m1), -[-, -, 2, 2, -, -, -, -, -, -] times. -[-, -, 84, 84, -, -, -, -, -, -] sts
All sizes:
Hem rnd: *K3, p1, k1, p1; rep from * to end of rnd.
Work this round 18 times. BO in pattern.
FINISHING
Block by washing in wool wash and water and lay flat to dry. Pin the tips of the waves in the neckline and right sleeve.
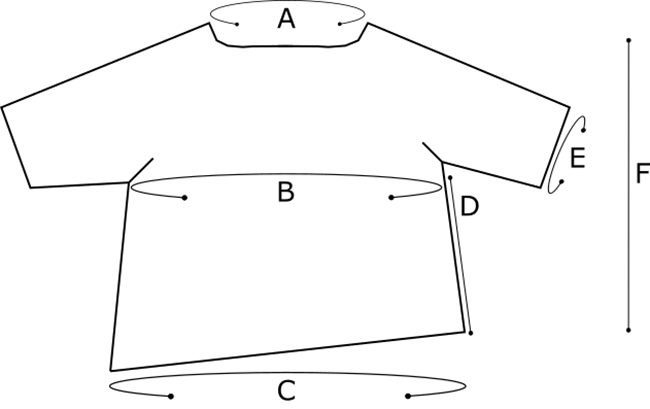
A – Neck circumference: 16.75[18.75, 18.75, 20.75, 20.75, 23, 23, 25, 25, 25, 25] inches/ 42.5[47.5, 47.5, 52.5, 52.5, 58.5, 58.5, 63.5, 63.5, , ] cm
B – Chest circumference at underarm: 32[36.25, 37.5, 41, 45.25, 46, 50.75, 52.25, 55.75, 57.75, 60.5] inches/ 81.5[92, 95.5, 104, 115, 117, 129, 132.5, 141.5, 146, 153.5] cm
C – Hem circumference: 38.25[41.75, 46, 50, 52.75, 55, 60.5, 62.5, 66.75, 70.25, 73] inches/ 97[106, 117, 127, 134, 139.5, 153.5, 159, 169.5, 178.5, 185.5] cm
D – Body length to underarm: 9[9, 9, 10, 10, 11, 11, 12, 12, 13, 13] inches/ 23[23, 23, 25.5, 25.5, 28, 28, 30.5, 30.5, 33, 33] cm
E – Arm circumference: 9.75[11.75, 12.5, 14.25, 14.25, 14.5, 15, 15.75, 16, 16, 16.5] inches/ 25[30, 32, 36, 36, 37, 38, 40, 40.5, 40.5, 42] cm
F – Total length (shorter side): 15.75[16, 17, 18.75, 19.25, 20.5, 20.75, 21.75, 22.25, 23, 23] inches/ 40[40.5, 43, 47.5, 49, 52, 52.5, 55, 56.5, 58.5, 58.5] cm
ABOUT THE DESIGNER
 Curiosity and exploration is the focus of Canadian knitwear designer and indie hand dyer, Kim McBrien Evans. A lifelong love of colour, texture, pattern, and shape prompted Kim to transition from working artist to textile maven. Her knitwear designs are known for their ability to turn an abstract idea into a wearable reality while simultaneously fitting and complimenting a wide range of bodies. She lives and works in the woods of Central Ontario, Canada.
You can find her lurking on Instagram, flipping through Ravelry, and dyeing yarn at indigodragonfly.ca.
Pattern & images © 2023 Kim McBrien Evans