


Frosty Musings, a free knitting pattern from Knitty.com.
INTRODUCTION
Frosty Musings
 by Amy Odin

"How many lessons of faith and beauty we should lose, if there were no winter in our year!"
--Thomas Wentworth Higginson
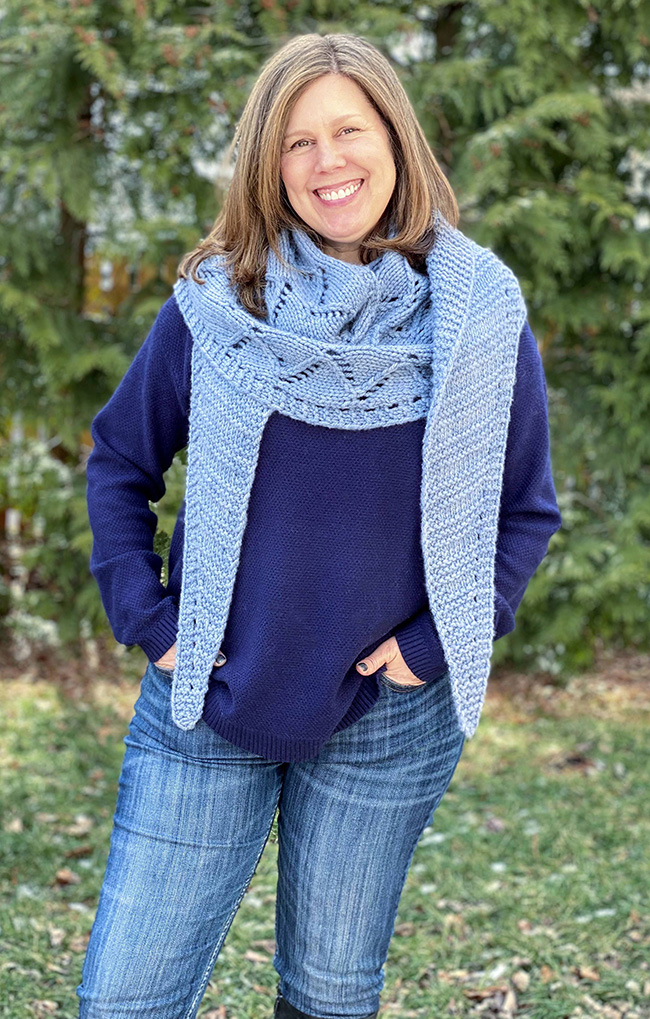
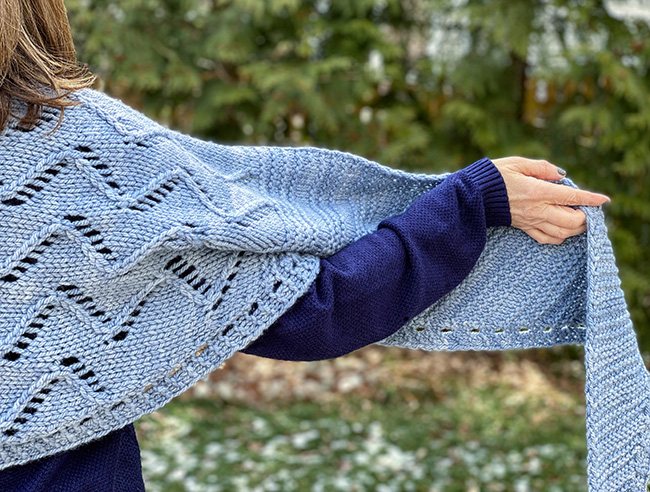
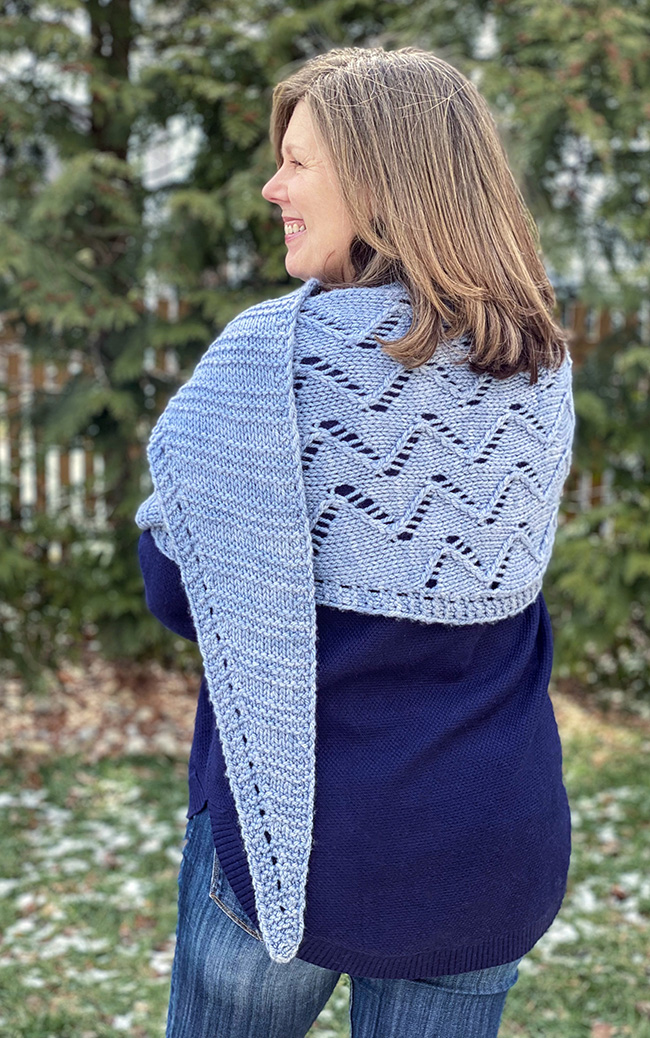
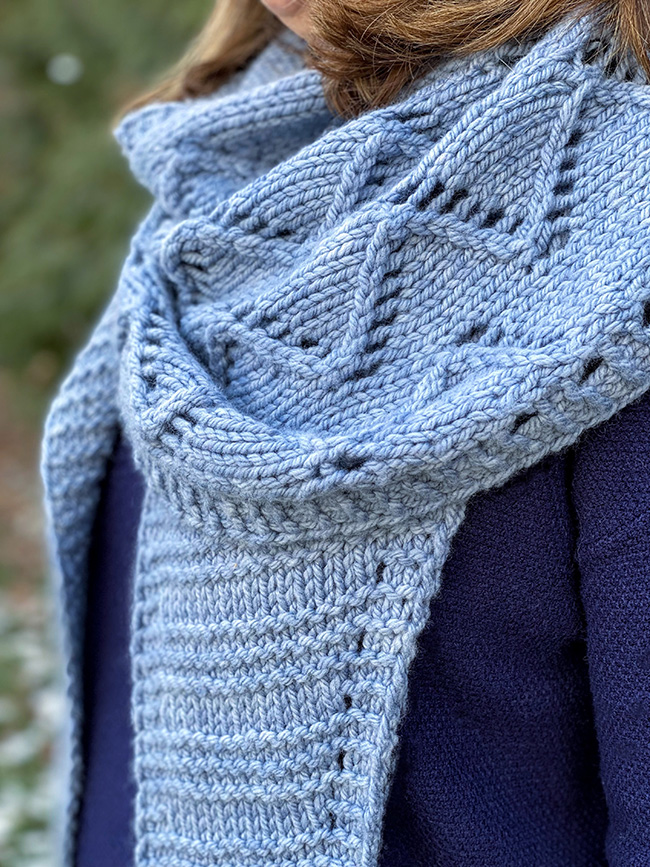
The Frosty Musings Shawl will wrap you in warmth all winter long! Knitted in a chunky weight yarn, It features a central zig-zag lace pattern with side wings in a welted stitch pattern. The shawl can be worn with the lace section around the neck like a scarf, or around the back and over the shoulders. It's knitted side-to-side beginning with three stitches, then gradually increases to the center. After the mid-point, the shawl gradually decreases until ending with three stitches. Both written instructions and charts for the central lace section are provided.
This is a great project for an advanced beginner or early intermediate knitter looking to explore simple shaping and lace.
 model: Amy Odin
photos: Leah Antler


SIZE
One
FINISHED MEASUREMENTS
Width: 100 inches/254 cm
Depth at deepest point: 16 inches/ 41 cm
MATERIALS
Yarn
![]() Miss Babs K2 [100% Merino Wool; 120 yds / 110 m per 4 oz / 100 g skein]; Blue: Stonewashed; 4 skeins.
Miss Babs K2 [100% Merino Wool; 120 yds / 110 m per 4 oz / 100 g skein]; Blue: Stonewashed; 4 skeins.
Yarn Characteristics
![]() The sample shown uses a chunky-weight 3-ply wool. It is bouncy, round and soft! If you'd like to substitute yarn, use at least a 3-ply yarn which will create the greatest stitch definition for your shawl. The pattern will also be the most visible using a solid or tonal color. The stitch pattern may get lost if you decide to choose a variegated yarn. A wool or wool blend is highly recommended so that the shawl will hold its shape well and not grow.
The sample shown uses a chunky-weight 3-ply wool. It is bouncy, round and soft! If you'd like to substitute yarn, use at least a 3-ply yarn which will create the greatest stitch definition for your shawl. The pattern will also be the most visible using a solid or tonal color. The stitch pattern may get lost if you decide to choose a variegated yarn. A wool or wool blend is highly recommended so that the shawl will hold its shape well and not grow.
Recommended needle size
[always use a needle size that gives you the gauge listed below - every knitter's gauge is unique]
![]() Set US #11/ 8 mm needles for working flat
Set US #11/ 8 mm needles for working flat
Notions
![]() stitch markers
stitch markers
![]() yarn needle
yarn needle
GAUGE
13 sts/16 rows = 4 inches/10 cm in stockinette stitch
PATTERN NOTES
[Knitty's list of standard abbreviations and techniques can be found here.]
Construction method: The shawl is worked side-to-side beginning with a CO of three stitches. After a few set-up rows to establish the pattern, an increase of one st is worked every fourth row until the center of the lace section, where the pattern remains even for about six inches. Then, a decrease of one st is worked every fourth row until the last few rows. Here, one last dec is worked and the shawl ends with a BO of three sts.
CHARTS
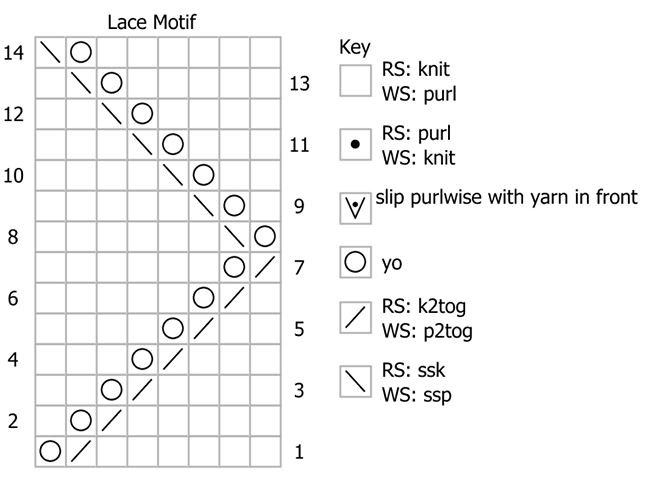
Lace Motif – worked over 8 stitches and 14 rows
Row 1 [RS]: K6, k2tog, yo.
Row 2 [WS]: P1, yo, p2tog, p5.
Row 3: K4, k2tog, yo, k2.
Row 4: P3, yo, p2tog, p3.
Row 5: K2, k2tog, yo, k4.
Row 6: P5, yo, p2tog, p1.
Row 7: K2tog, yo, k6.
Row 8: P6, ssp, yo.
Row 9: K1, yo, ssk, k5.
Row 10: P4, ssp, yo, p2.
Row 11: K3, yo, ssk, k3.
Row 12: P2, ssp, yo, p4.
Row 13: K5, yo, ssk, k1.
Row 14: Ssp, yo, p6.
DIRECTIONS

Wing A
CO 3 sts.
Row 1 [RS]: K2, sl1 wyif.
Row 2 [WS]: K2, m1, sl1 wyif. 4 sts.
Rows 3-4: K3, sl1 wyif.
Row 5: K2, m1, k1, sl1 wyif. 5 sts.
Rows 6, 7, 8: K4, sl1 wyif.
Row 9: K3, yo, k1, sl1 wyif. 6 sts.
Rows 10, 11, 12: K5, sl1 wyif.
Row 13: K3, yo, k2, sl1 wyif. 7 sts.
Row 14, 15, 16: K to last st, sl1 wyif.
Row 17: K3, yo, k to last st, sl1 wyif. 8 sts.
Row 18, 19, 20: K to last st, sl1 wyif.
Row 21: K3, yo, k to last st, sl1 wyif. 9 sts.
Rows 22, 23, 24: K to last st, sl1 wyif.
Row 25: K3, yo, k to last st, sl1 wyif. 10 sts.
Row 26: K3, p to last 4 sts, k3, sl1 wyif.
Row 27-28: K to last st, sl1 wyif.
Row 29: K3, yo, k to last st, sl1 wyif. 1 st increased.
Rows 30, 31, 32: K to last st, sl1 wyif.
Row 33: K3, yo, k to last st, sl1 wyif. 1 st increased.
Row 34 [WS]: K3, p to last 4 sts, k3, sl1 wyif.
Repeat Rows 27-34 14 more times, and work Rows 27-33 once more. 42 sts.
Next row: K to last st, sl1 wyif.
Note: When looking at the RS, your last garter st section will have a group of 4 garter ridges (not a group of three as all the others that came before).
Lace Section
Increases
Row 1 [RS]: K5, pm, (work Lace Motif, pm) 4 times, k4, sl1 wyif.
Row 2 [WS]: K3, p2, work Lace Motif to last marker, p to last 4 sts, k3, sl1 wyif.
Row 3: K3, yo, k to marker, work Lace Motif to last marker, k4, sl1 wyif. 1 st increased.
Row 4: K3, p2, work Lace motif to last marker, p to last 4 sts, k3, sl1 wyif.
Row 5: K to first marker, work Lace Motif to last marker, k4, sl1 wyif.
Row 6: K3, p2, work Lace motif to last marker, p to last 4 sts, k3, sl1 wyif.
Repeat Rows 3-6 4 more times, and work Row 3 once more. With RS facing, you will have 11 sts before the first marker.
Row 24: K3, p2, work Lace motif to last marker, work first 7 sts of Lace motif, k3, sl1 wyif.
Row 25: K4, work last 7 sts of Lace motif to first marker, work Lace motif as set to last marker, k4, sl1 wyif.
Row 26: K3, p2, work Lace motif to last marker, remove last marker, work first 7 sts of Lace motif, k1, place marker, k2, sl1 wyif.
Row 27: K3, yo, k to first marker, work Lace motif to last marker, k4, sl1 wyif. 1 st increased.
Row 28: K3, p2, work Lace motif to last marker, p to last 4 sts, k3, sl1 wyif.
Row 29: K to first marker, work Lace Motif to last marker, k4, sl1 wyif.
Row 30: K3, p2, work Lace motif to last marker, p to last 4 sts, k3, sl1 wyif.
Repeat Rows 27-30 one more time. 50 sts.
Even Section
Row 1 [RS]: K3, yo, k2tog, work Lace Motif to last marker, k4, sl1 wyif.
Row 2: K3, p2, work Lace motif to last marker, p1, k3, sl1 wyif.
Row 3: K to first marker, work Lace Motif to last marker, k4, sl1 wyif.
Row 4: K3, p2, work Lace motif to last marker, p1, k3, sl1 wyif.
Repeat Rows 1-4 4 more times.
Decreases
Row 1 [RS]: K3, yo, k3tog, removing Lace motif marker, work last 7 sts of Lace motif, work Lace Motif to last marker, k4, sl1 wyif. 1 st decreased.
Row 2: K3, p2, work Lace motif to last marker, work 7 sts of Lace motif as set, p to last 4 sts, k3, sl1 wyif.
Row 3: K5, work 7 sts of Lace motif as set, work Lace Motif to last marker, k4, sl1 wyif.
Row 4: K3, p2, work Lace motif to last marker, work 7 sts of Lace motif as set, p1, k3, sl1 wyif.
Row 5: K3, yo, k3tog, work last 6 sts of Lace motif, replace marker, work Lace Motif to last marker, k4, sl1 wyif. 1 st decreased.
Row 6: K3, p2, work Lace motif to last marker, work 6 sts of Lace motif as set, p to last 4 sts, k3, sl1 wyif.
Row 7: K5, work 6 sts of Lace motif as set, work Lace Motif to last marker, k4, sl1 wyif.
Row 8: K3, p2, work Lace motif to last marker, remove last marker, p to last 4 sts, k3, sl1 wyif.
Row 9 [RS]: K3, yo, k3tog, k to first marker, work Lace Motif to last marker, k4, sl1 wyif. 1 st decreased.
Row 10: K3, p2, work Lace motif to last marker, p to last 4 sts, k3, sl1 wyif.
Row 11: K to first marker, work Lace Motif to last marker, k4, sl1 wyif.
Row 12: K3, p2, work Lace motif to last marker, p to last 4 sts, k3, sl1 wyif.
Repeat Rows 9-12 4 more times, and work Rows 9-10 once more. 42 sts remain; and there will be 5 sts before the first marker.
Wing B
Note: Just as at the end of Wing A, the garter stitch section at the beginning of Wing B will have a group of 4 garter ridges instead of groups of three that follow.
Row 1 [RS]: K to last st, sl1 wyif.
Row 2 [WS]: K to last st, sl1 wyif.
Row 3: K3, yo, k3tog, k to last st, sl1 wyif. 1 st decreased.
Row 4, 5, 6: K to last st, sl1 wyif.
Row 7: K3, yo, k3tog, k to last st, sl1 wyif. 1 st decreased.
Row 8-9: K to last st, sl1 wyif.
Row 10: K3, P to last 4 sts, k3, sl1 wyif.
Repeat Rows 3-10 15 more times. 10 sts rem.
Final Decreases
Row 1 [RS]: K3, yo, k3tog, k to last st, sl1 wyif. 1 st decreased.
Row 2, 3, 4: K to last st, sl1 wyif.
Repeat Rows 1-4 3 more times.
Row 17: K3, k2tog, sl1 wyif. 5 sts.
Rows 18-19: K4, sl1 wyif.
Row 20: K2, k2tog, sl1 wyif. 4 sts.
Row 21: K1, k2tog, sl1 wyif. 3 sts.
BO.
FINISHING
Weave in ends. Block the shawl by soaking in cool water with wool wash for about 30 minutes. Rinse and gently press out excess water. Do not wring. Roll in a towel and press until damp. Lay out on blocking mats or a towel and shape to the correct dimensions. I used blocking wires to ensure straight edges on the wings and an even curve for the center lace section. Secure the wires with pins so the pattern opens up slightly. Don't overstretch the wings as the welting pattern may spread out too much and become less defined.
ABOUT THE DESIGNER
 Amy lives in Virginia and works for KnitChats, an online community of coaches that provides live support to knitters all around the world. She teaches beginning to advanced knitting classes both virtually and in-person. She will find just about any excuse to engage in knitting pursuits, and is devoting more time these days to getting creative and sharing new designs.
You can see more of her patterns here and follow her on Facebook or Instagram. For pattern support, she can be contacted at amyodindesigns.com
Pattern & images © 2023 Amy Odin