


Scarlotta, a free knitting pattern from Knitty.com.
INTRODUCTION
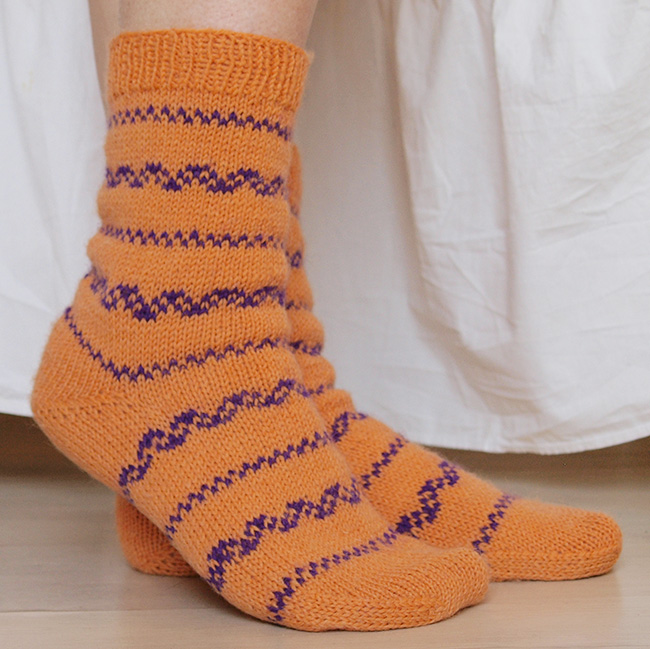
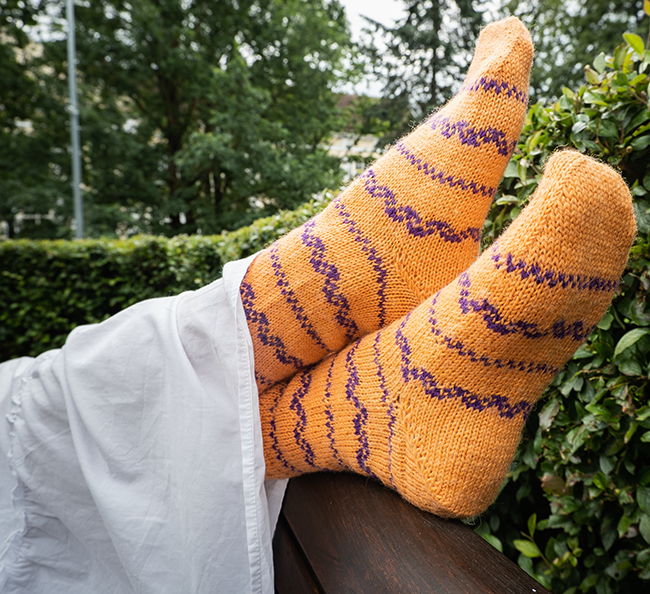
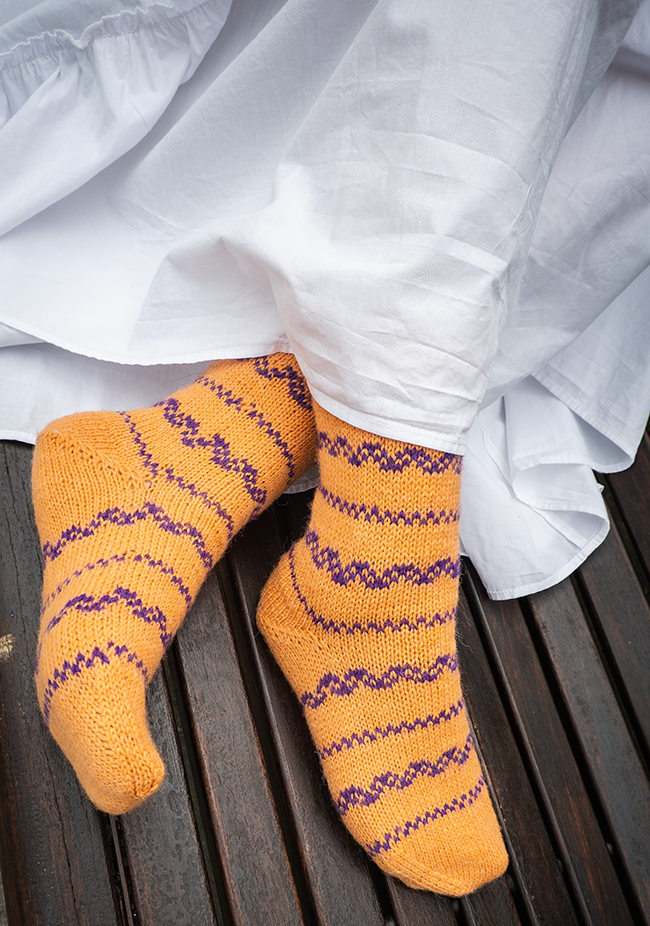
Scarlotta
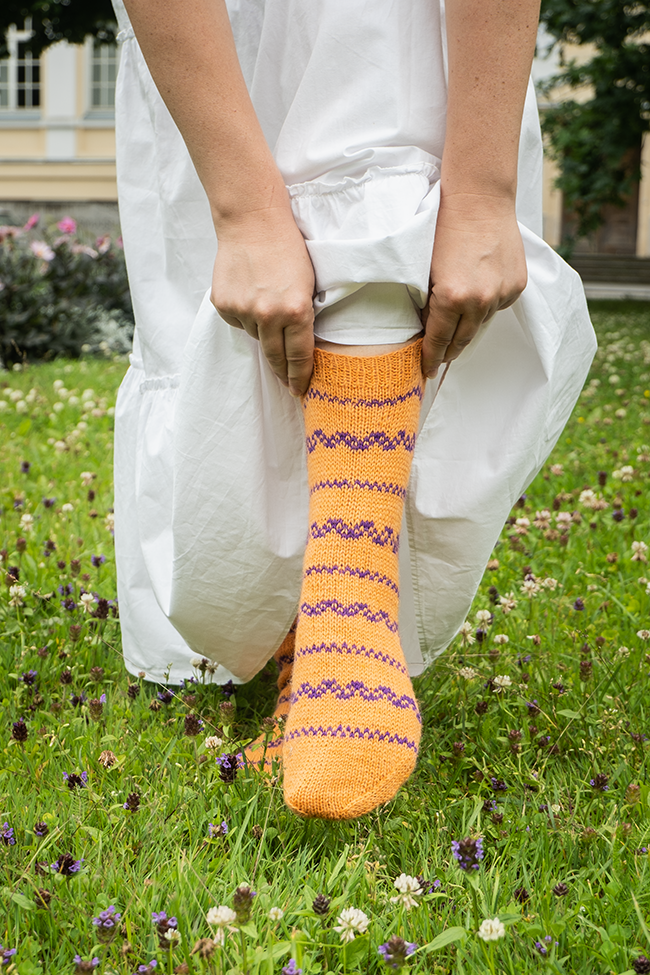 by Katrin Kolnes

When I read about the Rom-Com Revival theme for this issue, this dialogue from "Four Weddings and a Funeral" came into my mind:
Gareth: Scarlotta! Fabulous dress. The ecclesiastical purple and the pagan orange symbolizing the mystical symbiosis in marriage between the heathen and Christian traditions?
Scarlett: That's right.
And as I have been enjoying knitting socks recently, I decided to design socks in orange and purple inspired by Scarlett's dress.
 photos: Katrin Kolnes, Elen Kontkar


SIZE
Adult S[M, L, XL
]
shown in size L
FINISHED MEASUREMENTS
Foot circumference: 7.5[8.25, 9, 10] inches/ 19[21, 23, 25.5] cm
Foot & leg length: adjustable; sample leg is 6.5 inches/16.5 cm long
Choose a size approximately .5-1 inch/1.5-2.5 cm smaller around that your actual foot measurement; if you're between sizes, choose the larger size.
MATERIALS
Yarn
Schachenmayr Regia 4-fädig Uni/4-ply Solids [75% Virgin Wool, 25% Polyamide; 459 yd/ 420m per 100g skein];
![]() [MC] Orange 1054; 1 skein
[MC] Orange 1054; 1 skein
![]() [CC] Purple 1050; about 75 yds/70 m
[CC] Purple 1050; about 75 yds/70 m
Yarn Characteristics
![]() These socks use a superwash sock yarn in a wool and polyamide (nylon) blend. The patterning looks best in solid or nearly-solid colors. Choose two colors with strong contrast.
These socks use a superwash sock yarn in a wool and polyamide (nylon) blend. The patterning looks best in solid or nearly-solid colors. Choose two colors with strong contrast.
Recommended needle size
[always use a needle size that gives you the gauge listed below - every knitter's gauge is unique]
![]() 1 set US #1.5/2.5 mm needles for small circumference in the round
1 set US #1.5/2.5 mm needles for small circumference in the round
Notions
![]() tapestry needle
tapestry needle
![]() stitch markers (optional)
stitch markers (optional)
GAUGE
29 sts/38 rounds = 4 inches/10 cm in pattern stitch
28 sts/36 rounds = 4 inches/10 cm in stockinette stitch
PATTERN NOTES
[Knitty's list of standard abbreviations and techniques can be found here.]
Wrap & Turn [W&T]:
RS rows: Bring yarn to front of work between needles, slip next stitch to right-hand needle, bring yarn around this stitch to back of work, slip stitch back to left-hand needle, turn work.
WS rows: Bring yarn to back of work between needles, slip next stitch to right-hand needle, bring yarn around this stitch to front of work, slip stitch back to left-hand needle, turn work.
Working the Wraps: Instructions for working the warps are given in the heel turn; this pattern uses a method you might not have encountered before.
Grafting:
Instructions for grafting can be found here and here.
Short rows
Instructions for working short rows can be found here and here.
Note that the wraps are picked up and worked in a manner that's different from what's shown in the tutorials above – the method used here, although visible, closes the gaps more tightly.
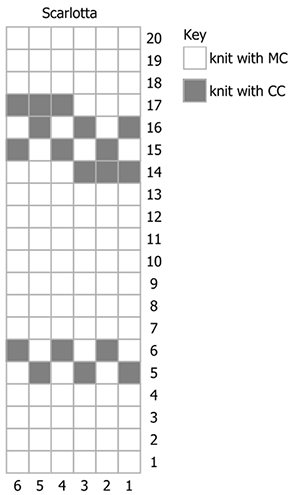
CHART
DIRECTIONS
Cuff
Using MC, and your preferred method CO 54[60, 66, 72] stitches. Distribute stitches across needles as you prefer and join for working in the round, noting or marking start of round.
Ribbing round: (K1, p1) around.
Work ribbing as set for approximately 1 inch/2.5 cm, or desired length.
Do not break MC yarn.
Leg
For Left Sock only: Work pattern chart until desired length, ending after row 2 or 19.
Setup for heel: K 28[30, 33, 36] , and stop here.
For Right Sock only: Work pattern chart until desired length, ending after row 3 or 20.
Keep note of what row you're on when you start the heel.
Heel
Row 1 [RS]: K 25[28, 31, 34] , W&T.
Row 2 [WS]: P 23[26, 29, 32] , W&T.
Row 3 [RS]: K 22[25, 28, 31] , W&T.
Row 4 [WS]: P 21[24, 27, 30] , W&T.
Row 5 [RS]: K 20[23, 26, 29] , W&T.
Row 6 [WS]: P 19[22, 25, 28] , W&T.
Row 7 [RS]: K 18[21, 24, 27] , W&T.
Row 8 [WS]: P 17[20, 23, 26] , W&T.
Row 9 [RS]: K 16[19, 22, 25] , W&T.
Row 10 [WS]: P 15[18, 21, 24] , W&T.
Row 11 [RS]: K 14[17, 20, 23] , W&T.
Row 12 [WS]: P 13[16, 19, 22] , W&T.
Row 13 [RS]: K 12[15, 18, 21] , W&T.
Row 14 [WS]: P 11[14, 17, 20] , W&T.
Row 15 [RS]: K 10[13, 16, 19] , W&T.
Row 16 [WS]: P 9[12, 15, 18] , W&T.
Row 17 [RS]: K 8[11, 14, 17] , W&T.
Row 18 [WS]: P 7[10, 13, 16] , W&T.
Important note: These instructions might be different than you expect: the wrapped sts are worked without picking up the wrap. After the stitch is knitted or purled, pick up the wrap from around the just-worked stitch with the tip of the left needle, and leave it on the needle, as if it's a new stitch. On a subsequent row, you will work it together with an adjacent stitch.
Row 19 [RS]: K 8[11, 14, 17] , pick up wrap. Turn work.
Row 20 [WS]: Sl 1, p 8[11, 14, 17] , pick up wrap. Turn work.
Row 21 [RS]: Sl 1, k 8[11, 14, 17] , ssk (wrap worked together with next st), pick up wrap. Turn work.
Row 22 [WS]: Sl 1, p 9[12, 15, 18] , p2tog, pick up wrap. Turn work.
Row 23 [RS]: Sl 1, k 10[13, 16, 19] , ssk, pick up wrap. Turn work.
Row 24 [WS]: Sl 1, p 11[14, 17, 20] , p2tog, pick up wrap. Turn work.
Row 25 [RS]: Sl 1, k 12[15, 18, 21] , ssk, pick up wrap. Turn work.
Row 26 [WS]: Sl 1, p 13[16, 19, 22] , p2tog, pick up wrap. Turn work.
Row 27 [RS]: Sl 1, k 14[17, 20, 23] , ssk, pick up wrap. Turn work.
Row 28 [WS]: Sl 1, p 15[18, 21, 24] , p2tog, pick up wrap. Turn work.
Row 29 [RS]: Sl 1, k 16[19, 22, 25] , ssk, pick up wrap. Turn work.
Row 30 [WS]: Sl 1, p 17[20, 23, 26] , p2tog, pick up wrap. Turn work.
Row 31 [RS]: Sl 1, k 18[21, 24, 27] , ssk, pick up wrap. Turn work.
Row 30 [WS]: Sl 1, p 19[22, 25, 28] , p2tog, pick up wrap. Turn work.
Row 31 [RS]: Sl 1, k 20[23, 26, 29] , ssk, pick up wrap. Turn work.
Row 32 [WS]: Sl 1, p 21[24, 27, 30] , p2tog, pick up wrap. Turn work.
Row 33 [RS]: Sl 1, k 22[25, 28, 31] , ssk, pick up wrap. Turn work.
Row 34 [WS]: Sl 1, p 23[26, 29, 32] , p2tog, pick up wrap. Turn work.
Row 35 [RS]: Sl 1, k 24[27, 30, 33] , ssk. Turn work.
Row 36 [WS]: Sl 1, p 25[28, 31, 34] , p2tog. Turn work.
Foot
Resume working in the round.
Right Sock only: You are positioned at the start of the round, and continue working from the chart pattern, with Row 4 or Row 1, as appropriate.
Left Sock only: You are positioned at the middle of the round. Knit across the instep stitches – this completes Row 3 or 20 of the chart that you started when you set up for the heel.
Continue in pattern until foot measures approx. 1.5[1.75, 2, 2.25] inches / 4[4.5, 5, 6] cm less than desired foot length.
Toe
To setup for toe arrange your stitches so that they are divided equally between instep and sole; place markers or arrange sts as you prefer. The instructions below refer to "midpoint of round" – this is the break between the sole and the instep sts.
Round 1: K1, SSK, knit to 3 sts before midpoint of round, k2tog, k1; k1, ssk, k to 3 sts before end of round, k2tog, k1. 4 sts decreased.
Round 2: K all stitches
Repeat Rounds 1-2 until 30[32, 34, 36] stitches remain.
Repeat Round 1 until 18[20, 18, 20] stitches remain.
Cut yarn, leaving a 12-inch/30cm tail to graft the remaining stitches together.
Graft toe closed.
FINISHING
Weave in all ends. Wash the socks and lay flat to dry.
ABOUT THE DESIGNER
 Katrin Kolnes lives in Tartu, Estonia. She is passionate about knitting and other craft techniques, and keeps on learning and improving her skills.
You can find out more about her knitting designs and other knitting projects in Ravelry or Instagram.
Pattern & images © 2023 Katrin Kolnes