
Whilst recently lurgied, I kept my fingers happy knitting little Hats. The brain wasn't feeling sufficiently cooperative to design a Hat yet the need to knit was ever present, and these little cuties fitted the bill.
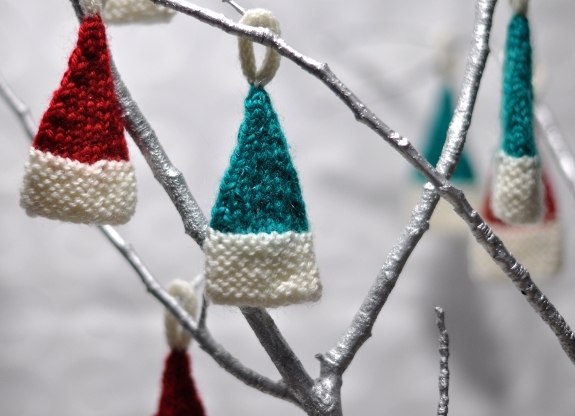
And who wouldn't want miniature elfin Hats to celebrate the coming festivities? That's what I thought. So I wrote the pattern down. It isn't really a pattern in the same sense as my published patterns, more a chatty recipe for whatever yarn and needles you have to hand.
They're a one size Hat, adapted to different sizes by your choice of yarn. By all means adjust the number of stitches cast on if you want to, and you could even alter the decreases ratios to get an entirely different shape. I found this decrease pattern the most pleasing, and it's worked on a multiple of 3.
Materials:
DK yarn (or thereabouts) in 2 festive colours - one Hat takes less than 5g of each colour.
Set of DPNs in a size or two smaller than you'd normally use for the chosen yarn (we want these kiddies to be firmish).
A tapestry needle will come in pretty handy for sewing in your ends.
I didn't use stitch markers, but go for it if they help keep track of where the round starts or where the increases should be.
Gauge:
Not really relevant - mine came out at 27sts x 36rows to 4in/10cm over St.St with a standard DK on 3mm needles. They stand about 3.25in/8.25cm tall excluding the I-cord loop (about 4.25in/10.75cm including the I-cord loop). If you're not sure about different yarn names/gauges or needle size notations use this handy guide to help you with the conversions.
Abbreviations:
K = Knit
St.St = stocking stitch
k2tog = knit next two stitches together
Rnd = round
sts = stitches
rpt = repeat
in = inches
cm = centimetres
DPNs = double pointed needles

How to:
Brim/Body:
Using your regular cast on method and the Brim colour (I chose white for the Brim), cast on 21 sts and spread them evenly across 3 DPNs. Join to work in the round, taking care not to twist the stitches (I find it easiest to work one row flat before joining). Work Garter St. in the round (alternate rounds of knit and purl) until the Brim measures 1in/2.5cm. By all means, use magic loop or two circulars but I found DPNs the easiest way to manage such a small amount of stitches. I used a Cable Cast-on and started the Garter St. by purling the first round - I really like the neat edge this gives.
Once the Garter St. Brim measures 1in/2.5cm deep, change to the Body colour and work 3 rounds of St.St (knit every round) before moving onto the Crown shaping.
Crown Shaping:
Here we start to shape that classic Elfin crown. Adding in more plain rounds will make the Crown steeper; less plain rounds will make it shallower. We'll be continuing in the Body colour.
Rnd 1: *K5, k2tog; rpt from * to end [18 sts]
Rnds 2 & 3: Knit all sts
Rnd 4: *K4, k2tog; rpt from * to end [15 sts]
Rnds 5 & 6: Knit all sts
Rnd 7: *K3, k2tog; rpt from * to end [12 sts]
Rnds 8 & 9: Knit all sts
Rnd 10: *K2, k2tog; rpt from * to end [9 sts]
Rnds 11 & 12: Knit all sts
Rnd 13: *K1, k2tog; rpt from * to end [6 sts]
Rnds 14 & 15: Knit all sts
Rnd 16: *k2tog; rpt from * to end [3 sts]
Change back to the colour you used for the Brim.
Finishing:
Now work an I-cord for approximately 2in/5cm. Finish by threading the yarn tail through the remaining stitches and tightening to close. Use the yarn tail to stitch down the end of the I-cord to it's base to form a loop. These I-cord loops are pretty stretchy, yet should you have a humongous Xmas tree, you could certainly knit the I-cord for longer to make a larger loop. I'd be wary though of making the loop too large. Sew in the remainder of the ends. And if you're like me, you might like to block these little babies too. I only gave them a gentle soak and laid them flat to dry. But I'm like that.

And there you have your miniature elfin Hat! Each one took me around 20 minutes to make - they're perfect stash busters and ideal last minute decorations. They could easily be jazzed up with some sparkle yarn or two finer plies knitted together - their simplicity provides a blank canvas for your imagination!


