Knitting · Patterns

Milk Tea Hat Knitting Pattern

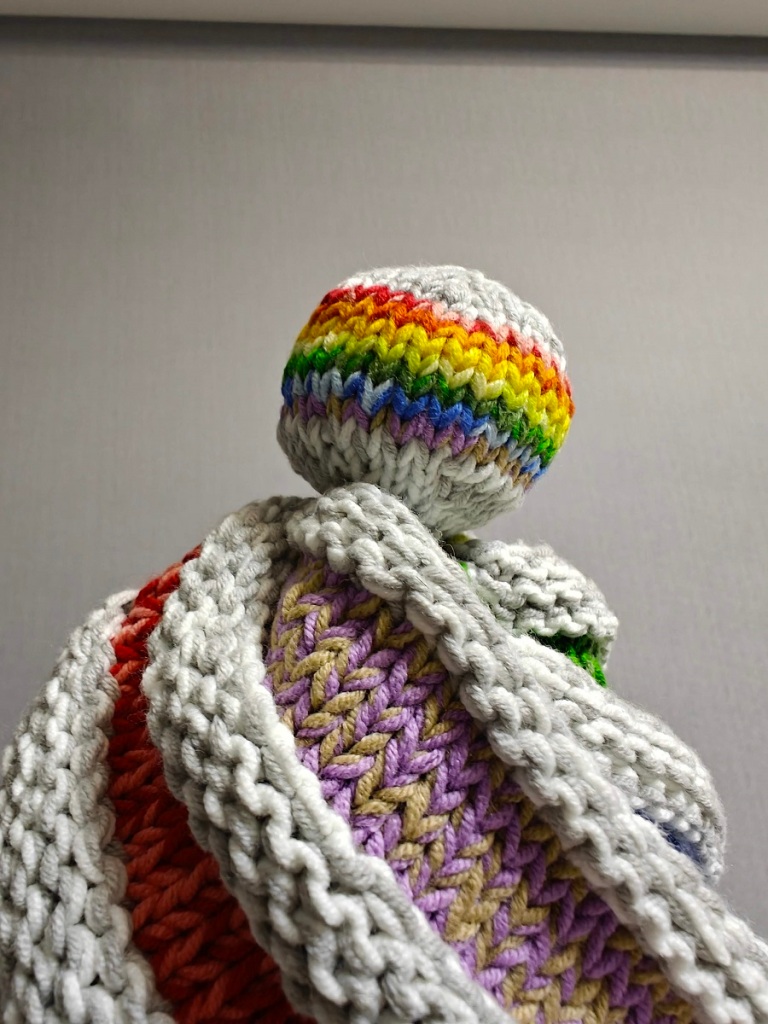
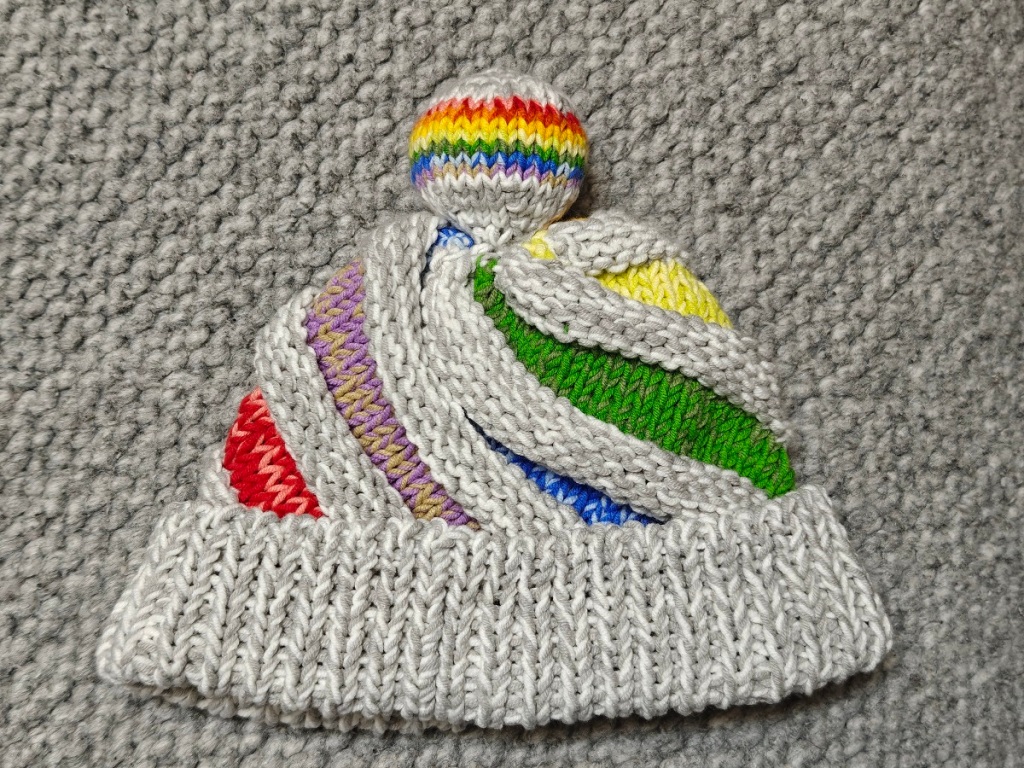
Milk Tea Hat is a simple beanie with some easy colorwork. The brim is made of a modified broken rib stitch using slip stitches to add some color and the main body includes garter ridges in a contrasting color. You can purchase an inexpensive PDF from my Ravelry store here, which contains instructions for eight sizes from preemie to adult. The instructions for the preemie size are provided here for free.

Skill Level:
Easy

Materials:
• US 4 (3.5 mm) DPNs and/or circular needles
• Sport yarn in 4 colors (see chart on page 2 for amounts)
• 8 stitch markers

Gauge:
24 sts x 32 rows to 4” (10 cm) in stockinette after blocking
* Be sure to check your gauge

Size:
Hat circumference for preemie size: 10” (25 cm)
Other sizes available on the PDF are: Newborn: 12” (30 cm); 3-6 Months: 14” (36 cm); 6-12 Months: 16” (41 cm); Toddler: 18” (46 cm); Child: 20” (51 cm); Teen: 21.3” (53 cm); Adult: 22.7” (58 cm)
* Worn with 1-2” (3-5 cm) of negative ease

Size Chart:
See below for the finished size of the hat compared to head size.

AgeHead CircumferenceHat CircumferenceHat Length
Preemie11-12” (28-30 cm)10” (25 cm)4” (10 cm)
Newborn13-15” (33-38 cm)12” (30 cm)5” (13 cm)
3-6 Months15-17” (38-43 cm)14” (36 cm)5.5” (14 cm)
6-12 Months16-19” (41-48 cm)16” (41 cm)6.5” (17 cm)
Toddler18-20” (46-50 cm)18” (46 cm)7” (18 cm)
Child19-21” (48-53 cm)20” (51 cm)7.5” (19 cm)
Teen21-22” (53-56 cm)21.3” (54 cm)8” (20 cm)
Adult23-24” (58-61 cm)22.7” (58 cm)8.5” (22 cm)

Yarn Amounts:
See below for approximate yardage of each color needed.

SizeMC1CC1MC2CC2
Preemie11 yd (10 m)< 5 yd (5 m)34 yd (31 m)7 yd (6 m)
Newborn13 yd (12 m)< 5 yd (5 m)46 yd (42 m)11 yd (10 m)
3-6 Months15 yd (14 m)< 5 yd (5 m)59 yd (54 m)16 yd (14 m)
6-12 Months17 yd (16 m)5 yd (5 m)74 yd (68 m)22 yd (20 m)
Toddler19 yd (17 m)6 yd (5 m)90 yd (82 m)28 yd (26 m)
Child22 yd (20 m)7 yd (6 m)100 yd (91 m)32 yd (29 m)
Teen23 yd (21 m)8 yd (7 m)115 yd (105 m)38 yd (35 m)
Adult25 yd (23 m)8 yd (7 m)131 yd (120 m)46 yd (42 m)

Abbreviations:
k = knit
p = purl
sl1p = slip 1 purlwise
wyib = with yarn in back
k2tog = knit 2 together
st(s) = stitch(es)
rep = repeat
rnd = round
CO = cast on
BO = bind off
MC = main color
CC = contrasting color

Notes:
When working with two colors, be sure to twist the strands of yarn when changing colors.

The ribbing for the brim is not very stretchy. You can change to smaller needle if you want a stretchier brim.

Instructions:
Brim:
With MC1, CO 60 sts. Join in the rnd and place marker.
If the CO and rnd 1 color change is tricky, you can CO an extra st and then join the first and last sts with k2tog in MC1. Count it as the first sl1p in rnd 1.
Rnd 1: With CC1, *sl1p wyib, k1, rep from * to end.
Rnd 2: With MC1, *k1, p1, rep from * to end.
Rnd 3: With MC1, k all.
Rep rnds 1-3 for a total of 4 times and then rnds 1-2 once more.

Body:
Change to MC2, and work in stockinette (k all) for 6 rnds.
Rnd 7: Change to CC2, k all.
Rnd 8: With CC2, p all.
Rnd 9: Change to MC2, k all.
Rnd 10: With MC2, k all.
Rep rnds 7-10 for a total of 3 times.

Crown:
Continue with only MC2.
Setup Rnd: k all, placing a marker every 7 sts. At the same time, work the setup row as follows: *k13, k2tog, rep from * to end. 56 sts
Rnd 1: *k to 2 sts before marker, k2tog, slip marker, rep from * to end.
Rnd 2: k all.
Rep rnds 1-2 for a total of 4 times.
Rep only rnd 1 2 more times.

Finish:
Cut yarn, draw tail through remaining 8 sts. Weave in ends and block.

You may make and sell products from my pattern but please credit me and/or link back to my post and use your own photos.

Have fun with it!

Knitting

Rainbow Swirl

I made a hat years ago following this pattern. I recently had the idea to make another one but with the stripes in different colors.

I didn’t have worsted weight yarn, so I ended up working with two strands of yarn. This gave me a chance to use even more colors! I worked it out to 7 gray/white stripes and 7 stripes in rainbow colors. I also had to borrow a pair of 5mm needles since I don’t usually work with this weight of yarn.

I modified the pattern a bit by changing the first row of each gray/white stripe to knit instead of purl. This way, the stripe transition looks smoother. I also did a provisional cast on, so that I could graft it together at the end.

For all the color stripes, I left an extra long tail. The tails were on the side that would become the top of the hat. After I grafted the beginning row to the last row and gathered the top, I used all those tails to knit a ball to replace the pompom.

I ended up making the brim a few rows shorter than the pattern. It seemed like a good length before binding off.

My next project is going to be something with fingering yarn. I love how this hat turned out, but it reminded me that I really prefer working with thinner yarn.

Knitting

Milk Tea and Test Knits

About two weeks ago, I started knitting a baby cardigan for a friend. She had requested neutral colors, so I was looking at some beige and brown yarn. I was also drinking a milk tea at the time, and ended up picking colors that looked very much like my drink.

I used this pattern for the sweater, which I have used before and liked a lot. I changed colors for those garter ridges and for the cuffs and bands. I ended up choosing brown for the bands, beige for the body, and a caramel color for the garter ridges. I also modified the ribbing to add some black peeking through so they would look like boba balls.

I loved how it turned out. While working on this, I also thought of making a matching hat since I would have extra yarn. Using the same colors and the same stitches, I came up with this.

The crown decreases took a lot of research and a bit of frogging, but I think it worked out fine. I don’t have access to a head in this size, so we will have to wait and see if it will fit. I ended up calculating the math for several sizes, so now I’m looking for test knitters. Check my yarnpond for details.

Crochet · Patterns

Pattern Block Blanket Crochet Pattern

Remember the pattern blocks from elementary school? Let’s make a blanket with them! Play around with colors and shapes to make different designs. You can purchase an inexpensive PDF from my Ravelry store here, which contains instructions for six sizes. The instructions for size 1 are provided here for free.

Skill Level:
Easy

Materials:
• E-4 (3.5 mm) hook
• DK weight yarn in 6 colors and some extra for joining the shapes (see chart below for amounts)

Gauge:
20 dc x 10 rows to 4” (10 cm)
* Gauge is not critical, but a different gauge will affect the finished size.

Size:
Diameter of completed size 1: 19” (48 cm)
Other sizes available on the PDF are 2: 25” (64 cm); 3: 31.5” (80 cm); 4: 38” (96 cm); 5: 44” (112 cm); 6: 50” (128 cm)

Yarn Amounts:
See below for approximate yardage of each color needed.

 1: 19” (48 cm)2: 25” (64 cm)3: 31.5” (80 cm)4: 38” (96 cm)5: 44” (112 cm)6: 50” (128 cm)
Yellow0.4 oz (11 g) 24 yd (22 m)0.6 oz (17 g) 37 yd (34 m)1 oz (28 g) 61 yd (56 m)1.4 oz (40 g) 87 yd (80 m)1.9 oz (54 g) 118 yd (108 m)2.4 oz (68 g) 149 yd (136 m)
Orange1.8 oz (51 g) 112 yd (102 m)2.9 oz (82 g) 179 yd (164 m)4.3 oz (122 g) 267 yd (244 m)6 oz (170 g) 372 yd (340 m)8 oz (227 g) 497 yd (454 m)10.3 oz (292 g) 639 yd (584 m)
Beige2.4 oz (68 g) 149 yd (136 m)3.7 oz (105 g) 230 yd (210 m)5.3 oz (150 g) 328 yd (300 m)7.2 oz (204 g) 446 yd (408 m)9.4 oz (266 g) 582 yd (532 m)11.9 oz (337 g) 737 yd (674 m)
Blue0.9 oz (26 g) 57 yd (52 m)1.5 oz (43 g) 94 yd (86 m)5.2 oz (62 g) 136 yd (124 m)3.1 oz (88 g) 182 yd (176 m)4.1 oz (116 g) 254 yd (232 m)5.2 oz (147 g) 322 yd (294 m)
Green1 oz (28 g) 61 yd (56 m)1.6 oz (45 g) 98 yd (90 m)2.4 oz (68 g) 149 yd (136 m)3.3 oz (94 g) 206 yd (188 m)4.3 oz (122 g) 267 yd (244 m)5.5 oz (156 g) 341 yd (312 m)
Red1.2 oz (35 g) 77 yd (70 m)2.1 oz (60 g) 131 yd (120 m)3.1 oz (88 g) 182 yd (176 m)4.4 oz (125 g) 273 yd (250 m)5.9 oz (167 g) 354 yd (334 m)7.6 oz (215 g) 470 yd (430 m)
Gray0.7 oz (20 g) 44 yd (40 m)0.9 oz (26 g) 57 yd (52 m)1.1 oz (31 g) 68 yd (62 m)1.3 oz (37 g) 81 m (74 m)1.5 oz (43 g) 94 oz (86 m)1.7 oz (48 g) 105 yd (96 m)

Abbreviations:
ch = chain
st(s) = stitch(es)
sl st = slip stitch
rnd = round
dc = double crochet
tr = treble crochet
dc inc = double crochet increase (2 dc in the same st)
dc dec = double crochet decrease

Notes:
Pattern is written using US terms.

The hexagon and square are worked in the round. All the other shapes are worked flat, so turn at the end of each row.

For the shapes worked flat, you can work a sl st border along the edges before fastening off to make it neater for joining later. Make 2 sl sts for each dc to keep it even.

Instructions:
Hexagon (make 1):
Rnd 1: With yellow, magic ring, ch 2, 12 dc in magic ring, join with sl st. (12 sts)
Rnd 2: ch 2, [(dc, tr, dc) in next st, dc] 6 times, join with sl st. (24 sts
Rnd 3: ch 2, dc, [(dc, tr, dc) in next tr st, 3 dc] 5 times, (dc, tr, dc) in next tr st, 2 dc, join with sl st. (36 sts)
Rnd 4: ch 2, 2 dc, [(dc, tr, dc) in next tr st, 5 dc] 5 times, (dc, tr, dc) in next tr st, 3 dc, join with sl st. (48 sts)
Next rnds: ch 2, work a (dc, tr, dc) in each tr and a dc in each dc.
Continue until you have 6 rnds. Fasten off and weave in ends.
Increase 12 sts each rnd. St count = 12 × rnd #

Square (make 12):
Rnd 1: With orange, magic ring, ch 2, [3 dc, tr] 4 times in magic ring, join with sl st. (16 sts)
Rnd 2: ch 2, [3 dc, (2 dc, tr, 2 dc) in the next tr st] 4 times, join with sl st. (32 sts)
Rnd 3: ch 2, 5 dc, [(2 dc, tr, 2 dc) in next tr st, 7 dc] 3 times, (2 dc, tr, 2 dc) in next tr st, 2 dc. (48 sts)
Fasten off and weave in ends.

Narrow rhombus (make 24):
Row 1: With beige, ch 3, 1 dc in 3rd st from hook, turn. (1 st)
Row 2: ch 2, dc inc, turn. (2 sts)
Row 3: ch 2, dc, dc inc, turn. (3 sts)
Row 4: ch 2, 2 dc, dc inc, turn. (4 sts)
Next rows: ch 2, work a dc in each dc and a dc inc in the last st, turn.
Continue until you have 6 rows.
Increase 1 st each row. St count = row #
Dec row 1: ch 2, dc to last 2 sts, dc dec, turn. (5 sts)
Next rows: ch 2, work a dc in each dc and a dc dec in the last st, turn.
Continue until you have 11 rows in all, turn. (1 st)
Last row: ch 2, dc. (1 st)
Fasten off and weave in ends.
Decrease 2 sts each row. St count = total rows – dec row #

Rhombus (make 6):
Row 1: With blue, ch 3, 2 dc in 3rd st from hook, turn. (2 sts)
Row 2: ch 2, dc inc 2 times, turn. (4 sts)
Row 3: ch 2, dc inc, 2 dc, dc inc, turn. (6 sts)
Next rows: ch 2, work a dc inc in the first and last sts and a dc in each dc, turn.
Continue until you have 6 rows.
Increase 2 sts each row. St count = 2 × row #
Dec row 1: ch 2, dc dec, dc to last 2 sts, dc dec, turn. (10 sts)
Next rows: ch 2, work a dc dec in the first and last sts and a dc in each dc, turn.
Continue until you have 11 rows in all, turn. (2 sts)
Last row: ch 2, dc dec. (1 st)
Fasten off and weave in ends.
Decrease 2 sts each row. St count = 12 – (2 × dec row #)

Triangle (make 12):
Row 1: With green, ch 3, 2 dc in 3rd st from hook, turn. (2 sts)
Row 2: ch 2, dc inc 2 times, turn. (4 sts)
Row 3: ch 2, dc inc, 2 dc, dc inc, turn. (6 sts)
Next rows: ch 2, work a dc inc in the first and last sts and a dc in each dc, turn.
Continue until you have 6 rows. Fasten off and weave in ends.
Increase 2 sts each row. St count = 2 × row #

Trapezoid (make 6):
Row 1: With red, magic ring, ch 2, 7 dc in magic ring, turn. (7 sts)
Row 2: ch 2, dc inc, [dc, (dc, tr, dc) in next st] 2 times, dc, dc inc, turn. (13 sts)
Row 3: ch 2, dc inc, [3 dc, (dc, tr, dc) in next st] 2 times, 3 dc, dc inc, turn. (19 sts)
Next rows: ch 2, work a dc inc in the first and last sts, a (dc, tr, dc) in each tr, and a dc in each dc, turn.
Continue until you have 6 rows. Fasten off and weave in ends.
Increase 6 sts each row. St count = 1 + (6 × row #)

Finish: Block pieces. Arrange shapes in above pattern. Join pieces together using the flat crochet join or any join of your choice. Weave in ends.

You may make and sell products from my pattern but please credit me and/or link back to my post and use your own photos.

Have fun with it!

Knitting

Faking Two WIPs

A while back, I talked about how I was trying to knit two sweaters at the same time and I had trouble staying focused on them. As a result, I decided to focus on one thing at a time. But the problem here is that sometimes I get a bit bored and want to change it up a bit. Occasionally, I do a quick crochet to take a break, but I don’t enjoy crochet as much as knitting and sometimes, I just want to knit something different. I figured out a way to do this.

This week, I started with the body of this cardigan. It’s knit flat, so I was alternating rows of knits with purls. I got tired of purling, so I started on the sleeves (two at a time, of course). The sleeves are worked in the round, so it’s all knit stitches. It was pretty mindless for a while, but then I got to the increases. When I wanted a break from counting rows for increases, I went back to the body.

So far, it’s working out well! I get to change up what I’m working on (somewhat) without losing my focus by working too many projects.

Knitting · Patterns

How to Knit a Ball

I was knitting a baby hat that called for two pompoms, but I didn’t want to make pompoms. I really don’t like making them and it didn’t seem safe to put them in an item for a baby, so I started thinking about an alternative. I decided to knit stuffed balls instead. They still look like pompoms, but hopefully they won’t fall apart as easily. Here’s how I made them.

Skill Level:
Easy

Materials:
• Some scrap yarn. Any yarn will work, but I recommend needles a few sizes smaller so that the stuffing doesn’t show.
• A set of DPNs or cable needles
• A bit of fiber fill

Gauge:
Any gauge

Size:
Easily adjustable

Abbreviations:
k = knit
kfb = knit 1 into front and back of a stitch
k2tog = knit 2 stitches together
st(s) = stitch(es)
rep = repeat
rnd = round
CO = cast on
BO = bind off

Notes:
• Pattern is worked in the round on DPNs (or cable needle).
• Stuff as you go. Start stuffing when you start decreasing and then finish at the last decrease round.

Instructions:
CO 3 sts. Slide sts to the other end of the needle (as you would for knitting an i-cord). 3 sts

Increase section:
Rnd 1: [kfb] 3 times. 6 sts
Rnd 2: [kfb] 6 times. 12 sts
Rnd 3: k all.
Rnd 4: [k1, kfb] 6 times. 18 sts
Even rnds: k all.
Odd rnds: work 6 kfb spread out evenly.

Middle section:
All rnds: k all.
To determine how many rounds to knit here, generally the same number of rounds as the increase section seem to work out well.

Decrease section:
Rnd 1: work 6 k2tog spread out evenly. Start stuffing.
Rnd 2: k all.
Repeat these two rounds until 6 sts remain. Finish stuffing.
Next rnd: [k2tog] 3 times. 3 sts

Finish: Cut yarn, draw tail through the three loops. Weave in ends or use ends to attach the ball.


Knitting

French Macaroon and Tiny Tot

I just finished the French Macaroon sweater by The Noble Thread and Tiny Tot hat by Kristen Rettig to match.

Both patterns were knit flat in garter stitch and seamed at the end. I loved how simple they both were. There were no increases or decreases and it was so easy to just work until a certain length.

I really liked the way the pattern was written for the sweater. The instructions were in a chart, with different sizes in their own column. It made it easier to keep track of the sizes. The back of the sweater was a bit confusing with the button, but I checked some others’ project pictures and it was easy to figure out.

The pattern for the hat had options for knitting flat or in the round. I went with flat because I didn’t want to deal with purling this time. For the pompoms, I knitted two balls instead since I always worry about pompoms falling apart.

Can’t wait to give them to the recipient in the summer!

Knitting

Good Old Raglan

I started working on Good Old Raglan by Twisted Knitwear a while back. It started off just as a side thing for a few weeks, but it finally got my full attention last week. I just finished it and wanted to share about it.

I really liked the way the neck and shoulders were constructed. It looked so satisfying laid out like this. There were some short rows for the back part and then increases every other row for the shoulders.

The body went by so quickly. I like working with stripes (and just colorwork general). I think most of the things I’ve knitted have some kind of colorwork.

For the sleeves, I decided to work them both at the same time. I started making socks recently and decided to make them two at a time. I liked not getting second sock syndrome, so I figured it could work for sleeves as well. It did work, but with four balls of yarn, I had to spend some extra time untangling.

And here’s the finished product! Can’t wait to give it to the recipient!

Crochet

Pattern Block Shapes

I’ve had this idea to crochet pattern blocks since last spring. I bought the yarn back in May of last year, but I had a hard time getting started on it. Part of the issue is me wanting everything to be perfect. I wanted to knit all the shapes in the round, but some of the shapes were tricky. There was also the issue of figuring out how to get all the edges to be the same length. I couldn’t figure it out on paper, so I put it off.

I finally started yesterday and it turned out to be much easier than I expected. I started with the hexagon, figuring it’d be similar to making a circle but I’d put all the increases in the same place on purpose. I used treble stitches in the corners and worked increases in the same stitch. It worked out nicely. I tried the square next since I knew how to make a granny square. I just needed to replace the chain stitches with double crochet stitches so there wouldn’t be gaps. I used treble stitches again in the corners and it worked well. Two down, four to go!

The other shapes were the ones that stumped me though. I wanted to make them in the round, but I decided they may be easier worked flat. Once I accepted that, it turns out they’re easy to make. A trapezoid is half a hexagon. It took me a few tries to get the shape just right. I ended up adding a stitch to make it an odd number. At first, I tried treble crochet stitches on the ends, but it ended up being too long, so I redid it with double crochet stitches.

Next, a triangle is a third of a trapezoid. I thought about using treble crochet stitches for the edge stitches, but in the end, I stuck with double crochet and it worked out nicely. A rhombus is two triangles, so I made another triangle and then I worked the same number of rows with decreases. I had trouble figuring out the decrease rows, but when the last row was decreased to one stitch, everything fell into place.

The narrow rhombus was the final piece. Initially, I thought about working it lengthwise, but I couldn’t figure out how to work the increases. After a break, I realized that that the narrow rhombus is basically half of the other rhombus. I could work it in a similar way, but with increases on just one side. Same for the decreases, but on the opposite edge. And it worked!

UPDATE: About that narrow rhombus. I wasn’t happy with it, so I played around some more. Ended up alternating the edge that the increases and decreases were. They look more symmetrical now.

While working these shapes, I started thinking about how I could make them bigger. If I add a round to the square, I would have to add two rounds to the hexagon in order to keep the edges the same length. That means adding two rows to the trapezoid and the triangle and four rows to the rhombuses. I created an Excel sheet to keep track of all the sizes. And then, I ended up calculating how much yarn each size would use. This took a while. I made a sample piece to figure out how much yarn each stitch uses (both double and treble), then I played around with the numbers to figure out how many stitches each size would have (broken down to double and treble). I haven’t done this much math in a long time, but I think I finally got it now. I’ll work some sample shapes and double check them by weighing them.

Stay tuned for the pattern!

Knitting · Patterns

August Baby Blanket Knitting Pattern

August Baby Blanket is garter stitch blanket with bold stripes in fun colors. A great project for a beginner looking to start working with colors. You can purchase an inexpensive PDF from my Ravelry store here.

I used 3 colors of a cotton and acrylic blend DK yarn. Each stripe used about 1.4 oz (40 g) 87 yd (80 m) with the first and last stripes using about 10% more for the cast on and bind off. Any kind of yarn would work with this pattern, but note that a different gauge will affect the final size.

Skill Level:
Basic

Materials:
• US 7 (4.5 mm) circular needles
• DK yarn in 3 colors: about 4.6 oz (130 g) 284 yd (260 m) of colors 1 and 2; 3 oz (85 g) 186 yd (170 m) of color 3

Gauge:
18 sts x 36 rows to 4” (10 cm) in garter after blocking
* Gauge is not critical, but a different gauge will affect the finished size.

Size:
Completed size about 28” by 32” (71 cm by 81 cm)
Adjust the size by casting on a different number of stitches (multiple of 4 + 3) or working a different number of rows.

Abbreviations:
k = knit
sl1p = slip 1 purlwise
wyif = with yarn in front
st(s) = stitch(es)
rep = repeat
RS = right side
WS = wrong side
CO = cast on
BO = bind off

Notes:
Adjust the size by casting on a different number of stitches or working a different number of rows.

Instructions:
With color 1, CO 126 sts.
Row 1 (RS): k all.
Row 2 (WS): sl1p wyif, k124, sl1p wyif.
Rep rows 1 and 2 for a total of 18 times. You will have 18 garter ridges on the RS.

Change to color 2 and rep rows 1 and 2 18 times.

Change to color 3 and rep rows 1 and 2 18 times.

Change to color 2 and rep rows 1 and 2 18 times.

Change to color 1 and rep rows 1 and 2 18 times.

Change to color 3 and rep rows 1 and 2 18 times.

Change to color 1 and rep rows 1 and 2 18 times.

Change to color 2 and rep rows 1 and 2 18 times.

BO and weave in ends. Block if desired.

You may make and sell products from my pattern but please credit me and/or link back to my post and use your own photos.

Have fun with it!