
Whether it’s your first sweater or you’ve made many, top-down raglan sweaters are an easy, fully customizable, and fun to make! Best of all, there’s no sewing!
Notes
- This sweater is knit in one piece from the top down. This means you cast on at the neck, increase for the shoulders, then knit the body down to the hip (or wherever you want to stop) and the sleeves down to the cuff. This pattern is written as a CARDIGAN.
- The sizing of the sweater is super easy to customize – just keep increasing in the yoke until it fits over your shoulders. I’ve included sizing guidelines, but keep in mind that you can control the size.
- The yarn and needles you can use are endless! If using something at a vastly different gauge, make a swatch and determine the number of stitches to cast on using your neck measurement, and go from there (you’ll understand how to do it after your first one, I promise).
- The smallest size is given first, with following sizes in parentheses. When only one number appears, it applies for all sizes.
Sizes
To fit bust: 32-34” (36-38”, 40-42”, 44-46”)
Materials
Worsted or heavy worsted weight yarn: approximately 700 (800, 900, 1000) yards. Needles appropriate for yarn: about 5-6 mm (US8-10), 24” circular and a set of double pointed needles
Stitch markers
Buttons
Examples of yarns include Brown Sheep Lamb’s Pride, Brown Sheep Cotton Fleece, Mission Falls wool, Blue Sky Cotton, Manos del Uruguay, Malabrigo, Lorna’s Laces Worsted, Noro Kureyon or Silk Garden.
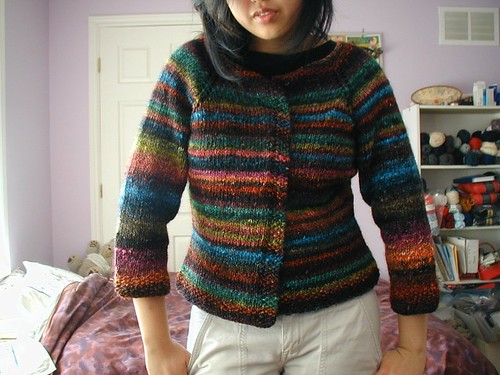
Top photo: Noro Silk Garden
Bottom photo: Patons Classic Wool and Manos del Uruguay Classica
Gauge
18 stitches/4” in stockinette stitch
Abbreviations
k: knit
p: purl
kf&b: increase by knitting into the front and back of the stitch
m1: make one increase (lift the bar between the stitches onto the left needle from front to back, then knit this through the back loop)
pm: place marker
k2tog: knit two together
ssk: slip, slip, knit
sl m: slip marker
RS: right side (the “public” side)
WS: wrong side
Directions
Neckband
Cast on 83 (87, 91, 95) stitches.
1×1 Ribbing
Row 1: *k1, p1*, repeat from * to * to end of row, k1.
Row 2: *p1, k1*, repeat from * to * to end of row, p1.
Repeat these two rows for 1 – 1.5”.
-OR-
Seed Stitch
Row1: *k1, p1*, repeat from * to * to end of row, k1.
Repeat this row for 1-1.5”.
Yoke
Next row (RS): k 15 (16, 17, 18), pm, k 12 (12, 12, 12), pm, k29 (31, 33, 35), pm, k 12 (12, 12, 12), pm, k 15(16, 17, 18).
Row 2 (WS): k5, purl to last 5 stitches, k5.
This sets up the cardigan fronts to be edged in garter stitch (the 5 stitches that are knit at the beginning and end of each row). If you wish, you can work these 5 stitches in ribbing or seed stitch.
Row 3 (RS): *k to 1 st before marker, kf&b, sl m, kf&b*, repeat from * to * three more times. Knit to the end of the round.
If you want buttonholes, work
Buttonhole row 3: *k to 1 st before marker, kf&b, sl m, kf&b*, repeat from * to * three more times. Knit to last 3 stitches, ssk, yo, k1.
Round 4 (WS): k5, purl to last 5 stitches, k5.
Repeat rows 3 and 4 21 (24, 27, 31) times TOTAL, working buttonhole row 3 every 2 inches.
NOW IS THE TIME TO TRY IT ON!
Slip the stitches to scrap yarn and try it on. If the two sleeve markers meet under your arm, you’re good. If you need to add a few more increase rounds or take out a few, do so. End with right side facing for next row.
Next row (RS): knit to first marker, slip stitches between next two markers onto scrap yarn (these are the sleeve stitches), cast on 2 (3, 4, 5) stitches to the right-hand needle, knit to next marker, slip stitches between marker to scrap yarn, cast on 2, (3, 4, 5) stitches to right-hand needle, knit to end of row.
Body
Continue working in stockinette stitch, creating buttonholes every two inches, until body is 12 (13, 14, 15) from underarm or two inches short of total desired length. Work k1, p1 ribbing or seed stitch for two inches, then bind off in pattern.
Optional side shaping
Side shaping can make the sweater more flattering and generally uses a little less yarn. To work shaping, place a marker in the middle of the cast-on stitches in the previous row (so for the 32” size, cast on 1, pm, cast on 1 in the underarm). These will be the side markers.
Decrease row (RS):
Work as established to 3 stitches before side marker, k2tog, k1, sl m, k1, ssk.
Beginning 3” below the underarm, repeat decrease row every 5 rows 4 times.
Try on the sweater as you go; you should be near your natural waist.
Work an inch even, then:
Increase row (RS):
Work to 1 stitch before side marker, m1, k1, sl m, k1, m1.
Repeat increase row every 5 rows 4 times.
Then continue as above, working even to desired length.
Sleeves
Slip sleeve stitches back onto a 16” circular needle or double pointed needles.
Pick up and knit 1 (2, 2, 3) stitches under the arm, place marker, pick up and knit 1 (1, 2, 2) stitches, and join for knitting in the round.
Decrease round: k1, ssk, knit around to 3 stitches before marker, k2tog, k1.
Repeat the decrease round every 5th row 10 times or to desired narrowness.
Knit straight until sleeve is 2” short of desired length, work K1, P1 ribbing (or edging of choice) for two inches and then bind off in pattern. Repeat for other sleeve.
Weave in the ends and you’re done!
Leave a Reply