
by Rina Shaikh-Lesko, July 2009
Hi all,
I created this blanket pattern for a good friend’s new arrival. There’s also a pdf version available here: http://www.skweezil.net/knitting/Four_Corners_Baby_Blanket_Knitting_Pattern.pdf
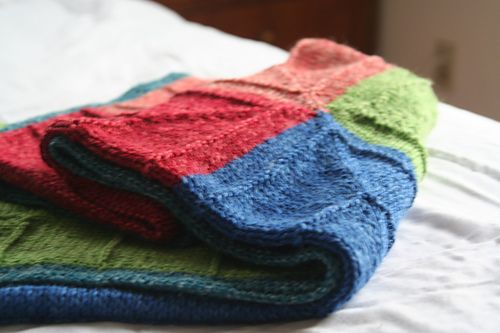
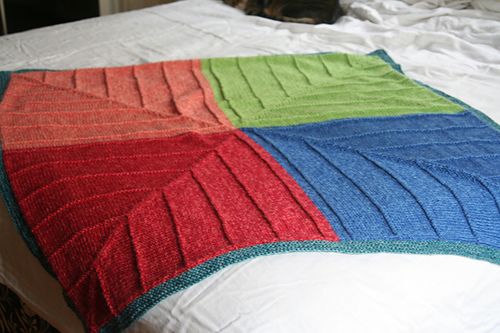
This blanket is constructed of four mitered squares that are mostly stockinette stitch with a few purl ridges for texture. I was experimenting with mitered squares when I came up with this design. The cotton-wool blend of this yarn is soft and light. Although it’s warm, it can still be used as a summer blanket.
Yarn
Serendipity Tweed, by Brown Sheep Company (worsted, 10-ply; 60% cotton, 40% Wool; 100 grams (3.53 ounces); 210 yards (192 meters))
1 skein each of Poinsettia (Color A) Water Lily (Color B) Striped Coral Root (Color C) Indigo Delphinium (Color D) Teal Orchid (Color E)
Other Materials
Size 9 US, 24-36” circular needles (or needle size needed to match gauge) – 4 split ring markers (or safety pins) – 3 stitch marker – Tapestry needle
Gauge
4” = 18 stitches/22 rows (vertical/row gauge not as important as stitch gauge)
Final Measurements
Approximately 36” x 36” Care of Finished Blanket: Wash by hand in cold water; lay flat to dry
Abbreviations
ssk: slip, slip, knit (a decrease that slants to the left)
k2tog: knit two together (a decrease that slants to the right)
Pattern Notes
Purl Ridge Rows: As you work each square, you’ll be making a purl ridge row every 16 rows. Because it’s easy to loose track of how many rows you’ve completed since the last purl ridge row, I like to keep 2 extra markers on the needles on either side of the middle marker. Each time I complete a purl ridge row, I place markers 13 stitches before and 13 stitches after the middle marker. When the extra markers come within one stitch of the middle marker, it means it’s time for a purl ridge row. Remove the markers at this point and while making the purl ridge row, replace the markers 13 stitches from the middle marker and keep going. These extra markers are helpful but not essential.
Picking Up Stitches: Picking up stitches on this pattern is relatively straightforward. Anywhere the pattern instructs you to pick up stitches, just pick up one new stitch per existing stitch. It’s a one-for-one ratio.
Pattern Instructions
Square 1 (Poinsettia, Color A)
Using Color A, cast on 150 stitches. Place a split ring marker (or safety pin) on the 75th stitch and on the 150th stitch of the cast-on row (you’ll use these later when picking up stitches for the other color yarns).
Row 1: Purl 75 stitches, place a marker, purl rest of stitches. This center marker will be where you make your decreases.
Row 2: Knit all stitches until four stitches before the middle stitch marker; ssk twice; transfer the marker; k2tog once; knit to the end of the row (148 stitches, 73 to the left of the marker, 74 oto the right of the marker).
Row 3: Purl all stitches
Row 4: Knit all stitches, until two stitches before the middle stitch marker; ssk once; transfer the marker; k2tog twice, knit to the end of the row (144 stitches, 72 on either side of the marker).
Row 5: Knit all stitches (this will make the purl ridge)
Row 6: Repeat row 2
Row 7: Purl all stitches
Row 8: Repeat Row 4
Row 9: Purl all stitches
Rows 10-17: Repeat rows 6 to 9 two more times.
Row 18 – 20: Repeat rows 6, 7 & 8. You should have decreased 12 stitches on either side of the middle marker (24 decreases in entire row) over the last 16 rows. (120 stitches, 60 on either side of the marker).
Row 21: Knit all stitches (second purl ridge)
Repeat rows 6 – 21 until only 2 stitches remain on needle. Remove the stitch marker. Knit these remaining stitches together and bind off.
You will have a mitered square that is 101 rows in length with 6 purl ridges.
Purl ridge – Row – Number of Stitches on Needle
1 – Row 5 – 144 stitches, 72 on either side of the marker
2 – Row 21 – 120 stitches, 60 on either side of the marker
3 – Row 37 – 96 stitches, 48 on either side of the marker
4 – Row 53 – 72 stitches, 36 on either side of the marker
5 – Row 69 – 48 stitches, 24 on either side of the marker
6 – Row 85 – 24 stitches, 12 on either side of the marker
Row 101 end of mitered square
Second Square (Water Lily, Color B)
Using Color B, complete another mitered square, following the same instructions as the previous square. When starting, it, put a marker (or a safety pin) on the cast on row on the 75th stitch and the 150th stitch, as you did for the first square.
Third Square (Striped Coral Root, Color C)
Using Color C, pick up 75 stitches from the cast on row of the Color B square, starting at the split ring marker (or safety pin) at the edge of the row and ending at the marker in the middle of the row. Don’t remove the split ring markers on the cast-on rows.
Place a stitch marker. This will be the corner that touches all the other squares in the center of the blanket.
Now, switching to the Color A square, pick up another 75 stitches; this time starting at the split ring maker in the middle of the cast-on row and ending at the marker at the edge of the row. Don’t remove the split ring markers on the cast-on rows.
If you lay the squares flat with the live stitches at the top, the Color A (Poinsettia) square should be to the left and the Color B (Water Lily) square should be to the right.
Starting with Row 1 (purl row), complete a third mitered square following the pattern above.
Fourth Square (Indigo Delphinium, Color D)
Picking up the stitches for the last square should be easier.
Start at the edge of the Color A square with the split ring marker and, using Color D, pick up 75 stitches, ending at the split ring marker in the middle of the cast-on row.
Place a stitch marker. Switch to the Color B Square and starting at the middle of the cast-on row, pick up 75 stitches, ending at the last stitch of the cast-on row. Remove the split ring markers.
Like the Color C square, start with Row 1 (purl row) and complete the last mitered square, following the pattern above.
Border (Teal Orchid, Color E)
Using Color E, pick up 150 stitches on any side of the blanket. Work in garter stitch for 6 to 8 rows (about 1 inch) increasing one stitch at the end of each row to create a diagonal edge. Bind off the border, leaving about 6 to 8 inches of yarn. Repeat for the other three sides.
Finishing
Using the extra yarn at the end of each side’s border, sew the gaps between each side’s border. Weave in all ends. Block if desired.
(Designer: Rina Shaikh-Lesko, published: July 2009)